Intro
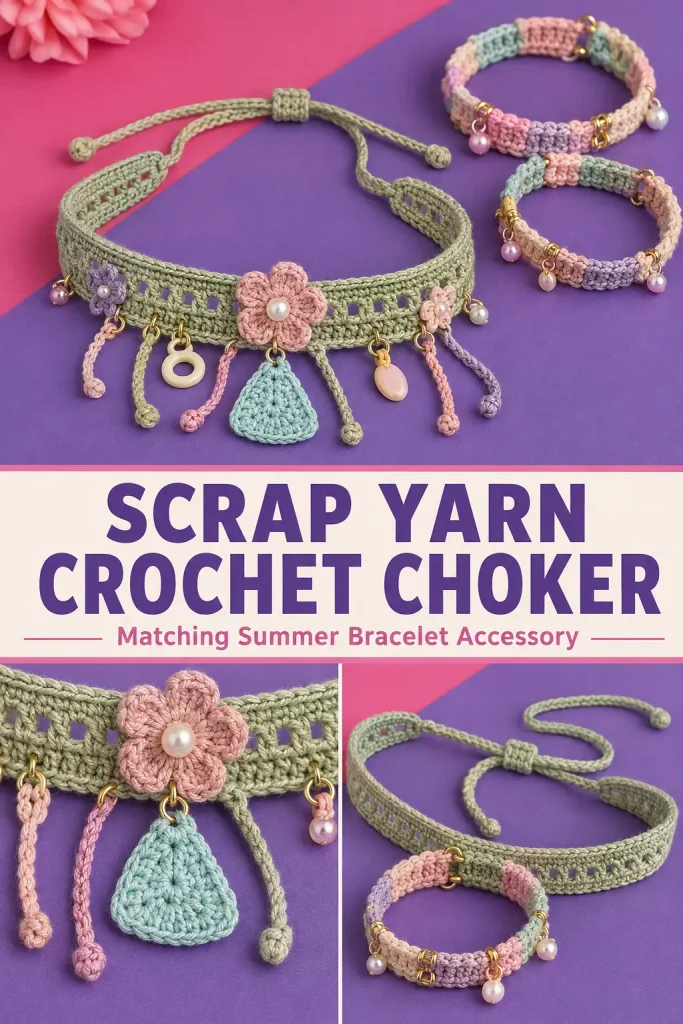
Tiny cotton leftovers are perfect for more than stripes and small motifs. This scrap yarn crochet choker turns short lengths of summer bracelet yarn into a coordinated necklace with a narrow lace band, adjustable crochet ties, miniature flowers, hanging cords, beads, and playful charms.
The finished design is inspired by the colorful accessory shown in the reference: a soft sage crochet choker forms the base, while pink and purple accents, tiny floral details, pearls, dangling cords, and pastel charms give it the layered handmade-jewelry look.
This is an original construction designed so every visible part works together as one wearable project, including the neck band, lace openings, reinforced edges, adjustable back ties, slider, center flower, side embellishments, hanging cords, and charm attachment points.
Description
The finished crochet choker has a narrow sage green cotton neckband approximately 2.5–3 cm wide. The center portion contains small decorative openings that make the fabric lighter and create convenient attachment points for beads and charms.
The front is decorated with:
- one small pink crochet flower with a pearl-style center
- two small beaded floral accents
- one small purple accent near the side
- several short dangling crochet cords
- one central turquoise crochet pendant
- pastel pearl-style beads
- optional resin or polymer charms
- small metal jump rings
At the back, two long crochet cords overlap and pass through a small crocheted slider, creating an adjustable choker rather than a fixed-size necklace.
Approximate Finished Size
Using DK cotton yarn and a 3 mm hook:
- Crochet band length: approximately 30–32 cm
- Band width: approximately 2.5–3 cm
- Adjustable tie cords: approximately 20–22 cm each
- Maximum adjustable circumference: approximately 42–46 cm
- Center flower: approximately 2 cm
- Central crochet pendant: approximately 2.5–3 cm
- Decorative dangling cords: approximately 4–7 cm
Always measure the intended wearer before finishing the ties.
Materials
- DK or light worsted cotton yarn in soft sage green
- Small scraps of dusty pink yarn
- Small scraps of lavender or muted purple yarn
- Small scraps of pale blue or turquoise yarn
- Small scrap of pale blush yarn
- Optional gray-lavender yarn scrap
- 3 mm crochet hook
- Yarn needle
- Scissors
- Measuring tape
- 1 small pearl-style bead for the center flower
- 2–4 additional pearl or glass beads
- 2 small decorative beads for side accents
- 4–8 small jewelry jump rings
- Jewelry pliers
- Optional pastel resin or polymer charms
- Optional metallic accent beads
Abbreviations
- ch – chain
- sc – single crochet
- hdc – half double crochet
- dc – double crochet
- sl st – slip stitch
- sp – space
- st – stitch
- sts – stitches
- MR – magic ring
Pattern Notes
- US crochet terminology is used.
- Difficulty: confident beginner.
- Cotton is recommended because it creates a crisp choker that is comfortable against the skin and does not stretch excessively.
- The main sample uses sage green for the neckband.
- The choker is worked flat in rows.
- The adjustable cords are crocheted directly from both ends.
- The decorative pieces are made separately and attached afterward.
- Leave the central front section free of bulky decorations that could make the choker twist.
- If you are using heavier beads or charms, reinforce their attachment points with several sewing stitches.
- Small beads and jewelry components are not suitable for young children.
Step-by-Step Instructions
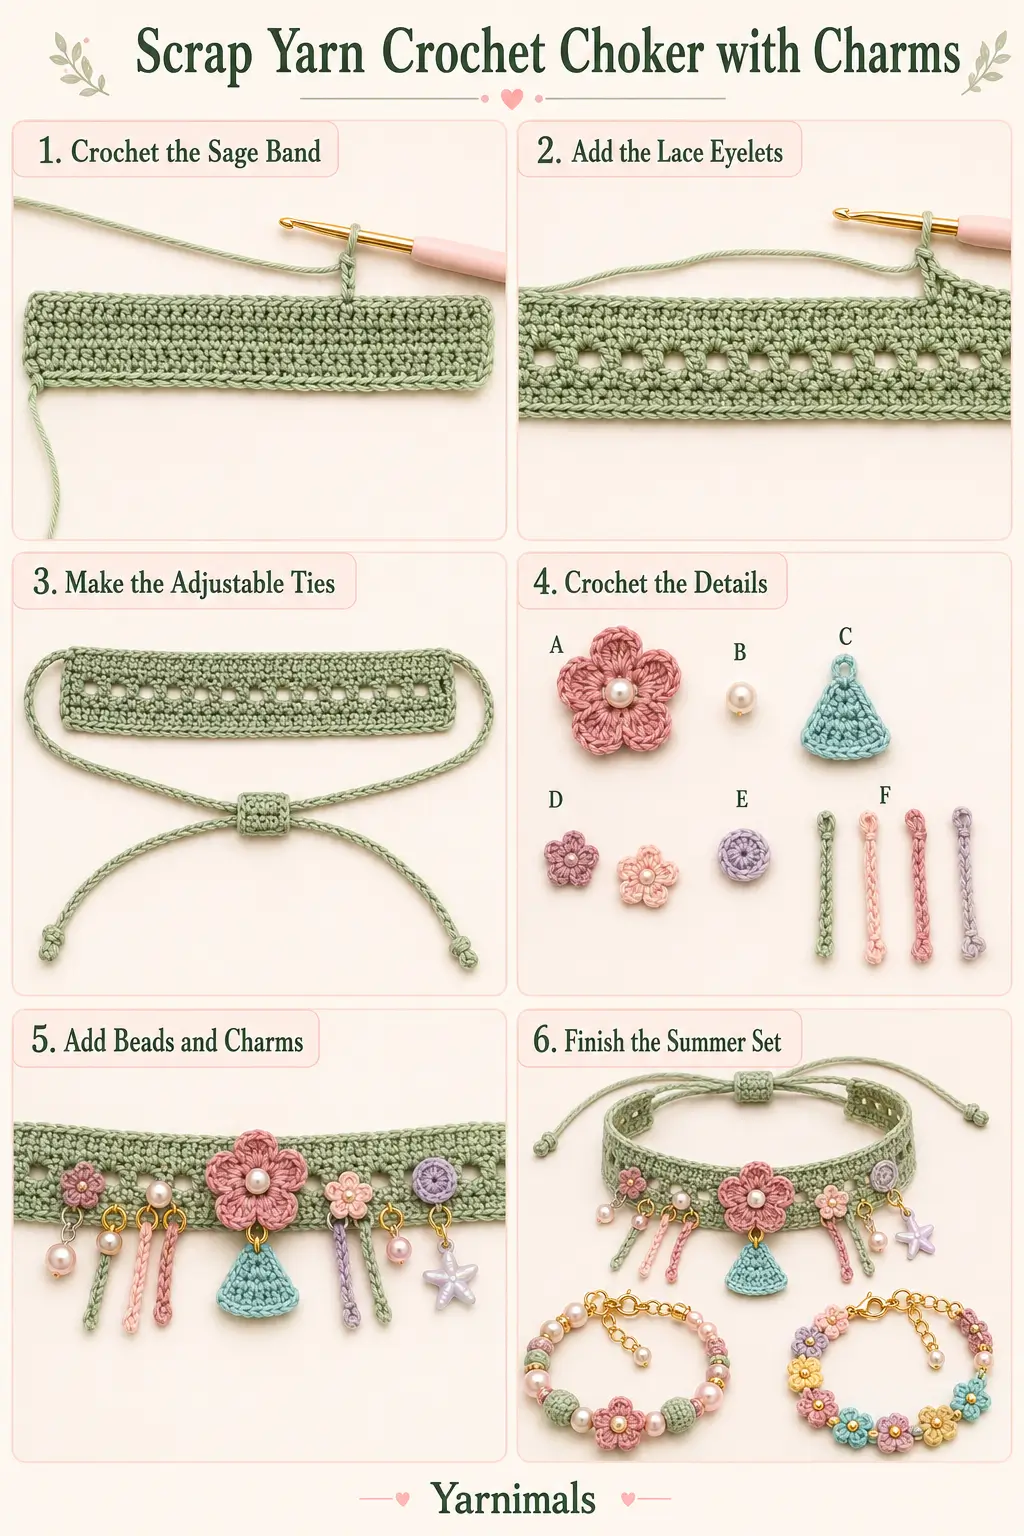
Part 1: Measure the Neck
Measure comfortably around the base of the neck where the choker will sit.
Do not pull the measuring tape tightly.
For an average adult choker, a finished adjustable circumference of approximately 34–40 cm works for many wearers, but individual measurements vary.
The solid crochet band should stop several centimeters before the back center so the adjustable cords can complete the fit.
For the sample:
Main band length: approximately 30–32 cm
Part 2: Crochet the Foundation
Using sage green yarn:
Ch 73.
The chain should measure approximately 30–32 cm without being stretched.
If necessary, add or remove chains in multiples of 2.
Row 1
Sc in the second ch from the hook.
Sc across.
72 sc
Ch 1 and turn.
Part 3: Create the Lower Reinforcement Row
Row 2
Sc in every stitch across.
72 sc
Ch 1 and turn.
This second solid row gives the lower edge enough strength to support the dangling charms.
Part 4: Crochet the Lace Eyelet Row
Row 3
Sc in the first 2 sts.
Then repeat:
ch 1, sk 1 st, sc in next st
across until 2 sts remain.
Sc in the final 2 sts.
Ch 1 and turn.
This creates small evenly spaced openings along the choker.
These openings are useful both visually and as attachment points for the embellishments.
Part 5: Stabilize the Lace
Row 4
Sc in each sc and work 1 sc into every ch-1 sp across.
Keep the stitch count even.
Ch 1 and turn.
Part 6: Add the Upper Edge
Row 5
Sc across.
Fasten off only if you are making the ties separately.
For the smoothest construction, continue directly into the first tie.
The finished choker band should now be approximately 2.5–3 cm wide.
Part 7: Crochet the First Adjustable Tie
At one end of the band:
Ch 45, or continue until the cord measures approximately 20–22 cm.
Beginning in the second ch from the hook:
Sl st in each chain back toward the choker.
This creates a narrow, firmer cord than a plain chain.
Fasten off.
Part 8: Crochet the Second Tie
Join sage yarn securely to the opposite end of the choker.
Ch the same number used for Tie 1.
Sl st back through every chain.
Fasten off.
The two cords must be equal in length.
Part 9: Finish the Cord Ends
At the end of each tie, make a small decorative knot.
For a slightly rounded crochet finish, you can instead work:
3 sc into the final chain space
and sl st back into the cord.
Fasten off securely.
The ends should resemble the small knotted cord tips visible in the inspiration.
Part 10: Crochet the Adjustable Slider
The visible design uses a small wrapped section around the two back cords.
For a fully crocheted version, make a tiny slider sleeve.
Using sage yarn:
Ch 7.
Row 1
Sc in second ch from hook and across.
6 sc
Ch 1 and turn.
Rows 2–5
Sc across.
6 sc
Fasten off, leaving a long sewing tail.
Wrap this tiny rectangle around both tie cords together.
Sew the short edges together to create a loose tube.
The two cords should still slide through the tube.
Test before tightening the final stitches.
The slider should be secure enough to hold position but loose enough to adjust the choker.
Part 11: Crochet the Center Pink Flower
Using dusty pink yarn:
Make an MR.
Work:
5 sc into MR
Pull the ring closed.
Join with sl st.
Petal Round
For each of the 5 stitches work:
sl st in st, ch 2, 3 dc in same st, ch 2, sl st in same st
Repeat around.
You should have:
5 small rounded petals
Fasten off.
The flower should measure approximately 2 cm across.
Part 12: Add the Pearl Center
Thread a small pearl-style bead onto matching sewing thread or fine yarn.
Position it in the center of the pink flower.
Sew through the flower center several times.
Secure firmly on the back.
The bead should sit flat rather than hanging loosely.
Part 13: Attach the Center Flower
Find the exact center of the choker.
Position the pink flower on the front surface.
Sew the flower through several stitches of the band.
Do not sew across the lace opening immediately below it if you plan to attach the center pendant there.
Part 14: Make Two Tiny Side Flowers
Make 2.
Using pink, mauve, or another coordinating scrap:
MR.
Work:
5 sc in MR
Join.
For each stitch:
sl st, ch 1, 2 hdc, ch 1, sl st
Repeat around.
Fasten off.
These flowers should be smaller than the center flower.
You can sew a tiny bead into each center.
Position one on either side of the center flower.
Part 15: Make the Purple Side Accent
Using lavender yarn:
MR.
Work:
6 sc in MR
Join.
Work:
2 sc in each st around
Join.
Fasten off.
This creates a tiny circular crochet accent.
Sew a small bead or metallic embellishment onto its center if desired.
Attach it toward one side of the choker rather than directly beside the central flower.
Part 16: Crochet the Central Turquoise Pendant
Using turquoise or pale blue yarn:
Ch 6.
Row 1
Sc in second ch from hook and across.
5 sc
Ch 1 and turn.
Row 2
Sc2tog.
Sc in next st.
Sc2tog.
3 sts
Ch 1 and turn.
Row 3
Sc2tog, sc in final st.
2 sts
Ch 1 and turn.
Row 4
Sc2tog.
1 st
Fasten off.
This creates a small tapered pendant.
Pendant Edging
Join turquoise yarn along one lower side.
Work sc evenly around the entire piece.
At the widest lower corners, work 2 sc if needed.
Join and fasten off.
The pendant should resemble a small soft triangular or bell-shaped crochet charm.
Part 17: Attach the Central Pendant
Insert a small jump ring into a reinforced lace opening directly beneath the center pink flower.
Attach the turquoise pendant to the jump ring.
Close the ring securely with jewelry pliers.
The charm should hang freely without pulling the flower downward.
Part 18: Make the Hanging Crochet Cords
Create several small cords using leftover yarn.
The visible design looks best with slightly different lengths and colors.
Make:
Cord 1 – Lavender Gray
Ch 16.
Sl st back through every chain.
Fasten off.
Cord 2 – Pale Sage
Ch 19.
Sl st back through every chain.
Fasten off.
Cord 3 – Blush Pink
Ch 17.
Sl st back through every chain.
Fasten off.
Cord 4 – Soft Pink
Ch 14.
Sl st back through every chain.
Fasten off.
Add tiny knots or small rounded crochet ends to the bottom of each cord.
Part 19: Position the Hanging Cords
Arrange them around the central turquoise pendant.
For example:
- lavender cord to the left
- sage cord slightly left of center
- turquoise pendant at center
- blush cord slightly right of center
- shorter pink cord farther right
Do not make every element the same length.
The staggered lengths create the playful handmade jewelry look.
Sew the upper ends firmly into reinforced stitches along the lower edge of the choker.
Part 20: Add Pearl-Style Dangles
For the side pearl accents, use small jewelry jump rings.
Thread one pearl-style bead onto a head pin or use a bead already fitted with a loop.
Attach it to a jump ring.
Connect the ring through a strong stitch or eyelet along the lower choker edge.
Repeat on the other side.
Keep the heavier beads away from the center so the choker remains balanced.
Part 21: Add Optional Pastel Charms
To reproduce the eclectic summer-jewelry feel, add 2–3 small lightweight charms.
Good shapes include:
- oval pastel charm
- flat teardrop
- small ring
- smooth geometric pendant
Attach each charm with a small jump ring.
Space them around the front section instead of clustering everything in one place.
Keep the arrangement visually balanced.
Suggested Decoration Layout
Beginning from the left front and moving right:
- small purple crochet accent
- pearl-style bead
- small beaded flower
- short colored crochet cord
- center pink flower
- turquoise pendant underneath
- additional crochet cords around the pendant
- second beaded flower
- pearl-style bead
- pale oval charm
- optional ring-shaped charm
Do not make both sides perfectly identical.
The slight asymmetry is part of the scrap-yarn jewelry style.
Part 22: Reinforce Every Attachment
Turn the choker over.
Inspect each decoration.
For crochet pieces, make sure the sewing thread passes through:
- the embellishment
- multiple band stitches
For jump rings, attach them only through firm stitches.
Avoid hanging a heavy charm from a single chain loop.
Reinforce that area with matching yarn first if necessary.
Part 23: Test the Choker Fit
Place the choker around the neck.
Pull the two back cords through the slider until the band sits comfortably.
The crochet section should lie flat.
It should not:
- curl upward
- fold over
- dig into the neck
- pull tightly against the throat
The center flower should remain centered.
Adjust individual charm positions if one side feels noticeably heavier.
Design Consistency Lock
For the closest result to the visible inspiration, preserve these details.
Main Choker
- soft sage green
- narrow band
- approximately 2.5–3 cm wide
- solid reinforced edges
- small open lace spaces
- adjustable crochet ties at the back
Back Closure
Use:
- 2 long sage cords
- sliding crocheted sleeve
- small knots at cord ends
Do not use a large bow.
Center
Use:
- one small dusty pink flower
- one pearl-style bead in its center
- one turquoise crochet pendant hanging below
Side Details
Use a mixture of:
- tiny crochet flowers
- pearl-style beads
- small metallic accents
- pastel charms
Hanging Details
Use several short crochet cords in:
- sage
- pink
- lavender
- pale blue-gray
Vary the lengths slightly.
Overall Look
The finished accessory should feel:
- handmade
- summery
- colorful
- lightweight
- slightly eclectic
- coordinated with scrap-yarn bracelets
Do not add:
- thick wool
- bulky stitches
- long fringe
- tassels
- oversized flowers
- large metal chains
- heavy pendants
- multiple rows of beads
- rigid necklace wire
Tips & Variations
Match an Existing Bracelet
If you already made crochet bracelets from the same yarn, use the same:
- yarn weight
- hook size
- stitch tension
- color order
- bead finish
This makes the choker look intentionally coordinated rather than like a separate project.
Use Your Smallest Scraps First
The tiny flowers, hanging cords, and center pendant require very little yarn.
Even scraps measuring only a few meters can become useful embellishments.
Make It More Minimal
For a simpler version, use:
- sage choker
- center flower
- turquoise pendant
- two side beads
Leave off the extra charms and cords.
Make It Fully Crochet
If you do not want metal hardware, sew the decorations directly to the band and replace hard charms with tiny crochet circles, flowers, hearts, or leaves.
Make a Matching Bracelet
Use the same lace band construction but stop when it fits around the wrist.
Add shorter adjustable cords and one or two matching embellishments.
FAQ
What yarn is best for a crochet choker?
Smooth cotton is one of the best choices because it gives the stitches definition, holds its shape, and is generally comfortable for lightweight summer jewelry.
How do I make the choker adjustable?
Two crochet tie cords pass through a small crocheted slider at the back. Pull the cords through the slider until the choker fits comfortably.
Can I use beads and charms from old bracelets?
Yes. Lightweight beads and charms are perfect for this type of scrap-yarn project as long as their attachment points are reinforced securely.
Conclusion
This scrap yarn crochet choker is a fun way to turn leftover bracelet yarn into a complete summer accessory set. The sage lace band provides the structure, while the tiny pink flower, pearl accents, turquoise crochet pendant, colored cords, and pastel charms make every version feel unique.
Use the same colors as your favorite crochet bracelets, adjust the decorations to the scraps you already have, and create a coordinated handmade jewelry set without needing another full skein of yarn.



