
This colorful crochet stitch creates rows of plump seven-stitch shells that appear to overlap one another while long chain spaces are anchored into the rows below. The result is a textured, almost scale-like fabric with small openings between the shells and beautifully defined waves of color.
The stitch looks complicated at first, but the main pattern is a simple four-row repeat built from double crochet shells, wide V-stitches, chains, and single crochet anchor stitches. The starting chain is any multiple of 8 plus 2, making it easy to resize for scarves, baby blankets, throws, and larger blankets.
Skill Level
Confident Beginner to Intermediate
You should be comfortable with:
- chain stitches
- single crochet
- double crochet
- working several stitches into one stitch or space
- identifying the center stitch of a shell
- working into chain spaces
- changing colors
- crocheting into stitches several rows below
Materials
For a practice swatch:
- Medium #4 yarn
- 5 mm crochet hook
- Yarn needle
- Scissors
- Stitch markers, optional
For a blanket, choose a soft washable yarn with good stitch definition.
This stitch also works especially well for using several coordinated colors or leftover yarn.
Abbreviations — US Terms
ch – chain
sc – single crochet
dc – double crochet
sl st – slip stitch
st(s) – stitch(es)
sp – space
ch-2 sp – chain-2 space
ch-5 sp – chain-5 space
Special Stitches
7-Double-Crochet Shell
Work:
7 dc into the same stitch or chain space.
The fourth dc is the center stitch of the shell.
When a later row asks you to crochet into the center of a shell, count:
1, 2, 3, 4
and work into that fourth double crochet.
Wide V-Stitch
Work into the same stitch:
dc, ch 2, dc
The ch-2 space becomes the foundation for a shell on the following row.
Half Shell
At some row edges, the pattern uses four double crochets instead of seven.
The beginning turning chain can count as one dc, giving a total visual half-shell of four stitches.
Stitch Multiple
Use:
multiple of 8 + 2 chains
Examples:
- 26 chains
- 34 chains
- 42 chains
- 50 chains
- 58 chains
- 66 chains
- 98 chains
- 130 chains
- 162 chains
For the tutorial swatch:
Chain 34.
Foundation Chain
Make a slip knot.
Ch 34.
Keep the chain relaxed so the shells do not pull the lower edge inward.
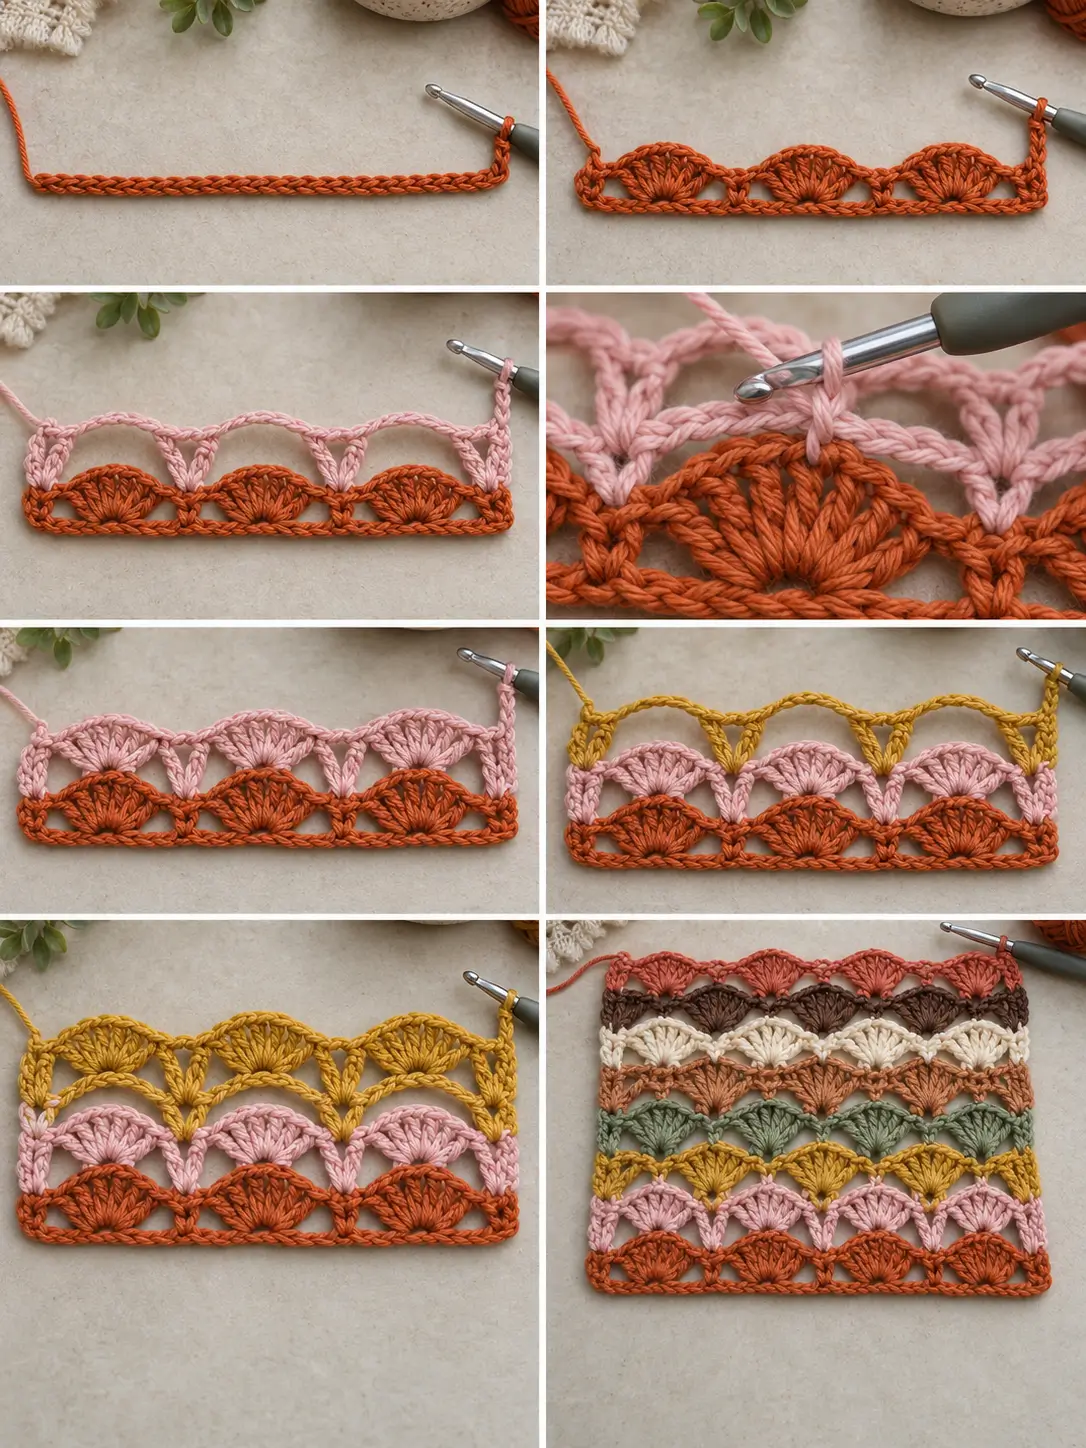
Row 1 — First Shell Row
Sc in the second chain from the hook.
The skipped chain does not count as a stitch.
Now repeat:
*skip 3 ch, work 7 dc in next ch, skip 3 ch, sc in next ch*
Repeat from * to * across.
Your final stitch should be a sc in the last foundation chain.
Turn.
What You Should See
The row should contain large rounded shells separated by single crochet stitches.
Each shell contains exactly:
7 dc
The spaces created by skipping three chains on either side of each shell help the shells spread into a rounded fan shape.
Optional Color Change After Row 1
This stitch looks particularly effective when colors are changed every two rows.
To change color:
Ch 1.
Cut the yarn, leaving a tail for weaving in.
Pull the tail through the ch-1 and tighten.
Turn the work.
Insert the hook through both loops of the first sc.
Pull the new color through and leave a long enough tail to weave in later.
If you are working the entire project in one color, simply turn and continue.
Row 2 — Chain Arches and Wide V-Stitches
With the new color, ch 3.
These 3 chains count as the first dc.
Work:
1 dc into the same first sc.
You now have 2 dc at the edge.
Ch 5.
Skip all 7 dc of the first shell from Row 1.
In the next sc work:
dc, ch 2, dc
This is one wide V-stitch.
Now repeat:
*ch 5, skip the next 7-dc shell, work dc, ch 2, dc in the next sc*
Continue across.
When you reach the final sc, do not work another wide V-stitch.
Instead, work:
2 dc in the final sc.
Turn.
Row 2 Structure
You should now have:
- 2 dc at the first edge
- ch-5 space
- wide V-stitch
- ch-5 space
- wide V-stitch
- repeated across
- ch-5 space
- 2 dc at the final edge
The ch-5 spaces float over the shells from Row 1.
Row 3 — Offset Shell Row
Ch 3.
The ch-3 counts as the first dc.
Turn.
Work 3 dc into the first stitch.
Including the starting ch-3, you now have a 4-dc half shell at the edge.
Now locate the first 7-dc shell from Row 1.
Count to the center:
1, 2, 3, 4
Insert the hook into the 4th dc, making sure the ch-5 strand from Row 2 is trapped underneath your hook.
Work:
1 sc
The ch-5 strand should now be caught neatly inside that single crochet.
Next, skip the remaining portion of the ch-5 section and work:
7 dc into the next ch-2 space
of the wide V-stitch from Row 2.
You have completed the first full shell of Row 3.
Repeat across:
*sc in the 4th dc of the next Row-1 shell, catching the ch-5 strand; 7 dc in the next ch-2 sp*
Continue until you have worked a sc into the center of the final Row-1 shell.
At the far edge, skip the remaining chain section and the first edge dc.
Work:
4 dc into the top of the beginning ch-3 from Row 2.
Turn.
What You Should See
The new shells should sit between the shells from Row 1.
The two shell rows are now offset.
The long ch-5 strands should be trapped by the single crochet stitches, creating a layered texture instead of loose floating chains.
Color Change
For the striped version, change color after Row 3.
Rows 2 and 3 should normally be worked in the same color.
Fasten off.
Turn the work.
Join the next color at the edge.
Row 4 — Offset Wide V-Stitch Row
Ch 3.
Important:
This ch-3 does not count as a dc.
It acts as part of the edge chain space.
Skip the next 3 stitches.
The following stitch should be a sc.
Into that sc work:
dc, ch 2, dc
to make a wide V-stitch.
Ch 5.
Skip the next 7-dc shell.
Into the following sc work:
dc, ch 2, dc
Repeat:
*ch 5, skip 7 dc, work dc, ch 2, dc in next sc*
Continue until you have worked the final wide V-stitch near the end of the row.
Now:
ch 2
Skip the final 3 stitches.
Work:
sl st into the top of the turning ch-3 from Row 3.
Turn.
Visual Check
The wide V-stitches should now sit in the gaps between the shells from Row 3.
The row begins and ends with partial chain spaces rather than full V-stitches.
Row 5 — Second Shell Alignment
Ch 1.
The ch-1 does not count as a stitch.
Turn.
Work:
1 sc into the same turning-chain space where the previous row ended with the sl st.
Skip the remaining edge chain section and the first dc of the first wide V-stitch.
Work:
7 dc into the first ch-2 space.
Now locate the next shell from Row 3.
Count:
1, 2, 3, 4
Work:
1 sc into the 4th dc, trapping the ch-5 chain from Row 4 beneath the stitch.
Skip the remaining chain section and neighboring dc.
Work:
7 dc into the next ch-2 space.
Repeat across:
*sc in center dc of next Row-3 shell, catching ch-5 strand; 7 dc in next ch-2 sp*
Near the end, after completing the final shell, skip the remaining edge dc and chain section.
Work:
1 sc into the final edge dc from Row 3, the same edge position where the yarn was joined for Row 4.
Turn.
Four-Row Pattern Repeat
The stitch is now established.
Repeat:
Rows 2–5
until the project reaches your desired length.
The repeat creates alternating layers:
Row 2
Wide V-stitches and ch-5 arches.
Row 3
Offset shell row.
Row 4
Second wide-V and arch row.
Row 5
Shell row returning to the original alignment.
Then begin again.
Color Sequence
The stitch looks especially good when each color is used for two rows.
A warm blanket palette could be:
Row 1
Rust
Rows 2–3
Soft blush
Rows 4–5
Mustard
Rows 6–7
Sage
Rows 8–9
Caramel
Rows 10–11
Cream
Rows 12–13
Chocolate
Then continue with new combinations.
For a more playful blanket, avoid repeating the colors in exactly the same order every time.
Suggested Autumn Blanket Palette
Try:
- burnt orange
- cinnamon
- mustard
- sage green
- dusty pink
- warm cream
- chocolate brown
- muted terracotta
This combination emphasizes the layered shell texture beautifully.
Baby Blanket Size
For a baby blanket, begin with a chain that follows:
multiple of 8 + 2
A useful starting point with medium #4 yarn is approximately:
Chain 130
This gives 16 complete pattern repeats across the foundation.
Work the four-row pattern until the blanket measures approximately:
38–42 inches long
Actual width depends on your yarn and hook size, so crochet at least five rows and measure before continuing.
Small Stroller Blanket
Try:
Chain 98
Work until approximately:
30–34 inches long
This makes a smaller blanket that is easy to carry.
Larger Baby Blanket
Try:
Chain 146
Work until approximately:
42–46 inches long
Throw Blanket
For a larger sofa throw, begin with approximately:
Chain 194
or another valid multiple of 8 + 2.
Work until the blanket reaches approximately:
55–65 inches long.
Make a gauge swatch first because the seven-dc shells use more yarn than a plain double crochet fabric.
How to Calculate Your Own Width
Because the pattern is:
multiple of 8 + 2
choose the number of complete repeats you want.
Use:
8 × number of repeats + 2
For example:
10 repeats
8 × 10 + 2 = 82 chains
15 repeats
8 × 15 + 2 = 122 chains
20 repeats
8 × 20 + 2 = 162 chains
25 repeats
8 × 25 + 2 = 202 chains
Crochet several rows and measure the actual width before committing to a large blanket.
Why the Ch-5 Strands Are Caught by Later Rows
The ch-5 strands are not simply decorative spaces.
When the following shell row is worked, each long chain is trapped inside a sc made into the center dc of the shell two rows below.
This does three things:
- keeps the long chain from floating loosely
- emphasizes the curved shell
- creates the layered overlapping texture
Make sure your hook passes under the ch-5 strand before entering the center dc.
The chain should be visibly captured by the completed sc.
Finding the Center of Every Shell
Each shell contains:
7 dc
The middle stitch is:
the 4th dc
Count:
- first dc
- second dc
- third dc
- center dc
- fifth dc
- sixth dc
- seventh dc
Always anchor the sc into the 4th dc.
Working into the 3rd or 5th dc gradually shifts the entire pattern sideways.
Keeping the Edges Straight
The middle of the pattern is highly repetitive, but the edge instructions alternate.
Pay close attention to:
- whether the beginning chain counts as a stitch
- whether you are making a 4-dc half shell
- whether the edge begins with a partial chain space
- where the final sc or half shell is placed
Do not simply repeat the center sequence all the way to the edge.
The special edge instructions are what keep the blanket rectangular.
Optional Simple Blanket Border
The shell stitch already creates plenty of texture, so a simple border works best.
Finish after Row 3 or Row 5 so the final row is a shell row.
Border Round 1
Using one coordinating color, attach yarn at a corner.
Ch 1.
Work sc evenly around the blanket.
At each corner:
3 sc
Along the side edges, space the sc stitches evenly enough that the fabric lies flat.
Join with a sl st.
Border Round 2
Ch 1.
Sc in each stitch around.
At each corner work:
3 sc in the center corner stitch
Join.
Fasten off.
Optional Shell Border
For a more decorative finish, add one final shell round.
Repeat along the straight border:
skip 2 sts, 5 dc in next st, skip 2 sts, sl st in next st
Adjust the spacing slightly around the corners so the border remains flat.
Because the blanket body already contains large 7-dc shells, using smaller 5-dc border shells keeps the edging from becoming too heavy.
Best Yarn for This Stitch
A smooth yarn gives the best definition.
Good choices include:
- acrylic
- cotton-acrylic blends
- soft cotton
- smooth wool blends
- washable baby yarn
Avoid extremely fuzzy yarn when learning the pattern.
You need to be able to identify:
- individual shell stitches
- the center 4th dc
- ch-2 spaces
- ch-5 strands
- turning chains
Yarn and Hook Tips
If the fabric feels stiff:
Use a slightly larger crochet hook.
If the shells look extremely loose:
Use a slightly smaller hook.
The finished fabric should have enough drape for the shells to spread while still keeping their rounded shape.
Tips for Clean Color Changes
Change After Two Rows
Changing every two rows keeps both parts of each structural layer in the same shade.
Leave Long Tails
Leave enough yarn to weave in securely later.
Weave Ends Into Matching Colors
Whenever possible, weave a tail through stitches of the same shade so it remains less visible.
Do Not Knot Tight Color Changes
A hard knot can create bumps along the side of a blanket.
Common Problems
Shell Has the Wrong Shape
Count the double crochets.
Every full shell needs exactly:
7 dc
Pattern Starts Leaning Sideways
Check the anchor single crochets.
They must be worked into the:
4th dc of each 7-dc shell
Long Chains Hang Loose
The ch-5 strand was not trapped by the sc in the next shell row.
Insert the hook beneath the chain before working into the center dc.
Fabric Becomes Wider
You may have added a V-stitch at an edge where only an edge stitch or half shell was required.
Recheck Rows 2–5.
Fabric Becomes Narrower
One edge sc or half-shell placement may have been skipped.
Check both ends of the previous row.
Shells Ruffle
Seven dc stitches require room to spread.
Try a slightly larger hook if they bunch excessively.
Shells Look Too Flat
Your yarn may be very soft or your tension too loose.
A slightly smaller hook can improve definition.
Edges Look Uneven
Follow the special beginning and ending instructions instead of treating every row as a full repeat from edge to edge.
Blocking
Blocking helps the shells settle into their final position.
After finishing:
- Weave in all yarn ends.
- Wash or lightly dampen according to the yarn label.
- Lay the project flat.
- Straighten the side edges.
- Gently shape the shells with your fingers.
- Make sure the trapped chain sections remain centered.
- Allow the blanket to dry completely.
Do not aggressively stretch the fabric.
The curved shells should remain dimensional.
Two-Color Version
For a calmer blanket, use only two colors.
For example:
Cream: Rows 1, 4–5, 8–9
Sage: Rows 2–3, 6–7, 10–11
Continue alternating every two rows.
The limited palette makes the overlapping shell structure easier to see.
Scrap-Yarn Version
This stitch is also excellent for leftover yarn.
Use one color for every two-row section.
Keep all yarns approximately the same weight.
A neutral shade every few color bands can help connect a large variety of leftovers visually.
Project Ideas
This stitch works for much more than blankets.
Use it for:
- colorful scarves
- baby blankets
- stroller blankets
- sofa throws
- cushion panels
- tote bags
- shawls
- decorative table runners
For bags or cushions, consider adding a fabric lining because the stitch contains decorative openings.
Finishing
When the project reaches the desired size:
- finish after a shell row if possible
- add the border if desired
- fasten off
- weave in every color-change tail
- gently block the finished fabric
- shape the shell rows evenly
The finished pattern should show alternating rows of rounded seven-double-crochet shells separated by wide V-stitches and long captured chain arches, producing a colorful layered texture that is especially striking when several coordinated shades are used.


