
This structured crochet tote combines a dense single-crochet body with dramatic raised five-spoke fan motifs across the front.
The fan design is the feature that makes the bag special. Each motif begins with a short solid crochet base, then five tall stitches rise from five evenly spaced points and are closed together at one narrow top point. Once the motifs are attached to the solid bag panel, the spaces between the five spokes create strong shadows and a beautiful three-dimensional geometric effect.
The motifs are arranged in four staggered rows:
4 fans
3 fans
4 fans
3 fans
when viewed from top to bottom.
A solid back panel, wide gusset, reinforced upper edge, sturdy crochet straps, optional lining, and optional base insert turn the decorative stitch into a practical everyday tote.
Skill Level
Intermediate
You should be comfortable with:
- chain
- single crochet
- double treble crochet
- working several unfinished tall stitches together
- sewing crochet pieces together
- counting rows and stitches
- attaching appliqué-style crochet motifs
- basic bag assembly
Finished Size
Approximately:
- 13 inches wide
- 12–12½ inches tall
- 3–3¼ inches deep
- 10–11 inch handle drop
The exact size depends on yarn, tension, and blocking.
Materials
- Medium weight #4 cotton or cotton-blend yarn
- Approximately 750–900 yards
- 4.5 mm crochet hook
- Yarn needle
- Scissors
- Stitch markers
- Measuring tape
- Blocking mats and pins, optional
Optional:
- Cotton lining fabric
- Lightweight interfacing
- Plastic canvas for bottom reinforcement
- Cotton webbing for handle reinforcement
- Magnetic snap
Yarn Recommendation
Use a smooth yarn with good stitch definition.
The raised fans show best in:
- cotton
- cotton-acrylic blends
- firm acrylic
- smooth wool blends
A dusty denim blue, slate blue, sage, cream, camel, or rust works particularly well because a solid color lets the shadows between the fan spokes create the detail.
Gauge
In single crochet:
15 sc × 16 rows = approximately 4 inches
Exact gauge is less important than producing a firm bag fabric.
If your single crochet fabric feels loose or floppy, move down to a smaller hook.
If it is excessively stiff, move up slightly.
Abbreviations — US Terms
ch – chain
sc – single crochet
sl st – slip stitch
dtr – double treble crochet
st(s) – stitch(es)
RS – right side
WS – wrong side
Special Stitch — Double Treble Crochet
Yarn over 3 times.
Insert hook into the indicated stitch.
Yarn over and pull up a loop.
You should have 5 loops on the hook.
Repeat:
yo, pull through 2 loops
four times to complete an ordinary dtr.
For the fan motif, however, each dtr is intentionally left unfinished before the final pull-through.
Special Stitch — Five-Spoke Fan Cluster
The raised fan is made from five partially completed double treble stitches worked into five positions across a 9-stitch foundation.
The five positions are:
1, 3, 5, 7, 9
This spreads the lower ends of the spokes apart while gathering all five tops together.
Partial DTR
Yarn over 3 times.
Insert into the indicated stitch.
Yarn over and pull up a loop.
Then work:
yo, pull through 2 loops
three times.
Stop.
Do not make the final yarn-over that would normally complete the dtr.
Leave the remaining loop from that tall stitch on the hook.
Complete Five-Spoke Cluster
Work one partial dtr in:
- stitch 1
- stitch 3
- stitch 5
- stitch 7
- stitch 9
Skip stitches 2, 4, 6, and 8.
After the fifth partial dtr, you should have 6 loops on the hook.
Yarn over.
Pull through all 6 loops at once.
Ch 1 firmly to lock the gathered top.
You now have five long crochet spokes spreading across a 9-stitch base and meeting at one point.
What the Fan Should Look Like
Each motif should have:
- a straight 9-stitch base
- five visible raised spokes
- four open-looking spaces between the spokes
- one narrow gathered point
- a broad triangular silhouette
The center spoke should rise almost vertically.
The two spokes beside it angle outward slightly.
The two outside spokes form the outer edges of the fan.
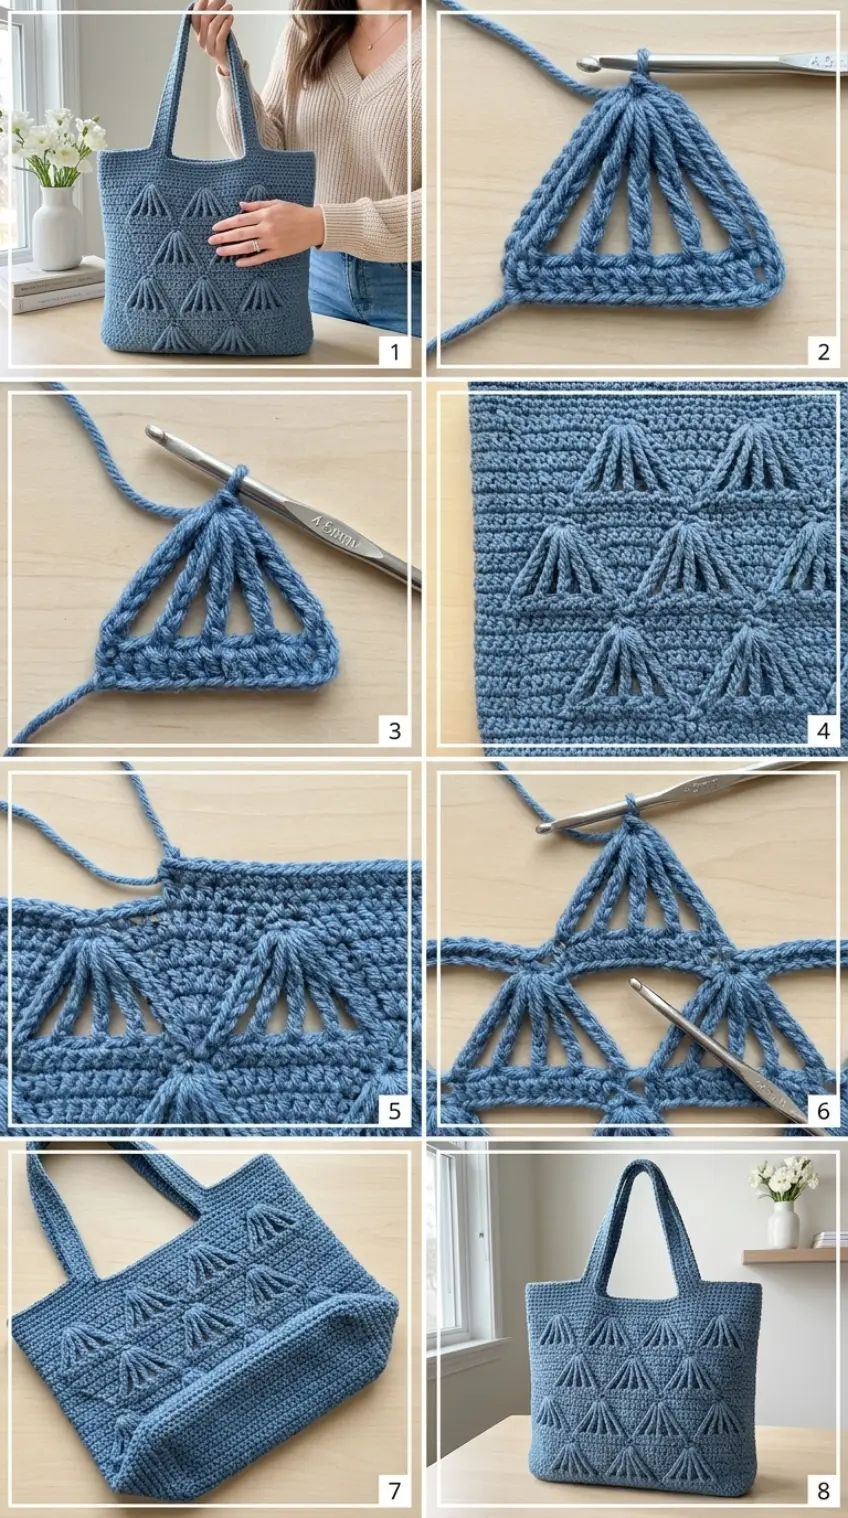
PART 1 — Make One Practice Fan
It is worth making one complete motif before beginning all 14.
Foundation
Ch 10.
Row 1
Sc in the second chain from the hook and in every remaining chain.
9 sc
Ch 1 and turn.
Row 2
Sc across.
9 sc
This creates the firm two-row bar visible underneath the five fan spokes.
Turn.
Row 3 — Five-Spoke Cluster
Do not ch 1.
Work a partial dtr into the:
1st sc
Leave it unfinished.
Skip the next sc.
Work another partial dtr in the:
3rd sc
Skip one.
Repeat in:
5th sc
then:
7th sc
then:
9th sc
You now have five unfinished tall stitches.
Yarn over.
Pull through all remaining loops.
Ch 1.
Fasten off, leaving approximately 8 inches of yarn at the top for attachment.
Leave the beginning tail long as well.
Shape the Fan
Lay the motif flat.
Spread the 9-stitch foundation bar horizontally.
Separate the five tall spokes with your fingers.
The five lower anchor points should remain visible.
Pull the gathered top gently upward.
The motif should form a clean triangle.
If it collapses inward, the tall stitches may be too tight.
If the spokes look floppy, reduce the hook size slightly.
Finished Fan Size
Using medium #4 yarn and a 4.5 mm hook, each motif should measure approximately:
- 2¼–2½ inches wide
- 1¾–2 inches tall
Minor variation is fine as long as every motif is approximately the same size.
PART 2 — Make All the Raised Fans
Make:
14 identical motifs
You need:
- 4 fans for the top motif row
- 3 fans for the second row
- 4 fans for the third row
- 3 fans for the bottom row
Do not weave in the long tails yet.
They are useful for attaching the motifs.
PART 3 — Crochet the Front Bag Panel
Using the main yarn:
Ch 50.
Row 1
Sc in the second chain from the hook.
Sc across.
49 sc
Ch 1 and turn.
Rows 2–50
Sc in every stitch across.
49 sc
Ch 1 and turn after Rows 2–49.
After Row 50, fasten off.
You now have a solid rectangular panel approximately:
13 inches wide × 12½ inches tall
depending on gauge.
Why the Background Is Solid
The raised fans are decorative surface motifs.
The bag panel itself remains completely solid.
This gives the finished tote:
- more strength
- less stretching
- better support for handles
- no large holes for objects to fall through
- a cleaner background behind the five raised spokes
The openings visible between the fan spokes come from the dimensional motif itself rather than large holes in the bag body.
PART 4 — Mark the Fan Placement
Lay the front panel flat with the foundation edge at the bottom.
Count all panel rows from the bottom upward.
You will place four staggered motif rows.
Use removable stitch markers before sewing anything.
Bottom Fan Row — 3 Motifs
Attach the bases along:
Panel Row 6
Use these stitch ranges:
Fan 1
Panel stitches 9–17
Center stitch:
13
Fan 2
Panel stitches 21–29
Center stitch:
25
Fan 3
Panel stitches 33–41
Center stitch:
37
The fan apices will be secured approximately 5 rows above the base, on:
Panel Row 11
at center stitches:
13, 25, 37
This creates the bottom row of 3 motifs.
Second Fan Row — 4 Motifs
Attach the bases along:
Panel Row 17
Use:
Fan 1
Stitches 3–11
Center:
7
Fan 2
Stitches 15–23
Center:
19
Fan 3
Stitches 27–35
Center:
31
Fan 4
Stitches 39–47
Center:
43
Attach their gathered tops to:
Panel Row 22
at stitches:
7, 19, 31, 43
The four fans should sit between and beyond the three motifs below, producing the staggered effect.
Third Fan Row — 3 Motifs
Attach the bases along:
Panel Row 28
Use:
- stitches 9–17
- stitches 21–29
- stitches 33–41
Centers:
13, 25, 37
Secure the tops to:
Panel Row 33
at:
13, 25, 37
Top Fan Row — 4 Motifs
Attach the bases along:
Panel Row 39
Use:
- stitches 3–11
- stitches 15–23
- stitches 27–35
- stitches 39–47
Centers:
7, 19, 31, 43
Secure their tops to:
Panel Row 44
at:
7, 19, 31, 43
This leaves several solid crochet rows above the motif decoration for strength at the bag opening.
Finished Motif Layout
Viewed from the top downward:
4 fans
3 fans
4 fans
3 fans
The center of every 3-fan row should fall between the centers of the 4-fan rows.
This staggering is what creates the geometric layout.
PART 5 — Attach the Fan Bases
Take the first motif.
Position its 9-stitch base directly over the marked 9-stitch section of the panel.
Thread the beginning tail onto a yarn needle.
Sew through the back portion of the motif base and the corresponding panel stitches.
Work from one side to the other.
Use small stitches.
The base should sit firmly against the panel without puckering it.
Do not sew through the long spokes.
Repeat across the entire 9-stitch base.
Secure the yarn on the wrong side.
PART 6 — Attach the Fan Apex
Thread the top yarn tail onto the needle.
Stretch the fan upward naturally.
Do not pull hard.
Position the gathered point at the marked stitch approximately 5 rows above the center of the base.
Pass the yarn through:
- the gathered fan top
- the marked panel stitch
Repeat several times.
The top should be secure but slightly dimensional.
Do not flatten the fan against the fabric.
Weave the tail into the wrong side.
Check the Fan
The motif should now show:
- flat base
- five separate long spokes
- four clearly visible gaps/shadows
- raised surface
- centered apex
Repeat for all 14 motifs.
Keep Every Fan Identical
For the cleanest finished bag:
- sew every 9-stitch base flat
- position every apex exactly five rows higher
- keep all fans centered
- do not stretch one motif more than another
After attaching one complete row, lay the panel flat and compare all motifs before continuing.
PART 7 — Make the Back Panel
The back is plain single crochet.
Ch 50.
Row 1
Sc in second chain and across.
49 sc
Rows 2–50
Sc across.
49 sc
Fasten off.
The back panel should match the front exactly in width and height.
If desired, you can decorate the back with another 14 fans, but the one-sided version gives the bag a cleaner look and reduces bulk.
PART 8 — Block the Panels
Before assembly, lightly block the front and back.
Follow the yarn manufacturer’s care instructions.
Lay the panels flat.
Straighten:
- side edges
- bottom
- top
On the front panel, gently spread each fan spoke.
Do not press or flatten them.
Allow the pieces to dry completely.
PART 9 — Crochet the Gusset
The gusset creates both side walls and the bottom.
This version is approximately:
3–3¼ inches wide
Use the same main yarn.
Foundation
Ch 146.
Row 1
Sc in the second chain from the hook.
Sc across.
145 sc
Ch 1 and turn.
Rows 2–12
Sc across.
145 sc
Ch 1 and turn through Row 11.
After Row 12, fasten off.
The gusset should measure approximately:
38–39 inches long × 3 inches wide
Check the Gusset Length
Before assembly, lay the gusset around one panel.
It needs to cover:
- left side
- complete bottom edge
- right side
The two gusset ends should stop near the upper corners.
If your gauge differs, adjust the foundation length before completing all 12 rows.
The actual fit is more important than the exact chain count.
PART 10 — Mark the Gusset Center
Fold the gusset in half lengthwise from one short end to the other.
Place a stitch marker at the center of its long edge.
That point should line up with the center of the bottom edge of the bag panel.
This keeps both sides the same length.
PART 11 — Join Gusset to Front Panel
Place the front panel with the right side facing outward.
Position the gusset around:
- left side
- bottom
- right side
Align the gusset midpoint with the panel’s bottom center.
Use stitch markers generously.
At the bottom corners, fold the gusset smoothly around the turn.
Do not stretch either piece.
Crochet Seam
Attach matching yarn at one upper corner.
Insert the hook through:
- the front-panel edge
- corresponding gusset stitch
Work:
1 sc through both layers
Continue down the side.
At the bottom corner, distribute the stitches so the corner turns without gathering.
Work across the complete bottom.
Turn the second corner.
Continue up the opposite side.
Fasten off.
PART 12 — Attach the Back Panel
Place the back panel against the free side of the gusset.
Match:
- upper corners
- side lengths
- bottom corners
- bottom center
Pin thoroughly.
Join with the same single crochet seam.
Work down one side, across the bottom, and up the opposite side.
Leave the top open.
Seam Style
For a visible framed seam, keep wrong sides together while crocheting.
The single crochet ridge remains visible on the outside.
For a smoother exterior, place right sides together while joining and turn the bag afterward.
The finished example works well with either method.
PART 13 — Reinforce the Top Opening
With the bag right side out, attach yarn at one side seam.
Top Round 1
Sc evenly around the complete opening.
Join with a sl st.
Top Round 2
Ch 1.
Sc around.
Join.
Top Round 3
Ch 1.
Sc around.
Join.
Fasten off.
The opening should now feel firm and stable.
PART 14 — Crochet the Handles
Make 2 identical handles.
Foundation
Ch 86.
Row 1
Sc in the second chain from the hook and across.
85 sc
Ch 1 and turn.
Rows 2–6
Sc across.
Ch 1 and turn through Row 5.
After Row 6, fasten off, leaving a long sewing tail.
The finished strap should measure approximately:
- 22–23 inches long
- 1¼–1½ inches wide
Make the second handle exactly the same.
Prevent Handle Stretching
Cotton crochet handles can stretch with use.
For a stronger bag, reinforce them with:
- cotton webbing
- grosgrain ribbon
- non-stretch fabric
- strong cord hidden inside
Cut the reinforcement slightly shorter than the crochet strap.
Sew it to the underside before attaching the handles to the bag.
PART 15 — Position the Front Handle
Lay the bag flat.
On the front upper edge, position the first handle so its ends are approximately:
2½–3 inches inward from each side
A useful placement on the 49-stitch front panel is approximately:
Left Handle End
over stitches 8–13
Right Handle End
over stitches 37–42
Allow approximately:
1¾–2 inches
of each handle end to overlap the solid top section.
Pin securely.
PART 16 — Attach the Handle
Using matching yarn and a yarn needle:
Sew completely around the perimeter of the first handle end.
Then sew diagonally across the center.
Create a reinforced:
box + X
shape.
Repeat several times if necessary.
Attach the other end identically.
Back Handle
Position the second strap on the back panel in exactly the same locations.
Check the bag from the side before sewing.
Both handles should:
- have equal drop
- sit at equal heights
- remain untwisted
- line up front to back
Sew securely.
PART 17 — Optional Fabric Lining
A lining is optional because the bag body itself is solid, but it makes the finished tote more durable and professional.
Measure the Interior
Measure:
- width
- height
- gusset depth
after the bag is assembled.
Cut the Fabric
Cut:
2 main fabric rectangles
using the front/back measurements plus approximately:
½-inch seam allowance
on each edge.
Sew the Lining Pouch
Place the fabric pieces right sides together.
Sew:
- first side
- bottom
- second side
Leave the top open.
Box the Bottom Corners
At one bottom corner, line up the side seam with the bottom seam.
Flatten into a triangle.
Measure approximately:
1½ inches from the point
for a roughly 3-inch depth.
Sew straight across.
Trim the excess.
Repeat for the other corner.
Finish the Upper Edge
Fold the raw top edge inward approximately:
½ inch
Press.
Insert the lining into the crochet bag.
Position the folded fabric edge just below the crochet top edge.
Pin.
Hand sew around using small hidden stitches.
PART 18 — Optional Magnetic Closure
Install a magnetic snap before sewing the lining into the tote.
Find the center of:
- front lining
- back lining
Reinforce each position with interfacing.
Install the snap according to the hardware instructions.
Then sew the lining into the bag.
PART 19 — Optional Firm Bottom
For a bag that stands upright more easily, make a removable base insert.
Measure the interior bottom.
Cut plastic canvas approximately:
¼–½ inch smaller on all sides
Round the corners.
Cover it with matching fabric if desired.
Place it inside the lining at the bottom.
This helps prevent sagging when the bag is filled.
How to Make the Fans More Dimensional
If you want stronger relief:
- use a slightly smaller hook for the panel
- use the regular 4.5 mm hook for the fans
- leave the spokes slightly relaxed
- secure only the base and apex
Do not sew along the individual spokes.
They should remain free from the background.
How to Make Flatter Fans
For a subtler texture:
- use the same hook for panel and motifs
- sew one tiny hidden tack beneath each outer spoke
Do not sew down all five completely.
The motif should still retain some depth.
How to Make the Bag Wider
The solid body is easy to resize.
Add stitches to both panels.
For every additional inch of width, add approximately:
4 foundation chains
based on the sample gauge.
Then recalculate motif positions so the staggered layout remains centered.
How to Make the Bag Taller
Add single crochet rows to both front and back panels.
For every additional inch:
add approximately:
4 rows
at this gauge.
Add the extra rows either:
- above the top motif row
- below the bottom motif row
- or distribute them between motif rows
Smaller Handbag Version
Try:
Chain 42
for approximately:
41 working stitches
Work approximately:
42–44 rows
Use:
- 3 motifs
- 2 motifs
- 3 motifs
instead of four decorative rows.
Make the gusset approximately 2½ inches deep.
Larger Project Tote
Try:
Chain 58
for:
57 working stitches
Work approximately:
56–60 rows
Use wider motif spacing or add:
5 fans / 4 fans
across alternating rows.
Increase the gusset depth to approximately:
4 inches
for yarn or craft storage.
Color Ideas
Denim Blue
A dusty medium blue emphasizes the shadows between the five spokes.
Natural Cream
Excellent for showing every stitch.
Sage Green
Soft and modern.
Terracotta
Warm and bold.
Charcoal
Creates strong dimensional shadows.
Mustard
Gives the geometric design a vintage feel.
Dusty Rose
Softens the structured tote shape.
Two-Tone Variation
Make the entire bag body in one color and the raised fans in another.
Examples:
- cream body + camel fans
- sage body + dark olive fans
- pale blue body + navy fans
- dusty rose body + burgundy fans
- charcoal body + light gray fans
Because the fan motifs are made separately, changing their color requires no complicated colorwork.
Scrap-Yarn Variation
Keep the tote itself neutral.
Make the 14 motifs from coordinating scrap colors.
For example:
- rust
- mustard
- sage
- dusty rose
- terracotta
- cream
Arrange the motifs before sewing to balance the colors.
Common Problems
Fan Has Fewer Than Five Spokes
Count the foundation stitches.
Partial dtr stitches must be worked into:
1, 3, 5, 7, 9
There should be five total.
Fan Does Not Gather at the Top
Do not fully complete each dtr separately.
Each tall stitch must remain unfinished until all five have been made.
Then pull through all remaining loops together.
Fan Looks Too Narrow
Check that you are skipping one foundation sc between each tall stitch.
Using consecutive stitches makes the base too narrow.
Fan Looks Too Wide and Flat
Your dtr stitches may be too short.
Keep the yarn-overs relaxed and let each post reach its natural full height.
Panel Puckers Around Motifs
The apex is probably being pulled too high or too tightly.
The fan should lie comfortably between its base row and the row five levels above it.
Motifs Look Crooked
Use the exact center stitch when attaching the top.
The center of a 9-stitch base is:
stitch 5
Decorative Rows Do Not Look Staggered
Use the placement map exactly.
Four-fan rows center at:
7, 19, 31, 43
Three-fan rows center at:
13, 25, 37
The three-fan motifs therefore sit directly between the four-fan motifs.
Bag Sags at the Bottom
Add:
- fabric lining
- plastic canvas
- stronger cotton yarn
Handles Stretch
Reinforce them with webbing or fabric.
Gusset Twists During Assembly
Mark:
- gusset center
- panel bottom center
- all four bottom corners
before sewing or crocheting the seam.
Finishing
Once the entire tote is assembled:
- weave in every remaining yarn end
- check all 14 fan apices
- reinforce loose motif bases
- inspect handle attachments
- insert the lining if using one
- insert the bottom support
- gently shape the bag by hand
Light blocking can help the tote become more rectangular, but avoid pressing the raised fans flat.
Raised Five-Spoke Fan Crochet Tote
The finished bag combines a very simple solid single-crochet structure with one dramatic decorative motif.
Each small fan starts with a 9-stitch base. Five double-treble spokes rise from alternating stitches and are gathered into one point, creating the distinctive triangular shape. Four rows of motifs are then arranged in an alternating 4-3-4-3 layout across the front.
Because the fans are attached over a solid background, the bag remains practical and sturdy while still having the open, dimensional appearance of the raised geometric design.


