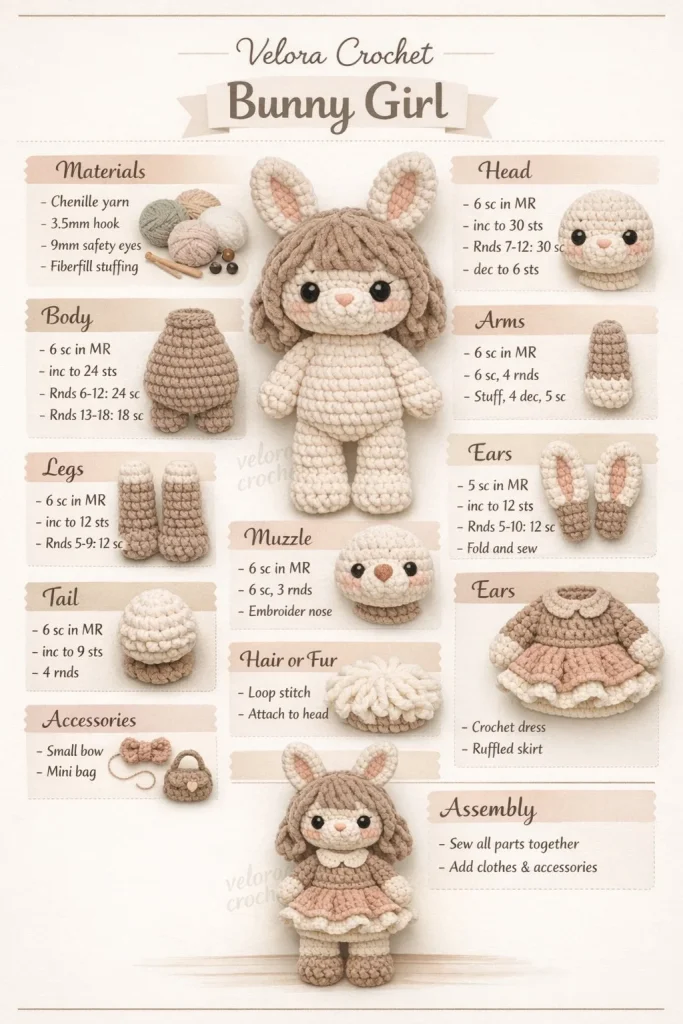
Crocheting an adorable amigurumi plush bunny is a delightful project perfect for anyone looking to expand their skills. This easy-to-follow crochet pattern is ideal for beginners and offers a chance to create a charming mini crochet friend with long floppy ears and simple limbs, featuring sweet embroidered facial details. Let’s gather your materials and get started with this engaging project!
Materials
- Bulky plush yarn in your choice of colors
- Crochet hook (size appropriate for your yarn)
- Fiberfill stuffing
- Tapestry needle for weaving in ends
- Safety eyes or black embroidery thread for eyes
- Scissors
Abbreviations
- Ch: chain
- Sc: single crochet
- Inc: increase (2 sc in the same stitch)
- Dec: decrease (sc two stitches together)
- R: round
- Sl st: slip stitch
Pattern Instructions
Head
- Start with a magic ring, ch 1.
- R1: 6 sc in ring (6 stitches)
- R2: Inc in each stitch (12 stitches)
- R3: (Sc in next stitch, inc) around (18 stitches)
- R4-6: Sc in each stitch (18 stitches per round)
- R7: (Sc in next 2 stitches, inc) around (24 stitches)
- R8-10: Sc in each stitch (24 stitches per round)
- R11: (Sc in next 2 stitches, dec) around (18 stitches)
- R12: (Sc in next stitch, dec) around (12 stitches)
- Stuff the head and finish off, leaving a long tail for sewing.
Body
- Start with a magic ring, ch 1.
- R1: 6 sc in ring (6 stitches)
- R2: Inc in each stitch (12 stitches)
- R3: (Sc in next stitch, inc) around (18 stitches)
- R4-8: Sc in each stitch (18 stitches per round)
- R9: (Sc in next 2 stitches, dec) around (12 stitches)
- R10: Dec around (6 stitches)
- Stuff the body and finish off, leaving a long tail for sewing.
Arms
- Start with a magic ring, ch 1.
- R1: 6 sc in ring (6 stitches)
- R2-5: Sc in each stitch (6 stitches per round)
- Stuff lightly and finish off, leaving a long tail for sewing. Make 2.
Legs
- Start with a magic ring, ch 1.
- R1: 6 sc in ring (6 stitches)
- R2: Inc in each stitch (12 stitches)
- R3-6: Sc in each stitch (12 stitches per round)
- Stuff lightly and finish off, leaving a long tail for sewing. Make 2.
Ears / Details
- Start with a magic ring, ch 1.
- R1: 6 sc in ring (6 stitches)
- R2: Inc in each stitch (12 stitches)
- R3: (Sc in next stitch, inc) around (18 stitches)
- R4: Sc in each stitch (18 stitches)
- R5: (Sc in next 2 stitches, inc) around (24 stitches)
- R6-7: Sc in each stitch (24 stitches)
- Finish off, leaving a long tail for sewing. Make 2 for the ears.
Accessories (if any)
Feel free to add a bow or scarf using extra yarn scraps. Simply chain to your desired length, and tie it around the bunny’s neck for a cute touch.
Assembly & Finishing
- Sew the arms and legs onto the body securely.
- Attach the head to the body, ensuring it is centered.
- Position the ears on top of the head and sew them in place.
- Use a tapestry needle to embroider facial features, or attach safety eyes.
- Weave in all loose ends.
Tips for Best Results
- Use a stitch marker to keep track of your rounds.
- Adjust stuffing to ensure your bunny is soft but retains its shape.
- Try out different yarn colors for fun variations.
Conclusion
This amigurumi plush bunny crochet pattern is not just an enjoyable project; it’s also a fantastic way to practice your crochet skills. With clear instructions and simple techniques, you can create a lovable plush friend to cherish or gift. Happy crocheting!



