
This medium crochet shoulder bag combines a dense cream macrame body with a contrasting burgundy top edge, long cream crochet straps, and a dimensional flower decoration on the front.
The bag itself is intentionally simple and sturdy. Most of the body is worked in compact single crochet so the floral appliqué becomes the main visual feature.
The decorative flower is made separately from burgundy yarn and sewn to the finished front panel with a green stem and leaves.
Skill Level
Confident Beginner / Intermediate
You should know how to:
- chain
- single crochet
- slip stitch
- half double crochet
- double crochet
- treble crochet
- increase
- decrease
- crochet around both sides of a foundation chain
- sew crochet pieces together
- attach appliqués
Finished Size
Approximately:
- 10½–11 inches wide
- 9½–10 inches tall
- 2½–3 inches deep
- 22–24 inch strap drop
The exact finished size depends on your cord, hook, and tension.
Materials
- 2 mm macrame cord in cream
- Approximately 300 g total cream cord
- Burgundy macrame cord or cotton yarn for top trim and flower
- Olive or moss-green yarn for stem and leaves
- 4 mm crochet hook
- Yarn needle
- Scissors
- Stitch markers
- Measuring tape
Optional:
- Fabric lining
- Magnetic snap
- Plastic canvas for base reinforcement
Abbreviations — US Terms
ch – chain
sl st – slip stitch
sc – single crochet
hdc – half double crochet
dc – double crochet
tr – treble crochet
st(s) – stitch(es)
sc2tog – single crochet 2 together
Gauge
Approximately:
15 sc × 16 rows = 4 inches
with 2 mm macrame cord and a 4 mm hook.
For a bag, a firm fabric is better than a loose one.
If your stitches feel floppy, move down to a 3.5 mm hook.
If the fabric is painfully stiff, move up to 4.5 mm.
BAG CONSTRUCTION
The bag is made from:
- Front panel
- Back panel
- Side-and-bottom gusset
- Contrasting top edging
- Two long straps
- Burgundy flower
- Green stem
- Two green leaves
- Optional lining
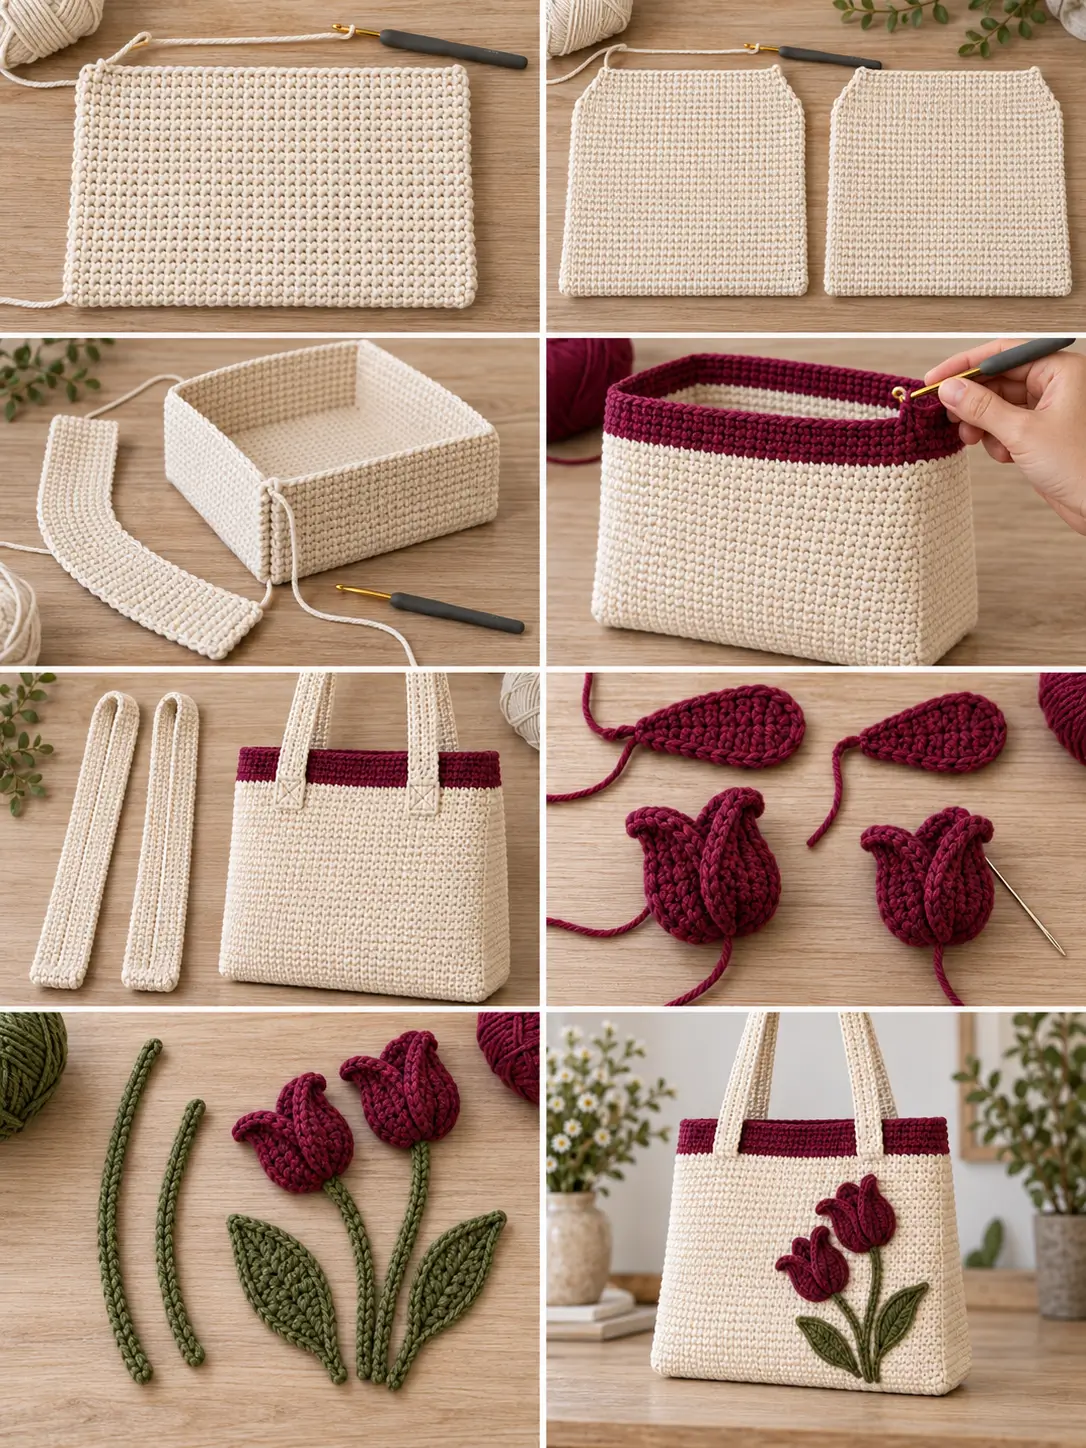
PART 1 — FRONT PANEL
Using cream cord:
Ch 42.
Row 1
Sc in the second chain from the hook.
Sc in every remaining chain.
41 sc
Ch 1 and turn.
Row 2
Sc in every stitch across.
41 sc
Ch 1 and turn.
Rows 3–36
Repeat Row 2.
You should have a dense rectangle approximately:
10½–11 inches wide × 9 inches tall
Do not fasten off yet.
Shape the Upper Corners
The inspiration has a slightly softened upper shape rather than sharp square corners.
Row 37
Sc2tog over first 2 stitches.
Sc across until 2 stitches remain.
Sc2tog.
39 sts
Ch 1 and turn.
Row 38
Sc across.
39 sts
Ch 1 and turn.
Row 39
Sc2tog.
Sc across to final 2 stitches.
Sc2tog.
37 sts
Fasten off.
The panel should now have very slightly tapered upper corners.
PART 2 — BACK PANEL
Repeat the complete front-panel instructions.
You should have:
2 matching cream panels
Check that both pieces have identical:
- width
- height
- row count
- upper shaping
PART 3 — CROCHET THE GUSSET
The gusset creates the:
- left side
- bottom
- right side
Use cream cord.
Ch 12.
Row 1
Sc in second chain from hook.
Sc across.
11 sc
Ch 1 and turn.
Row 2
Sc across.
11 sc
Ch 1 and turn.
Continue
Repeat Row 2 until the strip is long enough to fit:
- down one side of the front panel
- across the bottom
- up the opposite side
For the sample dimensions, aim for approximately:
29–30 inches long
Do not rely only on row count.
Measure the gusset directly around your actual panel.
Fasten off.
PART 4 — ATTACH GUSSET TO FRONT
Lay the front panel right side facing you.
Find the center of the bottom edge.
Find the center of the gusset.
Mark both.
Match those two center points.
Pin or stitch-mark the gusset around:
- first side
- bottom
- second side
The short ends of the gusset should stop at the upper corners.
Crochet Join
Hold the front panel and gusset together.
Attach cream cord at one upper corner.
Work:
sc through both layers
evenly down the first side.
Continue around the first bottom corner.
Work across the bottom.
Turn the second corner.
Continue up the opposite side.
Fasten off.
Keep your stitches firm but not tight.
PART 5 — ATTACH BACK PANEL
Place the back panel against the free edge of the gusset.
Match:
- upper corners
- bottom corners
- side lengths
- bottom center
Pin securely.
Attach the back using the same sc seam.
Leave the top open.
Turn the bag right side out.
PART 6 — BURGUNDY TOP EDGE
Attach burgundy cord at one side seam.
Round 1
Ch 1.
Sc evenly around the complete bag opening.
Join with sl st.
Round 2
Ch 1.
Sc in each stitch around.
Join.
Round 3
Repeat Round 2.
Fasten off.
The burgundy band should measure approximately:
¾–1 inch deep
and form a firm contrasting top edge.
PART 7 — CROCHET THE STRAPS
Make 2 identical cream straps.
For a shoulder bag:
Ch 105.
This creates a strap approximately:
24–26 inches long
before attachment.
Strap Row 1
Sc in second chain from hook and across.
Ch 1 and turn.
Rows 2–3
Sc across.
Fasten off, leaving a long sewing tail.
The strap should be approximately:
½–¾ inch wide
Make the second strap exactly the same.
Stronger Strap Variation
If you expect the bag to carry more than lightweight items, make each strap:
4 rows of sc
instead of 3.
You can also reinforce the underside with:
- cotton tape
- narrow webbing
- ribbon
This significantly reduces stretching.
PART 8 — ATTACH THE STRAPS
Lay the bag flat.
On the front panel, place the strap ends approximately:
2 inches inward from each side seam
Allow each strap end to overlap the bag by approximately:
1½ inches
Pin.
Sew the strap securely through the cream body and burgundy top band.
Use a rectangle of stitching around the attachment.
Then add an:
X
through the middle.
Repeat for the other end.
Attach the second strap to the back panel in exactly the same positions.
Check before final sewing that:
- both straps have the same drop
- neither strap is twisted
- front and back placements match
PART 9 — BURGUNDY LILY / TULIP FLOWER
The flower decoration is made separately.
Make 2 flower heads for the layered look shown.
Use burgundy yarn.
Flower 1 — Foundation
Ch 8.
Row 1
Sc in second chain from hook.
Hdc in next ch.
Dc in next 2 ch.
Tr in next 2 ch.
Work:
5 tr in final chain
Now work along the opposite side of the foundation chain.
Tr in next 2 loops.
Dc in next 2.
Hdc in next.
Sc in final loop.
You should have an elongated oval petal shape.
Do not fasten off.
Shape the Flower Into a Bud
Fold the lower third of the oval slightly inward.
Roll one side toward the center.
Wrap the opposite side over it.
The upper portion should remain slightly open, forming a tulip/lily-style cup.
Use the yarn tail to sew through the lower section several times.
Leave the upper petal edges free.
The flower should measure approximately:
2–2½ inches tall
Flower 2
Repeat the complete flower instructions.
For a natural look, make the second flower slightly smaller by using:
Ch 7
instead of 8.
Position the two finished flowers close together with one sitting slightly higher than the other.
PART 10 — OPTIONAL MORE OPEN LILY PETAL
If you prefer a more dramatic pointed flower, make three separate petals for each flower.
For each petal:
Ch 9.
Beginning in second chain:
- sl st
- sc
- hdc
- dc
- tr
- tr
- dc
- hdc
Ch 1 at the tip.
Work down the opposite side:
- hdc
- dc
- tr
- tr
- dc
- hdc
- sc
- sl st
Fasten off.
Make 3 petals.
Overlap their lower ends and sew together.
This creates a more open three-petal lily instead of a closed bud.
PART 11 — GREEN FLOWER STEM
Use olive or moss-green yarn.
Ch 28.
Starting in the second chain from the hook:
Sl st in every chain across.
Fasten off, leaving a long tail.
This creates a thin flexible stem.
For a thicker stem, work:
sc instead of sl st
along the foundation chain.
PART 12 — SECOND SHORT STEM
For the second flower:
Ch 20.
Sl st back across.
Fasten off.
When attaching the flowers, cross or curve the two stems naturally.
PART 13 — CROCHET THE LEAVES
Make 2 leaves in green.
Leaf Foundation
Ch 10.
Beginning in second chain from hook:
- sl st in next ch
- sc in next
- hdc in next
- dc in next 2
- tr in next
- dc in next
- hdc in next
- sc in final ch
Ch 1.
Work along the opposite side of the foundation chain:
- sc
- hdc
- dc
- tr
- dc in next 2
- hdc
- sc
- sl st
Fasten off, leaving a long sewing tail.
The leaf should be approximately:
2½–3 inches long
with a pointed tip.
Smaller Leaf
For variety, make the second leaf with:
Ch 8
and use the same gradual stitch progression.
This produces a slightly shorter leaf.
PART 14 — ARRANGE THE FLOWER DECORATION
Lay the finished bag flat.
Place the floral design slightly to the:
lower-right or lower-center area of the front panel
rather than directly in the middle.
A pleasing arrangement is:
- one taller flower on the upper-left of the floral grouping
- one slightly lower flower beside it
- one curved green stem extending upward
- one second stem crossing diagonally
- one leaf pointing upward-right
- one leaf pointing left or downward
Move the pieces until the arrangement looks balanced.
Pin everything before sewing.
PART 15 — SEW THE STEMS
Start with the stems.
Thread green yarn onto a yarn needle.
Sew through the stem and the front panel every:
½ inch
approximately.
Keep the stitches small.
Do not pull tightly enough to distort the bag.
The stem should retain a slight curve.
PART 16 — SEW THE LEAVES
Position each leaf against a stem.
Sew through:
- center vein area
- leaf base
Leave the outer leaf edges slightly free.
This gives the decoration more dimension.
PART 17 — ATTACH THE FLOWERS
Place the two burgundy flowers over the lower ends of the stems.
Sew firmly through the flower bases.
Add several hidden stitches through the lower petal areas.
Do not sew every petal edge flat.
The upper parts should remain raised and dimensional.
PART 18 — OPTIONAL GREEN CALYX
For a more finished flower base:
Using green yarn:
Make a magic ring.
Work:
5 sc
into the ring.
Join.
For each of the next 3 stitches:
ch 4, sl st back down the chain, sl st in next stitch
This produces small pointed sepals.
Fasten off.
Sew beneath the flower base before attaching the flower to the bag.
Make one for each flower.
PART 19 — OPTIONAL LINING
A lining helps a macrame bag keep its shape and protects the interior.
Measure
Measure the inside of the finished bag:
- width
- height
- depth
Cut Fabric
Cut two rectangles slightly larger than the front/back dimensions.
Add approximately:
½ inch seam allowance
on all sides.
Sew
Place right sides together.
Sew:
- first side
- bottom
- second side
Leave the top open.
Box the Bottom Corners
At each lower corner:
Flatten the corner so the side seam and bottom seam line up.
Measure inward approximately:
1¼–1½ inches
Sew across.
Trim excess fabric.
This creates approximately:
2½–3 inches of depth
to match the crochet gusset.
Install the Lining
Fold the top raw edge inward.
Insert the lining.
Position the fabric just below the burgundy crochet band.
Pin.
Hand sew around the opening with small hidden stitches.
PART 20 — OPTIONAL MAGNETIC SNAP
Install a magnetic snap in the lining before sewing it into the bag.
Reinforce the fabric behind both halves with:
- interfacing
- felt
- scrap canvas
Position the snap at the center of the opening.
PART 21 — OPTIONAL FIRM BASE
For a bag that stands more upright:
Measure the interior bottom.
Cut a rectangle of plastic canvas approximately:
¼ inch smaller on all sides
Round the corners.
Cover with fabric if desired.
Place inside the lining at the bottom.
How to Make the Bag Wider
Add chains to the front and back panels.
At this gauge, approximately:
4 stitches = 1 inch
For a bag roughly 2 inches wider:
Add approximately:
8 chains
to the panel foundation.
Make both panels identical.
Adjust the gusset length accordingly.
How to Make the Bag Taller
Add rows before the upper shaping.
Approximately:
4 rows = 1 inch
at this gauge.
If adding significant height, you may also want longer straps.
Smaller Handbag Version
For a smaller bag:
Ch 34
for the front and back panels.
Work approximately:
30–32 rows
before shaping.
Make the gusset:
Ch 9
for approximately 2 inches of depth.
Use straps approximately:
Ch 80
Larger Tote Version
For a larger tote:
Ch 50
for each panel.
Work approximately:
44–46 rows
before the top edge.
Use a gusset:
Ch 14
for extra depth.
Make wider 4-row straps.
Color Ideas
Original-Inspired
Cream body
Burgundy top
Burgundy flowers
Olive stems
Soft Romantic
Warm ivory body
Dusty rose edge
Dusty rose flowers
Sage leaves
Autumn
Camel body
Rust edge
Burgundy flowers
Olive leaves
Botanical
Cream body
Forest-green edge
Terracotta flowers
Dark-green leaves
Modern Neutral
Oatmeal body
Chocolate edge
Cream flowers
Muted olive leaves
High Contrast
Black body
Cream top
Deep-red flowers
Dark-green leaves
Make the Flower Removable
Instead of sewing the flower directly to the bag, attach a small safety pin or brooch backing to the reverse side of the floral group.
Then the decoration can be:
- repositioned
- removed for washing
- replaced with another crochet flower
Do not use a pin-backed flower on a bag intended for a young child.
Tips for Working With Macrame Cord
Keep Your Tension Relaxed
Macrame cord can become tiring if worked too tightly.
Use a Comfortable Hook
An ergonomic handle helps during long rows of dense sc.
Take Breaks
The cord is less flexible than ordinary yarn.
Avoid Splitting the Cord
Insert the hook cleanly underneath both loops.
Check the Panel Frequently
Dense macrame fabric can gradually change width if edge stitches are missed.
Common Problems
Bag Body Is Too Stiff
Move up half a hook size.
Bag Is Too Floppy
Move down half a hook size or add lining/interfacing.
Panels Are Different Sizes
Count both stitches and rows.
Block them before joining.
Gusset Is Too Long
Do not gather it into the panel.
Remove rows until it fits naturally.
Gusset Is Too Short
Add rows rather than stretching it.
Top Edge Flares Out
Use slightly tighter tension for the burgundy rounds.
If necessary, decrease a few stitches evenly around Round 1.
Straps Stretch
Add another sc row or reinforce the underside.
Flower Looks Flat
Attach only the lower flower section.
Leave the top petals free.
Leaves Curl Too Much
Lightly dampen and block them before sewing.
Flower Decoration Pulls the Panel
Your sewing stitches are too tight.
Loosen them so the front panel remains flat.
Finishing
After assembling the bag:
- weave in every cord end
- inspect all seams
- reinforce strap attachments
- check the flower stitching
- straighten the burgundy top band
- shape the side gusset
- insert lining if using one
- insert base support if desired
Lightly shape the bag by hand.
Avoid pressing the dimensional flower flat.
Lily Flower Crochet Shoulder Bag
The beauty of this bag comes from the contrast between a very simple, sturdy crochet body and one decorative floral detail.
Dense cream single crochet creates a practical everyday bag, the burgundy top band adds definition, and the dimensional flower and green stems turn the plain surface into something much more distinctive.
Because the flowers, leaves, and stems are made separately, the same basic bag can be customized with different floral arrangements, colors, strap lengths, lining styles, and sizes without changing the main construction.


