Raspberry & Cream Chunky Crochet Blanket – Easy Textured Throw Pattern
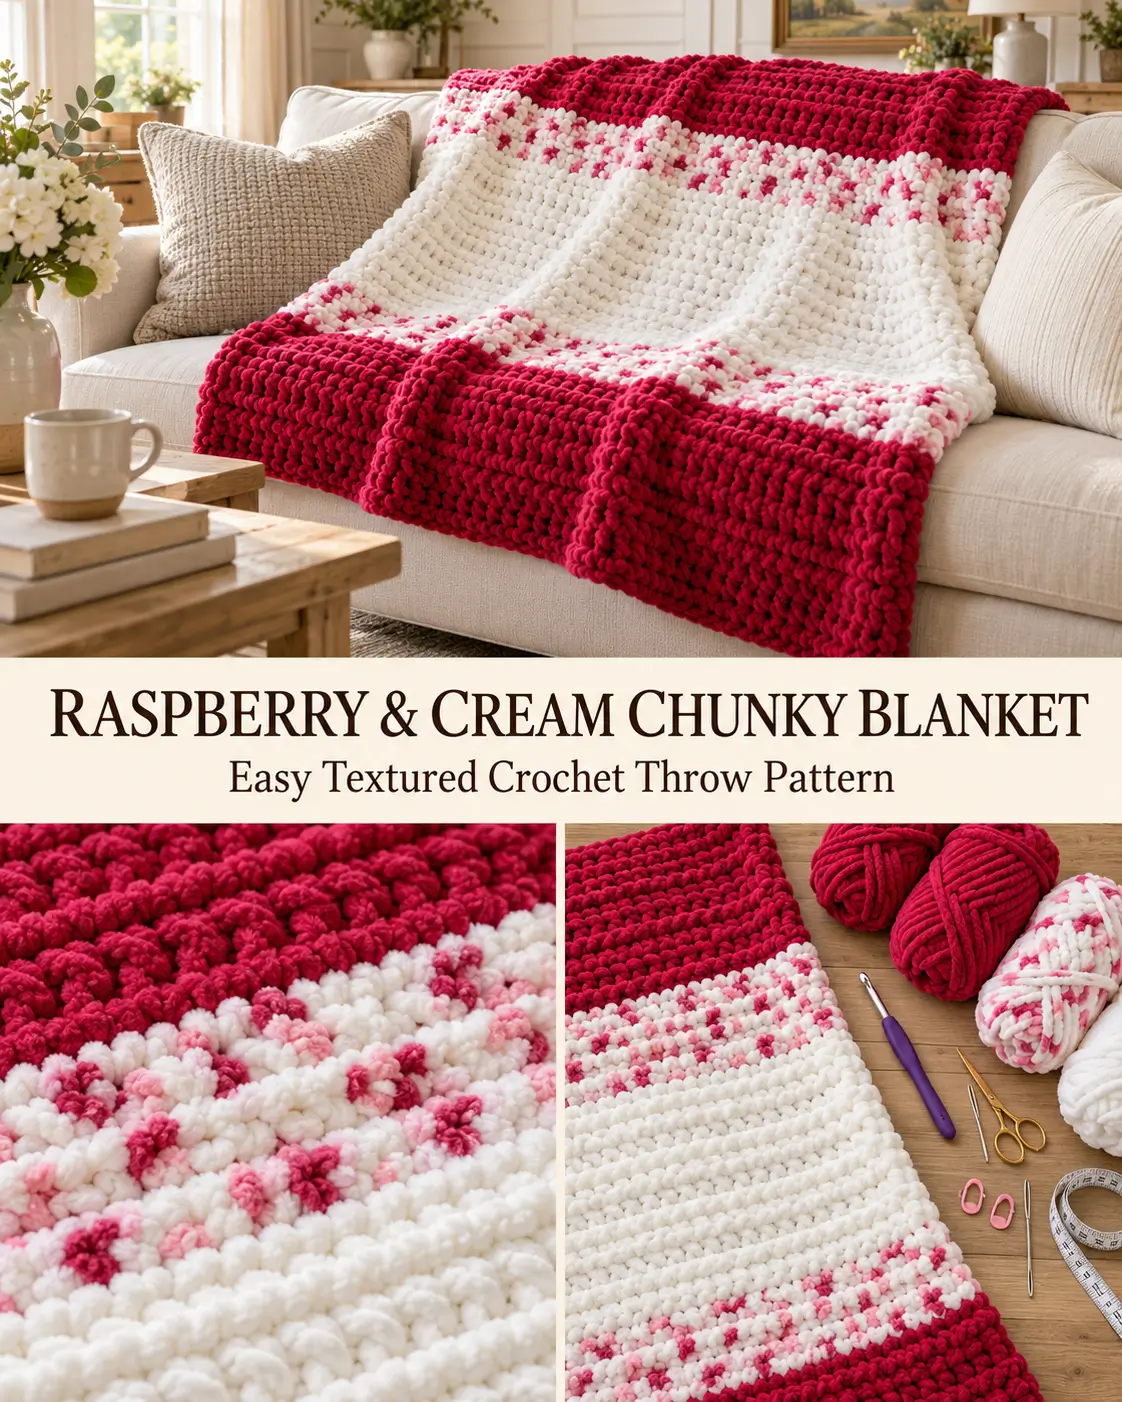
There’s something irresistible about a thick, plush crochet blanket, especially when it combines rich raspberry red, soft white, and pretty strawberry-speckled yarn.
This beautiful Raspberry & Cream Chunky Crochet Blanket brings together everything we love about cozy handmade throws: luxurious chenille texture, beautifully defined raised stitches, and bold color-blocked sections that make the finished blanket look professionally designed.
The color combination is particularly charming. Deep raspberry-red sections frame a wide, snowy-white center, while two narrower bands of white yarn dotted with pink and red add a playful strawberry-inspired touch.
And although the blanket looks incredibly textured, the construction is much easier than you might expect.
Instead of making separate crochet squares or joining complicated motifs, you’ll work the blanket in one continuous rectangular piece using a simple two-row stitch repeat.
The raised texture comes from alternating ordinary half double crochet rows with a combination of single crochet and front-post half double crochet stitches.
The result is a wonderfully squishy, warm blanket that’s perfect for curling up on the sofa.
Why You’ll Love This Crochet Blanket
- Beautiful raspberry, white, and strawberry-speckled color combination.
- Made with ultra-soft super bulky chenille yarn.
- Rich raised crochet texture.
- Simple two-row stitch repeat.
- Worked in one piece without complicated assembly.
- Easy to customize for different blanket sizes.
- Thick, cozy fabric perfect for cool-weather lounging.
- A lovely handmade gift for birthdays, housewarmings, and holidays.
- Striking color-block design that looks beautiful on a sofa or bed.
The texture makes this project especially satisfying because every few rows add another layer of soft, raised stitches.
Crochet Blanket Pattern Overview
Pattern name: Raspberry & Cream Plush Throw
Skill level: Confident beginner
Crochet terminology: US crochet terms
Construction: Worked flat in turned rows
Stitch pattern: Alternating half double crochet and front-post half double crochet texture
Pattern repeat: Two rows
Yarn weight: Super bulky #6 chenille yarn
Suggested hook: 10 mm (N/P)
Main color: Deep raspberry red
Accent colors: Strawberry-speckled white and soft white
Suggested blanket size: Approximately 48 × 60 inches
Foundation chain: 86 chains
Stitches per row: 85
Planned pattern rows: 104, subject to gauge
Edging: Optional simple single crochet border
The finished dimensions are estimates. The 104-row plan is based on a target gauge of approximately seven stitches and seven rows over four inches. Because this is a new stitch variation, the gauge must be checked against a sample rather than assumed.
Materials You’ll Need
- Super bulky #6 chenille yarn in raspberry red or crimson
- Super bulky #6 chenille yarn in strawberry-speckled white and pink
- Super bulky #6 chenille yarn in solid soft white
- 10 mm crochet hook
- Tapestry needle suitable for thick yarn
- Sharp scissors
- Stitch markers
- Measuring tape
- Optional blocking mats
Choosing Your Yarn
For the closest appearance to the inspiration blanket, choose a soft chenille yarn with a rounded, plush strand.
The original Rosy Chunky Blanket uses Bernat Blanket and Bernat Baby Blanket yarn. These super bulky polyester yarns offer the thick, velvety texture that makes the blanket look especially cozy.
For this adaptation, use three coordinating colors.
Color A – Raspberry Red
Choose a rich crimson or raspberry-red shade. This color frames both ends of the blanket and provides the strongest visual contrast.
Color B – Strawberry Speckle
Look for a predominantly white chenille yarn with little scattered pink and red color variations.
The yarn should create an irregular speckled appearance rather than regular stripes.
Color C – Soft White
Choose a warm, snowy white for the broad center section.
This solid color allows the raised stitch texture to stand out clearly.
How Much Yarn Will You Need?
The original Rosy Chunky Blanket lists 220-yard skeins and different amounts for its four sizes.
Because our version has a different stitch variation and stripe arrangement, its exact yarn requirements have not been measured.
For planning a medium throw, consider allowing approximately 1,800–2,000 yards of super bulky chenille yarn, divided among the three colors, then adjust using your swatch.
An initial shopping plan might be:
- 4 skeins raspberry red
- 2 skeins strawberry-speckled yarn
- 3 skeins soft white
This assumes approximately 220 yards per skein and provides 1,980 yards in total.
These are planning quantities, not verified consumption figures.
To estimate more accurately, make a sample in the actual stitch pattern, weigh it, and calculate the yarn needed for your finished blanket area.
Crochet Abbreviations
All instructions use US crochet terminology.
- Ch: Chain
- Sc: Single crochet
- Hdc: Half double crochet
- Fphdc: Front-post half double crochet
- Sl st: Slip stitch
- St: Stitch
- Rep: Repeat
- RS: Right side
- WS: Wrong side
Understanding the Raised Crochet Texture
This blanket uses two different types of rows.
The first is a simple half double crochet row.
The second alternates single crochet stitches with front-post half double crochet stitches.
Front-post stitches are worked around the vertical post of a stitch rather than through the two loops at its top.
This pulls the yarn forward slightly and creates a raised ridge on the surface.
When the rows are repeated, the blanket develops a soft, dimensional texture that looks especially attractive in chunky chenille yarn.
How to Make a Half Double Crochet
- Yarn over.
- Insert your hook into the indicated stitch.
- Yarn over and pull up a loop.
- Yarn over again.
- Pull through all three loops on the hook.
One half double crochet is complete.
How to Make a Front-Post Half Double Crochet
- Yarn over.
- Locate the vertical post of the indicated stitch in the previous row.
- Insert your hook from front to back, then back to front around the stitch post.
- Yarn over and pull up a loop around the post.
- Yarn over.
- Pull through all three loops on the hook.
This creates one front-post half double crochet.
The hook wraps around the post rather than entering the top V-shaped loops.
Helpful tip: Keep the front-post stitches relaxed. Pulling them too tightly can make the blanket bunch.
How to Choose Your Blanket Size
This stitch pattern works best with an odd number of stitches so the textured row begins and ends with a single crochet.
Your foundation chain should therefore contain one more chain than the desired odd stitch count.
Here are some approximate planning options, using a hypothetical gauge of seven stitches across four inches.
| Blanket Style | Starting Chain | Approx. Width |
|---|---|---|
| Small lap blanket | 64 | 36 in |
| Medium throw | 86 | 48.5 in |
| Standard throw | 92 | 52 in |
| Large throw | 106 | 60 in |
These widths are estimates before edging.
If your gauge differs, adjust the starting chain while keeping the final number of worked stitches odd.
For this tutorial, we’ll use 86 starting chains and 85 stitches per row.
Step-by-Step Raspberry & Cream Chunky Blanket Pattern
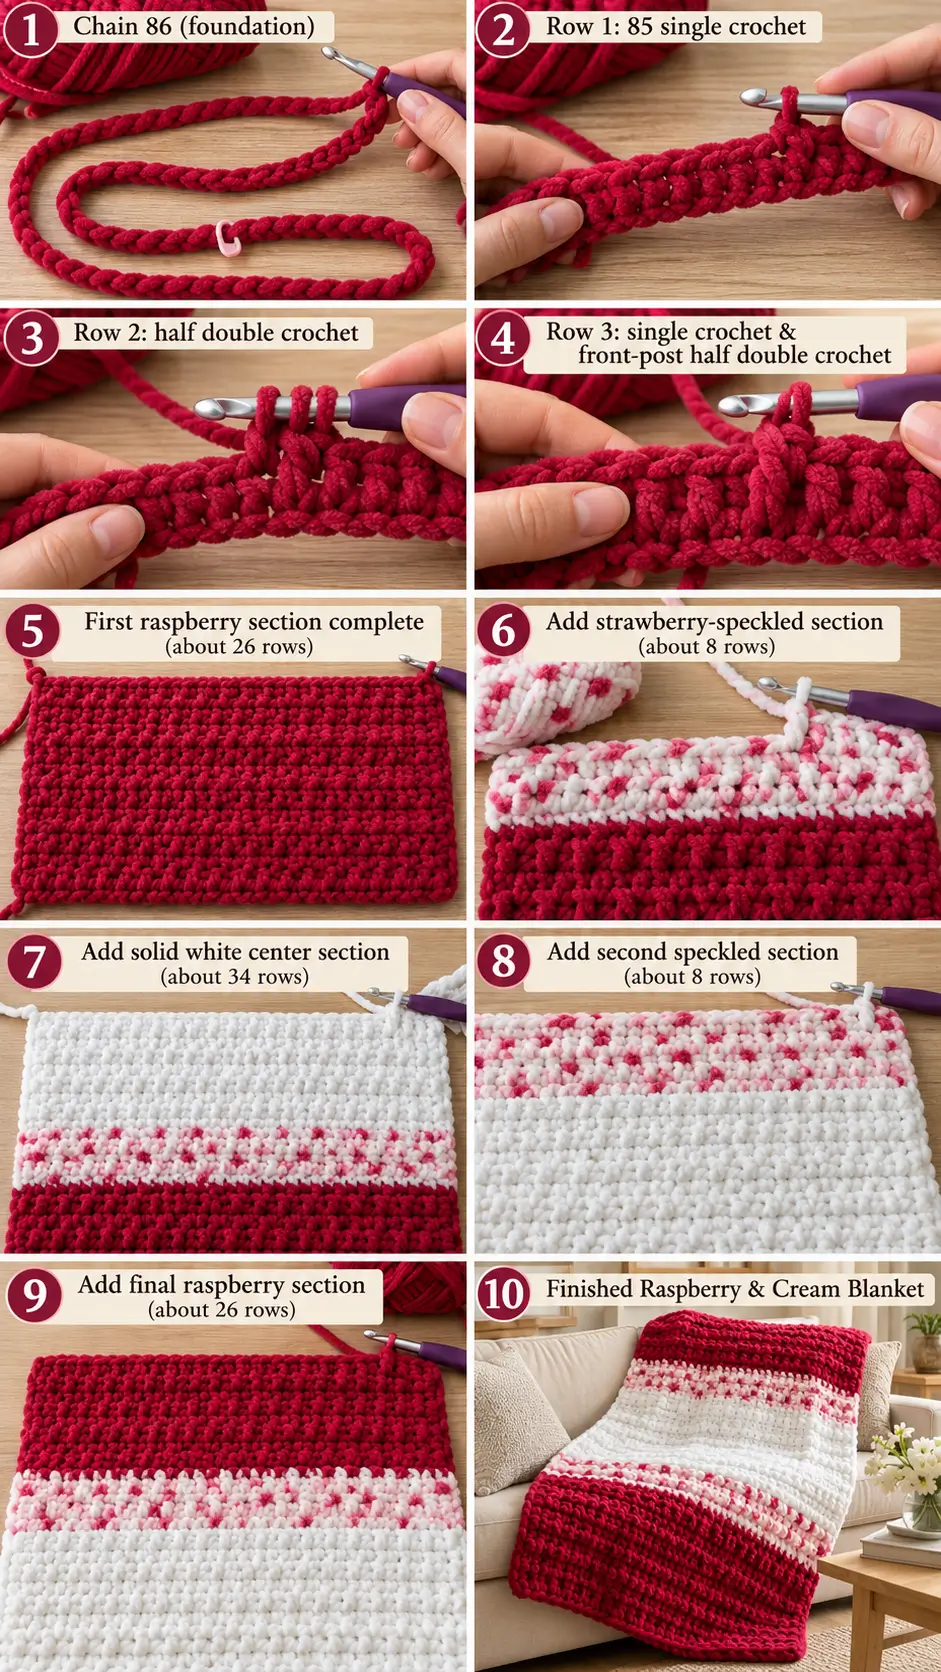
Step 1: Create the Foundation Chain
Using Color A, raspberry-red chenille yarn, and your 10 mm crochet hook:
Chain 86.
Keep the chains loose and evenly formed.
Chenille yarn can be difficult to see clearly because of its soft, fluffy surface, so count carefully.
Place a stitch marker every 15–20 chains if needed.
After finishing the foundation chain, straighten it across your workspace and check that it isn’t twisted.
Row 1 – Single Crochet Foundation
Using raspberry red:
- Work one single crochet in the second chain from the hook.
- Work one single crochet in each remaining chain.
- Turn your work.
Stitch count: 85 sc.
This gives the blanket a sturdy lower edge.
Try to maintain even tension without pulling the chenille yarn too tightly.
Row 2 – Half Double Crochet
Chain 2. The turning chain does not count as a stitch.
- Work one half double crochet into the first stitch.
- Work one half double crochet into each remaining stitch across.
- Turn.
Stitch count: 85 hdc.
The fabric should still look relatively flat.
The raised texture begins developing in the next row.
Row 3 – Create the Raised Texture
Chain 1. This does not count as a stitch.
- Work one single crochet into the first stitch.
- Work one front-post half double crochet around the post of the next half double crochet from Row 2.
- Work one single crochet into the next stitch.
- Repeat Steps 2–3 across the row.
- Turn.
Because you have 85 stitches, you’ll work 42 front-post half double crochets and 43 single crochets.
Stitch count: 85 stitches.
The row begins and ends with single crochet, making it easier to keep the side edges straight.
What Row 3 Should Look Like
You should see small raised sections formed by the front-post stitches.
The single crochets sit slightly lower between them, creating a nicely textured surface.
With thick chenille yarn, the difference between the two stitch types gives the blanket a plush, almost quilted appearance.
Row 4 – Return to Half Double Crochet
Chain 2.
Work one half double crochet into the top of every stitch across the previous row, including the front-post stitches.
Turn.
Stitch count: 85 hdc.
The regular half double crochet row stabilizes the textured stitches.
Row 5 – Repeat the Textured Row
Chain 1.
Work one single crochet into the first stitch.
Repeat:
Front-post half double crochet around the next stitch, single crochet in the following stitch.
Continue across and turn.
You should have 85 stitches.
Continue the Two-Row Repeat
For the rest of the blanket:
- Even-numbered rows: Half double crochet across.
- Odd-numbered rows from Row 3 onward: Alternate single crochet and front-post half double crochet.
Remember that the beginning turning chains do not count as stitches.
Keep 85 stitches in every row.
Part 2: Crochet the Raspberry and Cream Color Sections
One of the most beautiful parts of this blanket is the arrangement of its three colors.
The design uses two substantial raspberry-red sections, two narrow strawberry-speckled sections, and a broad white center.
This gives the finished blanket a balanced striped appearance.
Complete Color-Change Schedule
| Rows | Yarn Color | Number of Rows |
|---|---|---|
| 1–26 | Raspberry Red | 26 |
| 27–34 | Strawberry Speckle | 8 |
| 35–70 | Soft White | 36 |
| 71–78 | Strawberry Speckle | 8 |
| 79–104 | Raspberry Red | 26 |
| Total | 104 |
The two red sections are identical in row count, as are the two speckled sections.
The soft white center is the widest contrasting area.
If your gauge differs, preserve the approximate proportions rather than forcing the blanket to finish at exactly 104 rows.
Step 2: Complete the First Raspberry Section
Continue working the two-row texture through Row 26.
At this point, you should have a substantial section of solid raspberry-red crochet fabric.
The raised stitches will be especially noticeable because the yarn is one continuous color.
Lay the fabric flat occasionally to check that the edges remain reasonably straight.
Step 3: Change to Strawberry-Speckled Yarn
At the end of Row 26, change from raspberry-red yarn to strawberry-speckled yarn.
How to Change Colors Neatly
- Work the final half double crochet of the row until the last yarn-over-and-pull-through step.
- Before completing the stitch, place the new yarn on your hook.
- Pull the new color through the remaining loops.
- Turn and begin the next row using the new color.
- Leave sufficient tails to weave in securely.
Changing colors during the final pull-through gives a cleaner transition.
Do not knot the yarn ends together as the only method of securing them.
Rows 27–34 – Strawberry-Speckled Section
Work eight rows using the strawberry-speckled chenille yarn.
Continue the established two-row pattern without changing the stitch count.
The variegated yarn should create a pretty mixture of white, soft pink, and raspberry flecks.
Because the yarn changes color along its length, the finished band will have irregular color placement.
This is part of its charm.
Step 4: Crochet the Soft White Center
At the end of Row 34, change to Color C, soft white.
Work Rows 35–70 in the same repeating textured pattern.
This creates the broad central section of the blanket.
Why the White Center Looks So Beautiful
Solid white yarn makes the raised stitches particularly visible.
Natural shadows settle between the soft front-post stitches, helping the dimensional crochet texture stand out.
As this section grows, the blanket begins to look like a luxurious store-bought textured throw, but with the wonderful softness of handmade crochet.
Continue until Row 70 is complete.
Step 5: Add the Second Strawberry-Speckled Band
At the end of Row 70, change back to the strawberry-speckled yarn.
Work Rows 71–78.
Maintain the same 85-stitch count and two-row repeat.
This second narrow band should visually balance the first speckled section.
The speckles may fall differently because of the yarn’s natural color variation, which is perfectly fine.
Step 6: Finish With Raspberry Red
At the end of Row 78, change back to raspberry-red chenille yarn.
Work Rows 79–104 in the established two-row repeat.
The final solid red section matches the first red section in row count.
Finish after Row 104, a half double crochet row.
Fasten off, leaving a generous tail to weave into the thick fabric.
You now have a complete striped blanket body with five distinct color sections.
Part 3: Optional Crochet Border
The color-blocked design already looks attractive without a decorative border.
However, you can add a simple single crochet edge if you’d like a more finished appearance.
Use raspberry-red yarn for a matching border.
Border Round 1
With the right side facing upward, join red yarn at a corner.
- Chain 1.
- Work single crochet stitches evenly across the top edge.
- At the first corner, work three single crochets into the corner area.
- Continue along the side, working stitches into the ends of the rows.
- Place approximately one single crochet per row end as a starting point, adjusting the spacing to keep the edge flat.
- Work three single crochets at the next corner.
- Continue along the foundation edge.
- Repeat around the remaining side.
- Join with a slip stitch.
If the border ripples, you’ve probably added too many stitches.
If it pulls inward, you may need a few more stitches.
Border Round 2 – Optional
Chain 1.
Work one single crochet into each stitch around the blanket.
At each corner, work three single crochets into the center corner stitch.
Join with a slip stitch and fasten off.
For an appearance closer to the inspiration photograph, omit the border or work only one narrow round.
Part 4: Finish the Blanket
Weave in All Yarn Ends
Chenille yarn can sometimes shed or loosen at cut ends.
Use a yarn needle suitable for thick yarn and weave each tail securely through several neighboring stitches.
Change direction when possible.
Follow the yarn manufacturer’s recommendations for securing chenille ends.
Trim only after the ends are secure.
Check the Edges
Lay the blanket flat.
Inspect the foundation edge, final row, and both sides.
Make sure the texture is even and the color transitions are neat.
If necessary, gently smooth the fabric with your hands.
Wash and Care for Your Blanket
Always follow the washing instructions for your specific yarn.
Many polyester chenille blanket yarns are machine washable, but settings vary between products.
Use the recommended wash cycle and drying method.
Avoid excessive heat, which may damage or flatten synthetic fibers.
Your Raspberry & Cream Chunky Crochet Blanket is now complete!
Helpful Tips for Crocheting With Chunky Chenille Yarn
Don’t Pull the Stitches Too Tight
Chenille yarn has a plush outer surface that makes very tight stitches difficult to work.
Use relaxed, consistent tension.
Count Your Stitches Regularly
It’s easy to lose a stitch at the edge of a thick blanket.
Check that every row contains 85 stitches.
Use Stitch Markers at the Edges
Place a stitch marker in the first and last stitches of the row to help identify the correct insertion points.
Practice Front-Post Stitches First
If you’re unfamiliar with front-post crochet, make a small swatch before beginning the full blanket.
Watch Your Yarn Tension During Color Changes
Changing between different chenille colorways can sometimes affect your tension.
Try to keep all sections equally relaxed.
Check Your Gauge
Because this is a textured pattern, stitch height can vary.
Measure your sample before committing to the full 104-row plan.
Easy Ways to Customize Your Chunky Blanket
Make a Smaller Lap Blanket
Use fewer starting chains, keeping an odd final stitch count, and work fewer rows.
Preserve the same general color proportions for a coordinated design.
Try Burgundy and Ivory
Replace raspberry red with deep burgundy for a more sophisticated winter appearance.
Make a Pink and Cream Blanket
Choose blush pink, white-and-pink speckled yarn, and creamy white for a softer romantic version.
Create a Christmas Blanket
Use cranberry red, white, and a subtle holiday-speckled yarn.
This makes a cozy seasonal gift.
Make a Neutral Farmhouse Throw
Try warm taupe, cream-speckled yarn, and soft ivory.
The same chunky texture looks beautiful in understated colors.
Make It Longer
Add more rows to each color section, keeping the arrangement symmetrical.
For example, add four rows to both red sections and another eight rows to the white center.
Frequently Asked Questions
Is this chunky crochet blanket beginner-friendly?
Yes, for confident beginners. The half double crochet and single crochet stitches are familiar, while front-post half double crochet adds a little extra texture.
What yarn weight should I use?
Super bulky #6 chenille yarn creates the soft, plush appearance shown in the inspiration blanket.
What crochet hook size works best?
A 10 mm hook is a good starting point. Adjust if your fabric is too stiff or too loose.
Is this the same as the original Rosy Chunky Blanket?
No. This is a separate adaptation using a different front-post stitch variation, foundation count, and row schedule. The original design is by Pamela Kuloba.
Do I need to add a border?
No. The blanket can be finished without a border, especially if the side edges are neat.
Can I use regular worsted yarn?
Yes, but the blanket will have a much different texture, and you’ll need to recalculate the size and yarn quantity.
Can I make this blanket in one color?
Absolutely. A solid cream or raspberry-red blanket would highlight the raised stitch pattern beautifully.
How do I prevent the edges from becoming uneven?
Count each row, keep your turning chains consistent, and use stitch markers at the edges.
More Cozy Crochet Blanket Patterns
If you enjoyed making this chunky crochet blanket, you might also love:
- Cozy Reverse Blanket Stitch Crochet Blanket
- Beautiful Interlocking Block Stitch Blanket
- Easy Chunky Crochet Throw for Beginners
- Soft Textured Baby Blanket
- Granny Stripe Crochet Blanket
- Waffle Stitch Crochet Throw
- Cream Star Lace Crochet Blanket
Each project offers a different way to explore color, texture, and cozy handmade design.
Final Thoughts
A chunky crochet blanket is one of the most satisfying projects you can make, especially when the yarn is wonderfully soft and the pattern has beautiful texture.
This Raspberry & Cream Plush Throw combines rich red, strawberry-speckled accents, and a wide snowy-white center to create a cozy blanket that’s as attractive as it is comfortable.
The raised crochet stitches give the fabric lovely dimension, while the simple two-row repeat makes the project manageable even when you’re working on a generous throw.
Whether you make it for your own sofa, give it as a handmade gift, or choose a completely different color combination, the finished blanket is sure to become a favorite cozy accessory.
Happy crocheting! 🍓🧶