Daisy Meadow Crochet Pouch With Flowers and Drawstrings
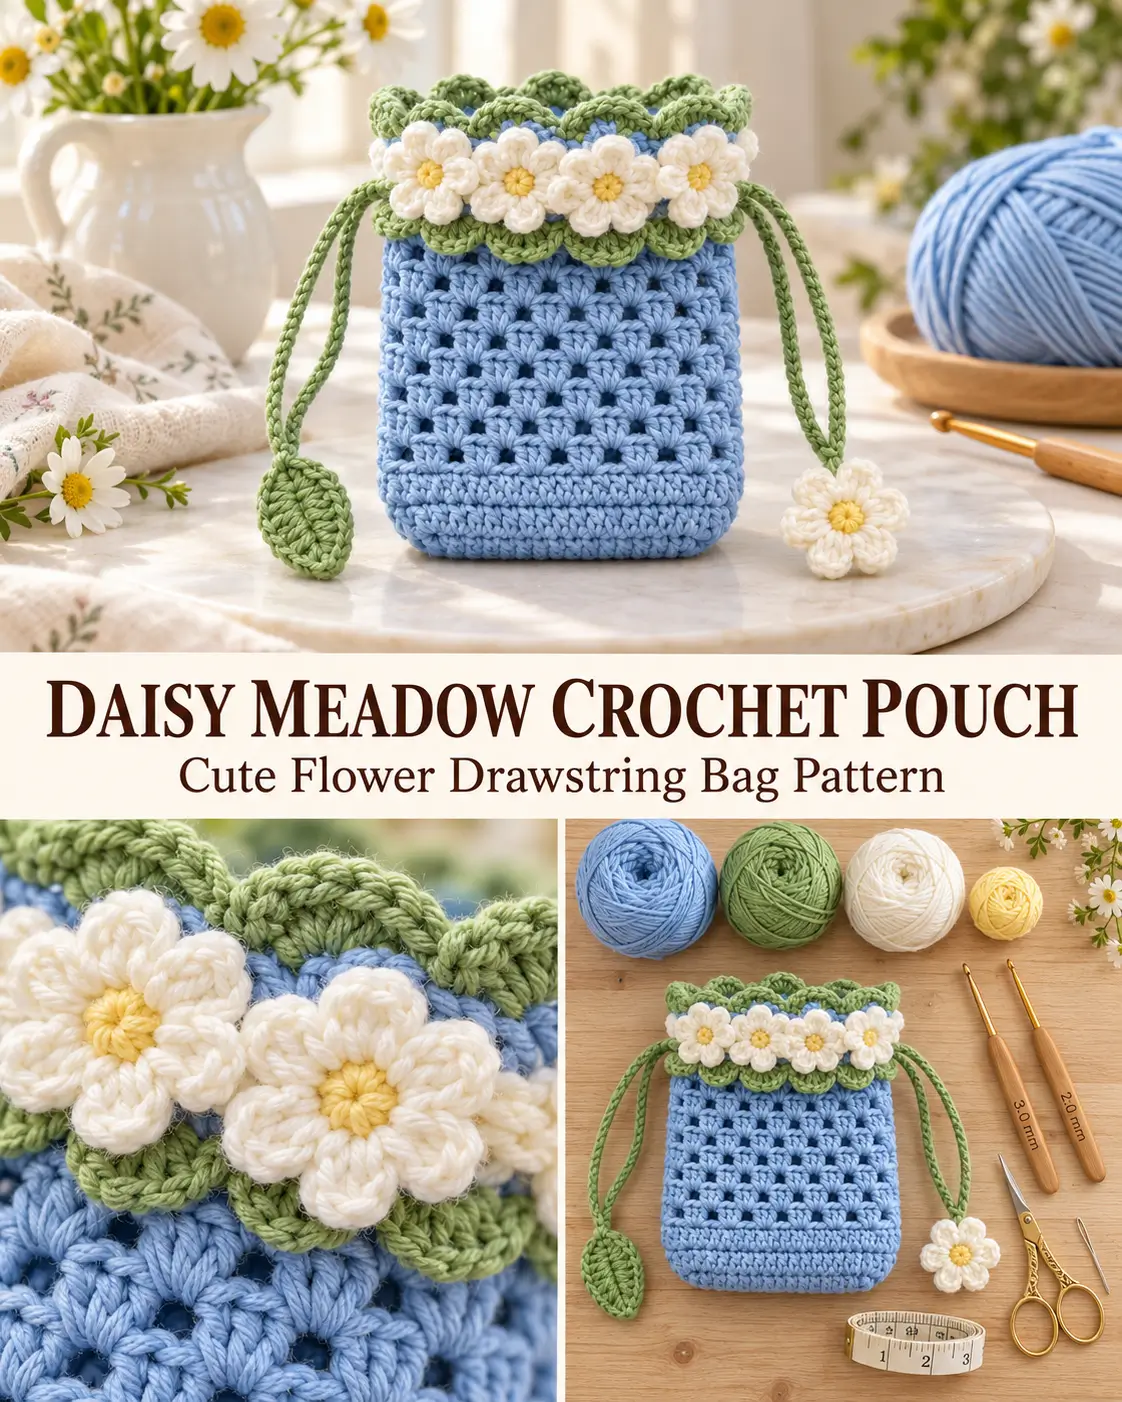
Some crochet projects are so charming that you want to make them the moment you see them.
This adorable Daisy Meadow Crochet Pouch is one of those projects!
With its soft sky-blue body, delicate white daisies, leafy green edging, and matching floral drawstrings, this little bag looks like a miniature flower garden you can carry with you.
The combination of pastel blue, fresh meadow green, creamy white petals, and sunny yellow flower centers gives the pouch a sweet cottagecore appearance.
Even better, it’s not just decorative. The finished pouch can hold small accessories, crochet supplies, hair ties, or other lightweight everyday essentials.
The design includes a sturdy oval base, a textured crochet body, a pretty scalloped flower border, and two functional drawstring cords finished with miniature crochet decorations.
If you enjoy making useful crochet projects with beautiful details, this little daisy bag is a lovely addition to your handmade collection.
Why You’ll Love This Crochet Pouch
- Adorable daisy flower decorations.
- Beautiful pastel blue and green color combination.
- Textured body made with repeating crochet clusters.
- No separate front and back panels to sew together.
- Cute leafy scalloped edging.
- Functional double drawstring closure.
- Decorative flower and leaf charms.
- Perfect for gifts, accessories, and small personal items.
- A fun project for practicing crochet in continuous-looking joined rounds.
The most enjoyable part is watching the simple blue pouch transform into a tiny flower-covered bag.
Crochet Pattern Overview
Pattern name: Daisy Meadow Pouch
Skill level: Intermediate
Crochet terminology: US terms
Construction: Oval base worked upward in joined rounds
Estimated crochet time: Approximately 5–6 hours, depending on experience
Main body color: Pastel sky blue
Accent colors: Meadow green, creamy white, and soft yellow
Main crochet hook: 3.0 mm
Detail crochet hook: 2.0 mm
Yarn: Smooth cotton yarn in suitable thicknesses
Closure: Two crochet drawstrings
Decoration: Eight attached daisies, one double-sided flower charm, and one double-sided leaf charm
The directions below form a complete project plan. Finished size and yarn usage depend on your gauge, and this clarified version has not been physically sample-tested.
Materials You’ll Need
Prepare the following supplies:
- Sky-blue 5-ply cotton yarn for the main bag
- Meadow-green 5-ply cotton yarn for the scalloped rim and drawstrings
- White 4-ply cotton yarn for the flower petals
- Soft-yellow 4-ply cotton yarn for the flower centers
- Green 4-ply yarn for the small leaf charms
- 3.0 mm crochet hook
- 2.0 mm crochet hook
- Tapestry needle
- Scissors
- Stitch markers
- Measuring tape
Yarn note: Ply labels are not standardized across all yarn brands. The original project specifies 5-ply and 4-ply cotton, but match your hook to the actual thickness of your yarn rather than relying on the ply number alone.
Choosing Your Colors
The pouch looks especially beautiful when you maintain the four-color combination shown in the inspiration photograph.
Color A – Pastel Sky Blue
A soft powder blue for the entire pouch body.
Choose a gentle, slightly muted shade rather than a bright royal blue.
Color B – Meadow Green
A fresh botanical green with a slightly muted undertone.
Use it for the scalloped top border, drawstrings, and leaves.
Color C – Creamy White
A soft ivory-white for the daisy petals.
Color D – Pale Yellow
A delicate buttery yellow for the flower centers.
Keeping the colors consistent across all the decorations gives the finished bag a coordinated handmade appearance.
Crochet Abbreviations
All instructions use US crochet terms.
- Ch: Chain
- Sc: Single crochet
- Hdc: Half double crochet
- Dc: Double crochet
- Tr: Treble crochet
- Sl st: Slip stitch
- St: Stitch
- Sp: Space
- Inc: Work two stitches into the same stitch
- Rep: Repeat
- Rnd: Round
Important Pattern Notes
The pouch begins with an oval base, so you’ll work along both sides of the foundation chain.
The first three rounds create a solid bottom.
Rounds 4–15 create the textured blue body.
Round 16 forms the decorative green scalloped edge.
Finally, you’ll crochet the daisies, leaves, and drawstrings before assembling the decorations.
The textured body consists of repeated groups of two double crochets followed by a chain-one space.
Each textured round contains 16 repeating groups.
Turning chains: Unless otherwise stated, the beginning chain 2 or chain 3 is treated according to the individual round instructions. Follow the joining directions carefully to maintain the correct stitch count.
Part 1: Crochet the Sky-Blue Pouch Body
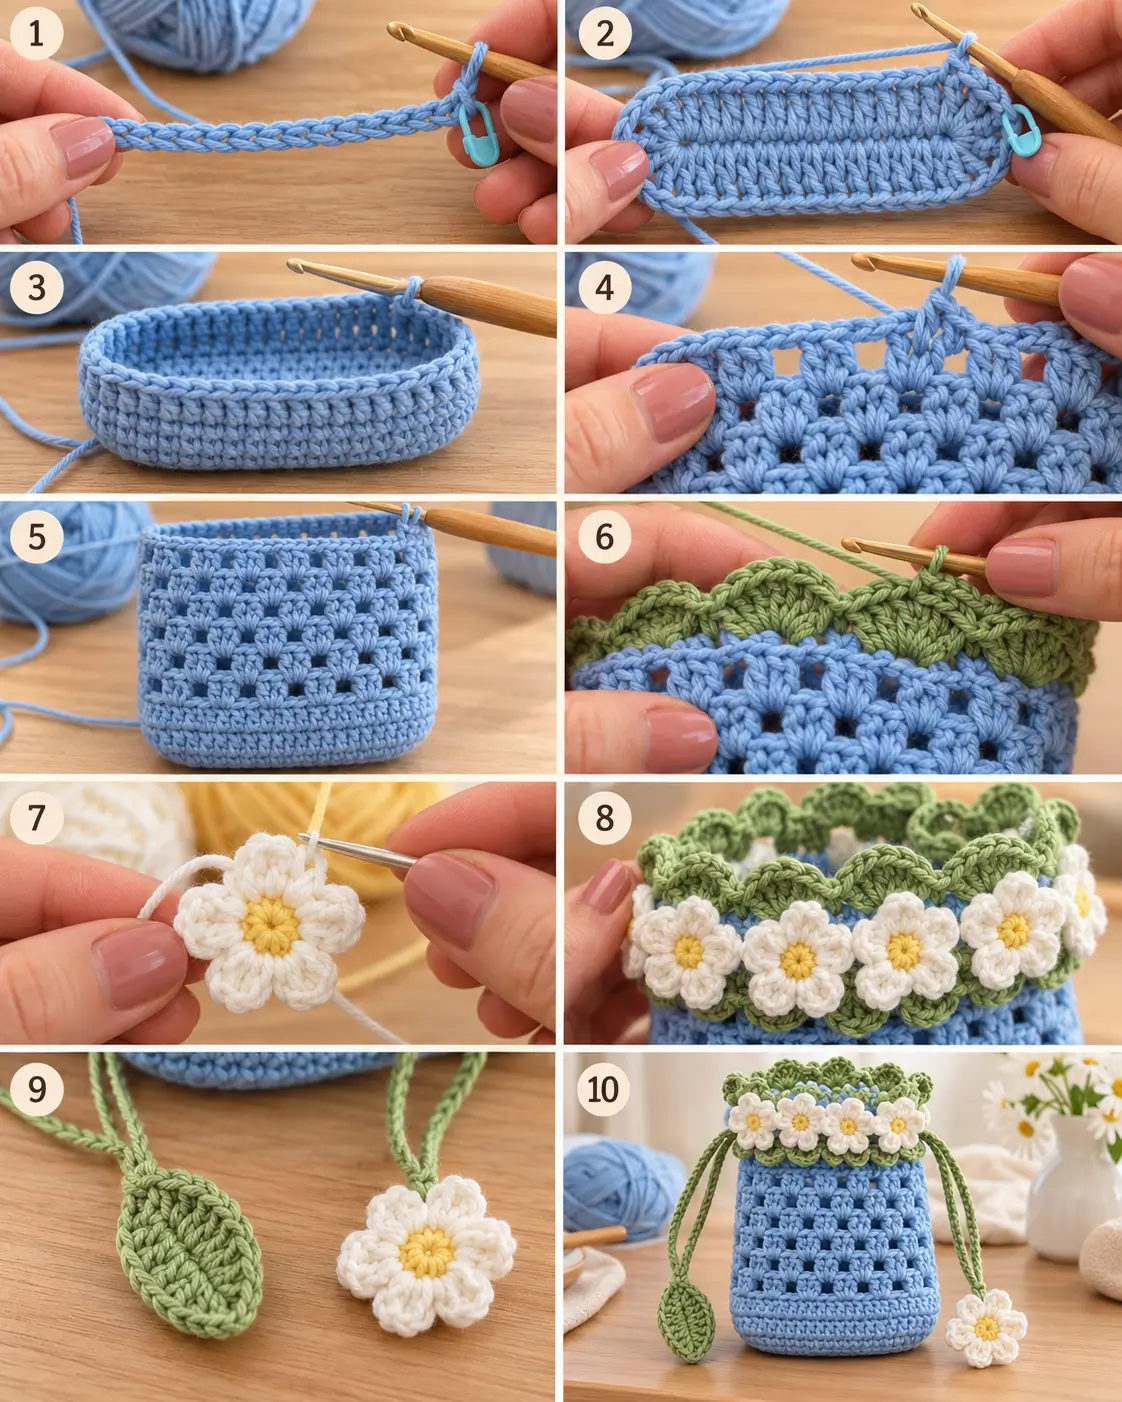
Step 1 – Make the Foundation Chain
Using sky-blue yarn and your 3.0 mm crochet hook:
Chain 18.
Keep the chain reasonably loose so the base can expand without curling.
You’ll crochet around both sides of the foundation chain to create an oval shape.
Place a stitch marker near the beginning so you can identify the first stitch of Round 1.
Round 1 – Create the Oval Base
Use the sky-blue yarn.
- Work 1 double crochet in the second chain from the hook.
- Work 1 double crochet in each of the next 15 chains.
- Work 7 double crochet stitches into the last chain to turn the end of the foundation.
- Rotate your work so you can crochet along the unused loops on the opposite side of the foundation chain.
- Work 1 double crochet into each of the next 15 foundation chains.
- Work 6 additional double crochets into the chain containing your very first double crochet, bringing that end to 7 double crochets in total.
- Slip stitch into the first double crochet to join.
Stitch count: 44 dc.
Your work should now resemble a small elongated oval.
The rounded ends contain seven double crochets each, with fifteen double crochets running along each long side.
This is a clarified oval-start method that preserves the 44-stitch count in your supplied pattern.
Round 2 – Widen the Base
Chain 2. This does not count as a stitch.
Working into the 44 double crochets from the previous round:
- Work 2 dc into the first stitch.
- Work 1 dc in each of the next 16 stitches.
- Work 2 dc into the next stitch.
- Work 1 dc in each of the next 4 stitches.
- Work 2 dc into the next stitch.
- Work 1 dc in each of the next 16 stitches.
- Work 2 dc into the next stitch.
- Work 1 dc in each of the final 4 stitches.
- Slip stitch to the first dc to join.
Stitch count: 48 dc.
You’ve added four stitches to the oval base.
The bottom should feel compact and sturdy.
It may begin to curve upward slightly as the next rounds are worked, which is appropriate for a pouch.
Round 3 – Establish the Bag Walls
Chain 2. This does not count as a stitch.
Work 1 double crochet into each of the 48 stitches around.
Slip stitch to the first double crochet to join.
Stitch count: 48 dc.
You should now have a neat solid base and the beginning of the bag walls.
The next rounds create the decorative texture visible on the main blue body.
Part 2: Crochet the Textured Blue Body
Round 4 – Begin the Cluster Texture
This round changes from solid double crochet to a more decorative stitch arrangement.
You’ll make groups of two double crochet stitches separated by chain-one spaces.
- Chain 3. This counts as the first double crochet.
- Work 1 additional double crochet into the same first stitch.
- Chain 1.
- Skip the next 2 stitches.
- Work 2 double crochet stitches into the next stitch.
- Chain 1.
- Skip the next 2 stitches.
- Repeat Steps 5–7 until you’ve completed 16 double-crochet pairs around the round.
- Slip stitch into the top of the beginning chain 3.
Stitch structure: 16 groups of 2 dc, with 16 chain-1 spaces.
The two-double-crochet groups create the small raised clusters that give the pouch its characteristic texture.
Round 5 – Continue the Textured Pattern
Slip stitch into the first chain-1 space from the previous round.
- Chain 3. This counts as the first double crochet.
- Work 1 double crochet in the same chain-1 space.
- Chain 1.
- Work 2 double crochet stitches into the next chain-1 space.
- Chain 1.
- Repeat around, placing two double crochet stitches into each chain-1 space and chaining one between groups.
- Slip stitch into the top of the starting chain 3.
Stitch structure: 16 groups of 2 dc and 16 chain-1 spaces.
The new clusters sit in the gaps between the previous round’s clusters.
This creates the slightly staggered, open crochet texture seen in the finished pouch.
Rounds 6–15 – Repeat the Textured Pattern
Repeat Round 5 for each subsequent round.
At the beginning of each round, slip stitch into the next chain-1 space before starting the new pair of double crochets.
Continue making:
2 dc in each chain-1 space, followed by ch 1.
Keep 16 groups of two double crochet stitches around each round.
Work through Round 15.
You should now have:
- Three solid blue base rounds
- Twelve textured blue body rounds
- A neat pouch shape
- Sixteen chain-one spaces around the upper opening
Check the Height
Lay the bag flat and check its proportions.
The bag should look like a small drawstring pouch, wider at the bottom than a narrow bottle bag, with enough height to show several rows of blue textured clusters.
Your final dimensions depend on yarn and gauge.
The fabric should remain flexible enough to gather when the drawstrings are pulled.
Part 3: Crochet the Green Scalloped Flower Border
Round 16 – Meadow Green Scallops
Change to meadow-green yarn.
Join the green yarn into any chain-1 space along the upper edge.
You’ll work eight rounded shell sections, using two chain spaces for each shell-and-slip-stitch repeat.
Scallop Instructions
- Chain 1. This does not count as a stitch.
- In the same chain-1 space, work:
- 2 double crochet
- 2 treble crochet
- 2 double crochet
- Slip stitch into the next chain-1 space.
- In the following chain-1 space, work another group of:
- 2 dc
- 2 tr
- 2 dc
- Slip stitch into the next chain-1 space.
- Repeat this scallop-and-slip-stitch sequence around the entire top edge.
You should have 8 green scallops.
Fasten off and weave in the green yarn ends.
What the Border Should Look Like
The upper edge should form a series of small, rounded green leaf-like shapes.
Each scallop has taller treble crochets in the center, giving it a softly curved appearance.
The finished edging should resemble a row of little green leaves around the top of the pouch.
Part 4: Crochet the White Daisy Flowers
You’ll make 10 small daisy motifs in total.
Eight flowers decorate the pouch itself.
The remaining two flowers are sewn together to create one double-sided daisy charm for the drawstring.
Daisy Flower – Make 10
Use your 2.0 mm crochet hook and the finer cotton yarn.
Round 1 – Yellow Flower Center
Using pale-yellow yarn:
- Make a magic ring.
- Work 6 single crochet stitches into the ring.
- Pull the ring closed.
- Slip stitch into the first single crochet.
- Fasten off.
Stitch count: 6 sc.
You now have a small yellow center.
Round 2 – White Flower Petals
Join white yarn into any single crochet stitch.
Each yellow stitch supports one rounded white petal.
For each petal:
- Slip stitch into the indicated yellow single crochet.
- Chain 2.
- Work 3 double crochet stitches into that same stitch.
- Chain 2.
- Slip stitch into the same stitch to close the petal.
Repeat this sequence in each of the remaining five yellow single crochet stitches.
You should have 6 white petals around the yellow center.
Fasten off, leaving a long sewing tail on the flowers intended for attachment.
Shape the Flowers
Gently spread the white petals with your fingers.
The daisy should have a small rounded yellow center and six soft white petals.
Keep the flowers relatively compact so they fit neatly along the upper edge of the bag.
Repeat until you’ve made all 10 flowers.
Part 5: Crochet the Green Leaf Charms
You’ll make 2 small leaves and sew them together around the ends of one drawstring.
Use green yarn and the 2.0 mm hook.
Leaf Pattern – Make 2
Foundation
Chain 7.
Work Along the First Side
- Work 1 sc into the second chain from the hook.
- Work 1 hdc into the next chain.
- Work 1 dc into each of the next 2 chains.
- Work 1 hdc into the next chain.
- Work 3 sc into the final chain at the tip.
Work Along the Opposite Side
Rotate the work so you can crochet along the unused loops of the foundation chain.
- Work 1 hdc into the next chain.
- Work 1 dc into each of the next 2 chains.
- Work 1 hdc into the next chain.
- Work 1 sc into the final chain.
- Slip stitch into the first single crochet to close.
Fasten off, leaving a long tail for sewing.
Your leaf should have a softly pointed oval shape.
Repeat to make a second matching leaf.
Optional Leaf Vein
For a more detailed finish, embroider a subtle center vein using a few small green stitches.
Keep the vein simple so the leaf remains flexible.
Part 6: Crochet the Two Drawstring Cords
Use meadow-green yarn and the 3.0 mm crochet hook.
First Cord
Make a slip knot and chain 100.
Fasten off, leaving a sewing tail.
Second Cord
Repeat to make another 100-chain cord.
Both cords should be approximately the same length.
The number of chains may need adjusting depending on your yarn and tension. Each cord must be long enough to travel all the way around the pouch and leave two useful ends outside.
How to Thread the Drawstrings
The drawstrings pass through the chain-one spaces of Round 13, below the scalloped edge.
Cord 1:
- Choose a starting opening on the left side of the pouch.
- Thread the cord through successive chain-one spaces around Round 13, passing alternately inside and outside the fabric.
- Continue around the full circumference.
- Bring the second end out beside the first end on the left.
Cord 2:
- Begin on the right side of the pouch, opposite the first cord.
- Weave the second cord around Round 13 in the same manner.
- Bring both ends out together on the right.
When the two cords are pulled outward in opposite directions, the pouch opening should gather closed.
Check the operation of both cords before attaching the decorative charms.
Part 7: Attach the Flowers Around the Pouch
Take eight of your completed daisies.
These will decorate the upper green border.
Placement
Arrange four flowers across the front of the pouch and four around the back.
Position each daisy near the center of a green scallop, slightly below the scalloped top edge.
The white petals should sit in front of the green background, creating a layered meadow appearance.
Sewing
- Thread a white sewing tail onto a tapestry needle.
- Position the flower on the green border.
- Sew through the flower center and nearby green stitches.
- Add a few stitches behind the petals if needed.
- Secure the yarn on the inside of the pouch.
- Weave in the remaining end.
Repeat for all eight daisies.
Important: Avoid sewing through the drawstring channels. The green cords should still slide freely.
Part 8: Make the Decorative Drawstring Charms
The pouch has two different charms: a small white daisy and a green leaf.
White Daisy Drawstring Charm
Take the two remaining daisy motifs.
- Place them together with wrong sides facing inward.
- Align the petals.
- Position the ends of the right-hand drawstring cord between the flower layers.
- Sew the flower layers together around their outer edges, securing both cord ends inside.
- Fasten off securely.
You now have one double-sided daisy charm hanging from the right drawstring.
Green Leaf Drawstring Charm
Take the two green leaves.
- Place the leaves together with wrong sides facing inward.
- Position both ends of the left-hand drawstring between the leaf layers.
- Sew around the leaf edges, securing the cord ends inside.
- Keep the pointed leaf shape neat.
- Fasten off and weave in the ends.
You now have a matching green leaf charm on the opposite drawstring.
The two different charms create an especially sweet botanical finish.
Part 9: Final Assembly and Finishing
Your pouch is almost complete!
Check the Flower Placement
Make sure the eight daisies are evenly arranged around the upper rim.
The white flowers should form a charming continuous floral band above the textured blue body.
Test the Drawstrings
Hold one charm in each hand and pull the cords outward.
The top should gather into a softly ruffled opening.
Loosen the cords again to reopen the pouch.
Secure Every Yarn End
Use a tapestry needle to weave in any loose ends.
Check the points where the flowers, leaves, and drawstrings are attached.
Shape the Pouch
Gently arrange the green scallops and white daisies with your fingers.
If needed, lightly dampen and reshape the decorations according to your yarn’s care instructions.
Avoid stretching the pouch body excessively.
Your adorable Daisy Meadow Crochet Pouch is complete!
What Can You Use This Crochet Pouch For?
This charming little bag works beautifully as a:
- Small accessory pouch
- Hair-tie and hair-clip holder
- Jewelry storage bag
- Crochet stitch-marker pouch
- Handmade gift packaging
- Small craft-supply organizer
- Decorative cottagecore accessory
Because the body uses an open textured stitch, tiny items may slip through the gaps.
For loose jewelry or very small accessories, add a fabric lining.
Easy Ways to Customize Your Daisy Pouch
Make a Pink Daisy Pouch
Replace the blue body yarn with dusty blush pink.
Keep the green edging and white daisies for a soft romantic appearance.
Create a Lavender Meadow Pouch
Use pastel lavender yarn for the body, sage-green edging, and cream flowers.
This version has a gentle springtime color palette.
Make a Strawberry-Inspired Pouch
Use muted strawberry-red yarn for the body and fresh green for the scalloped border.
Replace the white daisies with small cream blossoms for a garden-inspired look.
Make the Pouch Taller
Add more textured rounds before working the green scalloped border.
For example, work two to four additional blue pattern rounds.
Remember to move the drawstring channel to a round approximately three rows below the new upper edge.
Make the Pouch Wider
For a wider pouch, adjust the foundation chain and oval base.
However, the textured body requires a stitch count divisible by three, so recalculate the final base round to accommodate complete two-double-crochet-and-chain-one repeats.
Add a Fabric Lining
A simple lightweight cotton lining can help prevent tiny items from falling through the decorative openings.
Choose cream, pale blue, or a small floral print that complements the yarn.
Sew the lining below the drawstring channel so it doesn’t restrict the cords.
Helpful Tips for Beautiful Results
Maintain even tension. The blue textured rounds should form neat, consistent clusters.
Count your stitches. The 48-stitch base supports 16 repeated textured groups.
Use finer yarn for the flowers. This keeps the daisies delicate and proportional to the pouch.
Secure the drawstring charms. The flower and leaf decorations should be firmly attached to the cord ends.
Avoid overcrowding the rim. The eight small daisies should sit neatly across the green border without completely hiding the scallops.
Test the closure before finishing. It’s easier to adjust a cord before attaching its charm.
Frequently Asked Questions
Is the Daisy Meadow Pouch beginner-friendly?
The project is best for confident beginners or intermediate crocheters. The main body uses familiar stitches, but the oval base, shell edging, and double drawstring assembly require some attention.
How many flowers do I need?
You need 10 individual daisies.
Eight are attached around the upper edge.
The remaining two are sewn together to create one double-sided daisy charm.
How many leaves do I need?
Make two identical leaves and sew them together to create one double-sided leaf charm.
Does the pouch need a lining?
Not necessarily, but a lining is useful if you plan to store small items that could slip through the crochet openings.
Can I use acrylic yarn?
Yes, although cotton generally provides crisp stitch definition and works particularly well for this small structured pouch.
Can I make the drawstrings longer?
Absolutely. Add more chains to both cords, making sure they remain the same length.
Can I make this pouch without flowers?
Yes. The blue textured body and green scalloped edging make an attractive little pouch on their own.
However, the white daisies are the feature that gives this design its distinctive meadow appearance.
More Beautiful Crochet Projects to Try
If you love this flower-covered crochet pouch, try these projects next:
- Easy crochet daisy granny square bag
- Mini crochet flower drawstring pouch
- Crochet floral coin purse
- Beginner-friendly crochet tote bag
- Cute crochet strawberry pouch
- Small crochet gift bags
- Spring flower granny square accessories
Final Thoughts
The Daisy Meadow Crochet Pouch is a wonderful example of how a simple crochet bag can become something special with a few thoughtful details.
The soft blue texture forms a lovely base, while the scalloped green edging and little white daisies add a charming garden-inspired finish.
And those decorative drawstrings—with a miniature flower on one side and a tiny leaf on the other—make the pouch even more delightful.
Whether you’re making it for yourself, preparing a handmade gift, or adding a new floral accessory to your crochet collection, this little project is full of personality.
Enjoy every stitch, have fun making the tiny daisies, and watch your own miniature crochet meadow come to life.