Crochet Brown Patchwork Cardigan – Easy Step-by-Step Tutorial
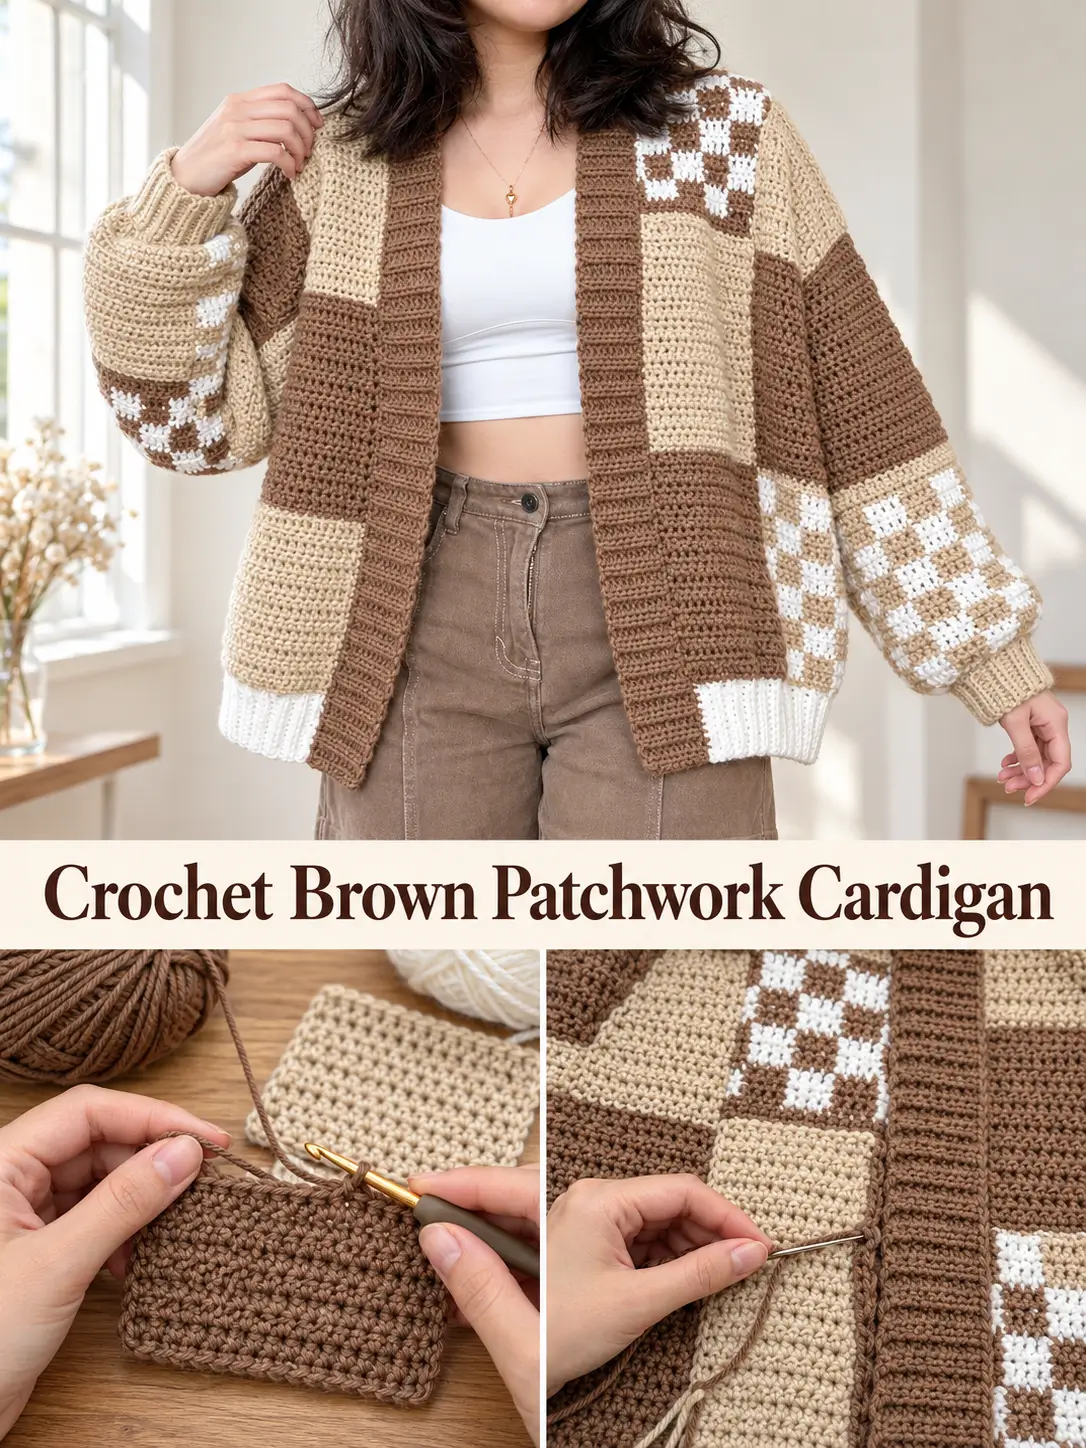
There’s something so cozy and timeless about a handmade crochet cardigan, especially when it combines warm brown, soft beige, and creamy white yarn. This Crochet Brown Patchwork Cardigan brings those beautiful neutral shades together in a relaxed, oversized design that’s perfect for layering over your everyday outfits.
What makes this cardigan special is its mix of simple solid-color crochet patches and playful two-color checkerboard sections. The different blocks create a beautiful handmade patchwork effect without needing complicated stitches or intricate shaping.
If you can crochet a chain and work half double crochet stitches, you already know most of the techniques needed for this project. The main challenge isn’t the stitches themselves—it’s making all your patches consistent and taking your time with the assembly.
In this tutorial, we’ll work through the yarn choices, patch construction, checkerboard technique, cardigan layout, sleeve assembly, and finishing details so you can create your own version of this beautiful neutral patchwork cardigan.
Why You’ll Love This Crochet Patchwork Cardigan
- Beginner-friendly stitches: Most of the cardigan uses simple half double crochet.
- Beautiful neutral palette: Chocolate brown, warm beige, and soft white look lovely together.
- Customizable fit: Adjust the size of your patches to create a shorter, longer, slimmer, or oversized cardigan.
- Easy-to-manage pieces: Make individual patches before joining everything together.
- Interesting checkerboard details: Two-color patches add personality without complicated shaping.
- Comfortable everyday style: The open front, dropped shoulders, and relaxed sleeves create an easy layering piece.
The finished cardigan has a soft, boxy silhouette with contrasting patches across the body and sleeves. A brown ribbed front band frames the opening, while contrasting cuffs and hem ribbing complete the design.
Materials You’ll Need
For a cardigan similar to the reference design, prepare:
- Medium-weight (#4) acrylic or acrylic-blend yarn in three colors
- Color A: Warm oatmeal beige or Buff
- Color B: Medium coffee brown or Cafe Latte
- Color C: Soft White
- 5 mm crochet hook for the main patches
- 4 mm crochet hook for ribbed cuffs and finishing
- Tapestry needle for joining patches
- Scissors
- Measuring tape
- Stitch markers
- Pins or blocking mats
- Optional: small yarn bobbins for the checkerboard color changes
Red Heart Super Saver is one suitable yarn option. Its Buff, Cafe Latte, and Soft White shades give a color combination close to the original inspiration.
Yarn consumption depends on your cardigan size, sleeve length, stitch tension, and desired fit. Make a sample patch and weigh it to estimate how much yarn you’ll need before producing the full set.
Skill Level
Confident beginner.
You’ll need to know how to make chains, half double crochet stitches, slip stitches, and basic seams. The checkerboard squares are an excellent introduction to changing colors within a crochet row.
Crochet Abbreviations (US Terms)
| Abbreviation | Meaning |
|---|---|
| ch | Chain |
| st / sts | Stitch / stitches |
| hdc | Half double crochet |
| BLO | Back loop only |
| sl st | Slip stitch |
| sc | Single crochet |
| rep | Repeat |
| RS | Right side |
| WS | Wrong side |
How to Make a Half Double Crochet
Yarn over, insert your hook into the indicated stitch, yarn over, and pull up a loop. You should now have three loops on your hook. Yarn over once more and pull through all three loops.
This single stitch forms the main fabric throughout the cardigan.
Gauge and Sizing
As a starting reference, a half double crochet gauge of approximately 20 stitches and 14 rows per 4 inches (10 cm) can be used.
Always make a gauge swatch before starting. Your yarn, hook, and tension may produce different measurements.
The following patch sizes provide starting points for adapting the cardigan:
| Size range | Starting chain | HDC per row | Starting rows |
|---|---|---|---|
| XS–M | 28 | 27 | 20 |
| L–2XL | 32 | 31 | 25 |
| 3XL–5XL | 36 | 35 | 30 |
These are patch starting counts, not guaranteed finished garment dimensions. This version is designed to be customized using your actual blocked patch measurements.
For the assembly illustrated below, the back consists of three patches across and four patches vertically. Each front panel has one patch across and four vertically.
Before making every patch, crochet one complete sample, block it, and measure its width and height.
Use these measurements to estimate:
- Back width: three patch widths
- Body length before ribbing: four patch heights
- Sleeve circumference: approximately two patch widths
- Sleeve length before cuffs: approximately two patch heights
Because this is an open-front cardigan, the two front panels intentionally do not meet across the entire chest. If you prefer more front coverage, wider panels, or a closed cardigan, increase their width before committing to the full set.
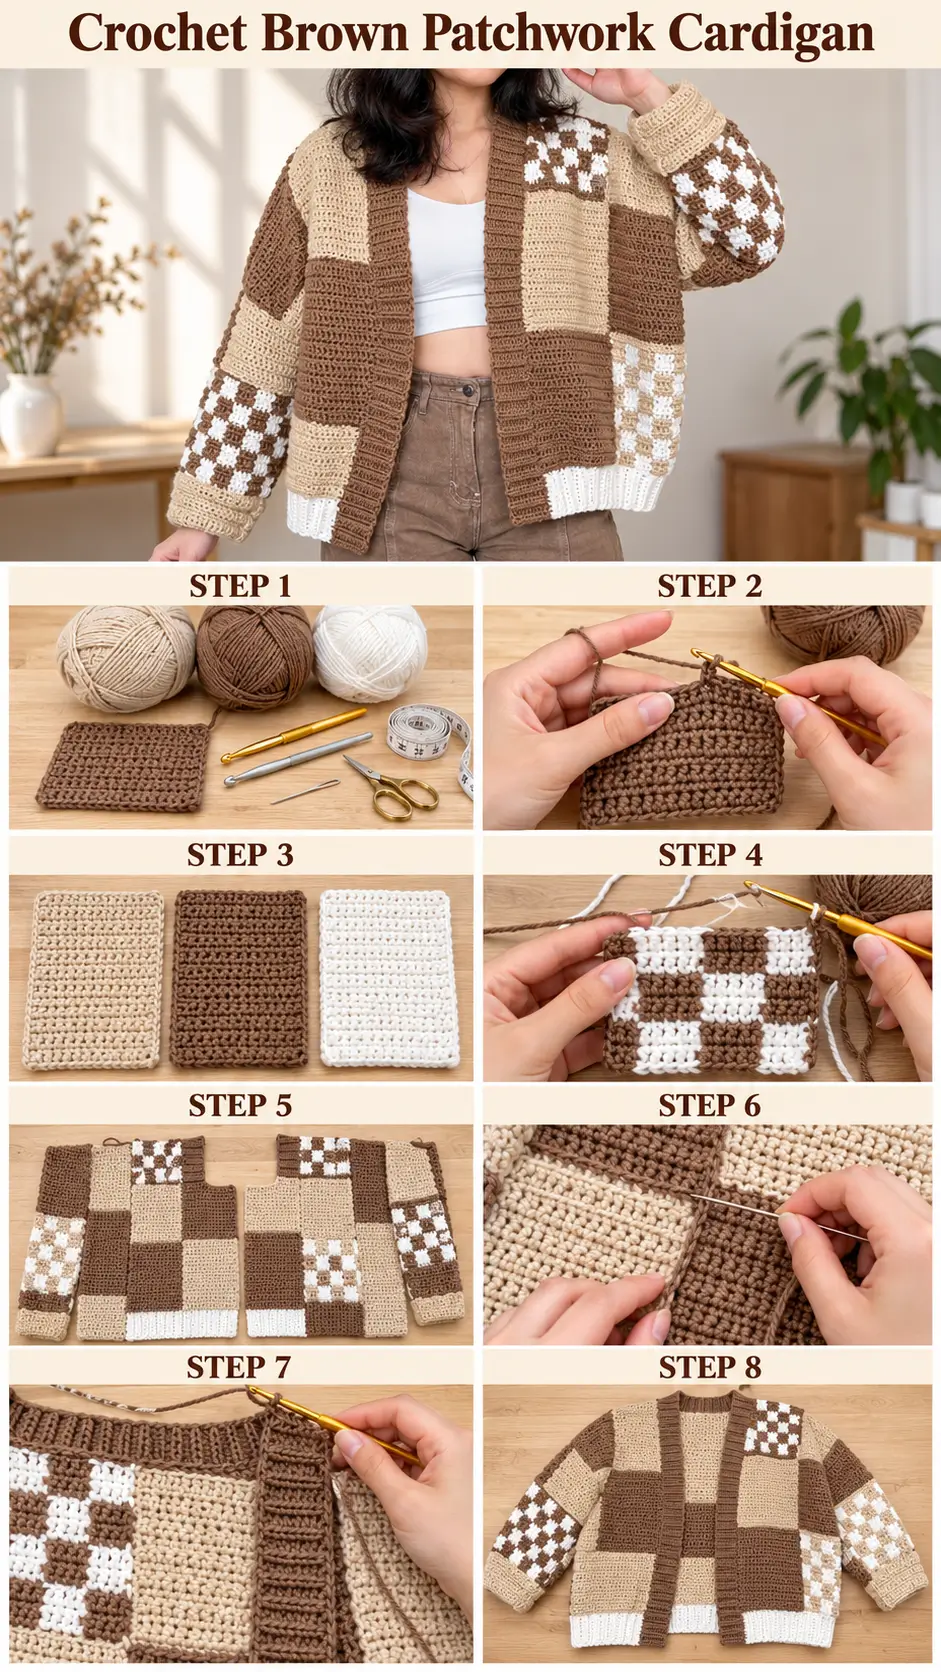
Step 1: Crochet the Basic Solid-Color Patches
We’ll begin with the easiest part: making the individual fabric blocks.
For the smaller-size starting example, use the 5 mm hook.
Foundation: Chain 28.
Row 1: Work one half double crochet in the second chain from the hook and in every remaining chain. You should have 27 stitches.
Row 2: Chain 2 and turn. Work one half double crochet in each of the 27 stitches. The turning chain does not count as a stitch.
Rows 3–20: Repeat Row 2 until your patch reaches the required height.
Fasten off, leaving enough yarn for weaving in the end.
Repeat this process in both warm beige and medium brown.
The patches should have a firm but flexible fabric. Avoid pulling your yarn too tightly, because overly stiff squares can make the finished cardigan uncomfortable.
Important: Lay each new patch beside your first blocked sample. All patches should finish at the same dimensions, even if you need a small adjustment in row count.
Step 2: Make the Two-Color Checkerboard Patches
The checkerboard patches are what give this cardigan its eye-catching character.
Use combinations of coffee brown and soft white, or oatmeal beige and soft white.
For a 27-stitch-wide patch, divide your stitches into four vertical sections:
7 stitches + 7 stitches + 7 stitches + 6 stitches = 27 stitches.
We’ll alternate two yarn colors across these sections.
Checkerboard Row Pattern
For a 20-row patch:
| Rows | Block 1 | Block 2 | Block 3 | Block 4 |
|---|---|---|---|---|
| 1–5 | Brown | White | Brown | White |
| 6–10 | White | Brown | White | Brown |
| 11–15 | Brown | White | Brown | White |
| 16–20 | White | Brown | White | Brown |
Read the block arrangement as the patch appears from its right side. When crocheting a wrong-side row, work across those blocks in the reverse visual order.
This creates alternating rectangular color sections that resemble a small checkerboard.
How to Change Yarn Colors Neatly
When you reach the last half double crochet stitch before a color change:
- Yarn over and insert the hook into the stitch.
- Yarn over and pull up a loop.
- Before completing the stitch, drop the working color.
- Yarn over with the new color and pull through all three loops.
- Continue working with the new color.
Use separate small bobbins where practical instead of carrying long strands behind large color blocks.
This prevents visible floats from spoiling the clean checkerboard effect.
For taller patches, continue alternating the color sections in five-row bands, adjusting the final band’s height as needed.
Tip: Make several checker patches with brown and white, and a few with beige and white. This variation helps the finished cardigan look balanced rather than overly repetitive.
Step 3: Arrange All the Crochet Patches
Now comes the creative part.
For the pictured style of cardigan, we’ll use a practical 28-patch arrangement:
- 9 solid beige patches
- 9 solid brown patches
- 10 two-color checkerboard patches
The 28 patches form the main body and sleeves. Ribbed trim is added separately.
You can change their positions to create your own patchwork pattern, but the following layout provides a balanced mix of neutral colors.
Patch key:
- A = Beige patch
- B = Brown patch
- C = Checkerboard patch
Back Panel — 12 Patches
Arrange three patches across and four rows down.
| Row (top to bottom) | Left | Center | Right |
|---|---|---|---|
| 1 | A | C | B |
| 2 | B | A | C |
| 3 | C | B | A |
| 4 | A | B | C |
Place the patches on a clean flat surface with their right sides facing upward.
Take a photograph of your arrangement before sewing, so you can refer to it during construction.
Front Panels — 8 Patches
Make two narrow vertical panels, each containing four patches.
Left front (top to bottom): C, A, B, B.
Right front (top to bottom): C, A, B, A.
This arrangement places checkerboard details near both shoulders, giving the cardigan a similar visual emphasis to the reference.
Sleeves — 8 Patches
Each sleeve uses four patches arranged in two rows of two.
Left sleeve:
| Top row | C | B |
|---|---|---|
| Bottom row | A | C |
Right sleeve:
| Top row | B | A |
|---|---|---|
| Bottom row | C | C |
The checkerboard sections should feel scattered naturally across the sleeves rather than appearing perfectly symmetrical.
Before sewing, check that all patch edges align.
Step 4: Join the Back Panel
Place the three patches from the first back row beside one another, right sides facing upward.
Using a tapestry needle and coordinating yarn, sew the adjacent edges together.
A mattress stitch works especially well because it creates a relatively flat seam without a heavy raised ridge.
Continue joining the remaining rows.
Once you have four horizontal strips, connect those strips together to form one large rectangular back panel.
Keep the seams smooth and avoid pulling too tightly.
A tight joining seam can cause the patches to bunch together, creating an uneven cardigan.
When complete, lay the back panel flat and measure the finished width and length.
Step 5: Assemble the Two Front Panels
Arrange the four patches for the left front panel vertically.
Join their horizontal edges, creating one long strip.
Repeat with the right front.
Next, place both front panels over the back panel with the right sides facing inward.
Align the upper outside corners of the fronts with the outside top corners of the back.
Sew each front shoulder edge to its corresponding outer top-back patch.
Leave the middle section of the upper back open for the neckline.
You should now have a cardigan body that opens down the front.
Before continuing: Try the body over your shoulders, or place it against a well-fitting cardigan.
Check the shoulder width, body length, and amount of front opening. It’s much easier to adjust these dimensions before adding the sleeves and edging.
For a more rounded neckline, you may replace the upper inner corners of the front patches with separately shaped pieces, rather than adding extra patches to the outside of the panels.
Step 6: Sew the Side Seams
Fold the front panels against the back with the right sides together.
Align the outer side edges.
Starting at the bottom hem, sew upward along each side.
Stop before reaching the shoulder to leave an opening for the sleeve.
A useful starting point is to leave approximately the height of the uppermost patch open, but the correct armhole depth depends on your actual blocked patch dimensions and desired upper-arm circumference.
Make both armholes the same size.
Turn the body right side out and check that the cardigan hangs evenly.
The front panels should fall naturally without twisting or pulling at the shoulders.
Step 7: Crochet and Assemble the Sleeves
Take the four patches set aside for the first sleeve.
Arrange them into a two-by-two rectangle and sew the adjoining edges together.
Repeat for the second sleeve.
Each sleeve panel is now two patches wide and two patches long.
Bring the two long outer edges of the sleeve panel together, with right sides facing inward, and seam them to form a tube.
Leave both ends open: one for the wrist and the other for attachment to the body.
Before closing the sleeve seam permanently, check that the wider opening will fit the armhole and allow comfortable movement around the upper arm.
If the patch measurements create a sleeve that’s too narrow, add width to the sleeve panel before assembly.
Attach the Sleeves to the Cardigan
Turn the cardigan inside out.
Insert the sleeve into the armhole, with right sides facing together.
Match the sleeve’s underarm seam to the body’s side seam.
Pin the remaining circumference evenly around the armhole.
Carefully sew the sleeve in place, distributing any small differences in fabric length without creating gathers or puckers.
Repeat on the other side.
Turn the cardigan right side out and try it on.
At this point, the basic patchwork cardigan is complete, but the edges still need their finishing details.
Step 8: Crochet the Ribbed Sleeve Cuffs
The cuffs help the wide patchwork sleeves sit comfortably around the wrists.
Use warm beige yarn and a 4 mm crochet hook.
Foundation: Chain 13.
Row 1: Work half double crochet in the third chain from the hook and every remaining chain. You’ll have 11 stitches.
Row 2: Chain 2, turn, and work one half double crochet in the back loop only of each stitch.
Continue: Repeat Row 2 until the ribbed strip is long enough to wrap comfortably around your wrist.
Join the short ends of the strip to form a cuff.
Attach the cuff to the bottom of the sleeve, evenly distributing the wider sleeve fabric around the smaller cuff.
Repeat to make the second cuff.
Working into the back loops creates the raised lines that give ribbing its familiar stretchy appearance.
Keep the cuffs comfortably fitted rather than tight.
Step 9: Add the Bottom Ribbing
The soft white ribbed hem provides a lovely contrast against the darker patchwork body.
With the 4 mm hook and Soft White yarn:
Foundation: Chain 10.
Row 1: Work half double crochet in the third chain from the hook and across. You should have 8 stitches.
Row 2: Chain 2, turn, and work half double crochet through the back loop of every stitch.
Repeat Row 2 until the ribbing reaches the measured length of the cardigan’s entire lower edge, running from one front corner, around the back, to the opposite front corner.
Don’t rely on a fixed row count if your patch measurements differ from the sample.
Pin the ribbing along the bottom edge, stretching it only gently where needed.
Sew it into place with a matching yarn needle.
The white ribbing should form a tidy lower border without making the hem flare.
Step 10: Crochet the Brown Front and Neck Band
One of the prettiest details of this cardigan is the medium-brown edging that runs around the open front and neckline.
It creates a clean frame that visually connects the different patch colors.
With Cafe Latte yarn and the 5 mm hook:
Foundation: Chain 8.
Row 1: Work one half double crochet in the third chain from the hook and each remaining chain. You’ll have 6 stitches.
Row 2: Chain 2, turn, and work half double crochet in the back loop only across the row.
Continue repeating Row 2 to make a long ribbed strip.
The strip should reach from the bottom of one front edge, up around the neckline, and down the opposite front edge.
Measure this path on the cardigan before deciding the final number of rows.
Pin the band in position, making sure the ribbing sits flat around the neck and front opening.
Carefully sew it to the cardigan.
At the corners or neckline curves, ease the strip gently rather than stretching it too tightly.
The finished brown band should have visible vertical ridges and a consistent width.
Step 11: Weave In Ends and Block the Cardigan
Once the cardigan is completely assembled, inspect all the seams.
Use your tapestry needle to weave in any loose yarn tails.
Check that:
- The shoulders are positioned evenly.
- Both sleeves are approximately the same length.
- The cardigan opens smoothly at the front.
- The cuffs sit comfortably around the wrists.
- The brown collar lies flat.
- None of the joining seams are excessively tight.
If your yarn’s care instructions allow it, lightly wet-block or steam-block the cardigan.
For acrylic yarn, avoid pressing a hot iron directly onto the stitches, since excessive heat can permanently flatten or damage the fibers.
Lay the cardigan flat and arrange it into its intended shape.
Allow it to dry completely before wearing.
How to Customize Your Brown Patchwork Cardigan
One of the biggest advantages of a patchwork cardigan is that you can modify its appearance without learning a completely new crochet technique.
Make It More Oversized
Increase the dimensions of your main patches or add extra width to the body panels. Remember to adjust the sleeve openings accordingly so the proportions remain comfortable.
Make a Cropped Version
Use fewer vertical rows of patches or reduce the height of each patch.
Check the finished body length before sewing on the bottom ribbing.
Add More Checkerboard Details
Create additional two-color patches and replace a few plain beige or brown blocks.
For the most balanced appearance, distribute the patterned patches between the shoulders, body, and sleeves.
Change the Color Palette
Although brown and beige give this design its cozy neutral style, the same method works with sage green and cream, dusty pink and ivory, or gray and white.
Stick with yarns of similar weight and texture so the patches behave consistently.
Common Mistakes to Avoid
Uneven Patch Sizes
If some patches are larger than others, the seams may pull or ripple.
Check stitch counts regularly and measure each patch before joining.
Tight Seams
A seam that’s tighter than the crochet fabric may make the cardigan stiff.
Use gentle tension and allow the fabric to retain its natural flexibility.
Uneven Checkerboard Sections
Count your color sections carefully and plan every change before beginning a new row.
Using small bobbins helps reduce tangled strands and prevents long yarn floats.
Making the Sleeves Too Narrow
A sleeve that looks wide when laid flat can become smaller after seaming.
Measure the sleeve circumference before joining the tube and check it against your upper-arm measurement.
Skipping a Fitting Check
Patchwork panels can change size after blocking.
Try on or measure the cardigan body before finishing the sleeves and bands, especially if you’re making a custom size.
How to Style Your Crochet Patchwork Cardigan
This cardigan looks beautiful with simple everyday clothing.
Wear it over a fitted white top and high-waisted brown jeans for a coordinated neutral outfit.
For a softer look, pair it with light-wash denim and a plain cream T-shirt.
You can also layer it over a simple dress or wear it with comfortable trousers for a relaxed autumn outfit.
Because the patchwork already contains several colors and textures, simple clothing and accessories help the cardigan remain the center of attention.
Frequently Asked Questions
Is this cardigan suitable for beginners?
Yes. The main crochet technique is half double crochet, and the cardigan is assembled from separate panels. Beginners should practice one solid patch and one checkerboard patch before producing the full set.
How many crochet patches do I need?
The layout described in this tutorial uses 28 main patches for the body and sleeves. If you change the construction, neckline shaping, or cardigan dimensions, you may need a different number.
Can I use cotton yarn?
Yes, although cotton may create a heavier and less elastic cardigan. Choose a yarn that feels comfortable against your skin and works well with the recommended gauge.
Can I make the cardigan without checkerboard patches?
Absolutely. Replace all the checkerboard sections with solid-color patches. The assembly method remains the same.
How do I wash my finished cardigan?
Follow the care instructions on your yarn label. When in doubt, gently hand-wash in cool water and lay flat to dry. Avoid hanging a heavy wet cardigan, as this can stretch the fabric.
Final Thoughts
A Crochet Brown Patchwork Cardigan is a wonderful project for anyone who enjoys building a larger handmade garment from simple, manageable pieces.
The combination of warm beige, rich coffee brown, and soft white gives the cardigan a classic look, while the alternating checkerboard sections make each finished piece feel unique.
Take your time creating consistent patches, arrange the colors carefully, and pay extra attention to the joining seams. With patience, you’ll have a comfortable handmade cardigan that’s just as enjoyable to wear as it is to create.
Save this crochet patchwork cardigan tutorial for later, and enjoy creating your own cozy neutral cardigan!