How to Crochet Beautiful Roses – Easy Crochet Flower Tutorial
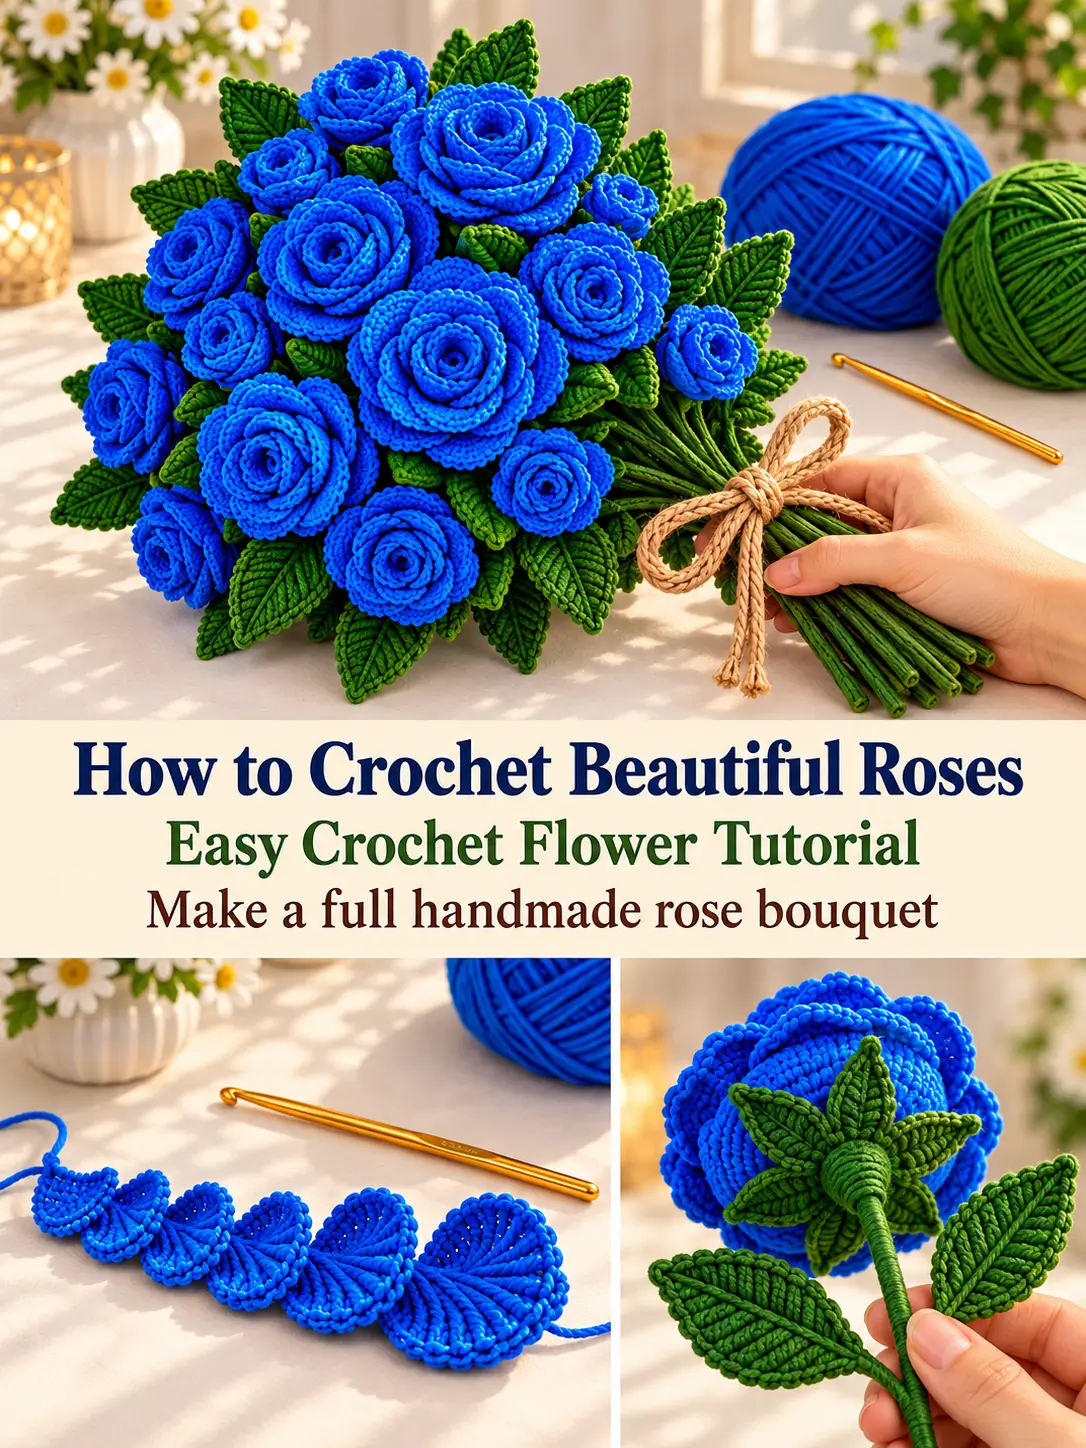
These crochet roses are designed to create the full, layered flower look shown in the reference image: tightly curled centers, gradually larger outer petals, green calyxes, shaped leaves, and sturdy wrapped stems that can be arranged into a realistic handmade bouquet.
The flower itself is surprisingly approachable. Each rose begins as one long strip of graduated petals. The strip is rolled into a spiral, sewn securely at the base, and finished with a crocheted calyx and leaves.
This version is a recreated, workable crochet design based on the visible construction idea in the reference image. It is not claimed to be the original designer’s exact pattern.
Pattern Details
Skill level: Advanced beginner / intermediate
Terminology: US crochet terms
Finished rose size: Approximately 3–4 inches across
Small rose: Approximately 2.5–3 inches across
Suggested hook: 3–3.5 mm
Yarn: DK / #3 cotton or cotton blend
The tighter hook size is intentional. A very large hook would create loose petals and would not give the compact layered rose shape shown here.
Materials
For one rose:
- DK / #3 yarn in flower color
- DK / #3 green yarn
- 3–3.5 mm crochet hook
- tapestry needle
- scissors
- 18–20 gauge floral wire or floral stem
- wire cutters
- optional floral tape
- stitch marker
For a full bouquet of approximately 16 flowers:
- 180–250 g flower-color yarn
- 100–150 g green yarn
- approximately 16 floral stems
- natural jute cord or ribbon for finishing
Crochet Abbreviations
- ch – chain
- sl st – slip stitch
- sc – single crochet
- hdc – half double crochet
- dc – double crochet
- tr – treble crochet
- st / sts – stitch / stitches
- sp – space
- MR – magic ring
The abbreviation k2tog is a knitting term and is not needed for this crochet pattern.
Main Crochet Rose
Each full-size rose contains 18 petals divided into three sizes:
- 5 small center petals
- 6 medium petals
- 7 large outer petals
This gradual increase is what gives the finished flower a realistic spiral shape.
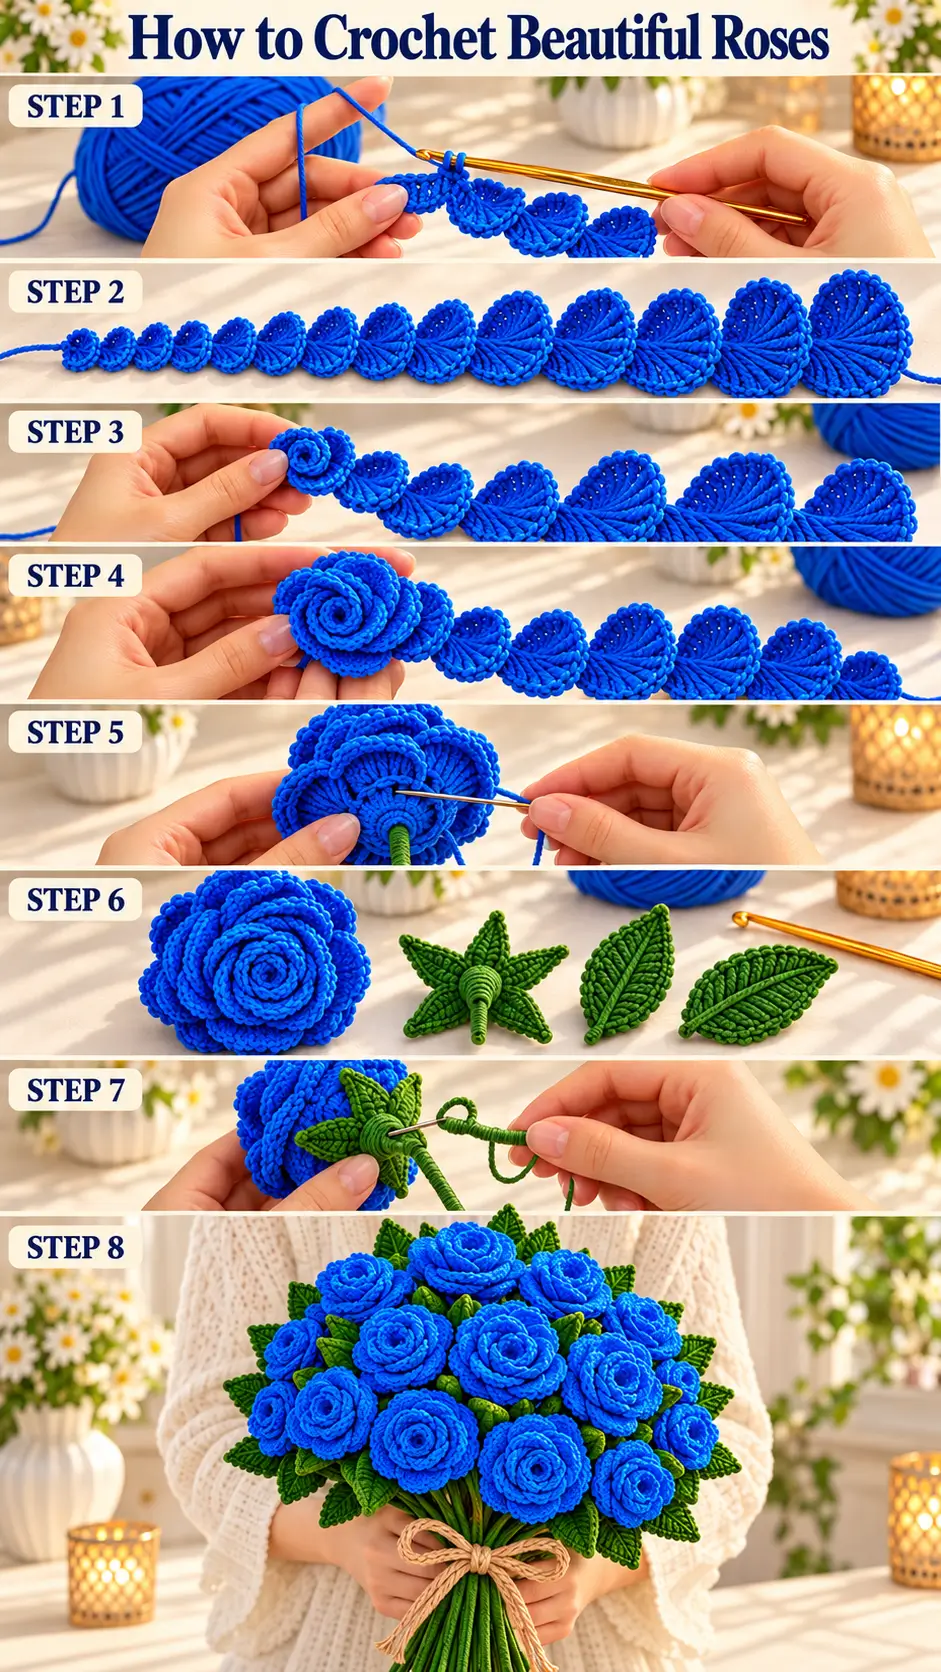
Rose Foundation
With your flower-color yarn:
Ch 55.
Row 1
Work:
(dc, ch 2, dc) in the 4th chain from the hook.
Then repeat:
Skip 2 ch, (dc, ch 2, dc) in next ch
across the foundation chain.
You should finish with 18 V-stitch sections.
Each ch-2 space becomes one petal.
Do not fasten off.
Crochet the Petals
Ch 1 and turn.
All stitches for each petal are worked into the corresponding ch-2 space.
Petals 1–5: Small Center Petals
In each of the first 5 ch-2 spaces work:
(sc, 5 dc, sc)
These smaller petals form the tight center of the rose.
Petals 6–11: Medium Petals
In each of the next 6 ch-2 spaces work:
(sc, 7 dc, sc)
The flower should now begin to look noticeably fuller.
Petals 12–18: Large Outer Petals
In each of the remaining 7 ch-2 spaces work:
(sc, 9 dc, sc)
You should now have:
- 5 small petals
- 6 medium petals
- 7 large petals
18 petals total.
Fasten off, leaving approximately 24–30 inches of yarn for assembly.
How to Roll the Rose
Lay the finished strip flat with all petals pointing upward.
Begin at the end containing the smallest petals.
Form the Center
Roll the first small petal tightly into a little tube.
Wrap the second petal around it.
Continue wrapping Petals 3–5 around the center.
Each new petal should overlap approximately half of the previous petal.
Keep the lower foundation edge roughly level while rolling.
Form the Middle
Continue rolling the six medium petals around the center.
Do not make these as tight as the first petals.
Rotate each new petal slightly around the flower so they create a natural spiral instead of stacking directly behind one another.
Form the Outer Rose
Wrap the final seven large petals more loosely.
Let the top edges open outward slightly.
The final two or three petals should be the most relaxed and open.
This creates the classic rose silhouette.
Secure the Rose
Thread the long yarn tail onto a tapestry needle.
Turn the rose upside down.
The foundation strip should form a spiral underneath.
Insert the needle through several layers of the foundation edge.
Pull snugly.
Rotate the flower slightly and sew through another section.
Make at least 5–6 strong securing passes around different parts of the base.
Avoid sewing through the visible petal tops.
Knot securely underneath.
The rose should stay together even when lifted from the base.
Shape the Petals
Use your fingers to adjust the rose.
Keep:
- center petals tightly curled
- medium petals slightly open
- outer petals gently flared
Do not flatten the flower.
A small amount of irregularity makes the rose look more natural.
Crochet the Green Calyx
The calyx covers the sewn underside and creates a neat base for the stem.
With green yarn:
Make an MR.
Round 1
Work 5 sc into MR.
Join with sl st to first sc.
You now have five base stitches.
Make Five Sepals
From the first sc:
Ch 6.
Starting in the 2nd ch from hook:
- sl st
- sc
- hdc
- dc
- tr
Sl st into the same base stitch.
Sl st into the next sc.
Repeat the same sequence from each of the remaining four base stitches.
You should have 5 pointed sepals.
Fasten off leaving a long sewing tail.
Attach the Calyx
Place the green calyx underneath the completed rose.
The five points should extend outward slightly beneath the blue or colored petals.
Using the green yarn tail, sew through:
- the calyx
- the hidden foundation stitches underneath the rose
Work all the way around.
Keep the very center of the calyx accessible for attaching the stem.
Crochet Leaf
Make several leaves for the bouquet.
With green yarn:
Ch 12.
Starting in the 2nd ch from hook:
- sc
- hdc
- dc in next 2
- tr in next 3
- dc in next 2
- hdc
- 5 sc in the final chain
Now continue down the opposite side of the foundation chain:
- hdc
- dc in next 2
- tr in next 3
- dc in next 2
- hdc
- sc
Join with sl st.
Fasten off with a long tail.
The finished leaf should have a long pointed oval shape.
Add a Raised Leaf Vein
For the more detailed leaf appearance visible in the bouquet:
Join green yarn at the bottom center of the leaf.
Surface slip stitch directly along the original foundation chain toward the leaf tip.
Fasten off.
Do not pull the surface stitches too tightly.
Gently curve the leaf with your fingers afterward.
Make the Crochet Stem
A bouquet this large needs an internal support.
Crochet alone will generally not hold a rose upright.
Use approximately 10–12 inches of floral wire for each flower.
Prepare the Wire
Bend about ½ inch at the top of the wire into a small closed loop.
This prevents the sharp end from pushing into or through the flower.
Crochet Around the Wire
Make a green slip knot.
Hold the wire directly above the working yarn.
Insert your hook underneath the wire.
Yarn over.
Pull the loop underneath and around the wire.
Yarn over and complete a single crochet.
Continue making sc stitches around the wire, pushing them closely together.
Cover nearly the entire stem.
Do not leave large visible gaps between stitches.
Fasten off securely.
Attach the Stem to the Rose
Position the small wire loop against the center underside of the rose.
Do not push an exposed sharp wire through the flower.
Using green yarn:
Sew around the wire loop and through the calyx/base several times.
Work from several directions.
Pull firmly enough that the stem cannot rotate loosely underneath the flower.
Finish by sewing the calyx snugly around the attachment point.
Attach the Leaves
Position a leaf approximately 1–2 inches below the flower.
Place its base against the crocheted stem.
Using the leaf’s long yarn tail, sew and wrap it securely around the stem.
Add another leaf slightly lower and on the opposite side.
For the most natural bouquet, vary the leaf placement.
Some stems can have:
- 1 leaf
- 2 leaves
- 3 leaves
Avoid making every stem exactly identical.
Smaller Crochet Rose
Smaller roses add depth to the bouquet.
With flower-color yarn:
Ch 43.
Create 14 V-stitch sections using the same foundation method:
(dc, ch 2, dc) with 2 chains skipped between sections.
Then work:
First 4 petals
(sc, 5 dc, sc)
Next 5 petals
(sc, 7 dc, sc)
Final 5 petals
(sc, 9 dc, sc)
Roll and assemble using the same method as the full-size flower.
The finished rose will be approximately 20–25% smaller.
Large Open Rose
Use this version for a few focal flowers in the bouquet.
Make the normal 18-petal rose, but change the final seven outer petals to:
(sc, 2 dc, 5 tr, 2 dc, sc)
These petals are taller and flare outward more dramatically.
Use these larger petals only for a few flowers so the bouquet still has visual variation.
Bouquet Recipe
For a bouquet similar in fullness to the reference image, make approximately:
- 5 large open roses
- 7 regular roses
- 4 small roses
Total:
16 crochet roses
Make approximately 24–32 leaves.
You can make fewer flowers for a smaller bouquet.
Arrange the Crochet Bouquet
Begin with three large flowers.
Hold them together in the center.
Add four regular roses around them.
Position these slightly lower than the center flowers.
Add the remaining roses around the outside.
Rotate the bouquet as you work.
Do not place every flower at exactly the same height.
For a rounded bouquet:
- center flowers = highest
- middle flowers = about ½–1 inch lower
- outer flowers = another ½–1 inch lower
This produces a natural dome shape.
Position the Leaves
Before permanently binding the bouquet, pull several leaves outward between the flowers.
Concentrate the leaves around:
- the outer perimeter
- small spaces between flowers
- the underside of the bouquet
Avoid covering the rose centers.
The green should frame the flowers rather than dominate them.
Secure the Bouquet
Once you like the arrangement, hold all stems firmly together.
Approximately 3 inches below the flower heads, wrap strong green yarn around the stems 10–15 times.
Tie securely.
Continue wrapping another inch or two downward if you want a clean bundled appearance.
Finish the Bouquet
Trim the floral stems so they are approximately equal in length.
For the style shown in the reference, leave about 7–8 inches of visible stem underneath the flowers.
Wrap the stem bundle neatly with green yarn or floral tape.
Finish with a natural jute cord or ribbon tied into a bow.
Helpful Tips
Keep the petal stitches tight
The rose looks best when the center petals hold their shape. Cotton and cotton-blend yarns work especially well.
Do not roll every petal equally
The center needs to be tight while the outer petals need room to open.
Sew through the foundation, not the petals
This keeps the visible flower clean.
Make flowers in several sizes
A bouquet containing identical roses can look artificial. A mixture of small, medium, and open roses looks much more natural.
Keep stems strong
For display bouquets, internal floral wire makes a major difference.
Use different colors
This same pattern works beautifully in:
- royal blue
- burgundy
- dusty rose
- cream
- lavender
- butter yellow
- terracotta
- soft peach
Crochet Rose FAQs
Can I make the roses without wire?
Yes, if you are using them for appliqués, wreaths, gift toppers, or decorations.
For an upright bouquet, wire or another flexible floral stem is strongly recommended.
Can I use worsted-weight yarn?
Yes.
A #4 yarn with approximately a 3.5–4.5 mm hook will produce a larger flower.
You may need stronger stems because the finished flowers will be heavier.
Can I use chenille yarn?
You can, but chenille hides much of the petal definition.
Smooth cotton or cotton-blend yarn gives the clearest layered rose.
Why is my rose too flat?
The most common causes are:
- rolling the flower too loosely from the beginning
- flattening the outer petals
- not sewing the foundation spiral securely underneath
Keep the first five petals tight.
Why does my rose look like a spiral instead of a flower?
Overlap the petals while rolling instead of placing every new petal directly behind the previous one.
Also loosen the final outer petals.
Final Result
This pattern creates a complete crochet rose bouquet from individual handmade components:
18-petal roses → calyxes → shaped leaves → covered stems → bouquet assembly.
The biggest visual secret is the gradual petal sizing. Small petals make the tight center, medium petals build volume, and large petals produce the recognizable open rose shape.
Once you make the first flower, the remaining roses use exactly the same construction, making this a very repeatable project for bouquets, handmade gifts, wedding décor, table arrangements, or permanent flower displays.