Easy Crochet Mikasa Scarf Pattern – Beautiful Ribbed Winter Scarf With Fringe
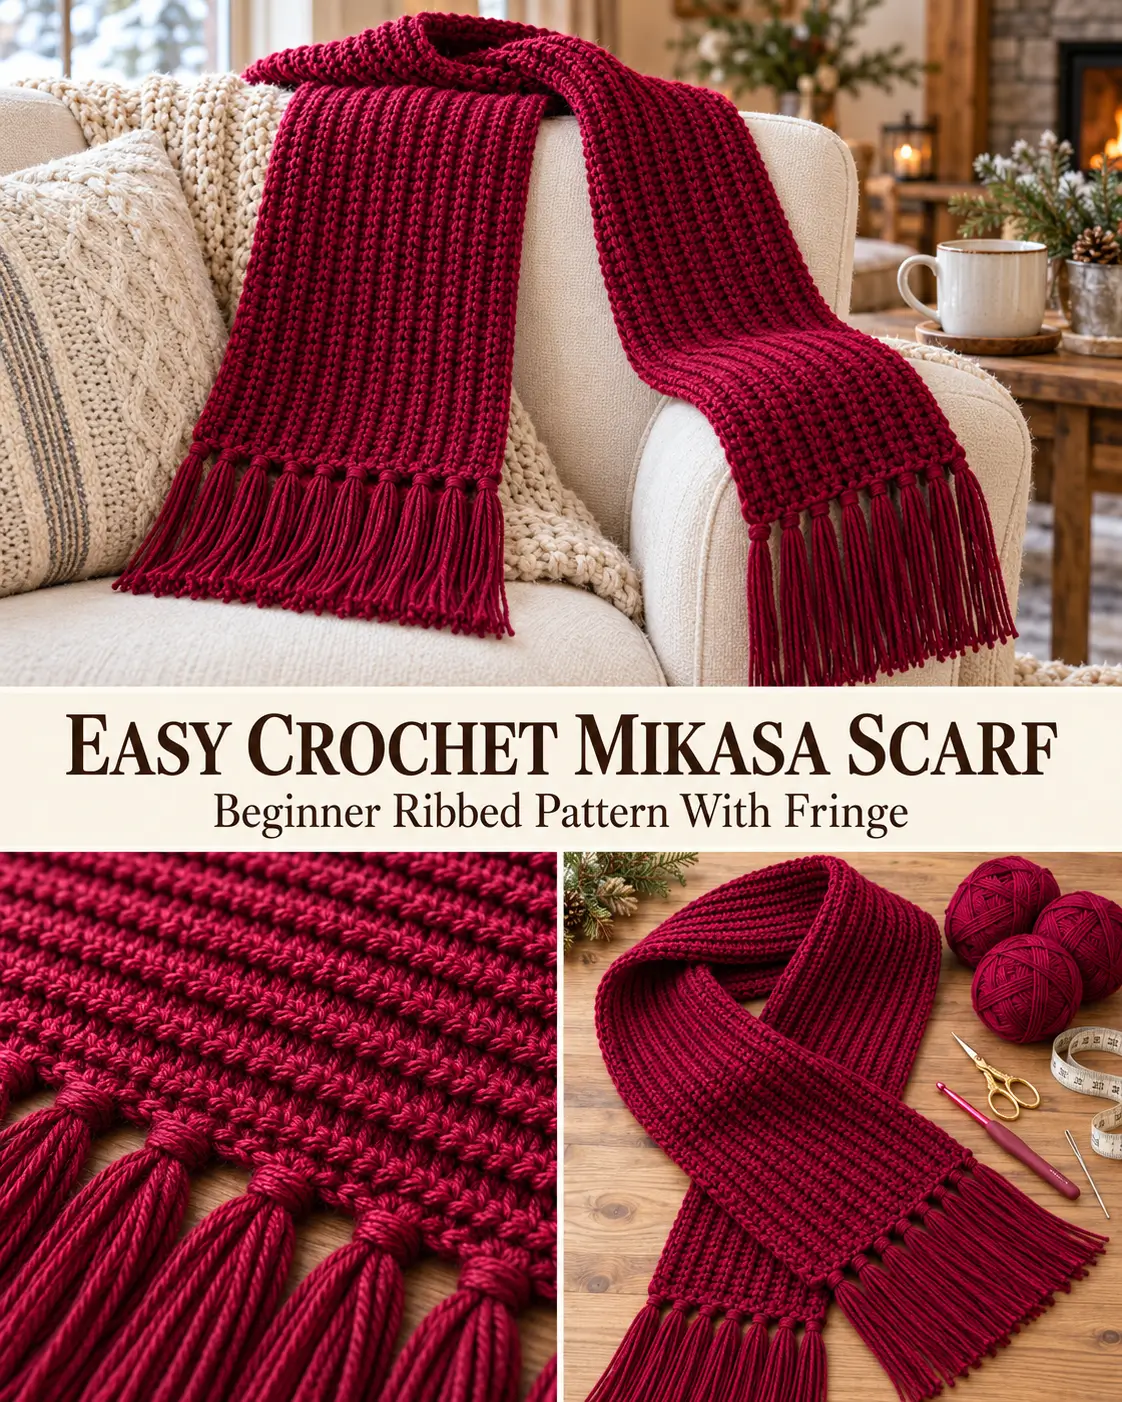
If you love simple crochet projects that look beautiful when finished, this easy crochet Mikasa-style scarf is a wonderful winter accessory to make. Its rich burgundy-red color, elegant ribbed texture, and long flowing fringe create a cozy handmade scarf that looks stylish without requiring complicated stitches.
The design is inspired by the classic deep-red scarf style, featuring a long rectangular shape and beautiful raised horizontal ridges that run across the fabric.
What makes this crochet scarf especially appealing is how simple the stitch combination is. You only need to know how to make a chain, single crochet, and half double crochet.
By alternating these two basic stitches and working through the back loops, you can create a beautifully textured fabric with subtle ridges.
The scarf is crocheted lengthwise, which means you’ll begin with a long foundation chain that determines the finished scarf’s length. Additional rows gradually build its width.
Once the scarf reaches your preferred width, you’ll finish both short ends with soft yarn fringe.
Whether you’re making a handmade gift, preparing for colder weather, or looking for an easy crochet scarf pattern for beginners, this beautiful ribbed design is a lovely choice.
Why You’ll Love This Crochet Scarf
This pattern combines an easy stitch repeat with a beautiful, wearable result.
- Beginner-friendly stitches: Made with single crochet and half double crochet.
- Beautiful raised ridges: Back-loop stitches create a subtle ribbed texture.
- Classic burgundy color: Deep wine red gives the scarf a cozy, timeless appearance.
- Simple rectangular construction: No complicated increases, decreases, or shaping.
- Soft and comfortable: The flexible ribbed fabric drapes nicely around the neck.
- Customizable dimensions: Adjust the foundation chain and number of rows to change the length and width.
- Decorative fringe: Long matching tassels add movement and a stylish finishing touch.
- Versatile design: Suitable for everyday winter outfits and handmade gifts.
The repeating pattern is easy to remember, making this an enjoyable project for relaxing crochet sessions.
Crochet Mikasa Scarf Pattern Details
Skill level: Beginner
Crochet terminology: US terms
Construction: Worked lengthwise in turned rows
Main stitch pattern: Alternating half double crochet and single crochet rows
Special technique: Back-loop-only crochet
Yarn color: Deep burgundy or wine red
Recommended yarn: Soft acrylic or acrylic-wool blend
Crochet hook: 4.5 mm
Foundation chain: 230 chains
Stitches per row: 228
Target scarf length: Approximately 60 inches before fringe
Target scarf width: Approximately 6–7 inches
Fringe: Long matching yarn tassels at both short ends
Yarn amount: Approximately 150 grams was used in the demonstrated version; actual requirements vary by yarn and dimensions.
The scarf’s finished dimensions depend on your gauge. Measure your foundation chain and growing fabric rather than assuming that every 230-chain scarf will have the same length.
Materials You’ll Need
Prepare the following supplies before starting:
- Approximately 150 grams of soft burgundy acrylic yarn, with extra available for the fringe
- 4.5 mm crochet hook
- Scissors
- Yarn needle
- Measuring tape
- Stitch markers
- A sturdy piece of cardboard approximately 7 inches wide for cutting fringe
- Optional ruler or straightedge for trimming the fringe
Choosing the Best Yarn
The demonstrated scarf uses 100% acrylic yarn described as three-ply.
However, the number of plies does not necessarily determine yarn thickness. Different three-ply yarns can have very different weights.
For a similar result, choose a smooth acrylic yarn that works comfortably with a 4.5 mm hook.
You want a fabric that feels soft, flexible, and comfortable rather than excessively stiff.
A deep burgundy or wine-red shade is ideal for reproducing the elegant appearance of the pictured scarf.
Other attractive options include cranberry red, cherry red, dark rose, charcoal gray, and warm cream.
For this version, we’ll use deep burgundy throughout the scarf and fringe.
Crochet Abbreviations
| Abbreviation | Meaning |
|---|---|
| ch | Chain |
| sc | Single crochet |
| hdc | Half double crochet |
| sl st | Slip stitch |
| BLO | Back loop only |
| st / sts | Stitch / stitches |
| RS | Right side |
| WS | Wrong side |
| rep | Repeat |
Crochet Stitches Used
Chain Stitch (ch)
Yarn over and pull the yarn through the loop on your hook.
Repeat to create the required number of chains.
Single Crochet (sc)
Insert your hook into the indicated stitch.
Yarn over and pull up a loop.
Yarn over again and pull through both loops on the hook.
You have completed one single crochet.
Half Double Crochet (hdc)
Yarn over.
Insert your hook into the indicated stitch.
Yarn over and pull up a loop.
You should now have three loops on your hook.
Yarn over and pull through all three loops.
You have completed one half double crochet.
Back-Loop-Only Crochet (BLO)
Look at the top of a crochet stitch.
You’ll see two loops forming a small V shape.
The loop closest to you is the front loop.
The loop farthest from you is the back loop.
For back-loop-only crochet, insert your hook beneath the back loop instead of both loops.
Leaving the front loop unworked creates a visible horizontal ridge.
These ridges give the scarf its beautiful ribbed texture.
Understanding the Crochet Ribbed Pattern
The texture is created by alternating two simple rows.
The first type of row uses half double crochet stitches.
The second type uses single crochet stitches.
After the foundation row, both stitches are worked through the back loops.
The different stitch heights create subtle variations in the fabric, while the unworked front loops form raised lines.
As you continue crocheting, these ridges develop into a repeating horizontal texture across the length of the scarf.
The design is simple enough for beginners but produces an attractive finished fabric.
Important Pattern Notes
Before beginning, remember these details:
- The scarf is worked lengthwise, not from one narrow end to the other.
- The foundation chain determines the scarf’s length.
- The number of completed rows determines its width.
- The beginning chain 1 and chain 2 do not count as stitches.
- The first half double crochet row is worked into the foundation chain.
- All following single crochet and half double crochet stitches are worked through the back loops.
- Each row contains 228 stitches.
- Turn your work at the end of every row.
- Keep your foundation chain relaxed so the scarf doesn’t pull inward.
- The fringe is attached to the two short ends after the scarf body is complete.
Step-by-Step Instructions
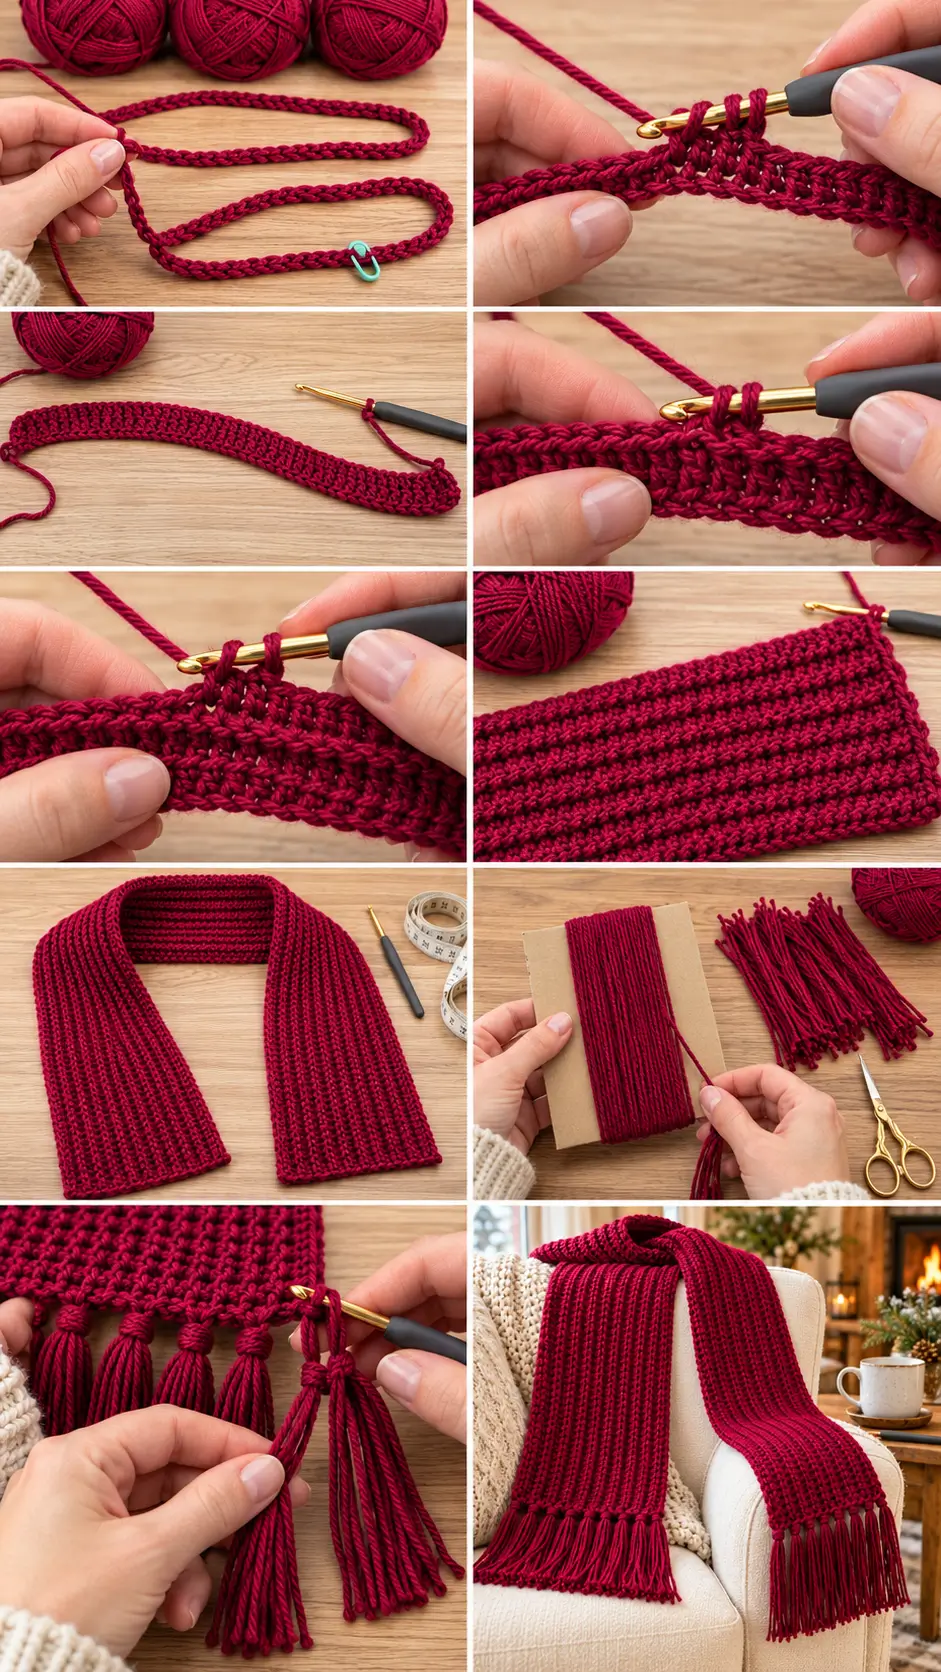
Part 1: Create the Long Foundation Chain
Step 1 – Make the Slip Knot
Begin with your burgundy yarn and 4.5 mm crochet hook.
Make a slip knot and place it on your hook.
Adjust the loop so it fits comfortably around the hook shaft.
Avoid tightening it excessively.
Step 2 – Chain 230
Chain 230.
Because this is a relatively long foundation chain, it’s helpful to use stitch markers while counting.
For example, place one stitch marker after completing 50 chains.
Add another after 100 chains, another after 150, and another after 200.
Then crochet the remaining 30 chains.
This method makes it easier to keep track of your count without repeatedly starting over.
You should finish with exactly 230 foundation chains.
Check Your Foundation Length
Gently lay the chain along a flat surface without stretching it.
Measure its length.
The target scarf length is approximately 60 inches, although the finished measurement may change slightly when the first row is worked.
If your chain is noticeably shorter or longer than desired, adjust the number of chains now.
You do not need a special stitch multiple for this pattern.
Part 2: Crochet the First Half Double Crochet Row
Step 3 – Work Row 1
Row 1 (RS):
Yarn over and insert your hook into the third chain from the hook.
Work 1 half double crochet.
Continue working 1 hdc into each remaining chain.
At the end of the foundation chain, turn your work.
Stitch count: 228 hdc.
The first two chains are skipped and do not count as stitches.
What Your First Row Should Look Like
You should now have a long, narrow strip of half double crochet stitches.
The upper edge should be relatively even.
Make sure that you haven’t accidentally skipped any foundation chains.
Because this is the first row, you may notice that it takes longer than later rows.
The following rows are generally easier because you’re working into recognizable crochet stitches rather than foundation chains.
Part 3: Crochet the First Ribbed Row
Step 4 – Work the Single Crochet Row
Row 2 (WS):
Chain 1 and turn.
Look at the top of the first half double crochet stitch.
Identify the back loop.
Insert your hook through the back loop only.
Work 1 single crochet.
Continue working 1 sc BLO in every stitch across the row.
Do not work into the turning chain.
Stitch count: 228 sc BLO.
Why This Row Creates Texture
Working through the back loops leaves the front loops unused.
These unused front loops form a horizontal ridge along the fabric.
The single crochet stitches also create a shorter, denser row than the half double crochet stitches.
This contrast helps define the ribbed appearance.
Part 4: Work the Next Half Double Crochet Row
Step 5 – Crochet Row 3
Row 3 (RS):
Chain 2 and turn.
Yarn over.
Insert your hook into the back loop of the first actual stitch.
Work 1 half double crochet.
Continue working 1 hdc BLO in every stitch across the row.
Stitch count: 228 hdc BLO.
Important Turning Chain Detail
For single crochet rows, use chain 1 before turning.
For half double crochet rows, use chain 2 before turning.
Neither turning chain counts as a stitch.
Always work into the first actual stitch after turning.
Be careful not to skip the first stitch or accidentally add an extra stitch at the end.
Part 5: Continue the Alternating Stitch Pattern
Step 6 – Crochet Row 4
Row 4 (WS):
Chain 1 and turn.
Work 1 sc BLO into each stitch across.
Stitch count: 228 sc BLO.
Step 7 – Crochet Row 5
Row 5 (RS):
Chain 2 and turn.
Work 1 hdc BLO into each stitch across.
Stitch count: 228 hdc BLO.
Step 8 – Repeat the Pattern
Continue alternating these two rows:
Single Crochet Row:
Ch 1, turn. Work 1 sc BLO into each stitch across.
Half Double Crochet Row:
Ch 2, turn. Work 1 hdc BLO into each stitch across.
Repeat until the scarf reaches your preferred width.
For a scarf similar to the reference, aim for approximately 7 inches wide.
If you prefer a slightly narrower scarf, stop at approximately 6 inches.
The exact number of rows will vary depending on your yarn, hook size, and tension.
Stitch Pattern Summary
Foundation: Ch 230.
Row 1: Hdc in 3rd ch from hook and in each remaining ch. Turn. (228 sts)
Row 2: Ch 1, sc BLO in each st across. Turn. (228 sts)
Row 3: Ch 2, hdc BLO in each st across. Turn. (228 sts)
Row 4: Ch 1, sc BLO in each st across. Turn. (228 sts)
Row 5: Ch 2, hdc BLO in each st across. Turn. (228 sts)
Repeat Rows 2–3 until the desired width is reached.
For a neat finishing edge, stop after completing a single crochet row.
Part 6: Measure Your Crochet Scarf
Step 9 – Check the Length and Width
Lay the scarf flat on a clean surface.
Use a measuring tape to check its dimensions.
For this design, aim for:
Length: Approximately 60 inches before fringe.
Width: Approximately 6–7 inches.
You can make the scarf wider simply by working additional rows.
Because the ribbed fabric has some flexibility, avoid stretching it while measuring.
A narrower scarf may feel lighter around the neck, while a wider scarf offers more coverage.
Check the Ribbed Texture
The finished body should show closely spaced horizontal ridges running along the scarf’s length.
The front and back may look slightly different, but both should have an attractive handmade texture.
Gently fold the scarf to see how the fabric drapes.
If it feels too stiff, your stitch tension may be too tight.
If it feels excessively loose, a slightly smaller hook may produce a denser fabric.
Part 7: Finish the Scarf Body
Step 10 – Fasten Off
After completing your final single crochet row, cut the yarn, leaving approximately 6–8 inches.
Pull the yarn tail completely through the final loop.
Thread the tail onto a yarn needle.
Weave it securely into several nearby stitches.
Change direction at least once to help prevent the end from slipping out.
Repeat for the beginning yarn tail.
Your rectangular scarf body is now complete.
The next step is adding the beautiful matching fringe.
Part 8: Make the Crochet Scarf Fringe
The fringe is one of the most recognizable details of this design.
It creates long, soft tassels at both narrow ends of the scarf, giving the finished piece a beautiful flowing appearance.
We’ll use the same burgundy yarn for the fringe.
Step 11: Prepare a Cardboard Fringe Template
Find a sturdy piece of cardboard approximately 7 inches wide.
You can also use a hardcover notebook or another firm object of a similar size.
Wrapping yarn around the template helps create strands of consistent length.
The finished fringe length depends on the size of the template and how much yarn is used in the knot.
For this project, aim for fringe that hangs approximately 6 inches after attachment and trimming.
Step 12: Cut the Fringe Strands
Hold the yarn against the cardboard.
Wrap the yarn around the template repeatedly.
For an initial batch, make approximately 30 wraps.
Carefully cut the yarn loops along one edge of the cardboard.
Remove the cut strands.
You should now have long, reasonably even pieces of burgundy yarn.
If you use a 7-inch-wide template and cut the loops along one edge, the resulting strands will be approximately 14 inches long before folding.
Their finished length will be approximately half that measurement, minus a little length used by the attachment knot.
Continue preparing additional yarn strands as needed.
Step 13: Group the Fringe Strands
For each fringe tassel, take three yarn strands.
Place them together so their ends are aligned.
Fold the three strands in half.
You should now have a loop at the folded end and six loose yarn ends hanging beneath it.
This creates a soft, moderately full tassel.
For thicker fringe, use four or five strands per group.
For lighter fringe, use two strands.
Try to use the same number of strands for every tassel so the finished scarf looks even.
Step 14: Attach the First Fringe Tassel
Lay one short end of the scarf flat on your work surface.
Insert your crochet hook through an edge stitch or a secure row-end space.
Catch the folded loop of the three yarn strands with your hook.
Pull the loop partway through the scarf edge.
Remove your crochet hook.
Pass all six loose yarn ends through the folded loop.
Gently pull the ends to secure the tassel around the scarf edge.
Do not pull excessively tightly.
The knot should sit neatly against the fabric without distorting the edge.
You have attached your first fringe tassel.
Step 15: Continue Adding Fringe
Continue attaching groups of three yarn strands along the short edge.
Space the tassels evenly.
For a scarf approximately 7 inches wide, you might begin with 8–10 tassel groups along each end, then adjust the spacing to suit the number of row-end stitches.
The exact number depends on the width and how closely you prefer the fringe to hang.
Use the ridges in the scarf to help distribute the tassels evenly.
Work from one corner to the other.
Once the first end is finished, repeat the process on the opposite short edge.
Try to use the same number of fringe groups on both ends.
Step 16: Trim the Fringe Evenly
After attaching all the tassels, lay the scarf flat.
Gently separate and straighten the yarn strands with your fingers.
Arrange the fringe so it hangs in the same direction.
Place a ruler or straightedge across the tassels at the length you want.
Use sharp scissors to trim the fringe into a straight line.
Work slowly to avoid cutting the scarf itself.
Repeat the same process on the opposite end.
The two fringe sections should now be approximately equal in length.
Optional: Make the Fringe Fuller
If you prefer a thicker fringe, you can attach additional tassels between the existing groups, provided the edge has enough space.
Alternatively, use more yarn strands in each group.
Keep the weight of the fringe balanced on both ends.
Part 9: Final Finishing
Step 17: Inspect the Scarf
Check that:
- The ribbed rows are even.
- Both long edges are reasonably straight.
- The yarn tails are securely woven in.
- The fringe knots are attached firmly.
- The tassels are evenly distributed.
- Both fringe sections have approximately the same length.
Gently smooth the scarf with your hands.
Step 18: Wash and Shape
Follow the washing instructions for your chosen yarn.
For washable acrylic yarn, a gentle wash may help the stitches relax and soften.
If washing is recommended, gently reshape the scarf and allow it to dry according to the yarn label.
Avoid using high heat on acrylic yarn.
Once dry, straighten the fringe with your fingers.
Your beautiful burgundy crochet scarf is now complete!
How to Adjust the Crochet Scarf Size
One of the biggest advantages of this pattern is that it doesn’t require a complicated stitch multiple.
You can adjust the scarf length simply by changing the foundation chain.
The width is adjusted by working more or fewer rows.
Suggested Foundation Chains
| Foundation chains | First row stitches |
|---|---|
| 180 | 178 |
| 200 | 198 |
| 230 | 228 |
| 250 | 248 |
| 280 | 278 |
| 300 | 298 |
These are stitch counts, not fixed measurements.
The finished length depends on your stitch gauge.
For the example scarf, 230 foundation chains are used to target a length of approximately 60 inches.
If you want a longer scarf that can wrap around the neck several times, you can add more chains.
For a shorter scarf, use fewer chains.
There is no absolute maximum foundation chain count.
Choose the length based on your measurements and available yarn.
Making the Scarf Wider
Continue alternating half double crochet and single crochet rows.
For a narrower scarf, stop when the width reaches approximately 6 inches.
For a wider scarf, work until the fabric reaches approximately 8 inches or your preferred measurement.
Because the scarf is crocheted lengthwise, adding rows makes the scarf wider rather than longer.
Why Back-Loop Crochet Creates Beautiful Ribbing
The ribbed texture comes from leaving the front loop of each stitch unworked.
Ordinary crochet stitches are usually worked through both top loops.
When you work only through the back loop, the unused front loop remains visible on the fabric.
This creates a thin horizontal line.
As you repeat back-loop rows, those lines form closely spaced ridges.
Alternating half double crochet and single crochet adds subtle differences in height, making the surface even more interesting.
The finished fabric has a soft, flexible appearance without requiring advanced crochet techniques.
It’s a useful texture for scarves, blankets, headbands, and other rectangular crochet projects.
Beautiful Color Ideas for This Crochet Scarf
Although deep burgundy is the classic choice for this design, several other shades look beautiful with the same ribbed pattern.
1. Deep Burgundy Red
Rich burgundy creates a timeless winter accessory.
It pairs beautifully with black coats, gray sweaters, and neutral outfits.
The matching fringe gives the scarf an elegant, coordinated finish.
2. Warm Cream
A soft cream-colored scarf creates a cozy, understated look.
The light yarn makes the horizontal ridges especially easy to see.
3. Charcoal Gray
Charcoal is a versatile color for everyday winter accessories.
The simple ribbed design works well for a scarf intended for anyone.
4. Dusty Rose
A muted rose shade creates a softer, romantic appearance.
It looks lovely with cream coats and light neutral clothing.
5. Forest Green
Deep forest green is a beautiful option for fall and winter.
The textured fabric gives the rich color additional depth.
6. Chocolate Brown
Warm chocolate brown produces a classic, cozy scarf with a natural, earthy appearance.
Tips for Making a Perfect Ribbed Crochet Scarf
Keep the Foundation Chain Relaxed
A tight foundation chain can make one long edge shorter than the rest of the scarf.
Try to keep the chains the same size.
If necessary, make the foundation chain using a slightly larger hook.
Count Your Stitches
The sample contains 228 stitches per row.
It can be easy to skip a stitch when working such long rows.
Check the stitch count occasionally, especially near the edges.
Don’t Forget the Last Stitch
The final stitch can appear slightly hidden near the turning chain.
Look carefully before ending the row.
Missing the last stitch repeatedly can make the scarf narrower along one edge.
Always Work Through the Back Loops
After Row 1, every single crochet and half double crochet is worked through the back loop.
This is what creates the repeating ribbed texture.
Working through both loops will produce a flatter appearance.
Keep the Turning Chains Consistent
Use chain 1 for single crochet rows.
Use chain 2 for half double crochet rows.
Do not count either turning chain as a stitch.
Measure Instead of Counting Rows for Width
Different yarns and crochet tensions produce different row heights.
Measuring the width is more reliable than following a fixed number of rows.
Make Both Fringe Ends Match
Use the same number of yarn strands in each tassel.
Space the groups similarly along both ends.
Trim carefully for a polished finish.
Common Crochet Scarf Problems and Solutions
Why Is My Scarf Curling?
Your tension may be too tight, especially along the foundation chain.
Try loosening your stitches or using a larger hook.
A gentle wash and reshaping may also help, depending on the yarn.
Why Are My Ribbed Lines Uneven?
Check that you’re consistently working through the back loops.
Uneven tension can also affect the appearance of the raised ridges.
Why Is My Scarf Getting Wider or Narrower?
You may be accidentally increasing or decreasing stitches near the turning chains.
Maintain the same stitch count across every row.
Why Does My Scarf Feel Stiff?
Your hook may be too small for the yarn.
Try working a sample with a slightly larger hook.
A softer yarn can also improve drape.
Why Is My Fringe Uneven?
The yarn strands may not have been cut to equal lengths, or some tassel knots may be tighter than others.
Use a cardboard template and trim the finished fringe evenly.
Why Is My Scarf Shorter Than Expected?
Foundation chain length varies depending on yarn thickness and stitch tension.
Measure the chain before beginning the first row.
If it’s too short, add additional chains until it reaches the desired length.
Frequently Asked Questions
Is This Crochet Scarf Suitable for Beginners?
Yes.
The pattern uses only chain stitches, single crochet, and half double crochet.
The main skill you’ll practice is working into the back loops to create the raised texture.
How Many Chains Do I Need?
The example begins with 230 foundation chains.
This produces 228 half double crochet stitches in the first row.
You can adjust the number of chains for a longer or shorter scarf.
How Wide Should the Scarf Be?
Approximately 6–7 inches is a comfortable width for this style.
You can make it wider if you prefer more coverage.
How Much Yarn Do I Need?
The demonstrated version uses approximately 150 grams of acrylic yarn.
However, actual yarn consumption depends on yarn thickness, stitch gauge, scarf dimensions, and fringe fullness.
It’s helpful to keep extra yarn available for the tassels.
Can I Make This Scarf With Wool?
Yes.
Wool and wool-blend yarns can produce a warm, comfortable scarf.
Choose a hook appropriate for your yarn and test the fabric’s softness and flexibility.
Can I Make This Scarf Without Fringe?
Absolutely.
The scarf looks beautiful as a simple ribbed rectangle.
For a clean finish, weave in the yarn ends securely and leave the narrow edges plain.
Can I Add Longer Fringe?
Yes.
Use a larger cardboard template to cut longer yarn strands.
Remember that each strand is folded in half during attachment.
Allow a little extra length for the knots and final trimming.
Can I Use This Stitch for a Blanket?
Yes.
The same alternating back-loop single crochet and half double crochet pattern works well for rectangular blankets.
Adjust the foundation chain and row count to create the desired dimensions.
Is the Ribbed Pattern Reversible?
Both sides have visible texture, although the ridges may not look exactly identical.
The scarf can be worn with either side facing outward.
What Is the Best Yarn Color?
Deep burgundy is particularly beautiful for this classic winter scarf.
Cream, charcoal, dark green, and chocolate brown also show the ribbed texture nicely.
Can I Make the Scarf Longer Than 60 Inches?
Yes.
Simply increase the number of foundation chains.
Measure the chain to determine the actual length rather than relying entirely on the chain count.
More Cozy Crochet Projects to Try
If you enjoy this simple ribbed scarf, consider exploring other beginner-friendly winter crochet projects.
A matching ribbed crochet beanie would create a beautiful handmade accessory set.
You could also try a textured crochet cowl, an easy crochet headband, fingerless gloves, or a soft ribbed baby blanket.
Back-loop crochet is a useful technique for many projects because it creates texture without complicated stitch combinations.
Experimenting with different yarn colors and thicknesses can give the same simple stitch pattern a completely different appearance.
Final Thoughts
This beautiful Mikasa-inspired crochet scarf proves that simple stitches can create an elegant handmade accessory.
The combination of back-loop single crochet and half double crochet produces attractive raised ridges, while the long rectangular shape makes the project easy to customize.
Deep burgundy yarn gives the scarf a rich, cozy appearance that’s perfect for fall and winter outfits.
The long matching fringe adds movement and a polished finishing touch.
Whether you’re making this scarf as a handmade gift or adding a new accessory to your winter wardrobe, the repetitive pattern makes it an enjoyable project for crocheters of different skill levels.
Once you learn the alternating two-row stitch sequence, you can create scarves in different lengths, widths, and colors using the same technique.
Grab your favorite burgundy yarn and crochet hook, and enjoy making this beautiful ribbed winter scarf one relaxing row at a time!