Easy Layered Puff Flower Granny Square
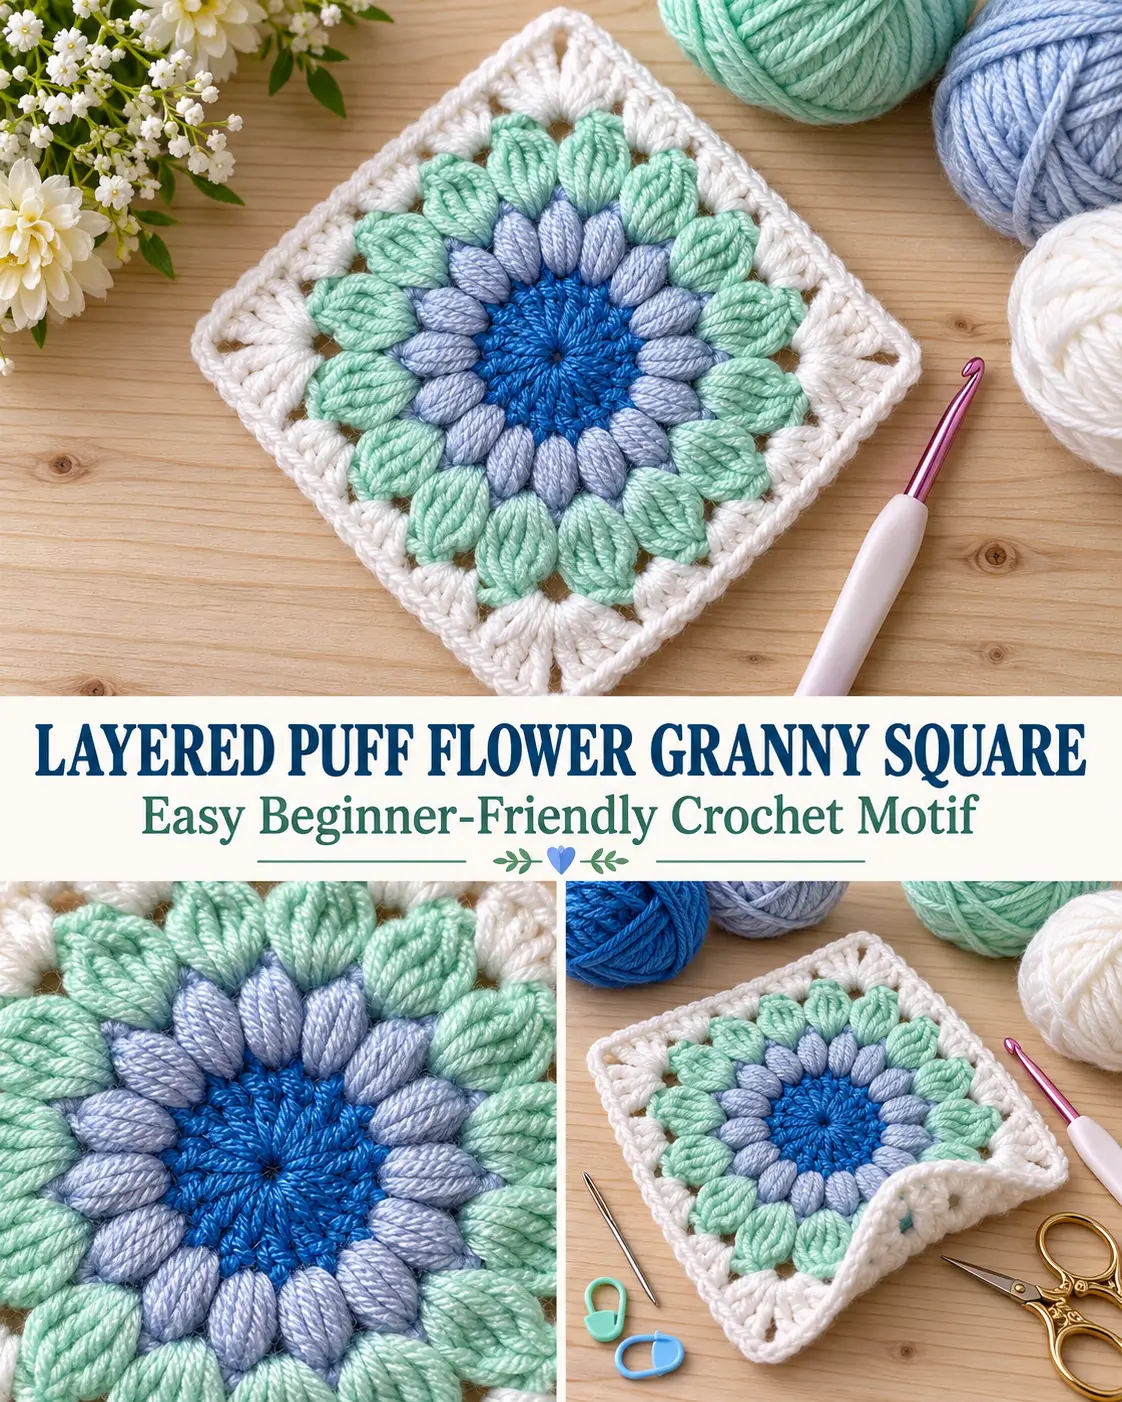
This colorful crochet granny square has a deep blue circular center, a ring of soft blue-gray puff petals, a second ring of larger mint-green petals, and a clean white granny-style square border.
The design looks detailed, but the construction is straightforward once you understand the puff stitches. The center is worked in rounds, the two petal layers are built around it, and the final two white rounds transform the flower into a true square.
For the closest match to the reference, keep the colors exactly in this order:
Center: deep medium blue
First petal round: pale blue-gray / periwinkle
Second petal round: pale mint green
Square border: clean white
Finished Size
Using medium weight yarn and a 4 mm hook:
Approximately 5¾–6¼ inches / 14.5–16 cm square after blocking
Your exact size will depend on yarn and tension.
Materials
- Medium weight #4 yarn
- Deep medium blue
- Pale blue-gray / light periwinkle
- Pale mint green
- White
- 4 mm / G crochet hook
- Yarn needle
- Scissors
- Stitch markers, optional
- Blocking pins, optional
Use yarns of the same weight and similar texture for all four colors.
A smooth acrylic, cotton blend, or soft anti-pilling yarn works especially well because the raised petals need good stitch definition.
Skill Level
Confident beginner
You should know:
- magic ring
- chain
- slip stitch
- single crochet
- double crochet
- working several loops together
- working into chain spaces
- changing colors
- crocheting in joined rounds
Abbreviations
US crochet terminology:
MR — magic ring
ch — chain
sl st — slip stitch
sc — single crochet
dc — double crochet
sp — space
st / sts — stitch / stitches
rep — repeat
Important Construction Overview
The square has seven rounds:
Round 1
Blue circular center
Round 2
Blue setup round with 12 small spaces
Round 3
12 pale blue-gray puff petals
Round 4
12 larger mint puff petals
Round 5
First white round — turns the flower into a square
Round 6
Second white granny-style border round
Round 7
Simple white single-crochet finishing edge
The puff petals are not separate appliqués.
Everything is crocheted continuously around the center.
Special Stitch — Inner Puff Petal
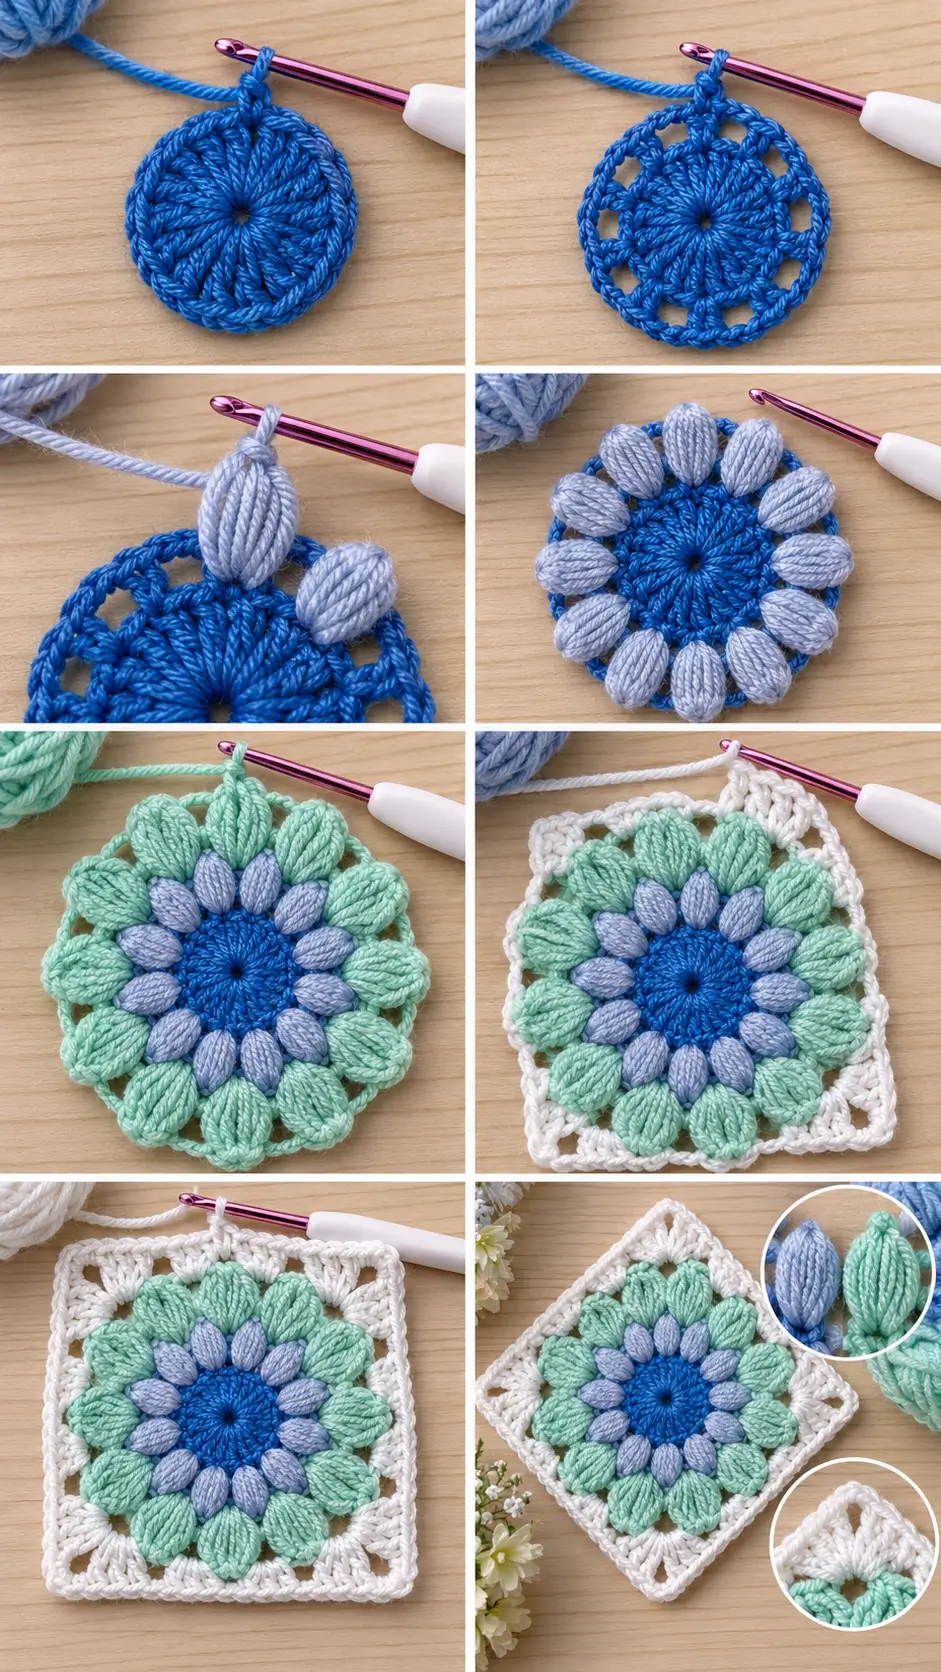
The pale blue-gray petals need to be elongated but still compact.
Yarn over.
Insert hook into the indicated space.
Yarn over and pull up a long loop to approximately the height of a double crochet.
Repeat:
yarn over, insert into same space, pull up long loop
until you have done this:
4 times total
You should have approximately:
9 loops on the hook
Yarn over.
Pull through all loops.
Ch:
1
to lock the puff.
One inner puff petal is complete.
Keep all four pulled-up loops approximately the same height.
Special Stitch — Large Mint Puff Petal
The mint petals are slightly larger than the pale blue-gray petals.
Yarn over.
Insert hook into the indicated space.
Pull up a long loop.
Repeat until you have pulled up:
5 long loops total
You should have approximately:
11 loops on the hook
Yarn over.
Pull through all loops.
Ch:
1
to lock the puff.
The mint petal should look:
- full
- rounded
- elongated
- slightly larger than the inner petal
Do not make the mint petals dramatically longer.
They should form a balanced second flower ring.
PART 1 — BLUE FLOWER CENTER
Using:
deep medium blue
make a magic ring.
Round 1
Ch:
3
The ch-3 counts as the first dc.
Work:
11 dc
into the magic ring.
Pull the ring tightly closed.
Join with a sl st to the top of the beginning ch-3.
You should have:
12 dc
The center should remain flat and circular.
Round 2 — Create the Petal Spaces
Ch:
1
This does not count as a stitch.
Sc in the same stitch.
Ch:
1
Now repeat around:
sc in next dc, ch 1
Join with a sl st to the first sc.
You should now have:
- 12 sc
- 12 ch-1 spaces
Fasten off the blue yarn.
These 12 spaces determine the number of petals.
PART 2 — PALE BLUE-GRAY INNER PETALS
Join the:
pale blue-gray / periwinkle yarn
in any ch-1 space.
Round 3
In the same space make:
1 Inner Puff Petal
Ch:
1
In the next ch-1 space work:
1 Inner Puff Petal
Ch:
1
Repeat around.
You should finish with:
12 pale blue-gray puff petals
and:
12 ch-1 spaces between them
Join with a sl st at the base/top of the first petal as neatly as possible.
Fasten off.
Shape the Inner Petals
Before continuing, gently pull each puff outward with your fingers.
The petals should radiate evenly from the blue center.
You should see:
- blue circular center
- 12 pale blue-gray oval petals
- one small space between each petal
Do not flatten the puffs.
PART 3 — MINT OUTER PETALS
Join:
pale mint green
in any ch-1 space between two blue-gray petals.
Round 4
Work:
1 Large Mint Puff Petal
in the same space.
Ch:
2
In the next space between gray petals work:
1 Large Mint Puff Petal
Ch:
2
Repeat around.
You should have:
12 mint puff petals
and:
12 ch-2 spaces
Join.
Fasten off.
Check the Flower Before Squaring
Lay the motif flat.
You should now see:
Center
One compact blue circle
Inner flower
12 pale blue-gray petals
Outer flower
12 larger mint petals
The mint petals should sit outside and between the inner structures, creating a layered flower effect.
The entire motif should remain approximately circular.
A slight tendency to cup is acceptable at this stage because the white squaring rounds will help flatten it.
PART 4 — TURN THE FLOWER INTO A SQUARE
Now switch to:
white yarn
There are:
12 ch-2 spaces
around the mint round.
These divide perfectly into:
4 corners
with:
2 ordinary spaces between each corner
The structure is:
corner → side group → side group
repeated four times.
Round 5 — First White Squaring Round
Join white yarn in any ch-2 space.
This first space becomes a corner.
Ch:
3
This counts as the first dc.
In the same space work:
2 dc, ch 2, 3 dc
First corner complete.
Ch:
1
In the next ch-2 space work:
3 dc
Ch:
1
In the next ch-2 space work:
3 dc
Ch:
1
In the next space work a corner:
3 dc, ch 2, 3 dc
Ch:
1
Now repeat around:
3 dc in next space, ch 1
3 dc in next space, ch 1
(3 dc, ch 2, 3 dc) in next space, ch 1
Continue until all four corners are complete.
Join to the top of the beginning ch-3.
Round 5 Stitch Layout
Each side should contain:
- half of one corner
- 2 ordinary 3-dc groups
- half of the next corner
Each corner contains:
3 dc, ch 2, 3 dc
The flower should now clearly be transforming into a square.
Straighten the Corners
Lay the work flat.
Gently pull each:
ch-2 corner
outward.
The four corners should form approximately:
90-degree angles
Do not pull the mint petals.
Only shape the white corner spaces.
Round 6 — Second White Granny Border
Sl st across the first 3 dc until you reach the:
corner ch-2 space
Ch:
3
In the same corner work:
2 dc, ch 2, 3 dc
Ch:
1
Across the side, work:
3 dc in the next ch-1 space
Ch:
1
Work:
3 dc in next ch-1 space
Ch:
1
Work:
3 dc in next ch-1 space
Ch:
1
At the next corner work:
3 dc, ch 2, 3 dc
Ch:
1
Repeat the same sequence around all four sides.
Join with a sl st to the beginning ch-3.
What Round 6 Should Look Like
Each side now has a clean granny-style frame surrounding the raised flower.
You should see:
- small open spaces between white groups
- clearly defined corners
- layered colored flower centered inside
- straight outer sides
The border should remain relatively narrow.
Do not add a wide white frame if you want the same proportions as the reference.
PART 5 — FINAL WHITE EDGE
This last round stabilizes the square and gives it a cleaner outline.
Round 7
Ch:
1
Sc in every dc around.
Work:
1 sc in every ch-1 space
At each corner ch-2 space work:
3 sc
Continue around.
Join with a sl st to the first sc.
Fasten off.
Finished Stitch Counts Are Less Important Than Structure
Because the final rounds contain grouped stitches and chain spaces, the easiest way to check the square is visually.
Every side must be identical.
Every corner must contain the same construction.
The motif should have:
- 12 inner petals
- 12 outer petals
- 4 identical corners
- 4 identical white sides
If one side has a different number of white clusters, go back and check Round 5.
FINISHING
Thread each yarn tail onto a yarn needle.
Weave the tails through stitches of the same color.
For the puff rounds:
weave the tail through several bases of the puff stitches.
Change direction.
Weave through another section.
Trim.
Do not pull the tails tightly enough to distort the flower.
BLOCKING
Blocking makes a big difference with this granny square.
Lightly dampen the finished motif.
Lay it flat.
Pin:
- first corner
- opposite corner
- remaining two corners
Then straighten all four sides.
Arrange the puff petals with your fingers.
Make sure:
- all gray petals point outward
- all mint petals are evenly spaced
- the center remains circular
- the white border remains square
Allow to dry completely.
Finished Appearance
The finished square should show:
Center
A compact deep-blue circle
Inner Petals
12 pale blue-gray elongated puff petals
Outer Petals
12 larger pale-mint puff petals
Background
Open white granny-style squaring
Outer Edge
A clean white single-crochet finish
The raised petals should create most of the texture while the white border remains flatter.
If the Blue Center Ruffles
Check Round 1.
You should have:
12 dc
Do not accidentally count the beginning ch-3 and also make 12 additional dc.
The total is:
12 stitches
including the beginning chain.
If the Center Cups
Your tension may be too tight.
Try:
- relaxing the stitches
- using a slightly larger hook
- pulling the magic ring firmly closed without tightening the surrounding stitches
If the Gray Petals Are Too Small
Make sure each puff uses:
4 long pull-ups
and that every pull-up reaches approximately dc height.
Short loops create small round bobbles rather than elongated petals.
If the Gray Petals Are Too Bulky
Do not use 5 or 6 pull-ups for the inner layer.
Keep them at:
4
The mint petals are supposed to be slightly fuller.
If the Mint Petals Look Like Bobbles
Pull each loop higher.
The goal is a long oval petal rather than a compact ball.
Keep the five long loops at approximately the same height before closing them together.
If the Petals Twist
After closing each puff:
gently rotate the puff so the strands sit side by side.
The long loops should form a smooth bundle.
Blocking will also help align them.
If the Square Cups After Round 5
Your white squaring stitches may be too tight.
Try:
- loosening the ch-1 spaces
- loosening the ch-2 corners
- using a 4.5 mm hook for the white rounds only
The corners need enough room to spread.
If the White Border Ruffles
Your chains or dc stitches may be too loose.
Before changing hooks, block a small sample.
Slight waviness often disappears after blocking.
Strong ruffling means the border has too much length.
If the Corners Are Not Square
Make sure every corner is:
3 dc, ch 2, 3 dc
Do not use only one chain at the corners.
The ch-2 opening provides the room needed for the 90-degree turn.
If One Side Has More White Groups
Round 5 must use exactly:
12 mint spaces
in this rhythm:
corner
side
side
corner
side
side
corner
side
side
corner
side
side
That creates four identical sides.
Color Placement
For the exact visual effect, keep the colors in this order:
Round 1–2
Deep medium blue
Round 3
Pale blue-gray / light periwinkle
Round 4
Pale mint green
Rounds 5–7
Clean white
Do not alternate colors inside a single round.
Make a Blanket
This square works especially well as a repeated blanket motif.
For approximately 6-inch finished squares:
Small Baby Blanket
Make:
30 squares
Arrange:
5 × 6
Before the joining border, this gives approximately:
30 × 36 inches
Larger Baby Blanket
Make:
42 squares
Arrange:
6 × 7
Approximate motif area:
36 × 42 inches
before the final blanket border.
Joining the Squares
Block every square to the same measurement before joining.
Good joining methods include:
- mattress stitch
- whip stitch
- slip-stitch join
- single-crochet join
For the cleanest look, join with:
white yarn
so the seams visually blend into the white borders.
Simple Blanket Border
After joining all squares:
Join white yarn in any outer corner.
Border Round 1
Sc evenly around.
At each blanket corner:
3 sc
Border Round 2
Sc in every stitch.
At each corner:
3 sc in the center corner stitch
Fasten off.
The simple border allows the layered flowers to remain the main focus.
Make a Cushion Cover
Make:
4 squares
Arrange:
2 × 2
for the front.
Join them with white yarn.
Crochet a plain back panel or make another four-square panel.
Join around three sides.
Insert a cushion.
Close the remaining side.
Make a Tote Bag
Make:
4 squares for the front
and:
4 for the back
Join each set in a:
2 × 2 arrangement
Add a plain crochet side-and-bottom gusset.
Finish with sturdy handles.
The dimensional puff flowers make especially attractive statement bags.
Final Pattern at a Glance
Round 1 — Blue
12 dc in MR
Round 2 — Blue
Repeat:
sc, ch 1
around.
You need:
12 ch-1 spaces
Round 3 — Pale Blue-Gray
In every ch-1 space:
1 four-pull elongated puff, ch 1
Total:
12 petals
Round 4 — Mint
In every space between gray petals:
1 five-pull elongated puff, ch 2
Total:
12 mint petals
Round 5 — White
Divide the 12 spaces into four groups of three.
Corners:
3 dc, ch 2, 3 dc
Other spaces:
3 dc
Use ch 1 between groups.
Round 6 — White
Granny-style second squaring round.
Corners:
3 dc, ch 2, 3 dc
Work 3-dc groups into each side ch-1 space.
Round 7 — White
Sc around.
At each corner:
3 sc
Fasten off and block.
The finished motif should be a layered blue, pale blue-gray, and mint puff flower surrounded by a crisp white square frame, with exactly 12 small inner petals, 12 fuller outer petals, four balanced corners, and a clean finished edge.