Cozy Reverse Blanket Stitch Crochet Blanket
Some crochet blankets look so intricate that you immediately assume they must require dozens of complicated stitches.
But this gorgeous textured crochet blanket has a wonderful secret: once you’ve completed the foundation row, you only need to repeat one simple row!
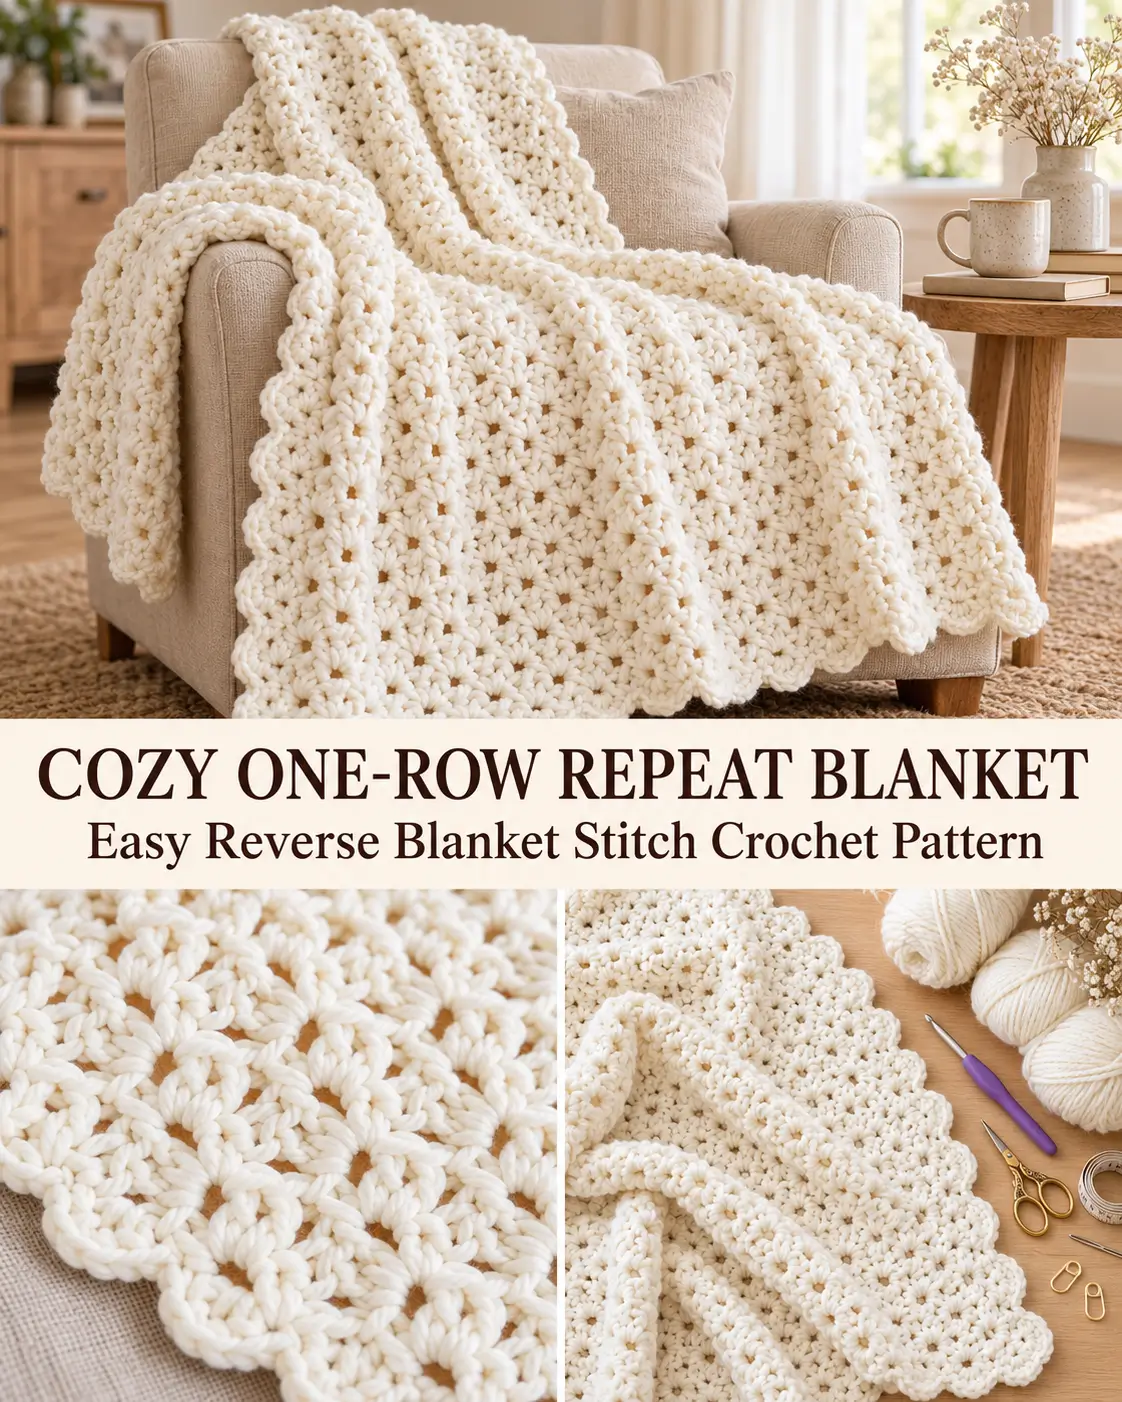
Made using the beautiful reverse blanket stitch, this cozy cream-colored throw features softly raised crochet clusters, delicate little openings, and charming scalloped edges.
The finished texture looks elegant and detailed, almost like a collection of tiny overlapping shells. Yet the pattern is created entirely with basic crochet stitches that many beginners already know.
Its warm ivory color makes it especially beautiful in neutral living rooms, cozy bedrooms, farmhouse-style interiors, and modern cottage-inspired spaces.
Whether you’re crocheting your first large blanket or simply want a relaxing project that doesn’t require constantly counting complicated stitch combinations, this one-row repeat blanket is a lovely choice.
Why You’ll Love This Crochet Blanket
- Uses a simple one-row repeat after the foundation.
- Creates beautiful raised texture with basic crochet stitches.
- Features naturally scalloped edges.
- Looks impressive without complex techniques.
- Made in one continuous piece without sewing motifs together.
- Easy to customize into different blanket sizes.
- Beautiful in cream, oatmeal, beige, or other solid colors.
- A cozy handmade gift for birthdays, housewarmings, and holidays.
- Works beautifully with soft worsted or bulky yarn.
The reverse blanket stitch creates an especially attractive surface because small stitch groups appear to overlap in a gentle repeating pattern.
Pattern Overview
Pattern name: Cozy Cream Reverse Blanket Stitch Throw
Skill level: Advanced beginner
Crochet terminology: US terms
Construction: Worked flat in turned rows
Stitch pattern: Reverse blanket stitch
Repeat: One row after the setup
Foundation chain multiple: 4
Starting chain for this version: 128
Suggested yarn: Bulky-weight #5
Recommended crochet hook: 6.5 mm (K/10.5)
Color: Warm creamy ivory
Suggested finished size: Approximately 48 × 58 inches, depending on gauge
Border: Optional matching scalloped foundation edge
The finished dimensions are a project target rather than a tested measurement. Make a gauge swatch before beginning if an exact blanket size is important.
Materials You’ll Need
- Bulky-weight (#5) yarn in warm ivory or cream
- 6.5 mm crochet hook
- Tapestry needle for weaving in ends
- Scissors
- Measuring tape
- Optional stitch markers
How Much Yarn Will You Need?
Yarn requirements depend on the size of your blanket, fiber, tension, and hook choice.
For reference, the designer’s related bulky reverse blanket stitch pattern uses approximately 1,370 yards for a reported 52 × 60-inch sample.
For this project, make a practice swatch and estimate your yarn requirements from its weight and area before buying the full quantity.
If you want a similar substantial cream blanket, smooth bulky acrylic-wool blends or soft bulky acrylic yarns are good starting options.
Choosing the Best Yarn
The reverse blanket stitch looks especially beautiful when worked with yarn that has a smooth, slightly rounded strand.
This makes the overlapping stitch groups easier to distinguish.
Bulky Yarn
Bulky #5 yarn creates a substantial blanket with pronounced texture.
It’s a lovely choice for a cozy sofa throw or winter blanket.
Worsted Yarn
Medium-weight #4 yarn creates a lighter fabric with smaller stitches.
If you choose worsted yarn, you’ll need more foundation chains and potentially more rows to reach the same blanket size.
Cotton Yarn
Soft cotton or cotton-blend yarn produces clear stitch definition.
It may create a heavier blanket, depending on the thickness of the yarn.
Best Color Choices
For a blanket similar to the reference image, choose warm creamy ivory.
Other beautiful options include:
- Oatmeal beige
- Soft natural white
- Warm taupe
- Pale sage
- Dusty blue
- Light greige
- Muted blush pink
A solid yarn color is especially effective because it allows the stitch texture to become the main feature.
Crochet Abbreviations
All instructions use US crochet terminology.
- Ch: Chain
- Sc: Single crochet
- Dc: Double crochet
- St: Stitch
- Sp: Space
- Sk: Skip
- Rep: Repeat
- RS: Right side
- WS: Wrong side
Understanding the Reverse Blanket Stitch
The reverse blanket stitch combines familiar crochet techniques in an unusual way.
Instead of working only one stitch into each space, you’ll work a small repeating group containing:
2 double crochet + chain 2 + 1 single crochet
The entire group is placed into the same chain space after the foundation row.
This combination creates a slightly raised, shell-like cluster.
The double crochet stitches give the fabric height, while the shorter single crochet helps shape the curved texture.
The chain-2 opening provides the insertion point for the next row.
When these groups are repeated, the fabric develops a delicate surface that looks much more complicated than the instructions actually are.
What Makes It a One-Row Repeat?
The first row establishes the stitch pattern.
The second row shows you how to work into the spaces created by the first.
After that, every new row is made in the same way as Row 2.
You don’t need to alternate between multiple complicated row sequences.
Blanket Size Options
The reverse blanket stitch begins with a foundation chain that is a multiple of four.
For example:
| Project | Suggested Starting Chain |
|---|---|
| Small practice swatch | 24 |
| Small baby blanket starting point | 80 |
| Lap blanket starting point | 104 |
| Cozy throw – this version | 128 |
| Larger blanket starting point | 152 |
These are valid stitch-repeat counts, not guaranteed finished widths.
Your blanket width will depend on the yarn and gauge.
Before making the full blanket, crochet a small sample, measure its width, and adjust the starting chain in groups of four until you reach the desired size.
Step-by-Step Reverse Blanket Stitch Crochet Blanket
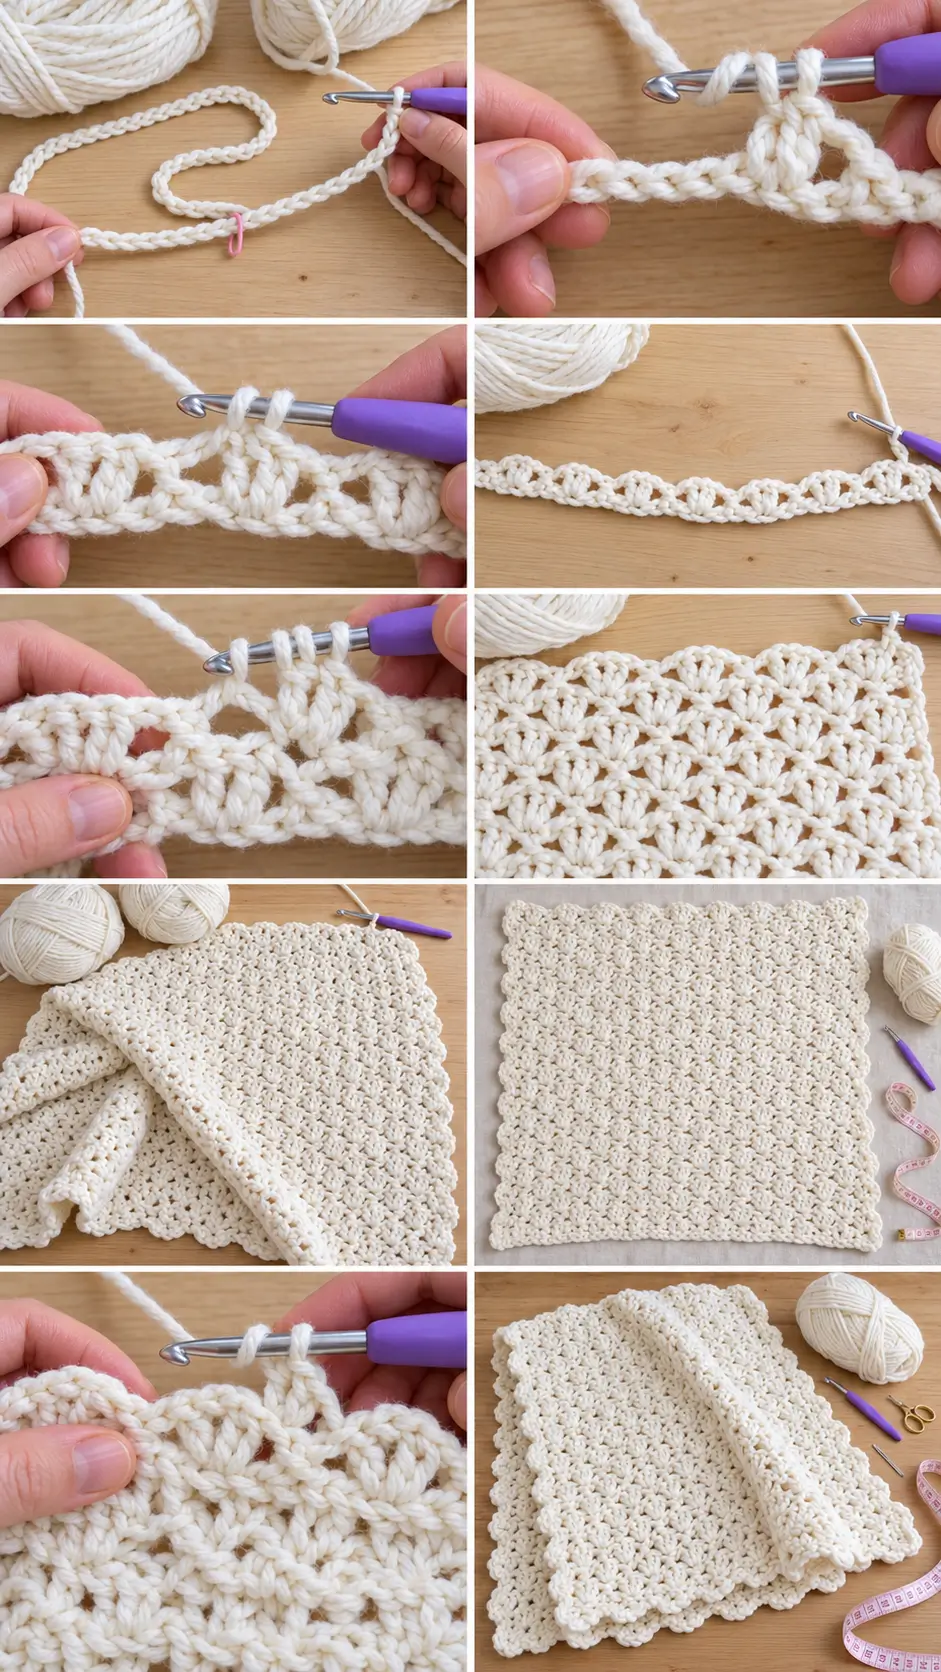
Step 1: Create the Foundation Chain
Using your warm-ivory bulky yarn and 6.5 mm crochet hook:
Chain 128.
Try to keep your starting chain loose and even.
If you tend to crochet very tightly, you can use a larger hook just for the foundation chain.
After completing the chain, gently straighten it across your work surface.
Make sure it isn’t twisted.
The chain will determine the width of your blanket.
Step 2: Crochet Row 1 – Establish the Texture
The foundation row is slightly different from the remaining rows.
You’ll work directly into the foundation chain.
Row 1
- Work one double crochet into the third chain from the hook.
- Chain 2.
- Work one single crochet into the next foundation chain.
- Skip the next two foundation chains.
- Work two double crochet stitches into the next chain.
- Chain 2.
- Work one single crochet into the following chain.
- Repeat Steps 4–7 across the foundation chain.
- Turn your work.
Your first row should now have repeated stitch groups with small chain-2 openings between the raised sections.
With 128 foundation chains, you should form 32 chain-2 spaces along the row.
What Row 1 Should Look Like
The fabric will still be narrow, but you should already see a slightly wavy edge.
Small clusters of double crochet stitches alternate with chain spaces and single crochet stitches.
Don’t worry if it doesn’t look like the finished blanket yet.
The dimensional texture becomes more noticeable after several rows.
Step 3: Crochet Row 2 – The Main Repeat
This row establishes the pattern you’ll repeat throughout the blanket.
Row 2
- Chain 2 and turn if you haven’t already turned.
- Skip the first single crochet stitch.
- Locate the first chain-2 space from the previous row.
- Into that chain-2 space, work:
- 2 double crochet
- Chain 2
- 1 single crochet
- Move to the next chain-2 space, passing over the intervening stitch group.
- Work the same sequence into that space:
- 2 double crochet
- Chain 2
- 1 single crochet
- Repeat across the row, working one complete group into every chain-2 space.
- Turn.
Pattern repeat: (2 dc, ch 2, 1 sc) in each chain-2 space.
You should maintain 32 chain-2 spaces in this version.
Important Stitch Placement Tip
Make sure your hook is inserted into the chain-2 opening rather than the top of an individual double crochet stitch.
Each complete stitch group belongs inside one chain space.
This placement is what creates the raised, slightly staggered reverse blanket stitch texture.
Step 4: Crochet Row 3
Chain 2.
Skip the first single crochet.
Work one complete stitch group into each chain-2 space:
(2 dc, ch 2, 1 sc)
Continue across the row.
Turn.
That’s it!
You’ve already learned the entire repeating pattern.
Step 5: Continue the One-Row Repeat
For Row 4 and every following row, repeat Row 2.
The pattern remains:
- Chain 2.
- Skip the first stitch.
- Work 2 dc, ch 2, and 1 sc into the next chain-2 space.
- Repeat in each chain-2 space across.
- Turn.
Keep repeating until the blanket reaches your desired length.
You can stop at approximately 58 inches for a generous throw, or continue for a longer blanket.
The row count will depend on your yarn and gauge.
How to Keep Your Edges Even
At the end of each row, count the chain-2 spaces.
For the 128-chain version, you should have 32.
If the number changes, you’ve likely missed a space or worked into an extra opening.
Stitch markers placed near the ends can help you identify the correct placement of the first and last groups.
Step 6: Watch the Beautiful Texture Develop
After approximately 6–10 rows, the textured pattern should become clearly visible.
You’ll notice small groups of crochet stitches forming soft, raised ridges across the fabric.
The chain spaces create little recessed openings between the raised sections.
The edges naturally develop a gentle scalloped appearance.
As the blanket grows, it becomes increasingly flexible and drapey.
A smooth cream-colored yarn highlights this texture beautifully.
Step 7: Continue Until Your Blanket Reaches the Desired Length
Keep repeating the same stitch row.
Measure the blanket occasionally by laying it flat on a clean surface.
Avoid stretching the fabric while measuring.
For this design, aim for a cozy throw measuring approximately 48 × 58 inches after finishing, adjusting the width through your foundation chain and the length through your number of rows.
If your fabric is significantly wider or narrower than expected, rely on the actual measurements rather than trying to force the project to match a fixed row count.
Helpful Crocheting Routine
Because this pattern uses the same row repeatedly, it’s ideal for working on during relaxed evenings.
You can crochet several rows at a time, put the blanket aside, and return to it without needing to remember a complicated sequence.
Simply locate the next chain-2 space and continue the repeating stitch group.
Step 8: Finish the Final Row
When the blanket reaches your desired length, complete the final row in the normal pattern.
Work the last single crochet into the final chain-2 space.
Cut the yarn, leaving a tail long enough to weave in securely.
Pull the tail through the final loop.
The upper edge should already have a softly scalloped appearance.
You don’t need to add a decorative edging along that side unless you prefer a different finishing style.
Part 2: Optional Matching Scalloped Foundation Edge
One of the loveliest features of this stitch is its natural wavy border.
However, the original foundation-chain edge tends to look straighter than the other three sides.
If you’d like the lower edge to match the rest of the blanket, you can add a decorative row along the unused underside of the foundation chain.
Step 9: Add the Matching Scalloped Edge
Turn the blanket so the foundation edge is at the top of your workspace.
Position the right side toward you.
Reattach the ivory yarn near one lower corner.
Work into the accessible foundation-chain spaces, aligning the new stitch groups with the repeating groups above.
For the first scallop:
- Chain 2 to establish the height of the first double crochet.
- Work one additional double crochet into the corresponding foundation space.
- Chain 2.
- Work one single crochet into that same space.
For subsequent scallops:
- Move to the next corresponding foundation space, approximately four foundation chains farther along.
- Work 2 double crochet stitches.
- Chain 2.
- Work 1 single crochet into the same space.
Continue across the foundation edge.
The goal is to create small scallops that match the waves along the opposite end.
Check the first few scallops before working all the way across, because the best insertion points can vary depending on how tightly the foundation chain was crocheted.
For a close-up demonstration of the edge placement, consult the original Jewels and Jones photo tutorial.
Fasten off when the final scallop is complete.
Step 10: Weave in the Yarn Ends
Using a tapestry needle, carefully weave in any loose yarn tails.
Thread the yarn through several nearby stitches on the wrong side of the blanket.
Change direction once or twice to secure the ends.
Avoid pulling too tightly, as this can distort the scalloped edge.
Trim the remaining yarn after the ends are secure.
Step 11: Gently Shape the Blanket
When the blanket is finished, spread it across a large clean surface.
Check the edges and corners.
Gently arrange the small scallops with your fingers.
If the yarn fiber allows it, a light blocking can help even out the edges and improve the drape.
Always follow the yarn manufacturer’s washing and blocking recommendations.
Allow the blanket to dry completely before folding or using it.
Your beautiful reverse blanket stitch crochet throw is now ready to enjoy!
Tips for a Beautiful Reverse Blanket Stitch Blanket
Keep Your Foundation Chain Loose
A tight starting chain can cause the lower edge to pull inward.
A relaxed foundation helps your blanket lie flatter.
Work Into the Chain Spaces
This is the most important part of the pattern.
Each stitch group should be worked into a chain-2 space from the previous row.
Maintain Consistent Tension
The double crochets should be even, while the chain spaces should remain open enough for the following row.
Use a Hook That Produces Soft Fabric
If your blanket feels stiff, try a slightly larger hook.
If the stitches are too loose and undefined, try a smaller hook.
Count the Repeats Occasionally
For this blanket, maintain 32 chain-2 spaces per row.
Counting occasionally helps prevent accidental increases or decreases.
Choose a Yarn With Good Stitch Definition
Smooth yarn makes the little raised groups stand out.
Highly fuzzy yarn can hide the detailed texture.
Easy Ways to Customize Your Blanket
Make a Soft Baby Blanket
Use a shorter foundation chain and stop when the blanket reaches your preferred baby blanket dimensions.
A gentle cream or pastel shade makes a sweet handmade gift.
For infants, follow current safe-sleep guidance and do not place loose blankets in a baby’s sleep space.
Try a Two-Color Blanket
Alternate cream and soft beige every four or six rows.
This adds subtle striping without distracting from the stitch texture.
Make an Oatmeal Farmhouse Throw
Choose a warm oatmeal shade for a timeless rustic appearance.
This looks especially beautiful draped over a neutral sofa or wooden bench.
Create a Cozy Winter Blanket
Use bulky wool-blend yarn in ivory, warm gray, or muted forest green.
The textured stitches create an inviting handmade look.
Make a Larger Bed Blanket
Increase the foundation chain in multiples of four.
Work additional repeating rows until the blanket reaches your desired length.
Because larger blankets require more yarn, make a sample first to plan your supplies.
Add a Matching Pillow
Use the same stitch in two rectangular panels, then join them around a pillow insert.
This creates a coordinated handmade blanket-and-pillow set.
Frequently Asked Questions
Is the reverse blanket stitch beginner-friendly?
Yes. The pattern uses chains, single crochet, and double crochet. The stitch placement takes a little practice, but the repeating row is straightforward.
Is this really a one-row repeat?
Yes. After completing the foundation row, you repeat the same stitch sequence for the rest of the blanket.
What is the starting-chain multiple?
The reverse blanket stitch uses a multiple of four.
For example, you can start with 80, 104, 128, or 152 chains.
Why are my blanket edges wavy?
The reverse blanket stitch naturally produces a softly scalloped appearance.
This is part of the stitch design rather than necessarily a mistake.
Why is the foundation edge straighter?
The foundation row is constructed differently from the subsequent rows.
You can add a matching scalloped row along the foundation edge if you want all four sides to look similar.
Can I use worsted-weight yarn?
Absolutely. The same stitch repeat works with different yarn weights, but your finished blanket size and required yarn quantity will change.
Does this blanket need a separate border?
No. The natural texture creates decorative edges.
You can leave the blanket without an additional border or add the optional matching foundation edging.
Can I make this blanket in several colors?
Yes. You can switch colors at the beginning of a row to create stripes.
For a more subtle appearance, use several shades from the same color family.
More Beautiful Crochet Blanket Ideas
If you love easy textured crochet blankets, you may also enjoy:
- Interlocking block stitch crochet blanket
- Easy waffle stitch crochet throw
- Soft moss stitch baby blanket
- Cozy granny stripe blanket
- Beautiful alpine stitch crochet blanket
- Beginner-friendly chunky crochet blanket
- Vintage floral granny square blanket
These projects are wonderful ways to explore new stitch textures while creating useful handmade items for your home.
Final Thoughts
The reverse blanket stitch is a beautiful reminder that simple crochet stitches can create extraordinary texture.
With just chains, single crochets, and double crochets, you can make a cozy blanket filled with delicate raised patterns and softly scalloped edges.
The warm ivory color gives this version a timeless appearance that works beautifully in nearly any room.
And because the entire project uses the same repeating row after the beginning, it’s an enjoyable blanket to make whenever you want a relaxing crochet project.
Whether you’re making it for your living room, preparing a thoughtful gift, or simply learning a beautiful new crochet stitch, the result is a lovely handmade blanket you’ll be proud to use.