Red and White Floral Granny Square Tote Bag – Free Crochet Pattern
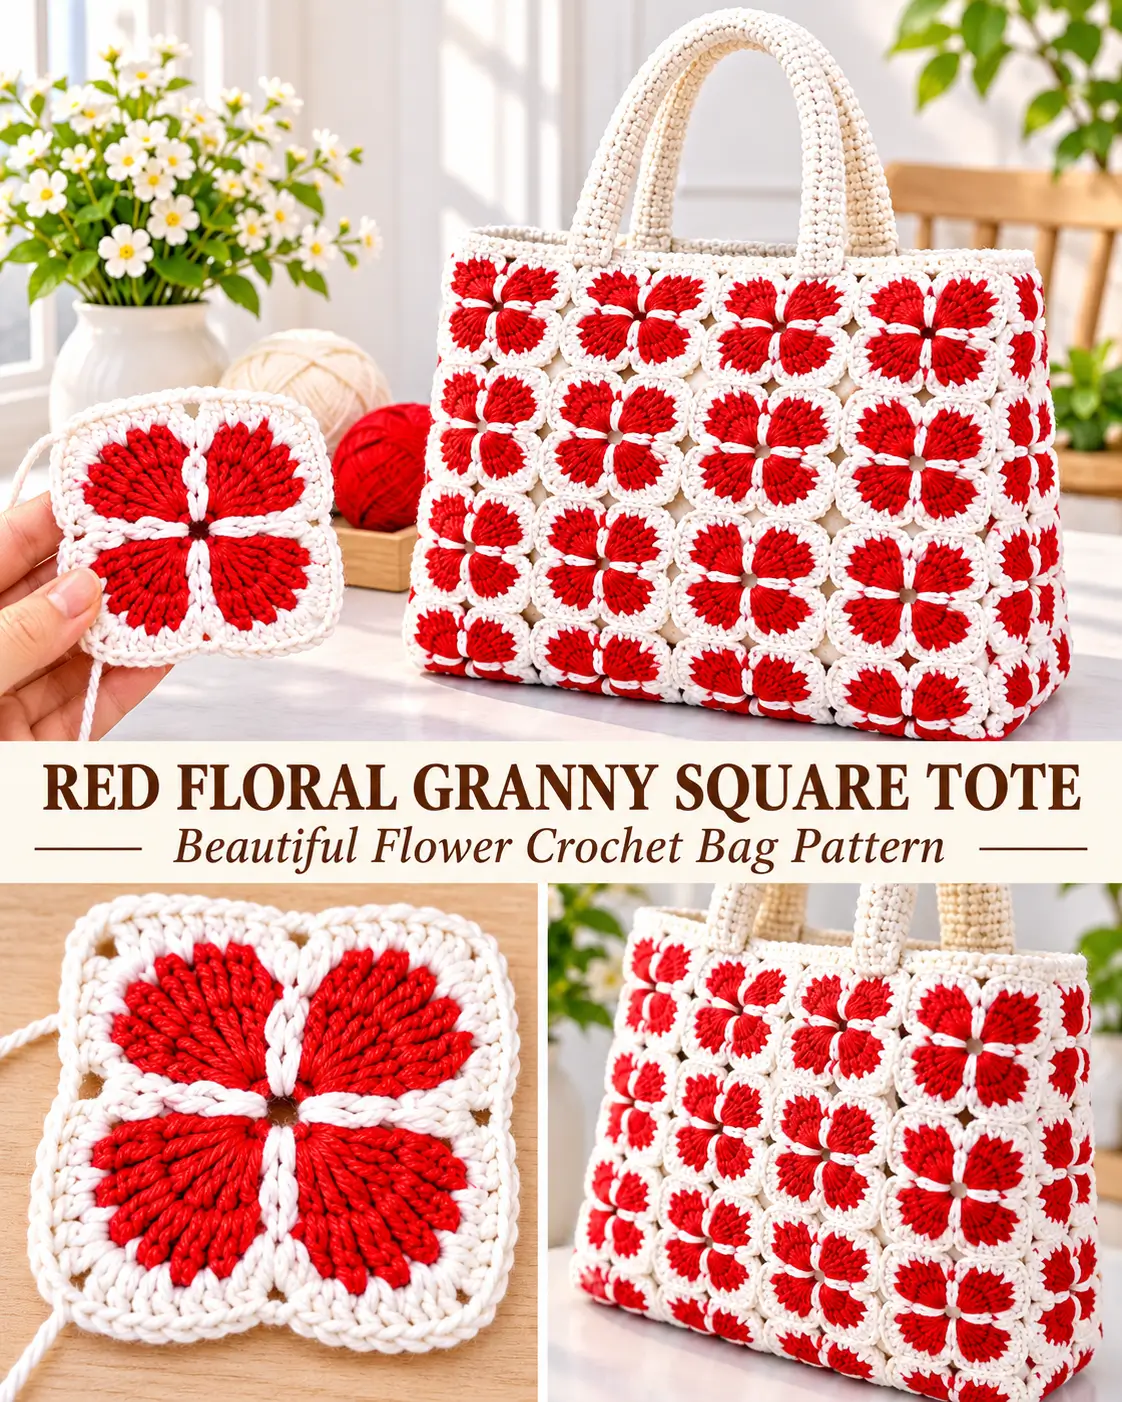
There’s something irresistible about a crochet bag covered in bright red flowers.
The contrast of vivid red petals against soft creamy-white yarn creates a bold, romantic look that feels both vintage and modern. And when those little floral granny squares are joined into a beautiful tote bag, the result is a handmade accessory that looks far more elaborate than its individual pieces.
This red and white floral granny square tote bag features repeated four-petal flower motifs, a softly structured rectangular body, and sturdy cream-colored crochet handles.
Each square starts with a little flower made from raised red crochet fans. The flower is then surrounded by ivory stitches that transform the circular motif into a neat square.
Once you’ve made all your squares, you’ll join them into panels, create a roomy bag with a flat bottom and side gussets, and finish it with two comfortable crocheted handles.
Whether you’re making it for yourself, gifting it to a friend, or looking for a beautiful new crochet bag project, this design is sure to attract attention.
Why You’ll Love This Crochet Bag
- Striking red flowers against an elegant ivory background.
- Beautiful vintage-inspired floral granny square design.
- Repeating motifs that can be made individually.
- Structured rectangular tote shape.
- Two sturdy crocheted handles.
- Spacious enough for many lightweight everyday essentials.
- Customizable size and color combinations.
- Optional fabric lining for extra durability.
- A gorgeous handmade gift.
The project looks especially impressive because the repeated motifs create a continuous floral pattern across the front, back, sides, and bottom.
Crochet Bag Pattern Overview
Pattern name: Red Blossom Granny Square Tote
Skill level: Intermediate
Crochet terminology: US terms
Construction: Individual floral squares joined into panels with a U-shaped gusset
Main stitches: Chain, single crochet, double crochet, slip stitch
Special techniques: Working in the round, color changes, seaming, and crocheted handles
Yarn: Medium-weight cotton or cotton-blend yarn
Suggested hook: 4 mm (G/6), adjusted to achieve the required square size
Main colors: Bright cherry red and creamy ivory
Finished style: Structured floral tote with two handles
Motifs required: 44 squares
Approximate finished dimensions: 13 inches wide × 13 inches high × 3¼ inches deep, before accounting for seam take-up
These dimensions assume finished, blocked squares measuring approximately 3¼ inches per side.
This is an original, measurement-based construction pattern. The precise size, yardage, and finished tension should be confirmed with a crocheted sample.
Materials You’ll Need
- Medium-weight cotton yarn in cherry red – Color A
- Medium-weight cotton yarn in creamy ivory – Color B
- 4 mm crochet hook
- Optional smaller hook for tightly crocheted handles
- Tapestry needle
- Sharp scissors
- Stitch markers
- Measuring tape
- Blocking mats and rustproof pins
- Optional cotton fabric for lining
- Optional cotton webbing or reinforcement material for handles
- Optional removable base insert
Choosing Your Yarn
For a bag that holds its shape, cotton yarn is an excellent choice.
Unlike very soft sweater yarn, firm cotton stitches can provide structure while keeping the floral motifs clearly defined.
A smooth cotton blend can also work well.
Try to avoid extremely stretchy or loosely twisted yarn for the handles, since the bag will need to support its contents.
Choose two contrasting colors:
Color A – Cherry Red: A vivid, saturated red for the four flower petals.
Color B – Creamy Ivory: A warm off-white for the square frame, seams, upper edging, and handles.
Keep the red color consistent across every motif for a coordinated floral appearance.
How Much Yarn Do You Need?
The exact yarn quantity depends on your hook, yarn thickness, tension, and finished square size.
Since this tote uses 44 granny squares, the most reliable way to estimate yarn is to crochet one complete sample square.
Weigh the red and ivory yarn used separately if possible, then multiply each amount by 44.
Add additional ivory yarn for the joining seams, top edging, and two handles.
Purchase extra yarn if you’re planning a deeper or wider bag.
This approach is much more reliable than assuming every cotton yarn will use the same yardage.
Crochet Abbreviations
All instructions use US crochet terminology.
- Ch: Chain
- Sc: Single crochet
- Dc: Double crochet
- Sl st: Slip stitch
- St: Stitch
- Sp: Space
- Rep: Repeat
- RS: Right side
- WS: Wrong side
- BLO: Back loop only
Special Stitch: Red Flower Fan
A red flower fan consists of seven double crochet stitches worked into the same chain space.
The wide fan creates one rounded flower petal.
Four fans arranged around the small center produce the main four-petal floral design.
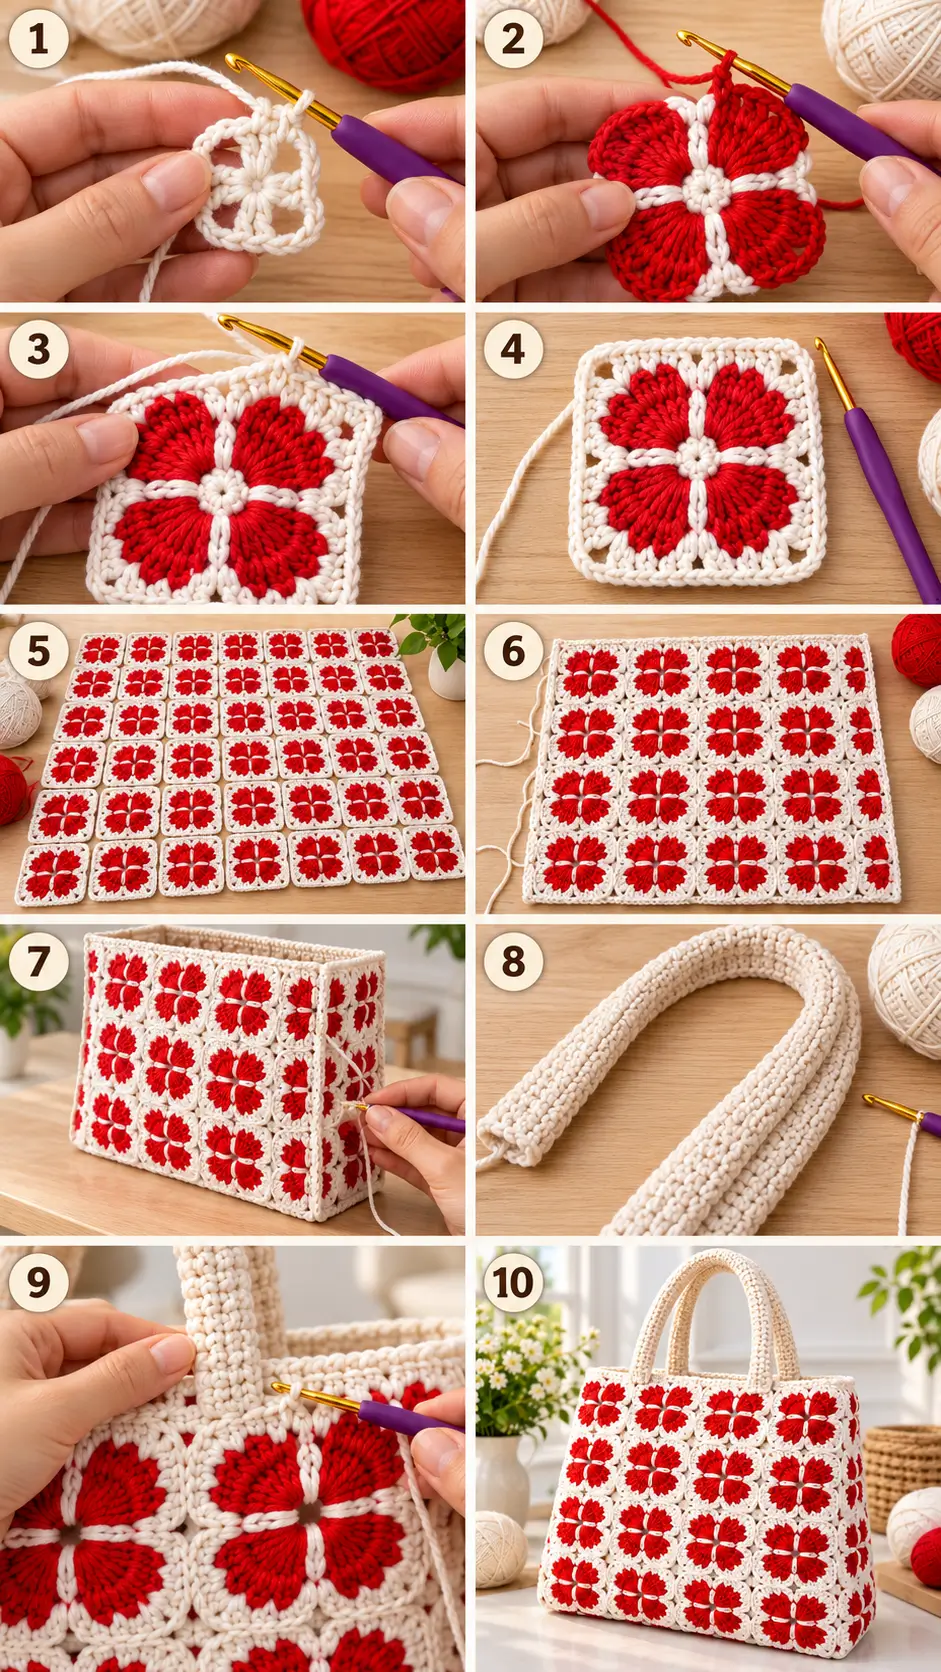
Part 1: Crochet the Red and White Floral Granny Square
The square begins as a small four-section ring, grows into a red flower, and finishes as an ivory-framed square.
You’ll make the same motif repeatedly until you have enough squares for the entire bag.
Round 1 – Create the Flower Foundation
Using Color B (creamy ivory):
- Make a magic ring.
- Chain 1. This does not count as a stitch.
- Work 1 single crochet into the ring.
- Chain 3.
- Repeat the sequence of 1 single crochet and chain 3 three more times.
- Slip stitch into the first single crochet to join.
- Pull the ring gently closed.
- Fasten off the ivory yarn.
Stitch count: Four single crochet stitches and four chain-3 arches.
These four arches provide the foundation for the four red flower petals.
Round 2 – Crochet the Four Red Petals
Join Color A (cherry red) into any chain-3 arch.
- Chain 3. This counts as the first double crochet.
- Work 6 additional double crochet stitches into the same arch.
You now have seven double crochet stitches forming one red petal.
- Chain 2.
- Work 7 double crochet stitches into the next chain-3 arch.
- Chain 2.
- Repeat the seven-double-crochet fan and chain-2 sequence in the remaining two arches.
- Slip stitch into the top of the starting chain 3.
- Fasten off the red yarn.
Stitch count: Four red fans, each containing seven double crochets, separated by four chain-2 spaces.
The motif should resemble a four-petal red flower.
Helpful Tip
Do not pull the red fan stitches too tightly.
The petals need enough space to spread outward, creating a rounded flower shape.
Round 3 – Add the Creamy-White Flower Frame
This round begins transforming the circular flower into a square.
Join Color B into any chain-2 space between the red petals.
First Corner
- Chain 3. This counts as the first double crochet.
- Work 2 more double crochets into the same space.
- Chain 2.
- Work 3 double crochets into the same space.
You’ve created the first ivory corner.
First Side
- Chain 1.
- Locate the middle stitch—the fourth double crochet—of the next seven-stitch red fan.
- Work 1 single crochet into that fourth red stitch.
- Chain 1.
Next Corners and Sides
- In the next chain-2 space between red petals, work 3 dc, ch 2, 3 dc.
- Chain 1.
- Work 1 sc into the fourth double crochet of the next red fan.
- Chain 1.
- Continue around, working the same corner and side sequence.
- Join to the top of the starting chain 3.
Stitch count: Four cream corners, each made from two groups of three double crochets; four single crochets positioned at the red petal centers; and eight chain-1 spaces.
The white stitches begin separating and outlining the four red petals.
Your flower now has four recognizable corners.
Round 4 – Complete the Ivory Granny Square Border
Remain with creamy-ivory yarn.
Slip stitch across to the nearest corner chain-2 space.
- Work 3 dc, ch 2, 3 dc into the corner.
- Chain 1.
- Work 3 dc into the next chain-1 space along the side.
- Chain 1.
- Work 3 dc into the following chain-1 space.
- Chain 1.
- Work 3 dc, ch 2, 3 dc into the next corner.
- Repeat the same side and corner sequence around the square.
- Join with a slip stitch.
Stitch count: Sixteen groups of three double crochets in total, including the corner groups, with four chain-2 corner spaces.
Fasten off and weave in the loose ends.
The square should now have:
- Four vivid red fan-shaped petals.
- A small ivory center.
- Cream stitches separating the petals.
- Four clearly defined ivory corners.
- A neat cream granny square frame.
This is the basic motif used throughout the bag.
Adjusting the Motif Size
For this tote, aim for approximately 3¼ inches per finished square after blocking.
If your square is too small, first check whether a slightly larger hook produces the correct size without making the fabric excessively loose.
You can also add another ivory granny-square round.
For an additional round, work 3 dc, ch 2, 3 dc in every corner, place 3 dc in each side chain-1 space, and chain 1 between neighboring groups.
Every motif used in the bag must have the same number of rounds and matching finished measurements.
Part 2: Make All 44 Flower Squares
You’ll need a total of 44 identical red and ivory flower squares.
Arrange them as follows:
| Bag Section | Floral Squares |
|---|---|
| Front panel | 16 |
| Back panel | 16 |
| Left gusset | 4 |
| Right gusset | 4 |
| Bottom gusset | 4 |
| Total | 44 |
Front and Back
Each main panel is four squares across and four squares high.
Gusset
The bag has a one-square-wide strip around each side and across the bottom.
This creates a boxy shape with real interior depth rather than a flat pouch.
For the most consistent appearance, keep all four red petals oriented in the same direction when you arrange your motifs.
Part 3: Block the Granny Squares
Before sewing, lay the squares flat and compare their measurements.
Because the red fans contain several double crochets worked into one space, some motifs may feel slightly rounded.
Blocking helps the ivory borders sit flat.
Follow the care recommendations for your chosen yarn.
For cotton yarn that allows wet blocking:
- Lightly dampen the squares.
- Place them on blocking mats.
- Shape each motif into a neat square.
- Pin the corners if necessary.
- Allow the squares to dry completely.
Every square should have the same width and height.
This is especially important for a structured tote bag.
Part 4: Assemble the Front Panel
Take 16 completed squares.
Arrange them into four rows of four squares.
Place the motifs with their right sides facing upward.
Check that the red flowers and white square borders are evenly positioned.
Join the First Row
- Place two squares with their right sides facing each other.
- Align the corresponding corner spaces and edge stitches.
- Thread ivory yarn onto a tapestry needle.
- Join the adjacent edges using a mattress stitch or neat whip stitch.
- Add the next square and repeat.
- Continue until all four squares form one row.
Join the Remaining Rows
Repeat until you have four horizontal rows.
Next, join the four completed rows into one rectangular panel.
Keep the seams firm but flexible.
Your completed front panel should measure approximately 13 inches wide and 13 inches high before seam take-up.
Part 5: Assemble the Back Panel
Repeat the same process using another 16 floral squares.
Arrange them four across and four down.
Join the motifs into one matching rectangular panel.
Lay the front and back panels side by side.
Their dimensions should match as closely as possible.
You now have the two main faces of your bag.
Part 6: Create the Side and Bottom Gussets
The gusset gives the tote its depth.
You’ll make three narrow strips of floral squares.
Left Gusset
Join four squares into one long vertical strip.
Right Gusset
Join another four squares into an identical strip.
Bottom Gusset
Join the final four squares into one horizontal strip.
Each strip is one square wide.
The side strips are four squares long, while the bottom strip is four squares wide.
Form the U-Shaped Gusset
Lay the bottom strip horizontally.
Place one side strip vertically along each end.
Join the bottom end of the left strip to the left end of the bottom strip.
Repeat on the opposite side.
The three strips should now form one large U-shaped piece.
This will wrap around the two sides and bottom of the tote.
Part 7: Attach the Gusset to the Front Panel
Lay the front panel flat with the right side facing upward.
Position the U-shaped gusset around the left, bottom, and right edges of the panel.
Match the square corners and joining seams.
Use stitch markers to secure the positioning.
With right sides together:
- Sew the left gusset strip to the left edge of the front panel.
- Sew the bottom gusset strip to the lower edge.
- Sew the right gusset strip to the right edge.
- Make sure the gusset turns neatly at the bottom corners.
Avoid pulling the seams so tightly that the rectangular panel begins to distort.
The bag should start taking on a shallow three-dimensional shape.
Part 8: Attach the Back Panel
Place the back panel against the remaining free edge of the U-shaped gusset.
Make sure the floral squares face outward.
Align the corners and seams.
With right sides together, sew:
- The left side of the back panel to the left gusset strip.
- The bottom of the back panel to the bottom gusset strip.
- The right side of the back panel to the right gusset strip.
Keep the upper opening unsewn.
Turn the entire bag right side out.
You should now have a boxy rectangular tote with:
- A floral front.
- A matching floral back.
- Two floral side gussets.
- A floral bottom.
- An open upper edge.
Gently straighten the corners with your fingers.
Part 9: Crochet the Top Edge
Use creamy-ivory yarn and your main crochet hook.
Join the yarn at a side seam near the top opening.
Edging Round 1
- Chain 1.
- Work single crochet stitches evenly around the entire upper opening.
- When crossing a joining seam, avoid making several bulky stitches in the same point.
- Continue around the front, side, back, and opposite side.
- Slip stitch to the first single crochet.
Edging Rounds 2–3
Chain 1.
Work one single crochet in each stitch around the opening.
Slip stitch to join.
Repeat once more.
Fasten off and weave in the ends.
The three rounds create a neat, slightly reinforced top rim.
If the rim begins to flare or pull inward, adjust the stitch distribution before completing the edging.
Part 10: Crochet the Two Ivory Handles
The handles are one of the most important structural elements of this bag.
For a design similar to the inspiration photograph, we’ll create two softly rounded ivory crochet handles.
Use a slightly smaller crochet hook if needed to produce a dense, firm fabric.
Handle 1
Using ivory yarn:
- Chain 13.
- Single crochet into the second chain from the hook.
- Work one single crochet into each remaining chain.
You should have 12 single crochet stitches.
Row 2
- Chain 1 and turn.
- Work one single crochet into each of the 12 stitches.
Repeat
Continue working 12 single crochet stitches in each row until the strap measures approximately 22 inches long.
Keep the rows tight and consistent.
Make the Rounded Handle
Fold the long crocheted strip lengthwise so its two long edges meet.
Use ivory yarn and a tapestry needle to sew the long edges together.
This creates a softly rounded, padded-looking handle.
If desired, insert a narrow strip of sturdy cotton tape inside before closing the seam to reduce stretching.
Fasten off securely.
Handle 2
Repeat the entire process to create a second identical handle.
Both handles should match in length and thickness.
Part 11: Attach the Handles
Lay the bag flat with the front facing upward.
Position the first handle so its two ends are evenly spaced across the upper front panel.
For the four-square-wide front, try placing the strap ends near the centers of the two outermost top squares.
Allow approximately 1½–2 inches of each strap end to overlap the inside of the bag for secure attachment.
Check that the handle forms a comfortable arch.
Sew the First Handle
- Pin both strap ends in position.
- Thread ivory yarn through your tapestry needle.
- Sew each strap end securely to the upper bag fabric.
- Reinforce the attachment with several rows of stitching.
- Work through strong structural stitches rather than only the decorative flower petals.
- Fasten off securely.
If you’re adding a fabric lining, use interior reinforcement patches at the handle attachment points.
Attach the Second Handle
Repeat on the back panel.
Make sure both handles are aligned and hang at the same height.
Before using the tote, gently test the handle attachments with light contents.
For carrying heavier items, add fabric reinforcement and a sturdy lining.
Part 12: Add an Optional Fabric Lining
A fabric lining is strongly recommended if you plan to use the bag regularly.
Because granny squares have small openings between stitches, keys, pens, and other small items may slip through the fabric.
A lining also helps reduce stretching.
Choosing Fabric
Use medium-weight cotton or canvas in a coordinating ivory shade.
Making the Lining
- Measure the inside width, height, and depth of your finished bag.
- Cut lining pieces using those actual measurements, adding suitable seam allowances.
- Sew the lining into a matching rectangular bag shape with a bottom and side depth.
- Turn the lining so the finished side faces inward.
- Place it inside the crochet tote.
- Fold the raw upper edge under.
- Hand-sew the lining just below the crochet rim.
Keep the lining smooth without stretching the crochet fabric.
Do not sew the lining across the handle openings or interfere with the reinforced handle attachments.
Part 13: Finish the Bag
Once the lining and handles are attached, check the entire tote.
Weave in any remaining yarn ends.
Inspect the floral motifs and joining seams.
Make sure all four bottom corners are neat.
Check the top edging for loose stitches.
Gently shape the tote with your hands.
If appropriate for your yarn, lightly block or steam-shape the exterior according to the fiber’s care instructions, avoiding excessive heat or stretching.
Your beautiful Red Blossom Granny Square Tote is now complete!
Creative Ways to Customize Your Tote
Make It in Burgundy and Cream
Replace the bright cherry-red petals with deep wine-red yarn.
This creates a more understated vintage accessory.
Try Pink Flowers
Use blush pink or dusty rose for a softer romantic version.
Make a Mini Handbag
Use smaller finished squares or a reduced motif layout.
For example, three squares across and three squares down on both main faces will create a smaller bag. Recalculate the side and bottom strips to match.
Make a Larger Market Tote
Add another column of floral squares to both front and back panels.
Extend the bottom gusset by the same number of squares.
Make the Handles Longer
Crochet longer strips if you prefer a shoulder bag.
Reinforce the attachment points and test the length before sewing them in place.
Use a Different Flower Color for Each Row
Try alternating red, pink, burgundy, and coral floral squares while keeping the borders ivory.
This creates a colorful garden-inspired version.
Tips for a Professional-Looking Crochet Bag
Use consistent yarn thickness. Mixing different yarn weights can produce uneven motifs.
Block all squares before joining. Matching dimensions give the bag a cleaner finished shape.
Keep the seams even. Tight seams can distort the floral motifs.
Use durable yarn for handles. Handles experience more tension than the decorative panels.
Reinforce the top edge. A firm rim helps the bag keep its shape.
Consider a lining. It makes the bag more practical and reduces stretching.
Don’t overload the bag. Crochet straps and decorative motifs should not be expected to carry heavy objects without proper reinforcement.
Frequently Asked Questions
Is this floral granny square bag beginner-friendly?
The individual stitches are familiar, but making the four-petal motif, joining the gusset, and reinforcing the handles require some experience.
This project is best suited to intermediate crocheters or confident beginners ready for a larger project.
How many granny squares do I need?
This version uses 44 floral granny squares: 16 for the front, 16 for the back, and 12 for the side and bottom gussets.
What yarn is best for this bag?
Firm cotton or cotton-blend yarn is a practical choice because it provides clear stitch definition and better structural support.
Can I make the bag without a lining?
Yes, especially if you use it for lightweight items that won’t slip through the crochet openings.
However, a lining is recommended for more frequent everyday use.
Can I use acrylic yarn?
Yes, but many acrylic yarns are softer and more elastic than cotton, so the bag may stretch more when filled.
A lining and reinforced straps can help.
How do I make the bag bigger?
Increase the number of squares across the front and back, or make larger motifs.
Adjust the side and bottom gusset dimensions to match the new body panels.
Can I use this motif for other projects?
Absolutely. The same red and ivory floral granny squares can be used for matching pouches, cushion covers, blankets, and other accessories.
More Crochet Projects You’ll Love
If you enjoy this floral tote, you might also like:
- Blue Floral Granny Square Cardigan
- Vintage Floral Granny Square Crochet Top
- Daisy Meadow Crochet Pouch
- Colorful Granny Square Tote Bag
- Beginner-Friendly Crochet Market Bag
- Flower Granny Square Blanket
These projects provide more ways to transform beautiful crochet motifs into practical handmade items.
Final Thoughts
A red and white floral granny square tote is the kind of crochet project that makes a lasting impression.
The vivid red petals create a beautiful contrast against the soft ivory background, while the repeated flower motifs transform a simple bag shape into something wonderfully decorative.
From crocheting the first little flower to joining the panels and attaching the final handles, every stage brings the finished design closer to life.
Whether you’re making it as a gift, adding it to your handmade wardrobe, or looking for a new way to use floral granny squares, this tote is a lovely project to explore.