Vintage Floral Granny Square Crochet Top
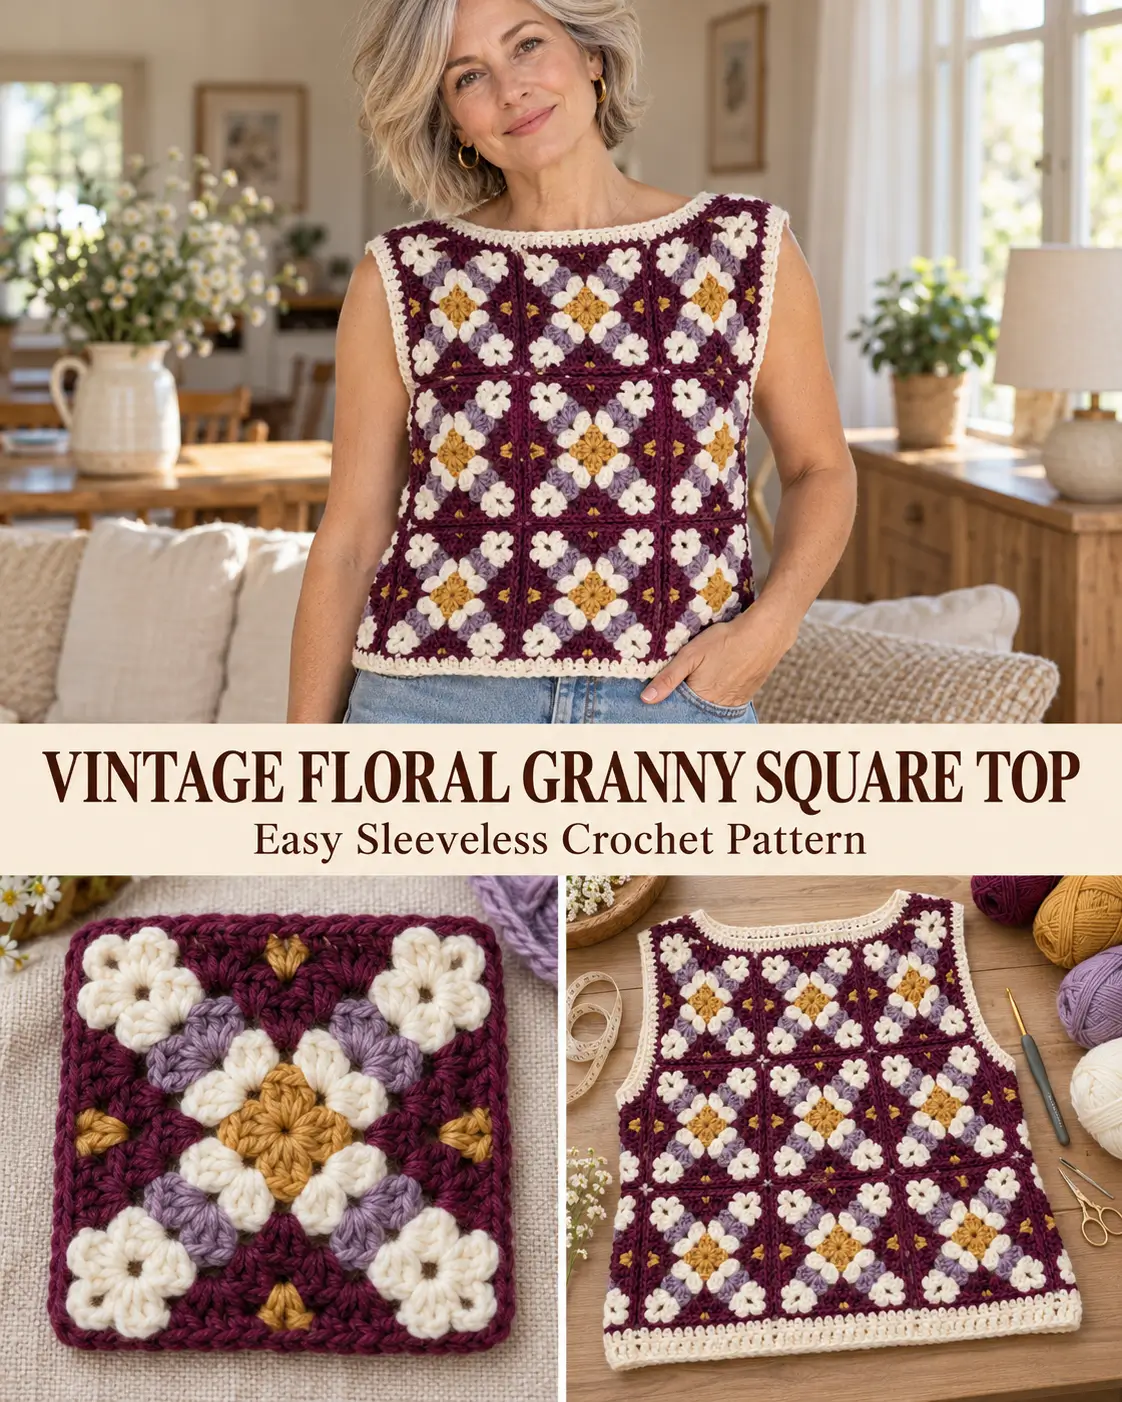
Some granny squares are so pretty that you immediately start imagining what you could make with them.
That’s exactly the inspiration behind this beautiful vintage floral granny square crochet top.
The combination of deep burgundy, golden mustard, dusty lavender, and creamy ivory gives this design a rich, slightly retro appearance. Small floral details make every square look like a miniature piece of handmade artwork.
Instead of using the motifs for a traditional blanket, we’re turning them into a stylish sleeveless crochet top with a comfortable boxy silhouette, a wide boat neckline, and beautifully finished edges.
The best part is that the top is constructed from simple square panels. Once you’ve mastered the floral motif, you’ll repeat it until you have enough squares to assemble the garment.
This is a lovely project for crocheters who want to explore wearable crochet without dealing with complicated sweater shaping.
Why You’ll Love This Crochet Top
- Uses a beautiful vintage-inspired floral granny square.
- Combines four gorgeous coordinating yarn colors.
- Features an easy, relaxed boxy silhouette.
- No complicated sleeve shaping.
- Constructed from repeatable granny square motifs.
- Comfortable boat neckline and sleeveless design.
- Perfect for layering over a fitted tank or camisole.
- Easy to adjust for different sizes.
- A beautiful handmade gift or statement wardrobe piece.
Crochet Top Pattern Overview
Pattern name: Vintage Plum Blossom Granny Square Top
Skill level: Intermediate
Crochet terminology: US terms
Construction: Two rectangular granny square panels
Style: Sleeveless boxy top
Neckline: Wide boat neckline
Fit: Relaxed with positive ease
Number of motifs: 18
Front panel: 9 squares
Back panel: 9 squares
Joining method: Mattress stitch or slip-stitch seaming
Finishing: Ivory single crochet edging
Recommended yarn: DK (#3) or light worsted (#4)
Suggested hook: 4.0 mm for light worsted yarn; adjust based on gauge
The 3.0 mm hook visible in the inspiration photo may be suitable for that particular yarn, but it does not establish the gauge for this new garment.
This is a customizable, measurement-based pattern. A completed sample square is required to determine the most appropriate hook and final dimensions.
Materials You’ll Need
Gather the following materials:
- Golden mustard yarn – Color A
- Creamy ivory yarn – Color B
- Dusty lavender yarn – Color C
- Deep burgundy or plum yarn – Color D
- Crochet hook suitable for your chosen yarn
- Yarn needle for joining
- Scissors
- Measuring tape
- Stitch markers
- Blocking mats and pins, if appropriate for your yarn
Choosing the Right Yarn
For a wearable crochet top, soft cotton blends or lightweight acrylic yarns can work beautifully.
Cotton provides excellent stitch definition and is especially attractive for floral motifs.
A cotton-acrylic blend may offer more flexibility and reduce some of the weight associated with a solid cotton garment.
Choose yarns with approximately the same thickness so the motifs stay consistent.
Because this design includes multiple flower details, avoid overly fuzzy yarn that hides the stitches.
The Vintage Floral Color Palette
The colors in this design are inspired directly by the granny square in the reference photograph.
Color A – Golden Mustard
A muted antique-gold shade used for the flower center.
Color B – Creamy Ivory
A soft warm white used for the center flower petals, small corner flowers, and garment edging.
Color C – Dusty Lavender
A muted purple shade used for the decorative floral background accents.
Color D – Deep Burgundy
A rich plum or wine-red shade used to frame the flower and create the main square background.
Keep the same arrangement across all motifs for a coordinated finished top.
Crochet Abbreviations
- Ch – Chain
- Sc – Single crochet
- Hdc – Half double crochet
- Dc – Double crochet
- Sl st – Slip stitch
- St – Stitch
- Sp – Space
- Rep – Repeat
- RS – Right side
- WS – Wrong side
Special Stitch: Three-Double-Crochet Cluster (3-dc-cl)
This stitch creates one raised petal.
- Yarn over.
- Insert the hook into the indicated space.
- Yarn over and pull up a loop.
- Yarn over and pull through the first two loops.
- Repeat Steps 1–4 twice more in the same space.
- You should now have four loops on your hook.
- Yarn over and pull through all four loops.
- Chain 1 to secure the cluster.
The chain 1 is the cluster’s closing chain. When the pattern separately specifies chain spaces between clusters, work those chains in addition to the closing chain.
Part 1: How to Crochet the Vintage Floral Granny Square
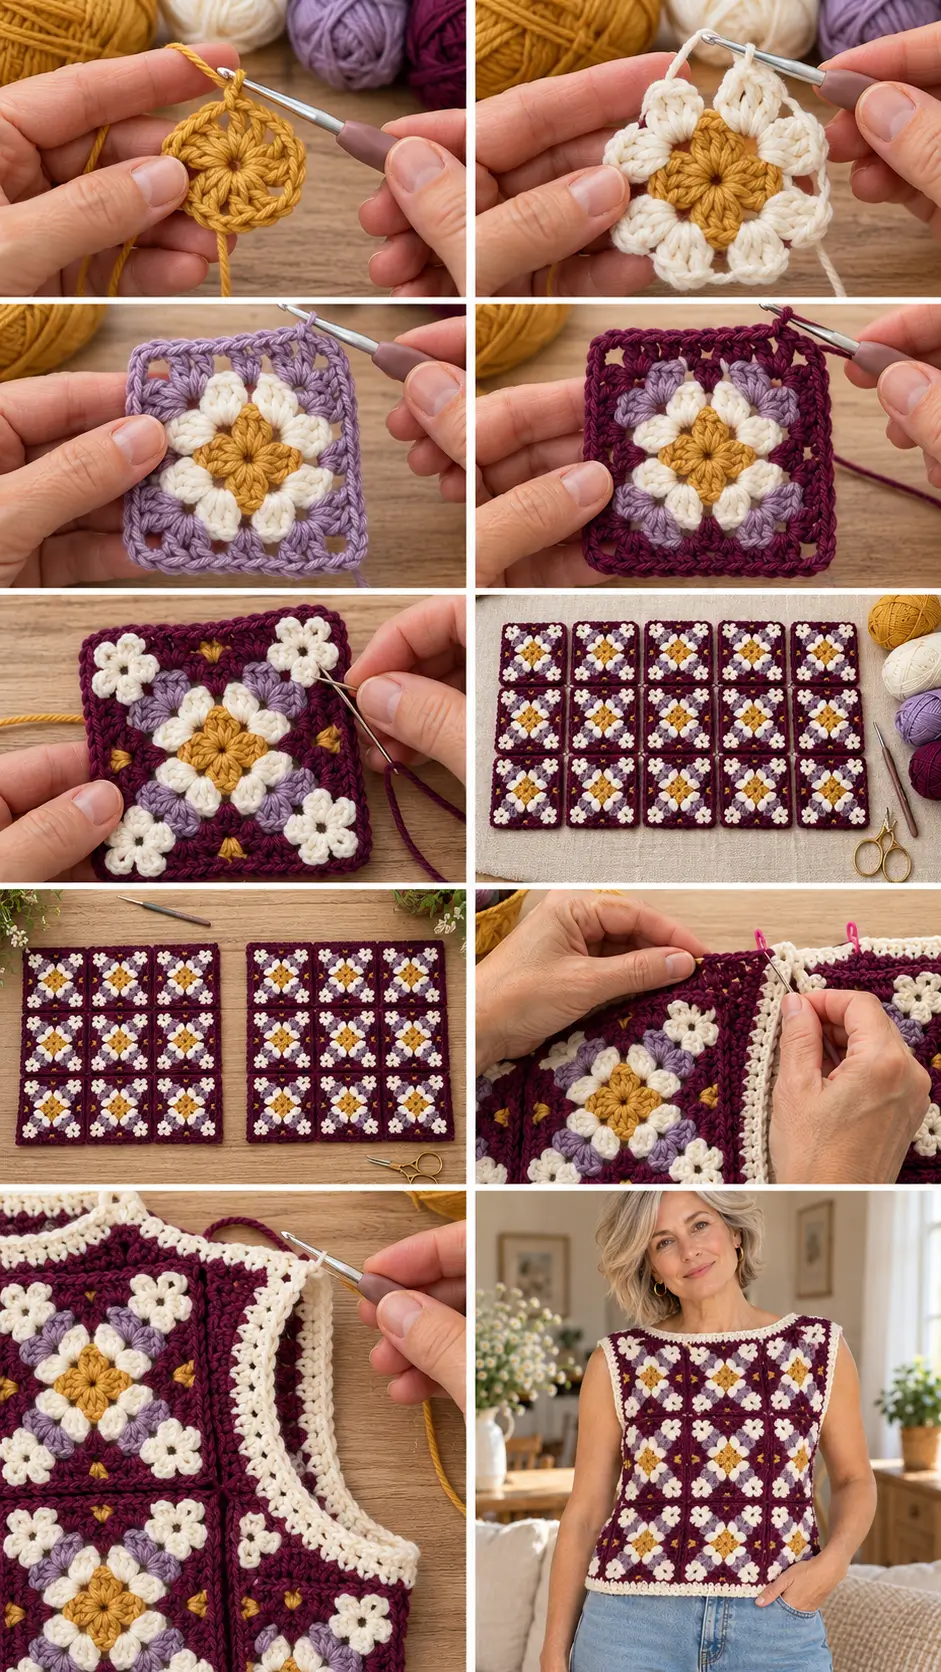
This original motif is built in five main stages:
- Mustard flower center
- Ivory raised center petals
- Lavender square-setting round
- Burgundy square background
- Four small ivory corner flower embellishments
The motif has a structured granny-square foundation, making it suitable for joining into a garment.
Round 1 – Golden Mustard Center
Using Color A:
- Make a magic ring.
- Chain 3. This counts as the first double crochet.
- Work 2 double crochet stitches into the ring.
- Chain 2.
- Work 3 double crochet stitches into the ring.
- Chain 2.
- Repeat the three-double-crochet cluster followed by chain 2 twice more.
- Slip stitch into the top of the starting chain 3.
- Pull the magic ring closed.
- Fasten off.
Stitch count: Four groups of three double crochet stitches, separated by four chain-2 spaces.
This creates a small mustard-colored center with four sections.
Round 2 – Ivory Flower Petals
Join Color B into any chain-2 corner space.
- Work one 3-dc-cl into the corner space.
- Chain 2.
- Work another 3-dc-cl into the same space.
- Chain 2 to travel to the next corner space.
- Repeat the paired clusters in each of the remaining three corner spaces.
- Chain 2 after the last paired cluster.
- Join with a slip stitch into the top of the first petal cluster.
- Fasten off.
Stitch count: Eight raised ivory petal clusters, arranged as four pairs.
There are four chain-2 spaces between the paired petals and four chain-2 spaces between neighboring pairs.
The center should now resemble a small cream flower surrounding the mustard center.
Round 3 – Dusty Lavender Floral Frame
Join Color C into one of the four chain-2 spaces located between the two ivory petals worked into the same Round 1 corner.
These four spaces will become the corners of the new square.
- Work 3 dc, ch 2, 3 dc into the first corner space.
- Chain 1.
- Work 3 dc into the next chain-2 space between neighboring ivory petal pairs.
- Chain 1.
- Work 3 dc, ch 2, 3 dc into the next corner space between paired petals.
- Chain 1.
- Work 3 dc into the next intervening side space.
- Chain 1.
- Repeat this pattern around all four sides.
- Join to the beginning chain or first double crochet.
- Fasten off.
Stitch count: Twelve three-double-crochet groups: eight corner groups and four side groups.
The flower is now surrounded by a lavender frame with four clear corners.
Round 4 – Deep Burgundy Square Background
Join Color D into any lavender corner chain-2 space.
- Work 3 dc, ch 2, 3 dc into the corner.
- Chain 1.
- Work 3 dc into the next side chain-1 space.
- Chain 1.
- Work 3 dc into the following side chain-1 space.
- Chain 1.
- Work 3 dc, ch 2, 3 dc into the next corner.
- Repeat around the square, working 3 dc into each side chain-1 space and 3 dc, ch 2, 3 dc into every corner.
- Chain 1 between neighboring groups.
- Join with a slip stitch.
Stitch count: Sixteen groups of three double crochet stitches around the square, including the corner groups.
Your floral square should now have a deep plum-colored border.
Round 5 – Continue the Burgundy Border
Remain with Color D.
- Move into the next corner chain-2 space with slip stitches.
- Work 3 dc, ch 2, 3 dc into the corner.
- Chain 1.
- Work one group of 3 dc into each chain-1 space along the side.
- Chain 1 between groups.
- Repeat the corner and side instructions around the entire square.
- Join with a slip stitch.
Stitch count: Twenty three-double-crochet groups in total, including all corner groups.
Additional Rounds – Adjust the Square Size
Continue using the same granny square formula if your motif needs to be larger:
In each corner: 3 dc, ch 2, 3 dc.
In each chain-1 side space: 3 dc.
Between neighboring groups: ch 1.
Each additional round adds four granny clusters to the total count.
Continue until your square reaches the required measurement for your chosen top size.
Fasten off and weave in the ends.
Part 2: Add the Four Small Ivory Flowers
The inspiration square has beautiful small cream flower details near its four corners.
For this design, we’ll create separate miniature four-petal flowers and attach them to the square after the main motif is complete.
This keeps the structural granny square easy to count and join.
Mini Flower Pattern – Make Four Per Square
Using Color B:
- Chain 4.
- Slip stitch into the first chain to form a small ring.
- Chain 2.
- Work 3 half double crochet stitches into the ring.
- Chain 2.
- Slip stitch into the ring.
One petal is complete.
Repeat Steps 3–6 three more times.
You should have four rounded flower petals.
Fasten off, leaving a yarn tail long enough for sewing.
Attach the Corner Flowers
Lay the completed burgundy granny square flat with the right side facing upward.
Position one ivory flower near each corner, slightly inward from the outer edge.
Using the yarn tail, sew each flower securely to the fabric through its center and petal bases.
Do not sew across the outermost joining stitches or chain-2 corner spaces.
This prevents the flowers from interfering with the final seams.
Repeat until all four corners are decorated.
Each completed motif should feature:
- One mustard center
- Eight ivory center-petal clusters
- Lavender accent stitches
- A burgundy square background
- Four small ivory corner flowers
Part 3: Determine Your Top Size
This pattern uses three squares across the front and three squares across the back.
Each panel is also three squares tall.
The width of the finished top is controlled by the finished square size.
Suggested Size Planning
| Square Size | Approx. Top Chest | Body Length Before Edging |
|---|---|---|
| 6 in | 36 in | 18 in |
| 6.5 in | 39 in | 19.5 in |
| 7 in | 42 in | 21 in |
| 7.5 in | 45 in | 22.5 in |
| 8 in | 48 in | 24 in |
These are geometric measurements based on the square layout, before small allowances for seams and edging.
Choose a finished chest circumference approximately 2–4 inches larger than your body measurement for a comfortable relaxed fit, adjusting for your preferred ease.
For example, someone with a 38-inch bust might aim for a finished circumference of approximately 40–42 inches.
That could mean making squares around 6.75–7 inches wide.
Important: Enlarging the squares also increases the length of the top. Measure against a favorite garment before making all 18 motifs.
If you want a shorter top, you can reduce the body to two rows of squares, but that changes the motif count to 12 and creates a noticeably cropped style.
Part 4: Crochet All 18 Floral Granny Squares
Once your sample square is the correct size, make the remaining motifs.
You need:
9 floral granny squares for the front.
9 floral granny squares for the back.
All 18 squares should have matching outer dimensions and the same number of structural rounds and edge stitches.
If you use one additional burgundy round on some squares, add that round to every square used in the same garment.
This makes seaming much easier.
For consistency, use the same four-color arrangement throughout.
When finished, you’ll have 18 beautiful floral granny squares ready for assembly.
Part 5: Block the Granny Squares
Blocking helps straighten the square edges and gives the floral details a more even appearance.
Lay each motif flat on a blocking mat.
If your yarn allows wet blocking, gently dampen the squares and shape them to the desired measurements.
Use rustproof pins if necessary.
Do not stretch the flowers excessively.
Allow the squares to dry completely before removing them.
Check that every finished motif has the same side length.
Part 6: Arrange the Front and Back Panels
The garment is made from two identical rectangular panels.
Front Panel
Arrange nine granny squares into three columns and three rows:
| Flower | Flower | Flower |
| Flower | Flower | Flower |
| Flower | Flower | Flower |
Back Panel
Repeat the same three-by-three arrangement using the remaining nine squares.
Every floral square should face the same way.
The cream flowers and mustard centers should be evenly positioned.
Lay the two panels beside each other and compare their dimensions.
Part 7: Join the Granny Squares Into Panels
Use burgundy yarn for the joins so they blend into the square borders.
You can use a mattress stitch for a flatter finish or slip-stitch seaming for a slightly more defined ridge.
Join the Front
- Lay three squares side by side with the right sides facing upward.
- Sew their adjacent edges together.
- Repeat until you have three horizontal rows of three squares.
- Sew the rows together, matching the square corners.
- Weave in the joining ends.
You now have one rectangular front panel.
Join the Back
Repeat the same process with the remaining nine squares.
Check that both panels have identical measurements.
Part 8: Create the Boat Neckline
This top has a wide, relaxed boat neckline rather than a deep V-neck.
Place the front and back panels together with the right sides facing inward.
Align the upper edges.
Mark the Neck Opening
Measure the full width of your panel.
Choose a comfortable neckline opening approximately 11–13 inches wide, depending on your size and preferred style.
The neck opening should comfortably pass over your head after edging.
For example:
If your panel measures 21 inches wide and you want a 12-inch neckline:
21 − 12 = 9 inches.
Divide by two:
9 ÷ 2 = 4.5 inches.
Sew approximately 4.5 inches at each shoulder, leaving the center 12 inches unjoined.
Join the Shoulders
- Place stitch markers to identify both shoulder seam positions.
- Sew the left shoulder section.
- Sew the right shoulder section.
- Leave the entire marked center neckline open.
- Turn the top right side out to check the opening.
Try the neckline over your head before permanently securing the ends.
If the opening is too tight, undo a small portion of each shoulder seam.
If it is too wide, extend the seams equally toward the center.
Part 9: Sew the Side Seams and Create Armholes
With the top turned inside out, align the front and back side edges.
The upper sections must remain open to create armholes.
Recommended Armhole Depth
| Finished Chest | Starting Armhole Depth |
|---|---|
| 36 in | 7.5 in |
| 39 in | 8 in |
| 42 in | 8.5 in |
| 45 in | 9 in |
| 48 in | 9.5 in |
These are starting measurements; check them against your upper-arm circumference and preferred fit.
Seam the First Side
- Measure downward from the shoulder along the outer edge.
- Place a marker at the desired armhole depth.
- Begin sewing at the bottom hem.
- Continue upward until you reach the armhole marker.
- Fasten off securely.
- Leave the space above the marker unsewn.
Repeat on the opposite side.
Turn the top right side out and try it on.
The top should sit comfortably across the bust with enough room for your arms to move.
Part 10: Crochet the Ivory Neckline Edging
The ivory neckline provides a soft contrast against the deep burgundy squares.
Join ivory yarn at one shoulder seam.
Round 1
Chain 1.
Work single crochet stitches evenly around the entire neckline opening.
When crossing seams, keep your stitches evenly spaced.
Slip stitch to the first single crochet to join.
Round 2
Chain 1.
Work one single crochet in each stitch around.
Join with a slip stitch.
Fasten off and weave in the ends.
Fit check: The border must stretch enough to pass over the head. If it becomes too tight, remove it and work with a slightly larger hook or fewer constricting stitches.
Part 11: Crochet the Armhole Edging
Repeat the same technique around both armholes.
Round 1
Join ivory yarn at the underarm seam.
Work single crochet stitches evenly around the armhole.
Join with a slip stitch.
Round 2
Chain 1.
Work one single crochet into each stitch.
Join and fasten off.
Repeat on the opposite armhole.
Make sure both armholes have the same finished dimensions.
Avoid pulling the edging too tightly, especially around the underarm curve.
Part 12: Crochet the Bottom Hem
For a clean vintage finish, add a narrow ivory border to the bottom of the top.
Join ivory yarn at one side seam.
Hem Round 1
Work single crochet stitches evenly around the bottom edge.
Place a suitable number of stitches across the edges of the granny squares so the hem lies flat.
Join with a slip stitch.
Hem Round 2
Chain 1.
Work one single crochet into each stitch around.
Join and fasten off.
The narrow ivory border brings the garment together by repeating the color of the small floral details.
Optional Picot Hem
If you prefer a more decorative vintage finish, add a third round:
Work three single crochet stitches, then chain three and slip stitch into the first of those three chains to create a small picot.
Repeat evenly around the hem.
Keep the picots small so they don’t overwhelm the floral motifs.
Part 13: Final Finishing
Once the top has been assembled:
- Weave in all remaining yarn ends.
- Inspect the shoulder and side seams.
- Check that the four-petal flower decorations are attached securely.
- Try on the top to check the fit.
- Adjust the neckline or armholes if necessary.
- Block the completed garment according to your yarn’s care instructions.
- Allow it to dry completely.
Your vintage floral granny square crochet top is now finished!
How to Customize Your Crochet Top
Make a Cropped Version
Use two rows of granny squares instead of three.
You’ll need six squares for the front and six for the back, for a total of 12 motifs.
Make It Longer
Add an additional row of three squares to both front and back.
This requires six more motifs, bringing the total to 24.
Create a More Relaxed Fit
Make slightly larger granny squares or use a looser gauge.
Remember that larger squares increase both garment width and length.
Try a Different Color Palette
Replace the original shades with:
- Sage green, cream, blush, and gold
- Navy, powder blue, ivory, and tan
- Terracotta, mustard, cream, and olive
- Dusty rose, mauve, ivory, and burgundy
Make a Lightweight Summer Version
Use lighter cotton yarn and a hook appropriate to the yarn.
Check your measurements because lighter yarn may produce smaller motifs.
Turn It Into a Sweater Vest
Work the same sleeveless construction with a slightly heavier yarn and layer the finished top over a long-sleeved shirt.
Helpful Tips for Beautiful Results
Make one complete sample motif first. Check its size, flatness, and flower placement before making the other 17.
Keep the burgundy borders consistent. Even edges make joining significantly easier.
Sew the corner flowers away from the joining edges. This prevents bulky seams.
Try the panels on before final assembly. Garment fit depends on more than just the number of squares.
Use gentle blocking. The floral clusters should remain raised and textured.
Choose comfortable yarn. A wearable top needs enough softness and flexibility to move naturally.
Frequently Asked Questions
Is this granny square crochet top beginner-friendly?
The panel construction is relatively straightforward, but the raised floral clusters and added corner flowers make this an intermediate-level project.
How many granny squares are needed?
The standard version uses 18 floral granny squares: nine for the front and nine for the back.
Can I use cotton yarn?
Yes. Cotton and cotton-blend yarns offer clear stitch definition and work well for sleeveless tops.
Does the top require shaping?
No complicated crochet increases or decreases are needed for the body. The neckline and armholes are formed by controlling where the panels are joined.
Can I make the top without the small corner flowers?
Yes. The structural granny square remains usable without them, although the result will look less like the original floral inspiration.
Can I turn this design into a cardigan?
Yes, but that requires a different body-panel arrangement and additional sleeve construction. This version is specifically designed as a sleeveless top.
More Beautiful Granny Square Projects
If you enjoyed this floral crochet top, you might also like:
- Blue floral granny square cardigan
- Cozy autumn granny square cardigan
- Colorful rainbow granny square sweater
- Granny square crochet tote bag
- Vintage floral granny square blanket
- Easy summer crochet tank top
Final Thoughts
A beautiful granny square deserves more than just a place in a blanket.
This vintage floral crochet top brings together the charm of handmade flower motifs with the practicality of a comfortable wearable garment.
The combination of deep burgundy, dusty lavender, creamy ivory, and golden mustard gives the top a timeless vintage appearance, while the simple boxy construction makes it approachable for crocheters who are ready to try their first or next garment.
Take your time making the flowers, enjoy watching the panels grow, and have fun turning each small granny square into a beautiful handmade top.