Cozy Berry Stitch Crochet Beanie Pattern
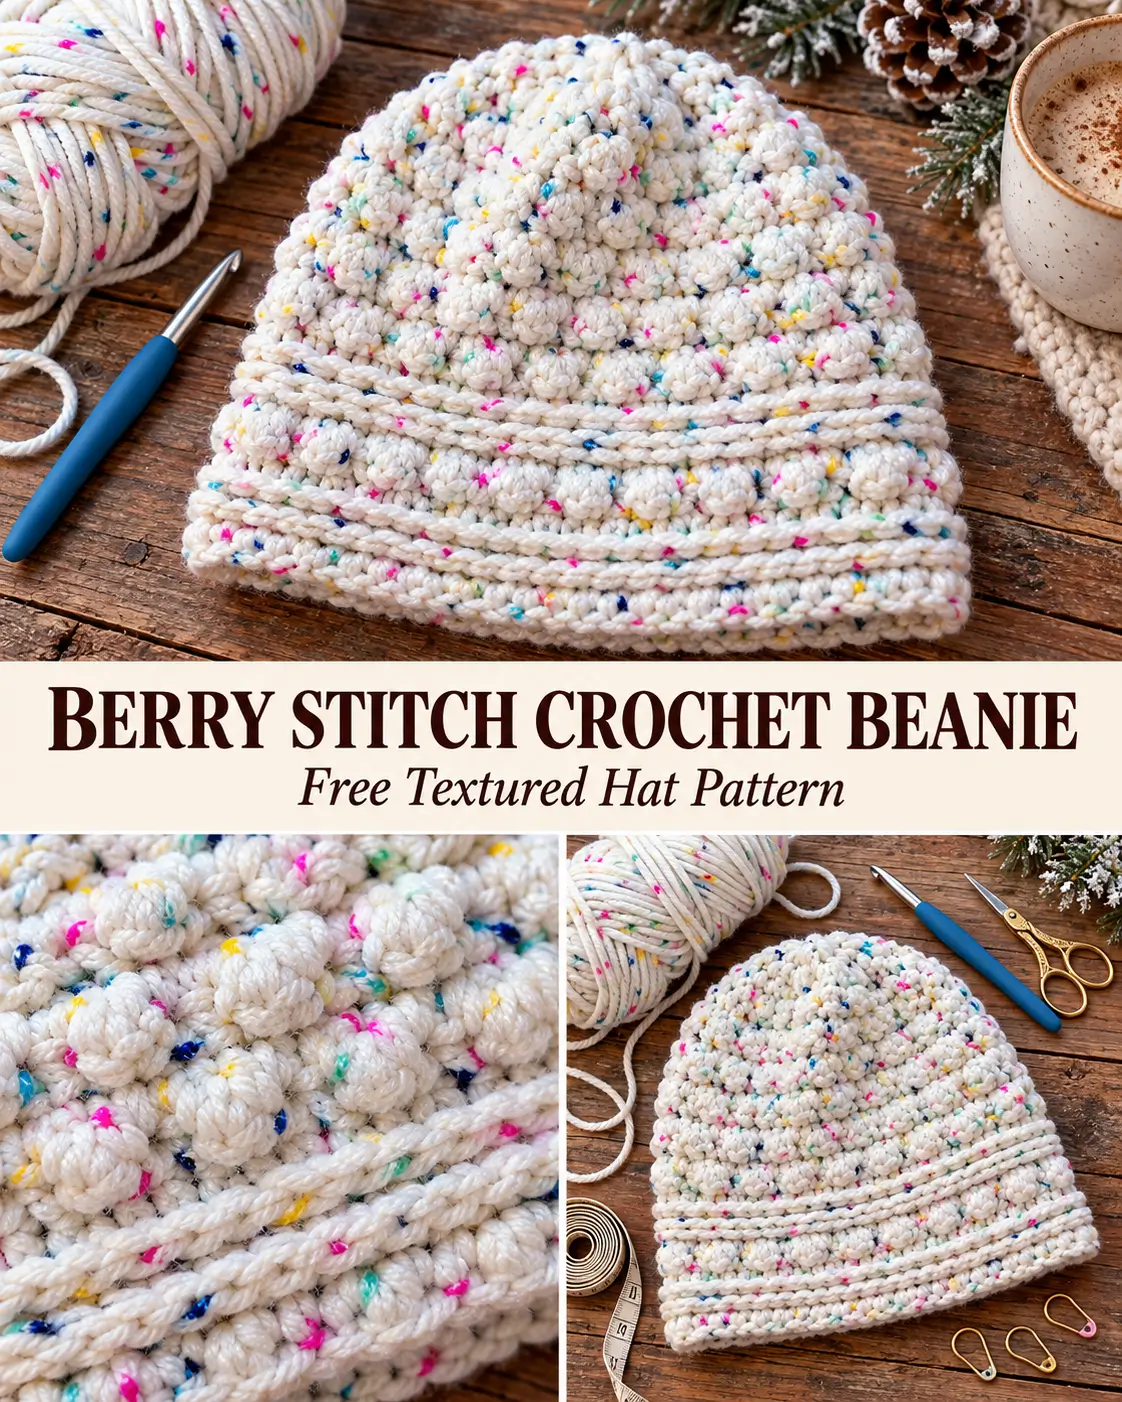
If you love crochet hats with beautiful texture, this cozy berry stitch crochet beanie is a lovely project to add to your winter wardrobe. Its raised stitches, decorative ridges, and colorful speckled yarn give it a handmade appearance that’s both playful and stylish.
What makes this crochet beanie special is the combination of small berry-like bobbles and subtle horizontal ridges. The raised stitches create a textured surface, while the smooth sections between them help define the pattern.
The design looks particularly beautiful when made with cream-colored yarn featuring tiny flecks of pink, turquoise, yellow, and blue. The colorful speckles add interest without distracting from the intricate crochet texture.
This pattern is worked from the bottom up, beginning with a decorative brim and continuing through the textured body before shaping the crown.
Although the finished hat looks detailed, the construction follows a manageable sequence of repeating stitches.
In this free crochet beanie tutorial, you’ll learn how to create the textured brim, crochet the berry-like stitches, form the raised decorative ridges, decrease the crown, and finish the hat neatly.
Why You’ll Love This Crochet Beanie
There are plenty of reasons to try this beautiful textured hat pattern.
- Beautiful raised texture: Small berry-like crochet stitches create a soft, dimensional finish.
- Decorative horizontal ridges: Third-loop crochet stitches add definition between the textured sections.
- Perfect for colorful yarn: Multicolored speckled yarn makes the finished hat especially charming.
- Cozy winter accessory: The relatively dense stitch pattern creates a warm fabric suitable for cool weather.
- Customizable fit: The circumference and length can be adjusted for different head sizes.
- Great handmade gift: The finished hat makes a thoughtful birthday, holiday, or winter gift.
The combination of textured stitches and simple shaping makes this an enjoyable project for crocheters who want to practice beyond basic single crochet and double crochet.
Crochet Berry Beanie Pattern Details
Skill level: Intermediate
Crochet terminology: US terms
Construction: Bottom-up, worked in joined rounds
Suggested size: Adult medium
Suggested head circumference: Approximately 21–23 inches
Target finished circumference: Approximately 20–21 inches, depending on gauge
Target finished height: Approximately 8.5–9.5 inches
Yarn weight: Worsted weight (#4)
Recommended hook: 5.5 mm (I/9), or size needed to meet gauge
Estimated yarn: 180–230 yards
Main stitch techniques: Single crochet, half double crochet, mini berry clusters, third-loop stitches, and half double crochet decreases
The measurements are approximate. This pattern has not been physically sample-tested, so checking your gauge and trying on the hat during construction are important.
Materials You’ll Need
Gather the following supplies before starting your crochet beanie.
- Approximately 180–230 yards of worsted-weight yarn
- 5.5 mm crochet hook
- Optional 6.0 mm hook for a more relaxed foundation chain
- Yarn needle
- Scissors
- Stitch markers
- Flexible measuring tape
Choosing the Best Yarn
For a beanie similar in appearance to the pictured design, choose a smooth, medium-weight yarn in soft ivory or cream with colorful speckles.
Yarn with tiny flecks of pink, blue, aqua, and yellow is especially pretty because the main light-colored background allows the raised stitches to remain visible.
Acrylic yarn is a practical option for everyday winter hats.
Wool and wool-blend yarns can provide warmth, softness, and natural elasticity.
Avoid yarn that is excessively fuzzy because it may obscure the smaller berry-like stitches.
You can also make this beanie using a solid color such as dusty pink, oatmeal, pale gray, sage green, or lavender.
Gauge and Sizing
The suggested gauge is approximately:
14 half double crochet stitches = 4 inches, measured across a relaxed swatch worked with the chosen yarn and hook.
Because the berry clusters have a different shape from ordinary half double crochet stitches, also check the actual circumference of the hat once several textured rounds are completed.
At a stitch gauge of 14 stitches per 4 inches, 72 stitches produce a circumference of approximately 20.6 inches.
For a comfortable hat, some negative ease is usually helpful, meaning the hat is slightly smaller than the wearer’s head.
However, the appropriate amount depends on how stretchy your yarn and stitch pattern are.
The pattern also includes suggestions for adjusting the circumference and length.
Crochet Abbreviations
| Abbreviation | Meaning |
|---|---|
| ch | Chain |
| sl st | Slip stitch |
| sc | Single crochet |
| hdc | Half double crochet |
| hdc2tog | Half double crochet 2 together |
| BLO | Back loop only |
| TL | Third loop |
| MB | Mini berry cluster |
| st / sts | Stitch / stitches |
| RS | Right side |
| WS | Wrong side |
| rep | Repeat |
Special Crochet Stitches Explained
Mini Berry Cluster (MB)
This pattern uses a small three-double-crochet cluster to form each raised berry-like bump.
The cluster is worked into one stitch and counts as one completed stitch.
To make a mini berry cluster:
- Yarn over and insert your hook into the indicated stitch.
- Yarn over and pull up a loop.
- Yarn over and pull through the first 2 loops on your hook. Two loops remain.
- Yarn over and insert the hook into the same stitch.
- Yarn over and pull up a loop.
- Yarn over and pull through the first 2 loops. Three loops remain.
- Yarn over and insert your hook into the same stitch a third time.
- Yarn over and pull up a loop.
- Yarn over and pull through the first 2 loops. Four loops remain.
- Yarn over and pull through all 4 remaining loops.
You have completed one mini berry cluster.
Each cluster uses one stitch from the previous round and produces one stitch at the top.
The clusters will be worked from the wrong side of the hat to encourage the raised texture to face outward.
Third-Loop Half Double Crochet (hdc TL)
A half double crochet stitch has an additional horizontal strand just below its top V-shaped loops.
This strand is known as the third loop.
To work hdc TL:
- Locate the third loop on the back of the previous round’s half double crochet stitch.
- Insert your hook under this horizontal strand.
- Yarn over and pull up a loop, with a yarn over already made as for an ordinary hdc.
- Yarn over and pull through all 3 loops on your hook.
Working into the third loop pushes the top V-shaped loops forward, creating a decorative ridge.
Third-Loop Single Crochet (sc TL)
Insert your hook under the third loop of the indicated half double crochet stitch.
Yarn over and pull up a loop.
Yarn over and pull through both loops.
This produces a shorter stitch while maintaining the raised horizontal line.
Half Double Crochet Decrease (hdc2tog)
- Yarn over and insert your hook into the next stitch.
- Yarn over and pull up a loop.
- Yarn over and insert your hook into the following stitch.
- Yarn over and pull up another loop.
- Yarn over and pull through all 5 loops on your hook.
Two stitches are now combined into one.
This decrease will be used to shape the top of the beanie.
Important Pattern Notes
Before starting, please read these details carefully.
- The hat is worked from the bottom upward in joined rounds.
- Chain 1 and chain 2 turning chains do not count as stitches.
- Join every round with a slip stitch into the first actual stitch of that round.
- Do not work into the joining slip stitch.
- The main body contains 72 stitches per round.
- The mini berry clusters are worked on wrong-side rounds so the raised bumps face outward.
- Some rounds require turning and others do not. Follow the directions carefully.
- The decorative third-loop sections are worked with the right side facing outward.
- Every mini berry cluster counts as one stitch.
- Use a stitch marker to identify the first stitch when needed.
The hat does not need a separate sewn brim. The decorative lower band is crocheted directly into the main body.
Step-by-Step Instructions
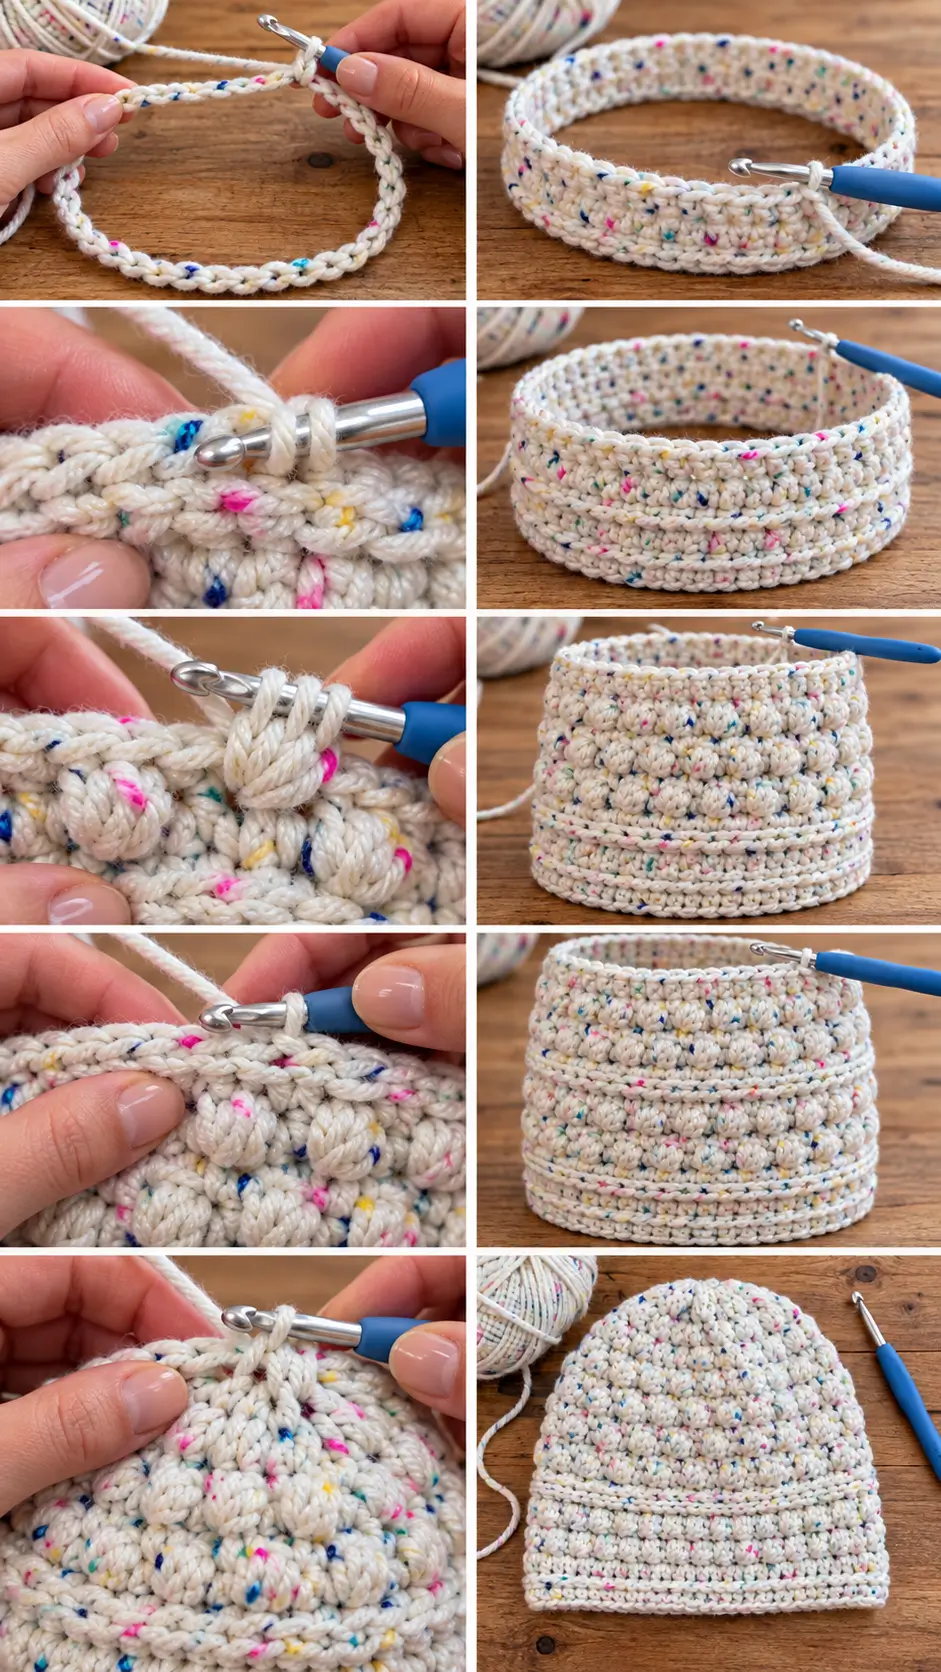
Part 1: Crochet the Textured Brim
The beanie begins with a comfortable circular band.
This lower section features raised horizontal ridges that create a structured appearance without needing a separately folded cuff.
Step 1 – Make the Foundation Chain
Using your chosen yarn and 5.5 mm crochet hook:
Chain 72.
Keep the chain relaxed and even.
If you tend to crochet tightly, consider using a 6.0 mm hook for the foundation chain before switching back to your main hook.
Bring the ends of the chain together, making sure it is not twisted.
Join with a slip stitch into the first chain to form a large ring.
This ring forms the bottom circumference of the beanie.
Round 1 – Single Crochet Foundation
Chain 1.
Work 1 sc into each of the 72 foundation chains, starting in the chain where you made the join.
Join with a slip stitch into the first sc.
Stitch count: 72 sc.
Check that the foundation ring remains untwisted.
Round 2 – Half Double Crochet
Chain 2.
Work 1 hdc into each stitch around.
Join with a slip stitch into the first hdc.
Stitch count: 72 hdc.
The taller stitches begin building the depth of the decorative brim.
Round 3 – First Raised Ridge
Chain 2.
Work 1 hdc into the third loop of each stitch around.
Join with a slip stitch into the first hdc.
Stitch count: 72 hdc TL.
You should notice a raised horizontal line developing as the original top loops are pushed forward.
Round 4 – Single Crochet Band
Chain 1.
Work 1 sc through the back loop only of each stitch around.
Join with a slip stitch into the first sc.
Stitch count: 72 sc BLO.
This adds another line of texture to the lower band.
Round 5 – Half Double Crochet
Chain 2.
Work 1 hdc into each stitch around.
Join with a slip stitch into the first hdc.
Stitch count: 72 hdc.
Round 6 – Second Raised Ridge
Chain 2.
Work 1 hdc into the third loop of each stitch around.
Join with a slip stitch.
Stitch count: 72 hdc TL.
Round 7 – Finish the Textured Brim
Chain 1.
Work 1 sc into the third loop of each stitch around.
Join with a slip stitch into the first sc.
Stitch count: 72 sc TL.
You have now completed the lower textured brim.
It should contain several subtle horizontal ridges, giving the beanie a neat, decorative finish.
Part 2: Crochet the First Berry Stitch Section
The next rounds create the small raised bumps that define the main body of the hat.
Each mini berry cluster is separated by a single crochet stitch.
The alternating stitch heights produce an attractive textured surface.
Step 2 – First Mini Berry Round
Round 8 – Berry Texture (WS)
After joining Round 7, chain 1 and turn the work so the wrong side faces you.
Work the following sequence:
1 sc in the next stitch, 1 mini berry cluster in the following stitch.
Repeat this sequence 36 times around.
Join with a slip stitch into the first sc.
Stitch count: 36 sc + 36 MB = 72 stitches.
Each mini berry cluster uses one stitch from the previous round.
Make sure you do not accidentally work multiple clusters into the same stitch unless specifically instructed.
Round 9 – Stabilizing Single Crochet (RS)
Chain 1 and turn so the right side faces you.
Work 1 sc in every stitch around.
Join with a slip stitch.
Stitch count: 72 sc.
This round helps stabilize the raised clusters and prepares the fabric for the next textured round.
Round 10 – Staggered Berry Texture (WS)
Chain 1 and turn.
Work the following sequence:
1 mini berry cluster in the next stitch, 1 sc in the following stitch.
Repeat 36 times around.
Join with a slip stitch.
Stitch count: 36 MB + 36 sc = 72 stitches.
Beginning this round with a cluster rather than a single crochet staggers the texture slightly.
Round 11 – Single Crochet (RS)
Chain 1 and turn.
Work 1 sc into every stitch around.
Join with a slip stitch.
Stitch count: 72 sc.
Round 12 – Berry Texture (WS)
Chain 1 and turn.
Work 1 sc in the next stitch and 1 MB in the following stitch.
Repeat 36 times around.
Join with a slip stitch.
Stitch count: 72 stitches.
Round 13 – Single Crochet (RS)
Chain 1 and turn.
Work 1 sc into each stitch around.
Join with a slip stitch.
Stitch count: 72 sc.
Round 14 – Staggered Berry Texture (WS)
Chain 1 and turn.
Work 1 MB in the next stitch and 1 sc in the following stitch.
Repeat 36 times around.
Join with a slip stitch.
Stitch count: 72 stitches.
Round 15 – Single Crochet (RS)
Chain 1 and turn.
Work 1 sc in every stitch around.
Join with a slip stitch.
Stitch count: 72 sc.
Check Your Work
You should now see several repeating rows of small raised berries separated by flatter crochet stitches.
The texture should face outward on the right side of the beanie.
The fabric should retain the same circumference from the brim through the textured section.
If the circumference becomes larger or smaller, count your stitches and inspect the beginning and end of each round.
Part 3: Add the Decorative Horizontal Ridges
This section creates a smooth band between the berry-textured areas.
The raised third-loop stitches provide a contrast to the little bobbles.
Step 3 – First Smooth Band
Round 16 – Half Double Crochet (RS)
With the right side still facing you, chain 2 without turning.
Work 1 hdc into each stitch around.
Join with a slip stitch.
Stitch count: 72 hdc.
Round 17 – Third-Loop Ridge (RS)
Chain 2.
Work 1 hdc in the third loop of each stitch around.
Join with a slip stitch.
Stitch count: 72 hdc TL.
Round 18 – Raised Single Crochet Line (RS)
Chain 1.
Work 1 sc in the third loop of each stitch around.
Join with a slip stitch.
Stitch count: 72 sc TL.
This finishes the decorative band.
You should now have a clear distinction between the raised berry section and the horizontal ridges.
Part 4: Crochet the Upper Berry Stitch Section
The upper part of the beanie continues with the same small berry-like texture.
This section provides additional depth before the crown begins narrowing.
Step 4 – Continue the Textured Body
Round 19 – Berry Texture (WS)
Chain 1 and turn.
Work 1 sc in the next stitch and 1 MB in the following stitch.
Repeat 36 times.
Join with a slip stitch.
Stitch count: 72 stitches.
Round 20 – Single Crochet (RS)
Chain 1 and turn.
Work 1 sc in each stitch around.
Join with a slip stitch.
Stitch count: 72 sc.
Round 21 – Staggered Berry Texture (WS)
Chain 1 and turn.
Work 1 MB in the next stitch and 1 sc in the following stitch.
Repeat 36 times.
Join with a slip stitch.
Stitch count: 72 stitches.
Round 22 – Single Crochet (RS)
Chain 1 and turn.
Work 1 sc into every stitch around.
Join with a slip stitch.
Stitch count: 72 sc.
Round 23 – Berry Texture (WS)
Chain 1 and turn.
Work 1 sc in the next stitch and 1 MB in the following stitch.
Repeat 36 times.
Join with a slip stitch.
Stitch count: 72 stitches.
Round 24 – Single Crochet (RS)
Chain 1 and turn.
Work 1 sc in each stitch around.
Join with a slip stitch.
Stitch count: 72 sc.
The main textured body is now complete.
Before beginning the crown, try the hat on or measure the fabric.
For a standard fitted adult beanie, the distance from the bottom edge to the start of the crown shaping should generally be around 5.5–6.5 inches, depending on head size and desired fit.
If your fabric is already longer than intended, you can omit one complete two-round berry-and-single-crochet pair from the upper section.
If the body needs more length, add another two-round pair, alternating the starting position of the berry clusters.
Always finish on a single crochet round with the right side facing outward before beginning the crown.
Part 5: Crochet the Crown Decreases
Now we’ll shape the top of the hat.
The circumference decreases gradually until only a small opening remains.
All crown rounds are worked with the right side facing outward.
Do not turn during this section.
The decrease rounds use half double crochet stitches for a smoother, less bulky crown.
Step 5 – Begin the Crown Shaping
Round 25 – First Decrease Round
Chain 2.
Work 1 hdc in each of the next 7 stitches, then work hdc2tog over the following 2 stitches.
Repeat 8 times around.
Join with a slip stitch.
Stitch count: 64 hdc.
You have decreased by 8 stitches.
Round 26 – Second Decrease Round
Chain 2.
Work 1 hdc in each of the next 6 stitches, then hdc2tog over the following 2 stitches.
Repeat 8 times.
Join with a slip stitch.
Stitch count: 56 hdc.
Round 27 – Third Decrease Round
Chain 2.
Work 1 hdc in each of the next 5 stitches, then hdc2tog.
Repeat 8 times.
Join with a slip stitch.
Stitch count: 48 hdc.
Round 28 – Fourth Decrease Round
Chain 2.
Work 1 hdc in each of the next 4 stitches, then hdc2tog.
Repeat 8 times.
Join with a slip stitch.
Stitch count: 40 hdc.
Round 29 – Fifth Decrease Round
Chain 2.
Work 1 hdc in each of the next 3 stitches, then hdc2tog.
Repeat 8 times.
Join with a slip stitch.
Stitch count: 32 hdc.
Round 30 – Sixth Decrease Round
Chain 2.
Work 1 hdc in each of the next 2 stitches, then hdc2tog.
Repeat 8 times.
Join with a slip stitch.
Stitch count: 24 hdc.
Round 31 – Seventh Decrease Round
Chain 2.
Work 1 hdc in the next stitch, then hdc2tog over the following 2 stitches.
Repeat 8 times.
Join with a slip stitch.
Stitch count: 16 hdc.
Round 32 – Final Decrease Round
Chain 2.
Work hdc2tog around, combining the stitches in pairs.
You will make 8 decreases.
Join with a slip stitch.
Stitch count: 8 hdc.
The crown opening should now be small enough to close with a yarn needle.
Crown Decrease Stitch Count Summary
| Round | Stitches remaining |
|---|---|
| 24 – Before decreases | 72 |
| 25 | 64 |
| 26 | 56 |
| 27 | 48 |
| 28 | 40 |
| 29 | 32 |
| 30 | 24 |
| 31 | 16 |
| 32 | 8 |
Each decrease round reduces the stitch count by exactly eight.
Part 6: Close the Top of the Hat
Step 6 – Finish the Crown
After completing Round 32, cut your working yarn, leaving a tail approximately 10–12 inches long.
Pull the tail through the final loop.
Thread the yarn tail onto a yarn needle.
Pass the needle through the front loops of the eight remaining crown stitches, working around the opening.
Gently pull the yarn to close the opening.
Use the needle to secure the yarn on the inside of the hat.
Weave through several nearby stitches, changing direction to help prevent the end from coming loose.
Avoid creating a large knot at the top of the crown.
The finished top should look neat and rounded.
Part 7: Weave in the Ends and Shape the Beanie
Step 7 – Finishing
Turn the beanie inside out.
Weave in the starting yarn tail along the lower brim.
Secure any remaining ends from the crown or yarn changes.
Turn the hat right side out.
Gently smooth the brim, raised decorative ridges, and berry texture with your hands.
Check that the hat has a balanced shape and that the crown closes neatly.
Your cozy textured beanie is now complete!
How to Adjust the Crochet Beanie Size
The standard pattern uses 72 stitches around.
If you need a different circumference, the pattern can be adjusted in multiples of eight.
| Foundation chains | Approximate circumference at suggested gauge |
|---|---|
| 64 | 18.3 inches |
| 72 | 20.6 inches |
| 80 | 22.9 inches |
These are estimated unstretched circumferences, not guaranteed finished measurements.
For a Smaller Beanie
Begin with chain 64.
Work all decorative sections with 64 stitches per round.
For the berry rounds, repeat the two-stitch combination 32 times.
For the crown, start by working 6 hdc followed by hdc2tog, repeated eight times.
Continue decreasing eight stitches per round until eight remain.
For a Larger Beanie
Begin with chain 80.
Work the decorative sections with 80 stitches.
For the berry rounds, repeat the two-stitch combination 40 times.
Begin the crown with 8 hdc followed by hdc2tog, repeated eight times.
Continue reducing the number of ordinary hdc stitches before each decrease by one on each subsequent crown round.
Continue until only eight stitches remain.
Adjusting the Hat Length
For a shorter beanie, remove one or more complete pairs of berry and single crochet rounds before the crown.
For a longer, slightly slouchy hat, add extra two-round texture repeats.
Remember that a pair means one berry cluster round followed by one stabilizing single crochet round.
Beautiful Yarn Colors for This Crochet Beanie
This textured pattern can look completely different depending on the yarn you choose.
1. White Confetti Yarn
Choose cream or white yarn with tiny pink, blue, turquoise, and yellow flecks.
This creates a cheerful, colorful finish while keeping the berry stitch texture visible.
2. Soft Oatmeal
A natural oatmeal yarn emphasizes the raised stitch details and creates a timeless winter accessory.
3. Dusty Pink
A soft, muted pink adds a delicate look that pairs beautifully with winter coats and scarves.
4. Sage Green
Sage green gives the beanie a modern, understated appearance.
It is especially attractive when paired with a cream-colored scarf.
5. Lavender
Pale lavender highlights the textured crochet stitches while creating a soft pastel winter accessory.
6. Classic Cream
A solid cream-colored beanie allows the raised berry clusters and horizontal ridges to become the main decorative features.
Helpful Tips for a Beautiful Berry Stitch Beanie
Keep Your Berry Clusters Consistent
Try to maintain the same tension when forming each mini berry cluster.
Uneven clusters can make some raised bumps larger than others.
Practice the stitch on a small swatch before beginning the hat if it is unfamiliar.
Remember Which Side Faces Outward
The textured rounds are worked from the wrong side so the mini berry clusters appear raised on the right side.
Check the direction of your work after each turned round.
Don’t Count the Turning Chains
Chain 1 and chain 2 do not count as stitches in this pattern.
Your stitch count should remain consistent throughout the body.
Use Stitch Markers
Place a marker in the first stitch of each round if you find it difficult to locate the beginning.
Markers are especially helpful when working the crown decreases.
Check the Fit Before Decreasing
Once the textured body is complete, place the hat around your head or measure the circumference and height.
It is easier to add or remove texture rounds before beginning the crown.
Don’t Tighten the Crown Too Aggressively
When closing the top, pull the yarn firmly enough to close the small opening, but avoid bunching the entire crown into a tight knot.
Common Problems and Solutions
Why Is My Beanie Too Tight?
The stitch gauge may be smaller than expected, or the foundation chain may be too tight.
Try using a larger crochet hook or adjusting the stitch count before continuing.
Always check the circumference after a few rounds.
Why Does My Hat Look Too Wide?
Your gauge may be looser than the suggested gauge.
Try a smaller hook or use fewer foundation stitches.
Remember to adjust the berry repeats and crown decreases accordingly.
Why Aren’t My Berry Stitches Standing Out?
Make sure you’re crocheting the textured rounds with the wrong side facing you.
The raised clusters should appear on the outside of the finished hat.
Yarn texture and tension also affect the visibility of the bumps.
Why Is My Stitch Count Changing?
You may accidentally be working into the joining slip stitch or the starting chain.
Only count the actual stitches in each round.
Every mini berry cluster counts as one stitch.
Why Are My Horizontal Ridges Uneven?
Check that you’re working into the third loop of the previous half double crochet stitches.
Working into the ordinary top loops will produce a different texture.
Why Is the Crown Pointy?
The fabric may be too stiff, or the crown-shaping rounds may be taller than expected.
Check your stitch gauge and gently shape the crown.
If necessary, use a smaller hook for the crown to produce a more compact finish.
Frequently Asked Questions
Is the Berry Stitch Crochet Beanie Suitable for Beginners?
This is an intermediate-level pattern, although adventurous beginners can make it with practice.
You should be comfortable with basic crochet stitches, joined rounds, and reading stitch counts.
The berry clusters and third-loop techniques may require some practice.
Can I Use a Different Yarn Weight?
Yes, but the stitch count and finished dimensions will change.
If you use a different yarn weight, make a gauge swatch and adjust the pattern accordingly.
Can I Add a Pom-Pom?
Absolutely.
A faux-fur or yarn pom-pom can be attached to the finished crown.
Make sure the crown is securely closed before adding the decoration.
For hats intended for young children, avoid detachable decorations that could present a hazard.
Can I Make This Hat Without the Raised Berry Stitches?
Yes.
You could replace the berry cluster rounds with ordinary single crochet or half double crochet.
However, the hat will lose its distinctive raised texture, and you may need to adjust the number of rounds to maintain the same length.
Can I Use This Pattern for a Matching Scarf?
The mini berry cluster and third-loop textures can be adapted into a rectangular scarf.
Alternate berry stitch rows with ordinary single crochet rows, adding decorative ridges where desired.
How Much Yarn Do I Need?
Approximately 180–230 yards of worsted-weight yarn is a reasonable starting allowance for the suggested adult size.
The exact amount depends on gauge, hat dimensions, and yarn construction.
Keep additional yarn available if you plan to make a slouchier version or add a pom-pom.
How Should I Wash the Finished Hat?
Always follow the care instructions on your yarn label.
For delicate or wool-blend yarns, gentle handwashing may be appropriate.
Reshape the damp hat and allow it to dry completely before wearing.
Can I Make This Beanie for Children?
Yes, with appropriate adjustments.
Use a smaller circumference and shorter body length based on the child’s measurements.
Do not rely on age alone to determine fit.
Check the finished size carefully before gifting.
More Textured Crochet Projects to Try
If you enjoy the beautiful raised stitches in this pattern, consider trying other crochet projects that use interesting textures.
A matching berry stitch scarf would make a lovely winter accessory set.
You could also create a cozy crochet cowl, textured headband, fingerless gloves, or a soft baby blanket using raised stitch combinations.
Experimenting with third-loop half double crochet is another way to add decorative ridges to simple scarves, bags, and other accessories.
These techniques can transform ordinary crochet projects into something that looks much more detailed.
Final Thoughts
This cozy berry stitch crochet beanie combines playful texture with a practical, wearable design.
The raised mini berry clusters create a charming surface, while the decorative horizontal ridges add definition and visual interest.
Using colorful speckled yarn gives the beanie an especially cheerful appearance, but the pattern looks equally beautiful in solid shades.
With its adjustable circumference and repeating stitch sections, this design is a satisfying project for crocheters who enjoy making handmade winter accessories.
Once you’ve practiced the special stitches and learned how the crown shaping works, you can experiment with different colors, yarn textures, and hat lengths.
Choose your favorite soft yarn, grab your crochet hook, and enjoy making a beautifully textured beanie for your winter wardrobe or your next handmade gift!