Crochet Bunny Amigurumi Keychain Free Crochet Pattern
Introduction / Description
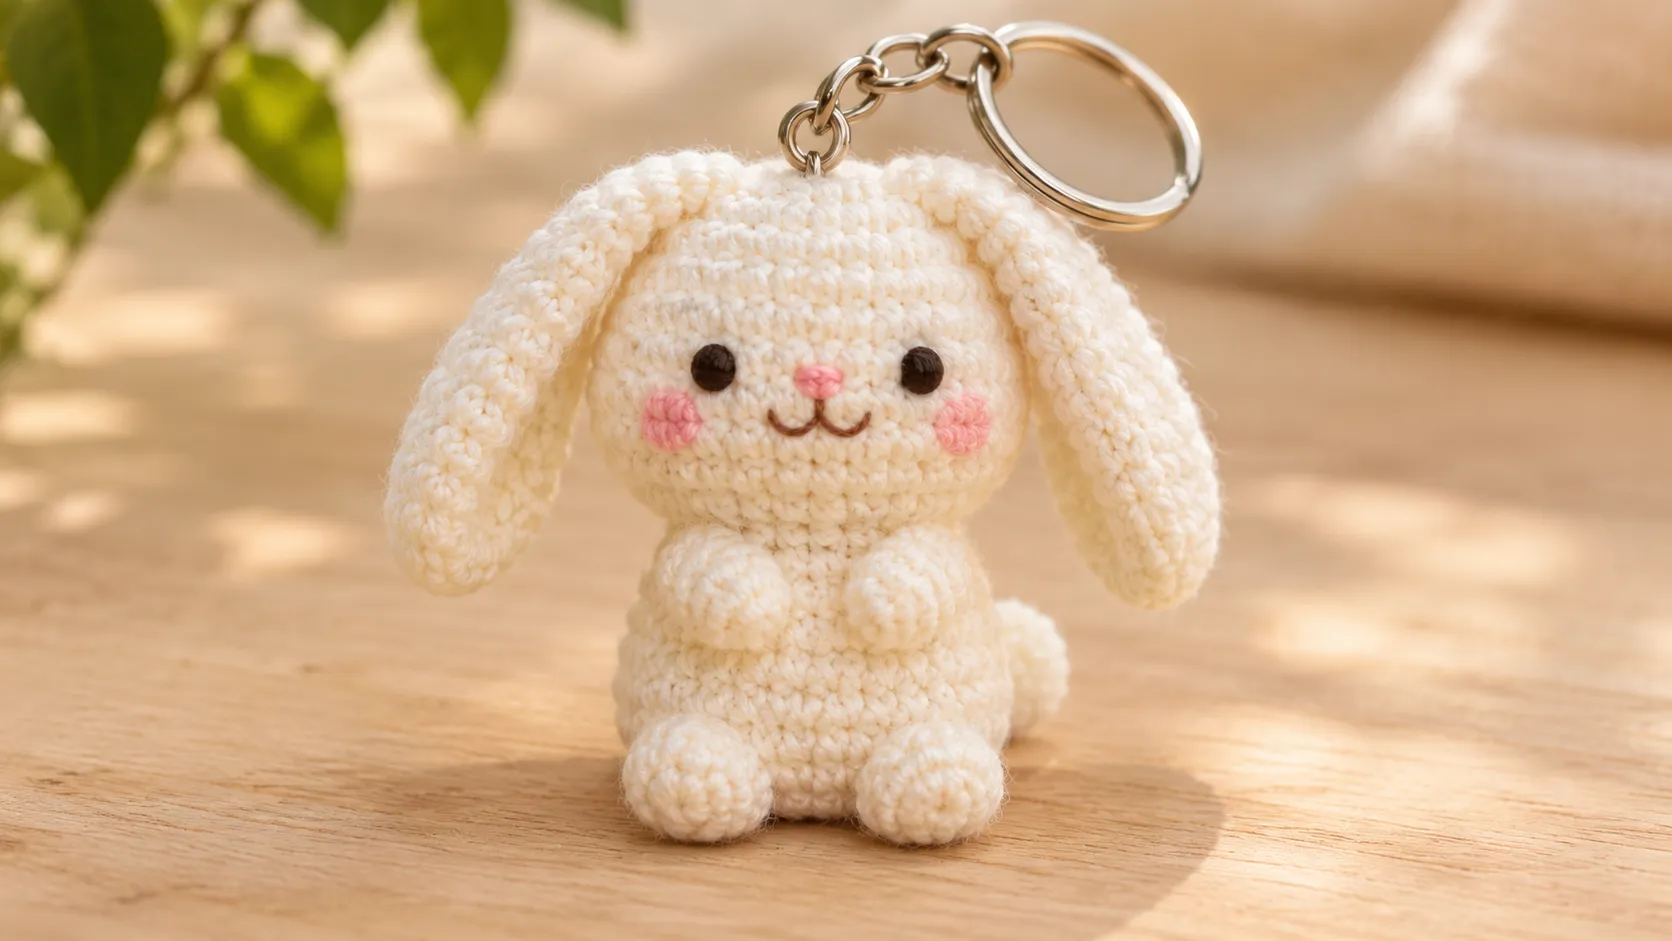
Meet your new favorite tiny crochet companion! This adorable Crochet Bunny Amigurumi Keychain is a sweet, beginner-friendly project featuring long floppy ears, a round little head, tiny paws, and a soft, cuddly shape. It is small enough to hang from a bag, keys, or backpack, yet detailed enough to make a thoughtful handmade gift.
The best part is its simple construction. The head and body are crocheted together in one continuous piece, so there is less sewing and a smoother shape. This original Yarnimals Crochet design is a lovely project for using leftover yarn, practicing amigurumi basics, and making a small gift in just one afternoon.
Project Details
- Skill level: Beginner
- Crochet terminology: US terms
- Construction: One-piece head and body with separately attached ears, paws, feet, and tail
- Finished style: Miniature floppy-ear bunny keychain
- Estimated crochet time: 1.5–2.5 hours
- Main stitches: Magic ring, single crochet, increase, invisible decrease
- Assembly: Basic hand sewing and embroidery
The finished bunny has a rounded cream-white head, a smaller chubby body, two long soft ears that drape down beside its face, and tiny paws and feet.
A reinforced metal keychain ring and short chain are attached at the top of the head, between the ears, so the bunny is ready to hang from a bag, keys, or backpack.
Materials
- Main yarn: DK weight (#3) cotton or cotton-blend yarn in warm cream-white, approximately 40–55 yards (37–50 m).
- Pink yarn: Small amount of light-pink embroidery floss or fine cotton yarn for the nose and rosy cheeks.
- Black yarn: Small amount of black embroidery floss for the eyes.
- Brown embroidery floss: Small amount for the tiny curved mouth, as shown in the finished design.
- Crochet hook: 3.0 mm (approximately US C/2–D/3 range).
- Polyester fiberfill: Small amount for lightly stuffing the head, body, feet, and tail.
- Metal keychain ring: One silver split ring approximately 20–25 mm in diameter.
- Short metal chain: Approximately 1–1.5 inches (2.5–4 cm), with a small connecting jump ring.
- Strong cotton thread: Matching cream-white thread for reinforcing the keychain attachment.
- Yarn needle for sewing and embroidery.
- Stitch marker for tracking rounds.
- Scissors.
- Small jewelry pliers for attaching the metal keychain hardware.
Yarn recommendation: Smooth DK cotton or a soft cotton blend gives the bunny clearly defined stitches and helps the tiny details stand out.
Finished Size
Using DK weight yarn and a 3.0 mm hook, the finished bunny is designed to measure approximately:
- Height excluding ears: 3–4 inches (7.5–10 cm).
- Width across the head: 1.75–2.25 inches (4.5–5.7 cm).
- Floppy ear length: Approximately 2–2.75 inches (5–7 cm).
- Body width: Approximately 1.25–1.75 inches (3.2–4.5 cm).
- Keychain hardware: Adds approximately 1–1.5 inches (2.5–4 cm) above the head.
These are estimated dimensions. The exact finished size will depend on your yarn thickness, hook size, tension, and stuffing.
The bunny should be small enough to hang from a keyring without feeling too bulky.
Gauge
Gauge is not critical for this small amigurumi project.
However, your stitches should be firm and close together so the polyester stuffing does not show through the fabric.
For the suggested DK yarn, a useful starting gauge is approximately 6–7 single crochet stitches per inch (2.5 cm), although this may vary.
If your stitches look loose or small gaps appear between them, try a 2.75 mm hook.
If the fabric feels extremely stiff and difficult to work, use a slightly larger hook while maintaining tight, even stitches.
The floppy ears should remain soft and flexible rather than heavily stuffed or rigid.
Abbreviations
All instructions use US crochet terminology.
- MR: Magic ring
- ch: Chain
- sc: Single crochet
- inc: Increase — work 2 sc into the same stitch
- dec: Invisible decrease — decrease 2 stitches into 1
- sl st: Slip stitch
- st: Stitch
- sts: Stitches
- FO: Fasten off
- RS: Right side
- WS: Wrong side
Pattern notation: Instructions inside square brackets are repeated the specified number of times. For example, [1 sc, inc] × 6 means work one single crochet in the next stitch, then two single crochets in the following stitch, and repeat this sequence six times in total. The number in parentheses at the end of every round or row shows the completed stitch total.
Pattern Notes
- The bunny’s head and body are crocheted together in one continuous piece, starting at the bottom of the body and continuing upward into the head.
- The ears, arms, feet, and tail are crocheted separately and attached afterward.
- Work in continuous spiral rounds unless otherwise instructed.
- Always use a stitch marker to identify the first stitch of each round.
- Stuff the body lightly before starting the head.
- Add more stuffing to the head before completing the final decrease rounds.
- The floppy ears are intentionally left unstuffed.
- Embroider the eyes, nose, mouth, and cheeks rather than using plastic safety eyes.
- For a balanced shape, position the ears symmetrically and check the front and back of the bunny before sewing any piece in place.
- The tiny arms should sit near the upper front of the body, while the feet project slightly forward.
- The keychain attachment must be reinforced through several stitches at the top of the head, not fastened to a single stitch.
- This is a decorative keychain accessory. The metal parts, small attachments, and hanging chain make it unsuitable as a toy for very young children.
Original design note: The following stitch counts and shaping were created for this Yarnimals Crochet bunny. This is not a copy of another designer’s pattern.
Step-by-Step Instructions
Part 1 — Head and Body (Worked in One Piece)
Using cream-white DK yarn and a 3.0 mm crochet hook. Begin at the bottom of the bunny and work upward toward the head.
Body
Round 1: Work 6 sc into MR. (6)
Round 2: Inc in each stitch around. (12)
Round 3: Repeat [1 sc, inc] 6 times. (18)
Round 4: Repeat [2 sc, inc] 6 times. (24)
Round 5: Sc in each stitch around. (24)
Round 6: Sc in each stitch around. (24)
Round 7: Sc in each stitch around. (24)
Round 8: Sc in each stitch around. (24)
Round 9: Repeat [2 sc, dec] 6 times. (18)
Round 10: Repeat [1 sc, dec] 6 times. (12)
Round 11: Sc in each stitch around. (12)
Pause and lightly stuff the lower body with polyester fiberfill. Make sure the bottom remains gently rounded and the upper body narrows naturally toward the neck. Do not fasten off. Continue directly into the head.
Head
Round 12: Inc in every stitch around. (24)
Round 13: Repeat [3 sc, inc] 6 times. (30)
Round 14: Repeat [4 sc, inc] 6 times. (36)
Round 15: Sc in each stitch around. (36)
Round 16: Sc in each stitch around. (36)
Round 17: Sc in each stitch around. (36)
Round 18: Sc in each stitch around. (36)
Round 19: Sc in each stitch around. (36)
Round 20: Repeat [4 sc, dec] 6 times. (30)
Round 21: Repeat [3 sc, dec] 6 times. (24)
At this point, the head should have a rounded shape with a wider middle section. If desired, pause to embroider the eyes and facial features while the head opening is still accessible.
Round 22: Repeat [2 sc, dec] 6 times. (18)
Round 23: Repeat [1 sc, dec] 6 times. (12)
Stuff the head firmly enough to hold its round shape, but avoid overstuffing.
Round 24: Dec 6 times. (6)
FO, leaving a yarn tail approximately 8 inches (20 cm) long. Thread the tail through the front loops of the remaining six stitches. Pull gently to close the opening completely. Weave the remaining yarn tail securely into the head.
The bunny now has one continuous rounded body and head, with a naturally narrower neck.
Part 2 — Long Floppy Bunny Ears (Make 2)
Using cream-white yarn and a 3.0 mm hook. Each ear begins at its rounded tip and gradually narrows toward the attachment end.
Round 1: Work 6 sc into MR. (6)
Round 2: Repeat [1 sc, inc] 3 times. (9)
Round 3: Repeat [2 sc, inc] 3 times. (12)
Rounds 4–10: Sc around. (12)
Round 11: Repeat [2 sc, dec] 3 times. (9)
Rounds 12–13: Sc around. (9)
Round 14: Repeat [1 sc, dec] 3 times. (6)
Round 15: Sc around. (6)
Do not stuff the ears. Flatten the six-stitch opening so three stitches lie directly opposite the other three.
Closing Row: Work 1 sc through each corresponding pair of stitches across the flattened opening. (3)
FO, leaving a long tail approximately 8–10 inches (20–25 cm) for attachment. Make the second ear exactly the same way.
Ear Placement
Position the two ears near the top of the bunny’s head, one on either side of the central closure, approximately two to three stitches apart. Leave a small space between their attachment points for the metal keychain connection. Sew the flattened three-stitch base of each ear securely to the head. Allow the ears to drape down naturally beside the face. For the soft floppy look shown in the finished bunny, avoid adding wire or stuffing.
Part 3 — Tiny Bunny Arms / Front Paws (Make 2)
Using cream-white yarn.
Round 1: Work 6 sc into MR. (6)
Round 2: Repeat [1 sc, inc] 3 times. (9)
Rounds 3–4: Sc around. (9)
Round 5: Repeat [1 sc, dec] 3 times. (6)
Do not stuff, or insert only a tiny pinch of fiberfill if you prefer slightly rounded paws. Flatten the opening.
Closing Row: Sc through both layers across the flattened opening. (3)
FO, leaving a long attachment tail. Repeat for the second arm.
Arm Placement
Position one arm on each side of the upper body, around Body Rounds 8–10. Angle both arms slightly toward the front of the bunny. Sew the closed edge of each arm securely to the body. The rounded ends should face forward and downward, giving the bunny two little paws resting against its body.
Part 4 — Small Rounded Bunny Feet (Make 2)
Using cream-white yarn.
Round 1: Work 6 sc into MR. (6)
Round 2: Inc in each stitch around. (12)
Round 3: Sc around. (12)
Round 4: Repeat [2 sc, dec] 3 times. (9)
Round 5: Repeat [1 sc, dec] 3 times. (6)
Add a very small amount of polyester fiberfill. FO, leaving a long tail. Thread the tail through the front loops of the remaining six stitches and pull to close the opening. Shape the foot gently with your fingers to make a small rounded oval. Repeat for the second foot.
Foot Placement
Place both feet at the lower front of the bunny, around Body Rounds 3–5. Keep them evenly spaced and symmetrical. Sew the back portion of each foot to the body, allowing the rounded front of the foot to extend slightly forward. Check that the bunny sits evenly when placed on a flat surface.
Part 5 — Tiny Round Bunny Tail
Using cream-white yarn.
Round 1: Work 6 sc into MR. (6)
Round 2: Inc in each stitch around. (12)
Round 3: Sc around. (12)
Round 4: Dec 6 times. (6)
Add a tiny amount of fiberfill to give the tail a round shape. FO, leaving a long attachment tail. Thread the tail through the front loops of the remaining six stitches and draw the opening closed. Position the tail at the center back of the bunny, approximately around Body Rounds 5–7. Sew it securely in place. The tail should appear as a small rounded bump rather than a large pompom.
Part 6 — Embroidered Face and Final Assembly
The bunny’s sweet expression is created entirely with embroidery, giving it a soft, handmade appearance.
Eyes — Using black embroidery floss:
- Identify the center front of the bunny’s head.
- Position the eyes around Head Rounds 16–17.
- Space them approximately six stitches apart, adjusting for your individual tension.
- Make each eye using a few small satin stitches to create a neat, round black dot.
- Secure the embroidery ends inside the head or weave them through the back of the crochet fabric.
Keep the eyes small and symmetrical.
Pink Bunny Nose — Using soft-pink embroidery floss:
- Locate the central point between the eyes.
- Position the nose approximately one round below eye level.
- Make three short stitches that form a tiny inverted triangle.
- Secure the pink yarn ends.
The nose should be delicate and proportional to the small face.
Tiny Curved Mouth — Using brown embroidery floss:
- Begin directly below the pink nose.
- Make one short vertical stitch downward.
- Add two small curved stitches spreading gently to the left and right.
- Shape them into a soft, rounded W-like smile.
Avoid making the mouth too large.
Pink Cheeks — Using soft-pink floss:
- Place one small cheek below and slightly outside each eye.
- Make several short satin stitches to form a tiny rounded blush mark.
- Keep both cheeks approximately the same size.
The completed face should have two black embroidered eyes, a small pink nose, a delicate brown smile, and two soft pink cheeks.
Final Assembly Check — Before attaching the keychain hardware, check that:
- The head and body form one continuous piece.
- Both ears are attached securely and hang evenly.
- The arms are positioned toward the front.
- The two feet are level.
- The tail is centered on the back.
- The facial embroidery is symmetrical.
- All remaining yarn ends are securely hidden.
Gently shape the bunny with your fingers. Avoid pulling the ears or paws to change their shape after attaching them.
Part 7 — Attach the Metal Keychain
For this final step, use the silver metal keychain ring, short chain, and matching strong cotton thread. The attachment point should be centered at the top of the head, between the two floppy ears.
Step 1 — Prepare the hardware: Connect the metal split ring to one end of the short metal chain using a small jump ring. Check that the metal connections close completely.
Step 2 — Reinforce the top of the head: Thread a doubled strand of strong cotton thread through a yarn needle. Pass the needle through several adjacent top stitches around Head Rounds 23–24, catching the underlying crochet fabric. Repeat the reinforcing passes so the pulling force is distributed across multiple stitches.
Step 3 — Connect the chain: Pass the doubled thread through the bottom link of the metal chain. Return the thread through the reinforced crochet stitches. Repeat this connection several times, using firm, even tension. The chain should emerge upright from the center of the head.
Step 4 — Secure the attachment: Make several small locking stitches through the reinforced area. Bury the thread ends securely inside the crocheted head and trim any excess. Do not rely on a single knot or stitch to hold the keychain hardware.
Step 5 — Final inspection: Gently test the connection by holding the metal ring and checking that the bunny hangs upright without tilting or pulling loose. Inspect the attachment periodically during use, especially if the keychain is carried in a frequently used bag. The finished bunny should hang naturally beneath the chain, with both floppy ears falling to the sides of its face.
Tips & Variations
- Keep the head round and soft. The head is the main feature of this design. Stuff it evenly, paying special attention to the cheeks and forehead. Avoid overstuffing, which can stretch the stitches and distort the bunny’s face.
- Leave the ears unstuffed. Soft, flat ears create the floppy appearance shown in the finished design. If the ears seem too stiff, gently roll them between your fingers to relax the crochet fabric.
- Try pastel color combinations. Use the same stitch counts with different yarn colors:
- Cream-white bunny with baby-pink details.
- Pale-beige bunny with dusty-rose cheeks.
- Soft-gray bunny with white paws.
- Pastel-lavender bunny with pink embroidery.
- Warm caramel bunny with cream-colored ears.
- Make matching bunny keychains. Once you’re comfortable with the pattern, crochet several bunnies in different colors. Attach matching silver keychains for a coordinated collection of handmade gifts.
- Use embroidery rather than plastic eyes. Small embroidered features suit the bunny’s soft appearance and avoid plastic eye components. However, the finished keychain is still a decorative accessory because of its metal hardware.
- Adjust the bunny’s size. For a smaller bunny, use sport-weight (#2) yarn with a 2.25–2.5 mm hook. For a slightly larger and softer bunny, use worsted-weight (#4) yarn with an appropriately sized hook. The stitch counts can remain unchanged, but the finished dimensions will vary.
FAQ
- Is this crochet bunny keychain suitable for beginners?
Yes! This pattern uses basic amigurumi techniques, including the magic ring, single crochet, increases, and invisible decreases. The head and body are made together, so beginners don’t need to sew those two main sections together. The ears, paws, feet, and tail require basic sewing, making the pattern ideal for beginners who want to practice simple assembly. - How big is the finished crochet bunny?
Using DK-weight yarn and a 3.0 mm hook, the bunny is designed to measure approximately 3–4 inches (7.5–10 cm), excluding the ears. The exact dimensions depend on your tension, yarn, hook, and stuffing. - Can I make this bunny without the keychain ring?
Absolutely! Simply omit the metal ring, chain, and keychain attachment steps. You’ll have a small, soft bunny amigurumi that can be used as a decorative desk companion, shelf decoration, or nursery accent. - Why are my bunny’s ears standing upright instead of flopping?
The most common reasons are using very stiff yarn, tight tension, or accidentally stuffing the ears. This pattern uses narrow, unstuffed ears so they can drape naturally. You can also gently shape the ears downward after attaching them. - Can I sell finished crochet bunny keychains made from this pattern?
Yes. You may sell finished handmade bunny keychains made using this original Yarnimals Crochet design. Please do not copy, redistribute, or sell the written pattern or its original photography as your own. When selling finished keychains, make sure the hardware and all crocheted parts are securely attached.
Conclusion / Final Thoughts
This tiny Crochet Bunny Amigurumi Keychain is a delightful project that turns a little yarn into an adorable handmade companion. With its round head, soft floppy ears, tiny paws, and sweet embroidered face, it is charming enough for a keychain, gift, or spring decoration.
The beginner-friendly stitches and simple shaping make it an enjoyable project for anyone practicing amigurumi. Try different pastel colors, experiment with facial expressions, and create your own collection of miniature bunnies.
Save this free crochet bunny pattern for later, gather your favorite yarn colors, and start making your own little bunny keychain today!