Christmas Train Amigurumi (Free Crochet Pattern)
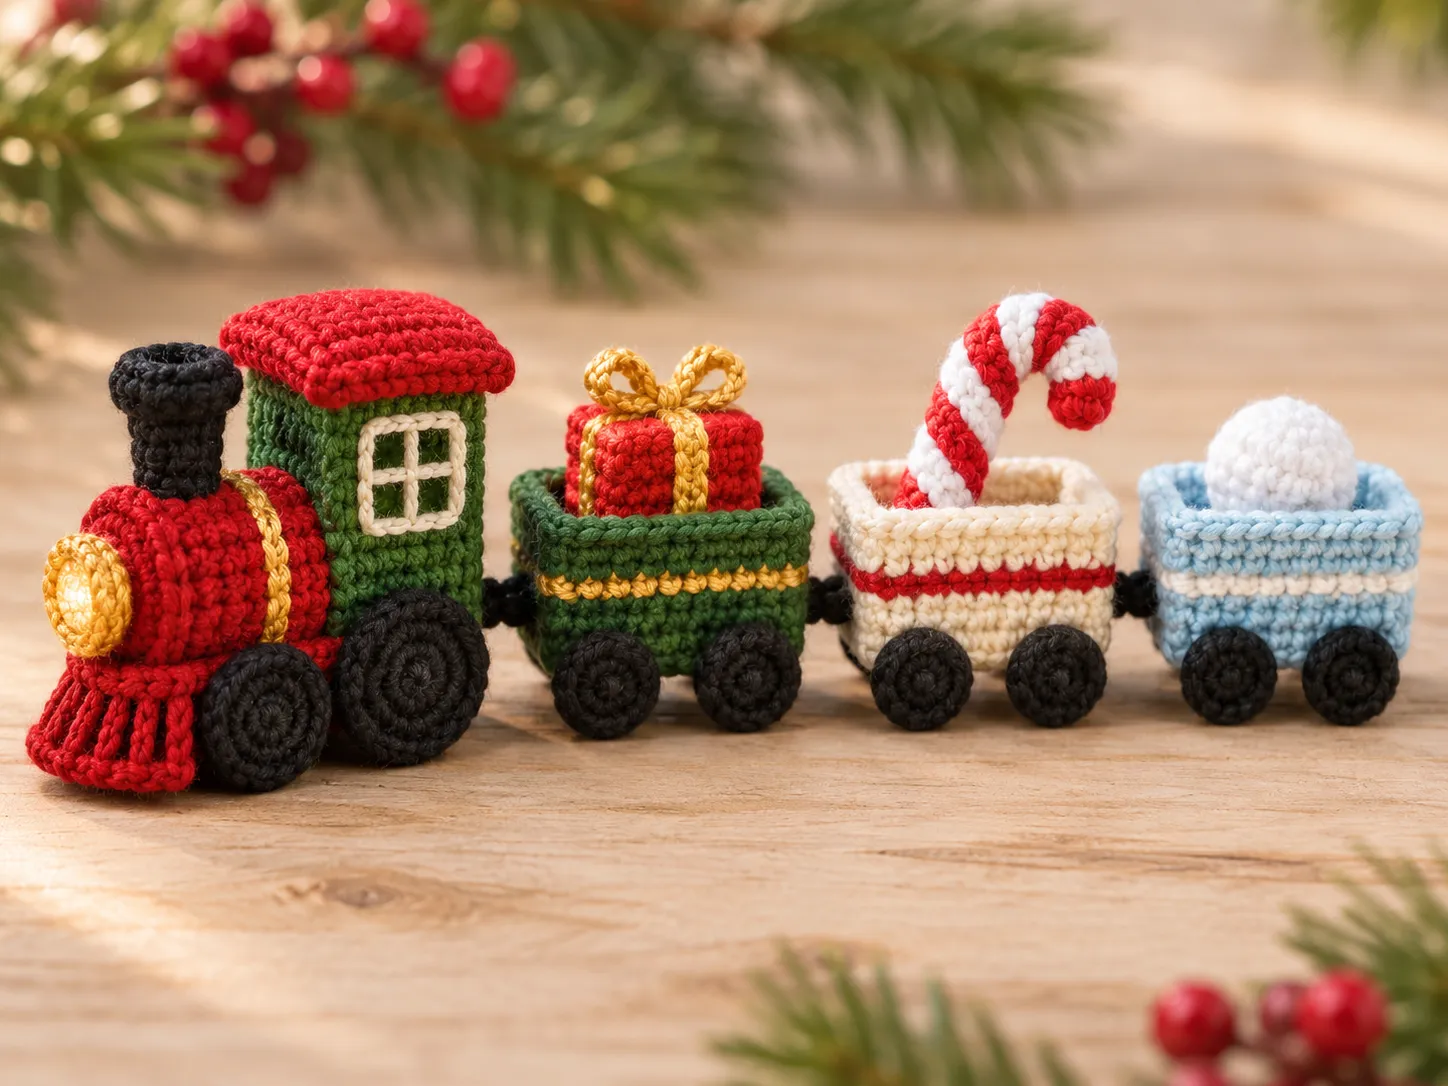
All aboard the Christmas crochet train! This adorable Christmas Train Amigurumi is a festive handmade train with a red locomotive and three colorful carriages, perfect for holiday shelves and Christmas displays.
The best part is that every train section starts with the same simple rounded body. Once you’ve learned the basic cylinder, you can make all four vehicles.
This original Yarnimals design is ideal for confident beginners who enjoy amigurumi and don’t mind a little sewing for the wheels and decorations.
Introduction / Description
This original four-piece Christmas train includes:
- Locomotive: Red engine with green cabin, black chimney, and golden headlamp.
- Car 1: Green carriage carrying a tiny red Christmas present.
- Car 2: Cream-colored carriage with a handmade candy-cane decoration.
- Car 3: Icy-blue carriage carrying a small white snowball.
Each section uses one horizontally positioned, stuffed cylinder. Four small black wheels are attached to each vehicle. Three short yarn couplers connect the locomotive and carriages.
Difficulty: Confident beginner. Crochet terminology: US terms. Construction: Stuffed cylinder bodies, sewn wheels and accessories, yarn connectors. Estimated working time: 5–7 hours for the complete set.
Materials
- Medium-weight (#4) cotton or acrylic yarn, in the following colors: Christmas red: approximately 45 yd (41 m). Forest green: approximately 40 yd (37 m). Warm cream: approximately 30 yd (27 m). Icy blue: approximately 25 yd (23 m). Black or charcoal: approximately 50 yd (46 m) for wheels and chimney. Golden yellow: approximately 10 yd (9 m) for details. White: approximately 10 yd (9 m) for snowball and embroidery.
- Crochet hook: 3.5 mm (US E/4).
- Polyester fiberfill.
- Yarn needle.
- Scissors.
- Stitch marker.
- Optional embroidery thread for windows, snowflakes, and decorative details.
Yarn amounts are estimates and may vary with tension and brand.
Finished Size
Approximate finished dimensions: Locomotive body length: 2.5–3 inches (6.5–7.5 cm). Each carriage length: 2.5–3 inches (6.5–7.5 cm). Train height: Approximately 3–4 inches (7.5–10 cm) at the locomotive. Complete connected train length: Approximately 12–15 inches (30–38 cm). These are estimated dimensions, not measurements from a physically completed sample. Actual size depends on yarn, hook, stuffing, and coupler spacing.
Gauge
Gauge is not critical. Use firm, even stitches so the stuffing stays inside the train bodies and wheels retain their shape. All four vehicles should be crocheted using the same yarn weight, hook size, and tension. If your stitches reveal the filling, use a slightly smaller hook.
Abbreviations
MR: Magic ring. ch: Chain. sc: Single crochet. inc: Increase; 2 sc in the same stitch. dec: Invisible decrease. sl st: Slip stitch. st: Stitch. sts: Stitches. FO: Fasten off. RS: Right side. WS: Wrong side. Numbers in parentheses indicate the completed stitch total. Turning chains are excluded unless otherwise stated.
Pattern Notes
- Every train vehicle uses the same main-body instructions.
- The locomotive and three carriages are crocheted separately.
- Each body is worked in continuous rounds.
- The body is positioned horizontally after stuffing.
- One end of the cylinder forms the front and the opposite end forms the rear.
- Make 16 wheels in total: four for each vehicle.
- Attach wheels at consistent positions to make the train appear level.
- The locomotive cabin, chimney, and cargo decorations are separate pieces.
- Use soft yarn couplers to join the vehicles.
- This is a decorative amigurumi train, not a rolling mechanical toy. The yarn wheels do not rotate.
- Small attachments and connecting cords make the train unsuitable for unsupervised play by young children.
Step-by-Step Instructions
Part 1 — Basic Train Body (Make 4)
Make one body in each of these colors:
- Red — locomotive.
- Green — gift carriage.
- Warm cream — candy-cane carriage.
- Icy blue — snow carriage.
Using your chosen yarn color:
Round 1: Work 6 sc into MR. (6).
Round 2: Inc in every stitch. (12).
Round 3: Repeat [1 sc, inc] 6 times. (18).
Round 4: Repeat [2 sc, inc] 6 times. (24).
Round 5: Sc in each stitch around. (24).
Round 6: Sc around. (24).
Round 7: Sc around. (24).
Round 8: Sc around. (24).
Round 9: Sc around. (24).
Round 10: Sc around. (24).
Round 11: Sc around. (24).
Round 12: Sc around. (24).
Round 13: Repeat [2 sc, dec] 6 times. (18).
Round 14: Repeat [1 sc, dec] 6 times. (12).
Stuff the body firmly but evenly, maintaining the elongated cylinder shape.
Round 15: Dec 6 times. (6). FO, leaving a tail. Thread through the remaining six front loops and pull closed.
Repeat until you have four stuffed cylinder bodies. For assembly, treat the original magic-ring end as the front of each vehicle and the final closed end as the rear.
Part 2 — Black Crochet Wheels (Make 16)
Using black or charcoal yarn:
Round 1: Work 6 sc into MR. (6).
Round 2: Inc in every stitch around. (12). Join with sl st to the first stitch. FO, leaving a long attachment tail.
Make 16 identical wheels. For each train section: Position two wheels along the lower edge of the left side. Position two matching wheels on the lower edge of the right side. Place the wheel centers approximately near Body Rounds 5 and 11. Sew around the outer edge of each wheel, allowing its lower portion to extend below the body. Check that all four wheels are level before securing the yarn ends.
For extra detail, embroider a tiny golden-yellow stitch or knot in the center of each wheel.
Part 3 — Locomotive Cabin
Using forest-green yarn:
Round 1: Work 6 sc into MR. (6).
Round 2: Inc in every stitch. (12).
Round 3: Repeat [1 sc, inc] 6 times. (18).
Round 4: Sc around. (18).
Round 5: Sc around. (18).
Round 6: Sc around. (18).
Round 7: Repeat [1 sc, dec] 6 times. (12).
Stuff lightly.
Round 8: Dec 6 times. (6). FO and close.
The cabin is a small, rounded shape rather than a square box. Position it upright on the top of the red locomotive, toward the rear, approximately above Body Rounds 10–12. Sew it securely to the engine body.
Using cream yarn, embroider a small rectangular window on each visible side of the cabin. Add a narrow golden-yellow line across its upper front to suggest a roof detail.
Part 4 — Black Locomotive Chimney
Using black yarn:
Round 1: Work 6 sc into MR. (6).
Round 2: Inc in every stitch. (12).
Round 3: Sc around. (12).
Round 4: Sc around. (12).
Round 5: Sc around. (12). FO, leaving the lower opening unclosed and a long tail for sewing.
Position the chimney vertically on the upper front portion of the red locomotive, approximately over Body Rounds 4–5. Sew the open 12-stitch edge to the locomotive body. The closed magic-ring end should point upward.
Part 5 — Golden Locomotive Headlamp
Using golden-yellow yarn:
Round 1: Work 6 sc into MR. (6). Join with sl st and FO.
Sew the small golden circle onto the center of the locomotive’s front end. Optionally, embroider two tiny cream stitches on the front surface to make a simple cheerful expression.
Part 6 — Green Gift Carriage
Use the green train body and its four black wheels.
Tiny Red Gift Box: Make six small red squares. For each square:
Foundation: Ch 5. (5 chains).
Row 1: Sc in the second chain from the hook and across. (4).
Row 2: Ch 1, turn, sc across. (4).
Row 3: Ch 1, turn, sc across. (4).
Row 4: Ch 1, turn, sc across. (4). FO, leaving an attachment tail.
After making six squares, arrange them into a cube. Sew together five squares, leaving one side open. Insert a small amount of stuffing, then sew the sixth square into place.
Gift Ribbon: Using golden-yellow yarn, embroider one vertical and one horizontal ribbon line around the cube.
For a small bow: Foundation: Ch 11. (11 chains).
Row 1: Sc in the second chain from the hook and across. (10). FO. Fold into two loops, wrap the center with the remaining yarn, and secure the bow on top of the gift.
Sew the finished gift to the upper center of the green carriage.
Part 7 — Cream Candy-Cane Carriage
Use the cream train body and its four black wheels.
Crochet Candy Cane: Using white yarn:
Foundation: Ch 17. (17 chains).
Row 1: Sc in the second chain from the hook and across. (16). FO, leaving a long tail.
Using red yarn, embroider a short diagonal stripe across the strip after every third or fourth stitch.
Bend one end of the strip into a small hook, approximately four stitches long. Secure the bend with one or two small stitches on the underside.
Position the candy cane along the upper surface of the cream carriage. Sew it securely at several points without flattening the curved tip.
For additional decoration, embroider two thin red stripes around the ends of the cream train body.
Part 8 — Blue Snow Carriage
Use the icy-blue train body and its four black wheels.
Small White Snowball: Using white yarn:
Round 1: Work 6 sc into MR. (6).
Round 2: Inc in every stitch. (12).
Round 3: Sc around. (12).
Round 4: Sc around. (12).
Round 5: Dec 6 times. (6). Add a little fiberfill before fully closing. FO, close the final opening, and weave in the end.
Sew the white snowball to the top of the blue carriage.
Snowflake Embroidery: Using white yarn, embroider three small snowflakes on the visible sides of the carriage. Each snowflake can be made with three short straight stitches crossing at one central point. Keep the snowflakes away from the wheel attachment areas.
Part 9 — Crochet the Train Couplers (Make 3)
Using black yarn:
Foundation: Ch 7. (7 chains).
Row 1: Starting in the second chain from the hook, sl st across. (6). FO, leaving a tail at both ends.
Make three identical coupler straps. Attach the first strap between the rear of the red locomotive and the front of the green gift carriage. Attach the second between the green gift carriage and the cream candy-cane carriage. Attach the third between the cream candy-cane carriage and the blue snow carriage.
Sew the couplers near the center of each vehicle’s end cap, at the same height. Leave a small space between neighboring bodies so the different cars remain visible. The connectors are sewn in place; they are not designed to detach or function as moving joints.
Part 10 — Final Train Assembly
Place all four sections on a flat surface in the following order: Red locomotive → Green gift car → Cream candy-cane car → Blue snow car.
Adjust each pair of wheels so the bodies sit at similar heights. Check that the chimney and cabin remain upright. Ensure the cargo decorations are securely attached. Weave in all remaining yarn ends. Gently straighten the train into a continuous line for display.
Tips & Variations
- Keep the wheels consistent. Use the same hook, yarn, and tension for all 16 wheels.
- Stuff evenly. The four main bodies should be firm enough to hold their shape but not so full that the stitches stretch open.
- Change the carriage colors. Try burgundy, pastel green, champagne cream, or snowy white.
- Make a smaller train. Using lighter yarn and a smaller hook will reduce the overall size without changing stitch counts.
- Personalize the cargo. Replace the snowball with another small handmade decoration or embroider a different holiday motif on a carriage.
Frequently Asked Questions
- Is this Christmas train beginner-friendly? Yes, for confident beginners. The individual shapes use basic crochet stitches, increases, and decreases, but the complete train takes time and careful assembly.
- How many train sections are included? Four: one locomotive and three matching-size carriages.
- Do the wheels actually turn? No. This is a decorative amigurumi train with securely sewn-on crochet wheels.
- Can I use plush chenille yarn? Yes. The train will become substantially larger and softer. Use a hook suitable for your yarn and keep your tension firm.
- Can I display the train as Christmas decoration? Absolutely. It is designed for decorative shelf displays and handmade holiday arrangements. Keep it away from heat and moisture.
Conclusion / Final Thoughts
This Christmas Train Amigurumi is a joyful holiday crochet project that combines four colorful little vehicles into one festive display. Save this free crochet pattern for later, gather your favorite holiday yarn colors, and crochet a Christmas train that’s ready to bring handmade cheer to your home!