Christmas Minis 5-in-1: Snowman, Yeti, Winter Bear, Snowglobe & Wreath (Free Crochet Pattern)
Published: November 13, 2026
If you love tiny Christmas crochet projects, this adorable collection of five holiday minis is the perfect way to use leftover yarn and create something special. From a cheerful snowman in a cozy scarf to a fluffy little yeti, each design brings a different touch of winter magic to your handmade Christmas decorations.
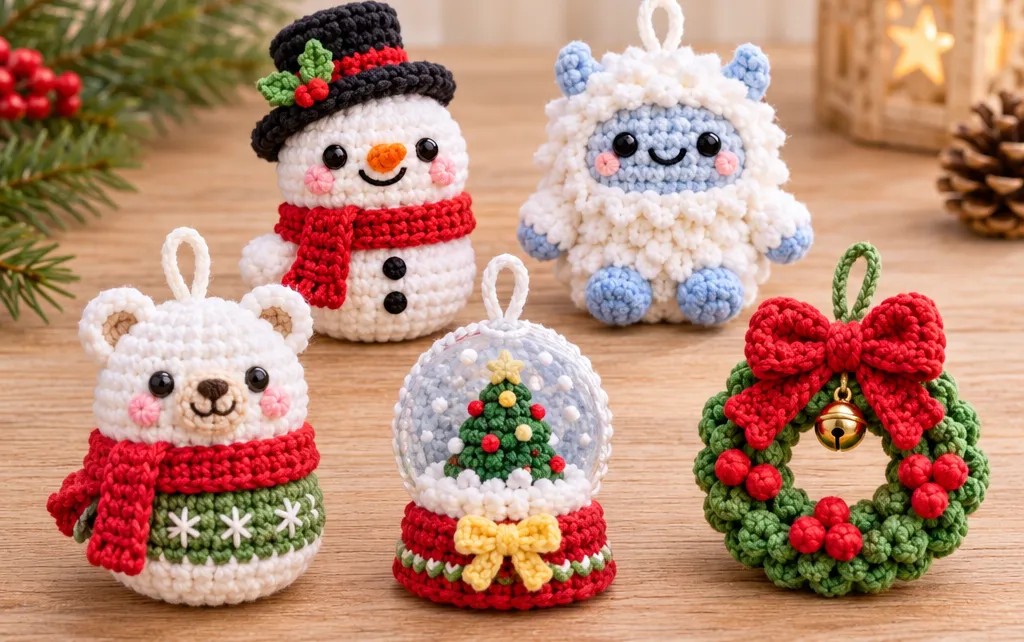
This free crochet pattern includes five original mini projects: a Christmas snowman, a snowy yeti, a winter bear, a miniature snowglobe ornament, and a festive Christmas wreath. Each one uses simple crochet stitches, small amounts of yarn, and easy decorative details.
Whether you’re making handmade stocking stuffers, decorating a miniature Christmas tree, or preparing small gifts for friends and family, these cute crochet minis are fun to personalize. Crochet the full collection in matching colors or choose your favorite character and make it your own.
Introduction / Description
This original Yarnimals Crochet collection includes five individual holiday designs:
- Christmas Snowman: A two-ball snowman with a black top hat and red scarf.
- Snowy Yeti: A white winter creature with a light-blue face, tiny horns, and fluffy facial edging.
- Winter Bear: A white polar-bear-inspired mini with a green sweater and red scarf.
- Christmas Snowglobe: A padded blue circular ornament featuring a little green tree and a red stand.
- Christmas Wreath: A small green crochet wreath decorated with red berries and a bow.
Each miniature can be displayed individually or combined into a coordinated Christmas set.
Skill level: Confident beginner
Crochet terminology: US terms
Construction: Small rounds, simple rows, and embroidered details
Approximate time: 30–75 minutes per mini, depending on the design
Materials
Main yarn: Medium weight (#4) cotton or soft acrylic.
- White: Approximately 25–35 yd (23–32 m) for the snowman, yeti, and bear.
- Light blue: Approximately 10–15 yd (9–14 m) for the yeti and snowglobe.
- Green: Approximately 15–20 yd (14–18 m) for the bear sweater, tree, and wreath.
- Red: Approximately 10–15 yd (9–14 m) for scarves, bows, and decorations.
- Black: Small amount for the snowman’s hat and embroidered faces.
- Cream: Small amount for the winter bear’s muzzle and pale details.
- Brown: Small amount for the snowglobe’s tree trunk.
- Orange: Small amount for the snowman’s carrot nose.
- Yellow or gold: Small amount for stars and bow details.
- Pink: Small amount for embroidered cheeks.
- Crochet hook: 3.5 mm (US E/4).
- Polyester fiberfill.
- Yarn needle.
- Scissors.
- Stitch marker.
- Optional small gold jingle bell for the wreath.
Use embroidered eyes for all five designs. Small decorative components and hanging cords are unsuitable for unsupervised use by young children or pets.
Finished Size
Approximate finished dimensions:
- Snowman: 3–3.5 inches (7.5–9 cm) tall, including the hat.
- Yeti: 2.5–3 inches (6.5–7.5 cm) tall.
- Winter bear: 2.5–3 inches (6.5–7.5 cm) tall.
- Snowglobe: 3–3.5 inches (7.5–9 cm) tall, excluding the hanging loop.
- Wreath: 3–3.5 inches (7.5–9 cm) across.
Size will vary with yarn, tension, stuffing, and hook choice.
Gauge
Gauge is not critical for this collection.
Use a smaller hook than normally recommended for your yarn to create a dense amigurumi fabric.
For the stuffed snowman, yeti, and bear, the stitches should be tight enough that the fiberfill does not show.
For the flat snowglobe and wreath, use even tension so the finished shapes remain neat and balanced.
Abbreviations
MR: Magic ring
ch: Chain
sc: Single crochet
hdc: Half double crochet
inc: Increase (2 sc in one stitch)
dec: Invisible decrease
sl st: Slip stitch
st: Stitch
sts: Stitches
FO: Fasten off
RS: Right side
WS: Wrong side
Stitch totals are shown in parentheses at the end of each round or row. Turning chains are not counted as stitches.
Pattern Notes
- Work amigurumi bodies in continuous rounds unless stated otherwise.
- Use a stitch marker to keep track of the beginning of each round.
- Stuff the characters gradually before their openings become too small.
- Use a yarn needle to embroider facial features.
- The snowman body and head are crocheted together.
- The yeti’s face and small limbs are separate attachments.
- The snowglobe is a padded crochet ornament, not a transparent or glass globe.
- The wreath is worked around a chain ring.
- Secure all attached pieces before display.
Step-by-Step Instructions
Mini 1 — Christmas Snowman
Snowman Body and Head — Using white yarn, begin at the bottom.
Round 1: Work 6 sc into MR. (6)
Round 2: Inc in each st. (12)
Round 3: Repeat [1 sc, inc] 6 times. (18)
Round 4: Repeat [2 sc, inc] 6 times. (24)
Rounds 5–7: Sc in each st around. (24 each round)
Round 8: Repeat [2 sc, dec] 6 times. (18)
Round 9: Repeat [1 sc, dec] 6 times. (12)
Stuff the lower body.
Round 10: Sc around to form the narrow neck. (12)
Round 11: Inc in each st around to begin the head. (24)
Rounds 12–14: Sc around. (24 each round)
Round 15: Repeat [2 sc, dec] 6 times. (18)
Round 16: Repeat [1 sc, dec] 6 times. (12)
Stuff the head, keeping the neck slightly defined.
Round 17: Dec 6 times. (6)
FO, draw the remaining six front loops closed, and weave in the end.
Black Top Hat — Using black yarn:
Round 1: Work 6 sc into MR. (6)
Round 2: Inc in each st around. (12)
Round 3: Repeat [1 sc, inc] 6 times. (18)
Round 4: Sc in BLO around. (18)
Rounds 5–6: Sc around. (18 each round)
Round 7: Repeat [2 sc, inc] 6 times. (24)
Round 8: Sc around. (24)
FO, leaving a long tail.
The first three rounds form the crown’s top, Rounds 4–6 form the sides, and Rounds 7–8 form the brim. With red yarn, embroider a band around the hat just above the brim. Add a few green stitches and tiny red embroidered berries if desired. Secure the hat to the top of the snowman’s head.
Red Scarf — Using red yarn:
Foundation: Ch 31. (31 chains)
Row 1: Sc in the second ch from the hook and in each remaining ch. (30)
Row 2: Ch 1, turn, sc across. (30)
FO. Wrap the scarf around the snowman’s neck. Cross the ends at the front and secure them with a few small stitches.
Snowman Face and Details: Embroider two black eyes between head Rounds 12 and 13. Add a small orange carrot-shaped nose using two or three straight embroidery stitches. Embroider a curved black smile. Add pink cheeks. Embroider two black buttons on the front of the lower body.
Mini 2 — Fluffy Snowy Yeti
Main Yeti Body — Using white yarn:
Round 1: Work 6 sc into MR. (6)
Round 2: Inc in each st. (12)
Round 3: Repeat [1 sc, inc] 6 times. (18)
Round 4: Repeat [2 sc, inc] 6 times. (24)
Rounds 5–8: Sc around. (24 each round)
Round 9: Repeat [2 sc, dec] 6 times. (18)
Round 10: Repeat [1 sc, dec] 6 times. (12)
Stuff the body firmly.
Round 11: Dec 6 times. (6)
FO and close the opening.
Light-Blue Face Patch — Using light-blue yarn:
Round 1: Work 6 sc into MR. (6)
Round 2: Inc in each st. (12)
Round 3: Repeat [1 sc, inc] 6 times. (18)
FO, leaving a long tail. Position the blue circle on the upper front of the white body and sew it around the edge. Embroider two small black eyes and a curved smile on the blue circle. Add pink cheeks.
Fluffy Face Border: Join white yarn to the outside edge of the blue face patch. Edging Round: Repeat [ch 2, sl st in the next edge stitch] 18 times, working evenly around the 18-stitch edge. (18 decorative loops) FO. Push the little loops outward so they frame the blue face.
Blue Horns — Make 2 — Using light-blue yarn:
Round 1: Work 4 sc into MR. (4)
Round 2: Sc around. (4)
Round 3: Sc around. (4)
FO, leaving a tail. Flatten each small horn slightly and attach them to the top sides of the yeti’s head.
Blue Arms — Make 2 — Using light-blue yarn:
Round 1: Work 6 sc into MR. (6)
Round 2: Sc around. (6)
FO, leaving a tail. Flatten the openings and sew one arm to each side of the body.
Blue Feet — Make 2 — Using light-blue yarn:
Round 1: Work 6 sc into MR. (6)
Round 2: Inc in each st. (12)
Round 3: Sc around. (12)
FO, leaving a tail. Add a tiny amount of stuffing to each foot if desired. Flatten the openings and attach the feet to the lower front of the yeti.
Mini 3 — Cozy Winter Bear
Bear Body — This mini bear has a white head and bottom with a green sweater-like middle. Start with white yarn.
Round 1: Work 6 sc into MR. (6)
Round 2: Inc in each st around. (12)
Round 3: Repeat [1 sc, inc] 6 times. (18)
Change to green yarn.
Round 4: Repeat [2 sc, inc] 6 times. (24)
Rounds 5–7: Sc around. (24 each round)
Change back to white yarn.
Rounds 8–9: Sc around. (24 each round)
Round 10: Repeat [2 sc, dec] 6 times. (18)
Round 11: Repeat [1 sc, dec] 6 times. (12)
Stuff the body.
Round 12: Dec 6 times. (6)
FO, draw closed, and weave in the end.
Bear Ears — Make 2 — Using white yarn:
Round 1: Work 6 sc into MR. (6)
Round 2: Inc in each st around. (12)
Round 3: Sc around. (12)
FO, leaving a tail. Flatten each ear without stuffing and sew it near the top sides of the bear’s head.
Cream Muzzle — Using cream yarn:
Round 1: Work 6 sc into MR. (6)
Round 2: Inc in each st around. (12)
FO, leaving a long tail. Flatten the circle and sew it onto the center front of the white face. Use black yarn to embroider a triangular nose and a small curved mouth. Embroider two black eyes above the muzzle and pink cheeks beside it.
Red Winter Scarf — Using red yarn:
Foundation: Ch 31. (31 chains)
Row 1: Sc in the second ch from the hook and in each remaining ch. (30)
Row 2: Ch 1, turn, sc across. (30)
FO. Wrap the scarf around the border between the white head and green sweater. Secure the crossing point with a few small stitches.
Sweater Decoration: Using white yarn, embroider three small snowflake shapes across the green sweater. Each snowflake can be made with three short crossing straight stitches. Keep the decorations evenly spaced across the front.
Mini 4 — Christmas Snowglobe Ornament
This design uses two flat crochet circles joined into a lightly padded ornament, with a miniature tree on the front and a small red stand.
Front Snowglobe Circle — Using pale-blue yarn:
Round 1: Work 6 sc into MR. (6)
Round 2: Inc in each st. (12)
Round 3: Repeat [1 sc, inc] 6 times. (18)
Round 4: Repeat [2 sc, inc] 6 times. (24)
Round 5: Repeat [3 sc, inc] 6 times. (30)
Round 6: Repeat [4 sc, inc] 6 times. (36)
FO and weave in the end.
Back Snowglobe Circle — Using pale-blue yarn, repeat Rounds 1–6 of the front circle. (36 stitches after Round 6) FO.
Mini Green Christmas Tree — Using green yarn:
Foundation: Ch 2. (2 chains)
Row 1: Work 2 sc into the second ch from the hook. (2)
Row 2: Ch 1, turn, inc in each st. (4)
Row 3: Ch 1, turn, inc in the first st, sc in the next 2 sts, inc in the final st. (6)
Row 4: Ch 1, turn, inc in the first st, sc in the next 4 sts, inc in the final st. (8)
FO, leaving a tail. This creates a small triangular tree.
Tree Trunk — Using brown yarn:
Foundation: Ch 4. (4 chains)
Row 1: Sc in the second ch from the hook and in the remaining chains. (3)
FO. Sew the trunk to the bottom center of the green tree, then attach the tree to the front blue circle. Use yellow yarn to embroider a tiny star at the top of the tree. Add a few red and yellow embroidered dots as miniature Christmas ornaments.
Snowy Ground — Using white yarn:
Foundation: Ch 18. (18 chains)
Row 1: Sc in the second ch from the hook and each remaining ch. (17)
Row 2: Ch 1, turn, sc across. (17)
FO. Sew this small white strip across the lower part of the blue front circle, positioning it beneath the green tree. Embroider a few small white snowflakes around the tree.
Join the Snowglobe Circles: Hold the front and back circles together with wrong sides facing inward. Join white yarn through one matching stitch of both outer rounds. Joining Round: Work 1 sc through both layers around the entire edge. (36) Before completing the last few stitches, insert a small amount of polyester fiberfill if you want a softly padded ornament. Join and FO.
Red Snowglobe Stand: With the completed globe facing you, identify the lower ten stitches of the joined edge. Join red yarn at the first of these ten stitches.
Row 1: Sc into each of the next 10 edge stitches. (10)
Row 2: Ch 1, turn, inc in the first st, sc in the next 8 sts, inc in the final st. (12)
Row 3: Ch 1, turn, sc across. (12)
Row 4: Ch 1, turn, sc across. (12)
FO and weave in the ends. The red rectangle forms the decorative base of the snowglobe.
Golden Bow — Using golden-yellow yarn:
Foundation: Ch 13. (13 chains)
Row 1: Sc in the second ch from the hook and across. (12)
Row 2: Ch 1, turn, sc across. (12)
FO. Pinch the center, wrap with a little extra golden yarn, and attach the small bow to the front of the red base.
Hanging Loop: Join white yarn at the top center of the globe. Ch 18 and sl st into the same joining point. (18 chains) FO and secure.
Mini 5 — Festive Christmas Wreath
Main Wreath Ring — Using green yarn:
Foundation: Ch 20 and join with sl st to the first chain, without twisting. (20 chains)
Round 1: Sc into each foundation chain around. (20)
Round 2: Repeat [1 sc, inc] 10 times. (30)
Round 3: Repeat [2 sc, inc] 10 times. (40)
Round 4: Sc around. (40)
FO and weave in the ends. Gently spread the ring with your fingers so the central opening remains visible. The increases produce a slightly ruffled wreath texture.
Red Christmas Bow — Using red yarn:
Foundation: Ch 13. (13 chains)
Row 1: Sc in the second ch from the hook and across. (12)
Row 2: Ch 1, turn, sc across. (12)
Row 3: Ch 1, turn, sc across. (12)
FO, leaving a long tail. Pinch the center of the rectangle. Wrap the yarn tail around the pinched center several times to create two rounded bow loops. Secure the bow at the upper center of the wreath.
Red Holly Berries — Make 6 — Using red yarn:
Round 1: Work 4 sc into MR. (4)
Round 2: Sc around. (4)
FO, leaving a tail. Tuck the short starting end inside each tiny berry to add a little volume, then draw the opening together with the finishing tail. Arrange the six berries in three small clusters around the wreath. Sew them securely to the green ring.
Optional Gold Bell: If desired, attach a small gold jingle bell below the red bow. Make sure the bell is securely attached. Omit it entirely when making decorations for environments where small detachable parts may be hazardous.
Hanging Loop: Join green yarn behind the upper center of the wreath. Ch 18 and sl st into the same joining point. (18 chains) FO and weave in the ends.
Final Assembly and Finishing: Check each miniature for loose ends or unsecured decorative parts. Gently reshape the snowman’s hat, the yeti’s facial loops, the bear’s ears, the snowglobe’s base, and the wreath’s bow. For hanging decorations, add a secure yarn hanging loop to any character that does not already have one. If adding a loop to the snowman, bear, or yeti, join yarn at the top center, ch 18, and sl st into the same attachment point. (18 chains) The finished five-piece set can be displayed together as a holiday collection.
Color Ideas
Classic Christmas: White snowman, blue-and-white yeti, white-and-green bear, blue snowglobe, and forest-green wreath.
Pastel Winter: Soft pink scarves, baby-blue snowglobe, mint-green wreath, and cream-colored characters.
Rustic Christmas: Ivory, sage green, deep burgundy, and warm brown accents.
Bright Holiday: Cherry red, emerald green, snowy white, sunshine yellow, and icy blue.
Minimal Winter: White and cream characters with dusty-blue and soft-gray details.
Tips & Variations
- Use the same yarn weight for the collection. This gives the characters a coordinated appearance and keeps their proportions more consistent.
- Embroider facial details before closing. It is often easier to position the eyes and smiles while you can still reach the inside of each piece.
- Stuff gradually. Add enough fiberfill for a rounded shape without stretching the stitches.
- Make individual ornaments. Add hanging loops to the snowman, yeti, and winter bear for a complete five-piece Christmas tree collection.
- Personalize the accessories. Change scarf colors, add tiny embroidered snowflakes, or make the wreath bow in a different holiday shade.
Frequently Asked Questions
- Are these five crochet Christmas minis beginner-friendly? Yes. The basic shapes use simple increases, decreases, and single crochet. Some assembly and embroidery require patience, but the techniques are suitable for confident beginners.
- How long does it take to make one Christmas mini? Depending on the design and your experience, an individual miniature may take approximately 30–75 minutes.
- Can I use safety eyes instead of embroidered eyes? You can use safety eyes on decorative pieces intended for adults, but embroidered eyes are the safer choice for items that may be handled by children.
- Can I make these minis smaller? Yes. Use lighter-weight yarn and a smaller hook while keeping the same stitch counts. The finished size will decrease.
- Do I have to crochet all five pieces? No. Each design is a separate mini pattern. You can make just the snowman, yeti, bear, snowglobe, or wreath, or crochet the entire matching set.
Conclusion / Final Thoughts
This Christmas Minis 5-in-1 collection is a fun way to fill your holiday season with tiny handmade creations. From the cheerful snowman and fluffy yeti to the winter bear, Christmas snowglobe, and festive wreath, every piece adds something special to your decorations.
These little projects are perfect for using yarn scraps, practicing amigurumi techniques, and creating personal gifts that friends and family can enjoy.
Save this free crochet pattern for later, choose your favorite Christmas mini, and start crocheting your own adorable holiday collection!