Holiday Mice 6-in-1 (Free Crochet Pattern)
Published: November 14, 2026
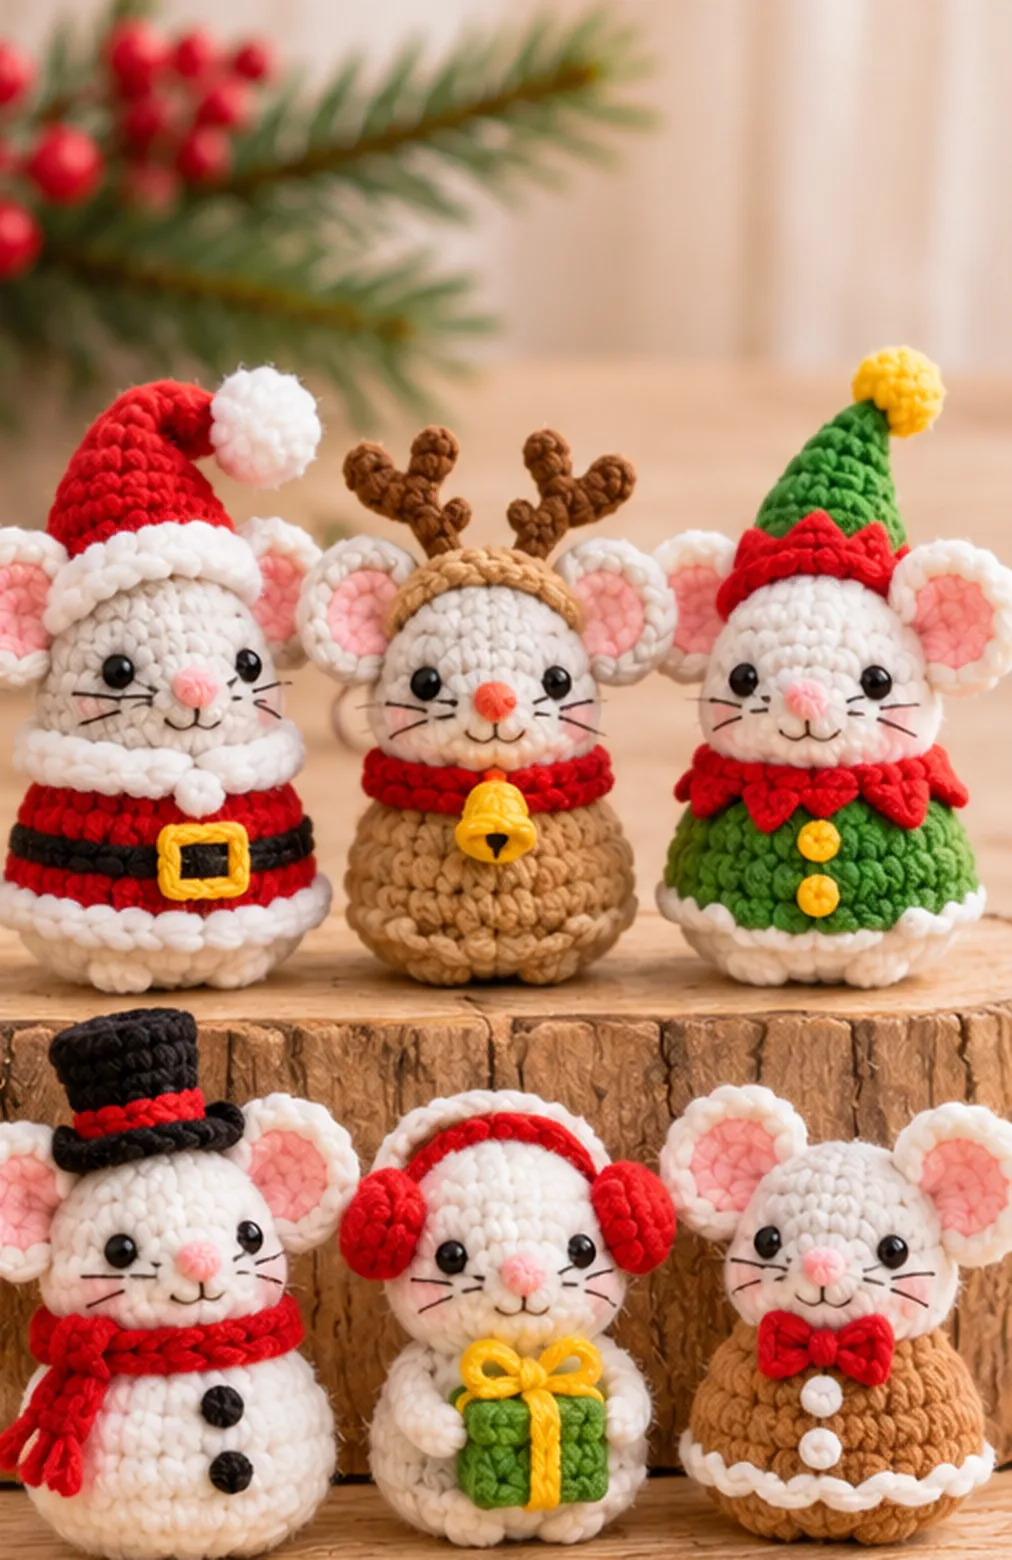
Get ready to crochet the cutest little Christmas mouse family! This Holiday Mice 6-in-1 collection includes six tiny mice, each with its own festive outfit and personality. From a jolly Santa mouse to a sweet gingerbread mouse, there’s a character for everyone to love.
What makes this collection especially fun is that all six mice share the same basic body pattern. Once you learn the body, you can change the colors and accessories to create each character. It’s a wonderful way to practice amigurumi while building a whole holiday set.
These little mice are lovely for stocking stuffers, small holiday gifts, craft fairs, and Christmas displays. Make one favorite, or crochet the complete family of six!
Introduction / Description
This original Yarnimals Crochet collection features six Christmas mice:
- Santa Mouse: Red outfit, white trim, black belt, and Christmas hat.
- Rudolph Mouse: Brown body, tiny antlers, red nose, and festive collar.
- Christmas Elf Mouse: Green outfit, pointed hat, red trim, and golden buttons.
- Snowman Mouse: White body, black top hat, red scarf, and black buttons.
- Christmas Present Mouse: White body, red earmuffs, and a tiny green gift.
- Gingerbread Mouse: Brown outfit, red bow tie, and white icing details.
All six use the same original mouse body, head, ears, muzzle, and tail instructions.
Difficulty: Confident beginner
Terminology: US crochet terms
Construction: One-piece mouse body and head, attached ears and muzzle, themed accessories
Approximate time: 1.5-2.5 hours per mouse
Materials
- Main yarn: Medium-weight (#4) cotton or soft acrylic yarn.
- Cream or ivory: Approximately 70-90 yd (64-82 m) for the mouse faces, ears, and pale body sections across the full set.
- Christmas red: Approximately 25-35 yd (23-32 m) for Santa outfits, hats, scarves, and bows.
- Forest green: Approximately 20-30 yd (18-27 m) for the elf outfit and Christmas present.
- Warm brown: Approximately 25-35 yd (23-32 m) for Rudolph and gingerbread outfits.
- White: Approximately 20-25 yd (18-23 m) for trims and snowman details.
- Black: Approximately 10 yd (9 m) for the top hat and Santa belt.
- Soft pink: Small amount for noses and inner-ear embroidery.
- Golden yellow: Small amount for buttons, buckles, and small accessories.
- Crochet hook: 3.5 mm (US E/4).
- Polyester fiberfill.
- Yarn needle.
- Scissors.
- Stitch marker.
- Optional: 6 mm safety eyes for decorative pieces intended for adults. Embroidered eyes are recommended for children’s items.
Finished Size
Each mouse measures approximately:
- Height: 3.5-4.5 inches (9-11.5 cm), including accessories.
- Width: 2.5-3.5 inches (6.5-9 cm), including the ears.
Actual size depends on yarn, hook size, stuffing, and personal tension.
Gauge
Gauge is not critical. Use a tight, even tension so the stuffed mouse bodies remain firm and the fiberfill does not show through. If you see gaps between stitches, use a smaller hook. For a matching six-piece collection, use the same yarn weight and hook size for every mouse.
Abbreviations
MR: Magic ring; ch: Chain; sc: Single crochet; inc: Increase, 2 sc in the same stitch; dec: Invisible decrease; sl st: Slip stitch; BLO: Back loop only; st: Stitch; sts: Stitches; FO: Fasten off.
The number in parentheses gives the stitch total at the end of each round or row. Turning chains are not counted as stitches unless stated otherwise.
Pattern Notes
- The shared mouse body is used for all six characters.
- Each mouse’s lower body color changes to match its holiday outfit.
- The cream head is worked directly onto the body without sewing the two pieces together.
- Ears, muzzle, paws, and accessories are added separately.
- Use a stitch marker to track continuous rounds.
- Stuff the lower body before closing the head.
- Embroider the eyes, nose, and whiskers before closing the top whenever possible.
- Small accessories should be sewn securely; these are decorative amigurumi and should not be treated as toys for unsupervised young children.
Step-by-Step Instructions
Part 1 – Basic Mouse Body and Head (Make 6) – Crochet the following body once for each of the six mice. Choose the lower body color: Santa: Red; Rudolph: Brown; Elf: Green; Snowman: White; Christmas Present: White; Gingerbread: Brown.
Using your chosen body color:
Round 1: Work 6 sc into MR. (6)
Round 2: Inc in each stitch. (12)
Round 3: Repeat [1 sc, inc] 6 times. (18)
Round 4: Repeat [2 sc, inc] 6 times. (24)
Round 5: Sc in each stitch around. (24)
Round 6: Sc around. (24)
Round 7: Sc around. (24)
Round 8: Repeat [2 sc, dec] 6 times. (18)
Round 9: Repeat [1 sc, dec] 6 times. (12)
Stuff the lower body.
Change to cream yarn for the head. For the snowman mouse, continue with white.
Round 10: Sc around to form the narrow neck. (12)
Round 11: Inc in each stitch around. (24)
Round 12: Sc around. (24)
Round 13: Sc around. (24)
Round 14: Sc around. (24)
Round 15: Repeat [2 sc, dec] 6 times. (18)
Round 16: Repeat [1 sc, dec] 6 times. (12)
Pause to add facial embroidery if needed. Stuff the head gently.
Round 17: Dec 6 times. (6)
FO, leaving a tail. Thread the tail through the front loops of the final six stitches and pull closed.
Part 2 – Large Mouse Ears (Make 2 Per Mouse) – Using cream or ivory yarn:
Round 1: Work 6 sc into MR. (6)
Round 2: Inc in each stitch around. (12)
Round 3: Repeat [1 sc, inc] 6 times. (18)
FO, leaving a long attachment tail. Do not stuff. Gently shape each flat circle into a rounded ear. Using soft-pink yarn, embroider a small semicircular inner-ear area at the center of each ear. Attach the ears to the upper sides of the mouse’s head, near Body Rounds 13-15, leaving space for any hat.
Part 3 – Mouse Muzzle (Make 1 Per Mouse) – Using cream yarn:
Round 1: Work 4 sc into MR. (4)
Round 2: Inc in each stitch around. (8)
Round 3: Sc around. (8)
FO, leaving a tail. Add a tiny amount of stuffing. Position the rounded muzzle at the center front of the mouse’s head, approximately across Body Rounds 13-14. Sew it securely in place. Embroider a small pink nose at the tip, except for Rudolph, whose nose is red. Add a small black smile underneath.
Part 4 – Tiny Mouse Paws (Make 2 Per Mouse) – Using the head color:
Round 1: Work 5 sc into MR. (5)
Round 2: Sc around. (5)
FO, leaving an attachment tail. Flatten each small paw and sew it to the upper sides of the mouse’s body near the neck. Position the paws so they project slightly forward.
Part 5 – Curly Mouse Tail – Using the lower body color: Join yarn at the center back near Body Round 6.
Foundation: Ch 14. (14 chains)
Return Row: Starting in the second chain from the hook, sl st back across the chain. (13) FO and secure the tail to the body. Gently curve the tail with your fingers. Make one tail for each of the six mice.
Part 6 – Mouse Face – Embroider two small black eyes on the front of the head, approximately five stitches apart. Position them slightly above the muzzle. Add three short whisker stitches to each cheek, spreading outward from the muzzle. Use pink yarn for a tiny blush on either side. You now have the basic Christmas mouse. Repeat the shared instructions six times, changing the body colors as listed above.
Mouse 1 – Santa Christmas Mouse
Santa Hat – Using red yarn:
Round 1: Work 4 sc into MR. (4)
Round 2: Sc around. (4)
Round 3: Inc in each stitch. (8)
Round 4: Sc around. (8)
Round 5: Repeat [1 sc, inc] 4 times. (12)
Round 6: Sc around. (12)
Round 7: Repeat [2 sc, inc] 4 times. (16)
Round 8: Sc around. (16)
Round 9: Repeat [3 sc, inc] 4 times. (20)
Round 10: Repeat [4 sc, inc] 4 times. (24)
Change to white yarn.
Round 11: Sc around for the fluffy brim. (24)
FO. Position the hat between the mouse’s ears and secure it with small stitches.
White Hat Pompom – Using white yarn:
Round 1: Work 6 sc into MR. (6)
Round 2: Inc in each stitch. (12)
Round 3: Dec 6 times. (6)
FO and close. Attach the pompom to the tip of the Santa hat.
Santa Outfit Details – Using white yarn, embroider a thick trim around the lower edge of the red body. Using black yarn, embroider a belt around the middle of the red body. With golden-yellow yarn, embroider a small square buckle at the center front. Add a short white collar around the neck.
Mouse 2 – Rudolph Christmas Mouse – Use the shared brown-body mouse. Embroider the tip of its muzzle in bright red instead of pink.
Antlers – Make 2 – Using brown yarn:
Foundation: Ch 7. (7 chains)
Main Antler: Starting in the second chain from the hook, sl st back along all 6 chains. (6) FO. To make a side branch, join a new strand of brown yarn approximately three chains above the base of the main antler.
Side Branch: Ch 4, then sl st back from the second chain to the attachment point. (3) FO. Make two matching antlers. Attach them behind the ears, one on each side of the head.
Festive Red Collar – Using red yarn:
Foundation: Ch 26. (26 chains)
Row 1: Starting in the second chain from the hook, sc across. (25) FO. Wrap the collar around the narrow neck and secure its ends.
Mini Golden Bell – Using golden-yellow yarn:
Round 1: Work 4 sc into MR. (4)
Round 2: Inc in each stitch. (8)
Round 3: Sc around. (8)
FO, leaving a long attachment tail. Flatten gently and sew it to the center front of the red collar. Embroider a tiny black line underneath to suggest the bell opening.
Mouse 3 – Christmas Elf Mouse – Use the shared green-body mouse.
Pointed Green Elf Hat – Using green yarn:
Round 1: Work 4 sc into MR. (4)
Round 2: Sc around. (4)
Round 3: Inc in each stitch. (8)
Round 4: Sc around. (8)
Round 5: Repeat [1 sc, inc] 4 times. (12)
Round 6: Sc around. (12)
Round 7: Repeat [2 sc, inc] 4 times. (16)
Round 8: Sc around. (16)
Round 9: Repeat [3 sc, inc] 4 times. (20)
Round 10: Repeat [4 sc, inc] 4 times. (24)
Change to red yarn.
Round 11: Sc around for the red brim. (24)
FO and secure the hat between the ears.
Golden Hat Pompom – Using golden-yellow yarn:
Round 1: Work 6 sc into MR. (6)
Round 2: Inc in each stitch. (12)
Round 3: Dec 6 times. (6)
FO, close, and attach to the tip.
Elf Collar – Using red yarn:
Foundation: Ch 25. (25 chains)
Row 1: Starting in the second chain from the hook, sc across. (24) FO. Wrap the collar around the neck and secure it. Embroider two little golden buttons down the center front of the green body.
Mouse 4 – Snowman Christmas Mouse – Use the shared white-body mouse.
Mini Black Top Hat – Using black yarn:
Round 1: Work 6 sc into MR. (6)
Round 2: Inc in each stitch. (12)
Round 3: Repeat [1 sc, inc] 6 times. (18)
Round 4: Sc in BLO around. (18)
Round 5: Sc around. (18)
Round 6: Repeat [2 sc, inc] 6 times to create the brim. (24)
Round 7: Sc around. (24)
FO. Embroider a narrow red band around the base of the hat crown. Position the hat slightly toward one side of the head and secure it.
Red Snowman Scarf – Using red yarn:
Foundation: Ch 31. (31 chains)
Row 1: Starting in the second chain from the hook, sc across. (30)
Row 2: Ch 1, turn, sc across. (30)
FO. Wrap the scarf around the neck and cross the ends at the front. Embroider two black buttons down the front of the white body.
Mouse 5 – Christmas Present Mouse – Use the shared white-body mouse.
Red Winter Earmuffs – Make two red ear pads. For each pad:
Round 1: Work 6 sc into MR. (6)
Round 2: Inc in each stitch around. (12)
FO. Sew one red pad over the outer center of each ear, leaving the pink ear interiors partly visible.
Earmuff Headband – Using red yarn:
Foundation: Ch 20. (20 chains)
Row 1: Starting in the second chain from the hook, sl st across. (19) FO. Secure the strip over the top of the mouse’s head, joining its ends to the two red earmuff pads.
Tiny Green Christmas Gift – Make six identical green squares. For each square:
Foundation: Ch 5. (5 chains)
Row 1: Starting in the second chain from the hook, sc across. (4)
Row 2: Ch 1, turn, sc across. (4)
Row 3: Ch 1, turn, sc across. (4)
Row 4: Ch 1, turn, sc across. (4)
FO, leaving a tail for joining. Sew the six squares together to form a small cube, leaving one seam open. Add a little polyester fiberfill, then close the final seam. Using golden-yellow yarn, embroider vertical and horizontal ribbon lines around the cube.
Gift Bow – Using golden-yellow yarn:
Foundation: Ch 13. (13 chains)
Row 1: Starting in the second chain from the hook, sc across. (12) FO. Fold the strip into two little loops, wrap the center with yarn, and attach it to the top of the gift. Secure the finished present between the mouse’s front paws.
Mouse 6 – Gingerbread Christmas Mouse – Use the shared brown-body mouse.
Red Gingerbread Bow Tie – Using red yarn:
Foundation: Ch 13. (13 chains)
Row 1: Starting in the second chain from the hook, sc across. (12)
Row 2: Ch 1, turn, sc across. (12)
FO, leaving a long tail. Pinch the strip at the center. Wrap the yarn tail around the pinched section several times to make a small bow. Attach the bow at the front of the neck.
White Icing Decorations – Using white yarn, embroider a wavy icing line around the lower part of the brown body. Add two or three small white buttons down the center front. You can also add a little white icing trim along the sleeves or paws.
Gingerbread Face – Embroider a small pink nose, black smiling eyes, and short whiskers. For extra detail, make a tiny white icing curve above the eyebrows.
Final Assembly and Finishing – Place all six mice together and compare their shapes. Make sure that: Every mouse has two securely attached ears. All noses, faces, and whiskers are centered. Each tail is secure at the back. Hats and accessories fit properly. The mice sit upright with evenly distributed stuffing. All yarn ends are woven in securely. Straighten the scarves, adjust the antlers, and reshape the bows with your fingers. If you want hanging ornaments rather than standing figures, add a securely fastened crochet hanging loop to the top of each mouse.
Tips & Variations
- Use one consistent yarn type. This ensures that all six mice look like a coordinated collection.
- Finish the basic bodies first. Crochet six bodies, then move on to the ears, muzzles, and accessories. This can make batch crocheting easier.
- Personalize the faces. Try sleepy eyes, tiny embroidered eyebrows, different nose colors, or cheek embroidery.
- Make a miniature Christmas display. Place the finished mice on a small wooden shelf with artificial greenery and miniature wrapped gifts.
- Create your own seventh mouse. Once you’ve learned the basic body pattern, experiment with a new accessory or color combination.
Frequently Asked Questions
- Is this Holiday Mice 6-in-1 pattern suitable for beginners? Yes. The basic mouse uses beginner-friendly amigurumi shaping. Some accessories require additional sewing and embroidery.
- Do I have to crochet six different bodies? The same body instructions are used for all six mice. You only need to change the body yarn color and accessories.
- Can I use plush yarn? Yes. Plush or chenille yarn will produce larger mice with a softer texture. Use an appropriate hook for your yarn.
- Are the mice safe for babies? These patterns are intended primarily as decorations and collectibles. Use embroidered facial features and secure all parts.
- Can I sell finished mice made using this pattern? Yes. You may sell finished handmade mice created from this original Yarnimals Crochet pattern. Please do not redistribute the written pattern.
Conclusion / Final Thoughts
This Holiday Mice 6-in-1 crochet collection is a delightful way to make a whole family of tiny Christmas mice. Whether you’re crocheting the Santa Mouse, Rudolph Mouse, Christmas Elf Mouse, Snowman Mouse, Christmas Present Mouse, or Gingerbread Mouse, each one brings its own festive charm to your holiday season. Save this free crochet pattern for later, pick your favorite Christmas mouse, and start making your own adorable holiday mouse family!