Friendly Christmas Tree Plush (Free Crochet Pattern)
Published: November 14, 2026
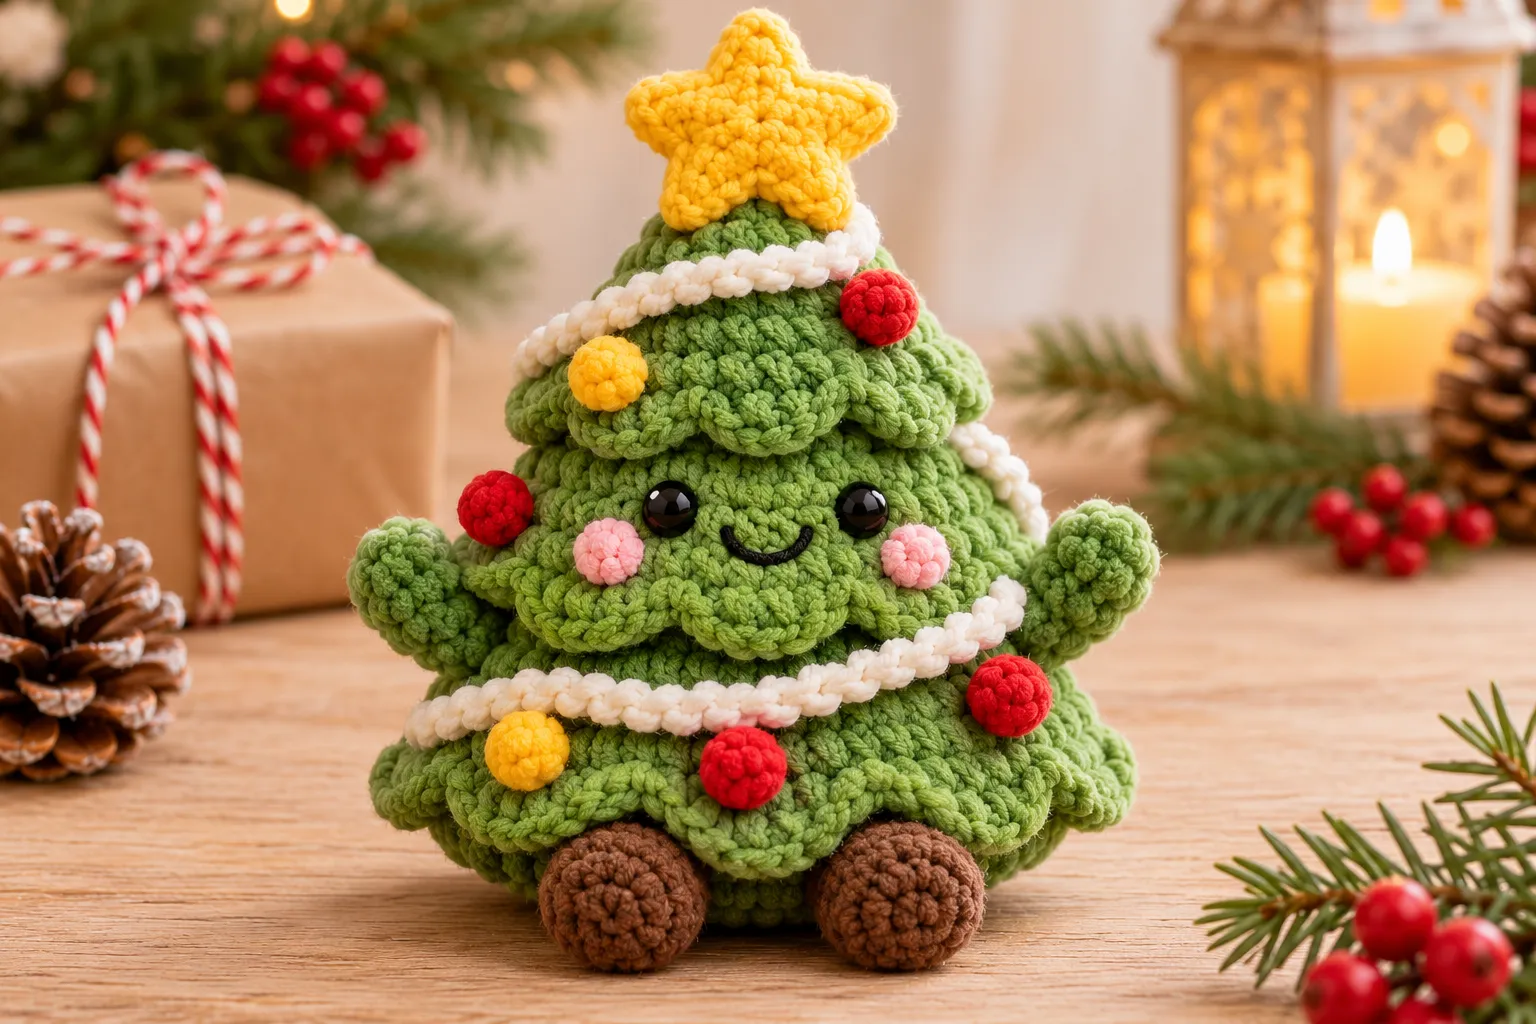
Looking for a Christmas crochet project that’s adorable, soft, and easy to personalize? This friendly Christmas tree plush is the perfect little holiday companion. With its bright green branches, cheerful face, and golden star, it’s guaranteed to bring a smile to anyone who sees it.
The best part is its low-sew construction. Instead of making lots of individual branches and attaching them one by one, the tree’s body is crocheted in one piece, with the scalloped branches worked directly onto the cone. That means fewer seams, less sewing, and a much quicker finish.
Made with super-bulky chenille yarn, this little tree feels wonderfully soft and cuddly. Add a cream garland, a few bright bobbles, and a sweet embroidered face, and you’ll have a festive decoration that’s perfect for a mantelpiece, a child’s bedroom, or a handmade Christmas gift.
Introduction / Description
This original Yarnimals Crochet design features a plush Christmas tree with a rounded cone body, three layers of scalloped branches, and a friendly embroidered face. The tree body is made from the top downward, with a separate base crocheted directly onto the bottom, so it can stand proudly on its own.
Only the small accessories require sewing.
Difficulty: Confident beginner
Terminology: US crochet terms
Construction: One cone body, joined base, crocheted-on branches, small attached decorations
Approximate working time: 2-3 hours
Materials
- Super-bulky (#6) chenille yarn: Forest green, approximately 65-85 yd (60-78 m), for the tree body and arms.
- Super-bulky (#6) chenille yarn: Brown, approximately 10-15 yd (9-14 m), for the trunk and feet.
- Worsted (#4) cotton yarn: Golden yellow, approximately 5 yd (4.5 m), for the star.
- Worsted (#4) cotton yarn: Warm cream, approximately 8 yd (7.3 m), for the garland.
- Worsted (#4) cotton yarn: Small amounts of red and yellow for decorations.
- Embroidery yarn: Black and soft pink for the face and cheeks.
- Crochet hook: 4.0 mm (US G/6) for chenille yarn.
- Crochet hook: 3.5 mm (US E/4) for the star and garland.
- Polyester fiberfill.
- Yarn needle.
- Scissors.
- Stitch marker.
- Optional 8 mm safety eyes for display-only pieces.
Finished Size
Estimated size using the suggested yarn:
- Height: Approximately 6-7.5 inches (15-19 cm), including the star.
- Width: Approximately 4.5-5.5 inches (11.5-14 cm) across the bottom branches.
These measurements are estimates, not a measured sample. Size depends on yarn thickness, hook size, stuffing, and personal tension.
Gauge
Gauge is not critical for this plush.
Use sufficiently tight stitches so that the stuffing cannot be seen through the fabric. A 4.0 mm hook with super-bulky chenille yarn usually gives a firm, plush fabric. The base should be firm enough to support the tree, while the decorative branch layers should remain soft and flexible.
Abbreviations
MR: Magic ring; ch: Chain; sc: Single crochet; hdc: Half double crochet; inc: Increase, 2 sc in the same stitch; dec: Invisible decrease; sl st: Slip stitch; BLO: Back loop only; FLO: Front loop only; st: Stitch; sts: Stitches; FO: Fasten off.
All stitch totals refer to completed stitches, excluding turning or decorative chains unless stated otherwise.
Pattern Notes
- Work in continuous rounds unless specified.
- Place a stitch marker at the beginning of every round.
- The tree starts at its tip and widens toward its base.
- Rounds 10, 14, and 18 are worked in BLO to leave free front loops for the scalloped branches.
- The body and base are joined with crochet stitches, not a sewn seam.
- Stuff the main tree before completely joining the base.
- The arms, feet, and star are separate small attachments.
- Use embroidered eyes for a plush that might be handled by children. Even with embroidered eyes, decorative pieces should be securely attached.
Step-by-Step Instructions
Part 1 – Main Christmas Tree Body – Using forest-green chenille yarn and a 4 mm hook:
Round 1: Work 6 sc into a MR. (6)
Round 2: Sc in each stitch around. (6)
Round 3: Repeat [1 sc, inc] 3 times. (9)
Round 4: Sc around. (9)
Round 5: Repeat [2 sc, inc] 3 times. (12)
Round 6: Sc around. (12)
Round 7: Repeat [3 sc, inc] 3 times. (15)
Round 8: Sc around. (15)
Round 9: Repeat [4 sc, inc] 3 times. (18)
Round 10: Sc in BLO around. (18)
Round 11: Repeat [2 sc, inc] 6 times. (24)
Round 12: Sc around. (24)
Round 13: Repeat [3 sc, inc] 6 times. (30)
Round 14: Sc in BLO around. (30)
Round 15: Repeat [4 sc, inc] 6 times. (36)
Round 16: Sc around. (36)
Round 17: Repeat [5 sc, inc] 6 times. (42)
Round 18: Sc in BLO around. (42)
Round 19: Sc around. (42)
Round 20: Sc around. (42)
FO, leaving the bottom opening accessible. The cone now has three reserved front-loop rounds for the decorative branches.
Part 2 – Scalloped Christmas Tree Branches – Work into the unused front loops of the indicated rounds.
Top branch layer – Round 10: Join green yarn to any available front loop. Repeat [2 hdc in the next free front loop, 1 sl st in the next free front loop] 9 times. (27 decorative stitches) FO.
Middle branch layer – Round 14: Join green yarn. Repeat [2 hdc in the next free front loop, 1 sl st in the next free front loop] 15 times. (45 decorative stitches) FO.
Bottom branch layer – Round 18: Join green yarn. Repeat [2 hdc in the next free front loop, 1 sl st in the next free front loop] 21 times. (63 decorative stitches) FO.
Spread the scallops outward with your fingers so the tree develops three overlapping tiers.
Part 3 – Brown Trunk and Green Base – Start with brown chenille yarn.
Round 1: Work 6 sc into MR. (6)
Round 2: Inc in each stitch around. (12)
Round 3: Sc around. (12)
Round 4: Sc around. (12)
Change to forest-green yarn.
Round 5: Repeat [1 sc, inc] 6 times. (18)
Round 6: Repeat [2 sc, inc] 6 times. (24)
Round 7: Repeat [3 sc, inc] 6 times. (30)
Round 8: Repeat [4 sc, inc] 6 times. (36)
Round 9: Repeat [5 sc, inc] 6 times. (42)
Do not fasten off. The brown portion forms a short central trunk, and the green portion widens into a circular base.
Part 4 – Join the Base Without Sewing
Fill the tree with polyester fiberfill, beginning at the tip and distributing the stuffing evenly. Place the green circular base against the 42-stitch opening, with the brown trunk pointing outward underneath. Match the stitches of the two pieces.
Joining Round: Working through both the base and body edges, make 1 sc through each corresponding pair of stitches. (42) Before completing the last few stitches, adjust the stuffing. Sl st to finish, FO, and weave in the ends.
Part 5 – Small Green Arms (Make 2) – Using green chenille yarn:
Round 1: Work 6 sc into MR. (6)
Round 2: Inc in each stitch. (12)
Round 3: Sc around. (12)
Round 4: Sc around. (12)
Round 5: Dec 6 times. (6)
Lightly stuff, FO, and close the opening. Attach one arm to each side of the tree, just beneath the middle branch layer.
Part 6 – Brown Feet (Make 2) – Using brown chenille yarn:
Round 1: Work 6 sc into MR. (6)
Round 2: Inc in each stitch. (12)
Round 3: Sc around. (12)
Round 4: Dec 6 times. (6)
Lightly stuff, FO, and close. Attach both feet to the lower front of the tree, spaced evenly on either side of the centerline.
Part 7 – Golden Christmas Star – Using golden-yellow worsted cotton yarn and a 3.5 mm hook:
Round 1: Work 10 sc into MR. Join with sl st to the first sc. (10)
Round 2: Repeat five times: Ch 3, sl st in the second ch from the hook, sc in the next ch, then sl st into each of the next 2 base stitches. (5 points) FO, leaving a long attachment tail. Spread the five points, position the star on the tip of the tree, and sew it securely in place.
Part 8 – Cream Christmas Garland – Using cream worsted yarn and a 3.5 mm hook:
Foundation: Ch 66. (66 chains)
Row 1: Starting in the second ch from the hook, work 1 sl st into each chain. (65) FO, leaving an attachment tail at each end. Wrap the garland loosely around the front and sides of the tree in two descending curves. Use the attachment tails and a few small securing stitches to keep the garland in position without flattening the branches.
Part 9 – Red and Yellow Decorations – For each little decorative bobble:
- Join red or yellow worsted yarn to a stitch on the tree’s surface.
- Ch 2.
- Work 4 unfinished hdc into the same attachment stitch, keeping the final loop of each hdc on the hook.
- Yarn over and pull through all 5 loops on the hook to close the cluster.
- Ch 1 and sl st into the attachment stitch. (1 bobble) FO and secure both ends inside the plush. Make approximately 6-8 bobbles, distributed across the three branch layers.
Part 10 – Friendly Christmas Tree Face – Locate the center front between Body Rounds 15 and 17, adjusting the nearby scallops so the face stays visible.
For embroidered eyes: Make two small black satin-stitched eyes, spaced approximately six body stitches apart. Embroider a curved black smile between them. Add a small soft-pink cheek on each side. For display-only pieces, optional 8 mm safety eyes must be installed before joining the base and closing the tree.
Finishing – Check that the green branches are evenly arranged and the tree sits upright on its trunk and feet. Gently shape the star and straighten the cream garland. Secure any remaining yarn ends and inspect every decorative attachment.
Tips & Variations
- Choose soft but dense chenille. A thick chenille yarn produces a cuddly tree, while a smaller hook helps keep stuffing hidden.
- Create a pastel version. Try mint-green yarn, blush-pink decorations, and a cream star.
- Customize the expression. Try sleepy embroidered eyes, tiny eyebrows, or a wider smile.
- Skip the accessories for a simpler version. The three scalloped branch tiers already make a recognizable Christmas tree.
- Make a matching family. Use different yarn weights and appropriately sized hooks to create small and large versions from the same stitch counts.
Frequently Asked Questions
- Is this Christmas tree plush beginner-friendly? Yes. Confident beginners who already know single crochet, basic increases, and working in the round can make it.
- Is this completely no-sew? No. It is low-sew. The main cone, base, and branch layers are crocheted together. The arms, feet, and star are sewn on.
- Can I use ordinary acrylic yarn instead of chenille? Yes. Worsted acrylic yarn with an appropriately smaller hook will produce a smaller, less plush version.
- How do I stop the tree from leaning? Distribute the stuffing evenly, keep the green base reasonably flat, and ensure the feet and trunk support it.
- Can I sell finished Christmas trees made using this pattern? Yes. You may sell your own finished handmade trees. Please do not redistribute the written pattern or claim it as your own.
Conclusion / Final Thoughts
This friendly Christmas tree plush is a fun holiday crochet project with plenty of personality. Its soft chenille branches, cheerful face, and golden star make it a lovely handmade decoration or gift. Save this free crochet pattern for later, choose your favorite Christmas colors, and crochet a little tree that’s ready to spread holiday cheer!