Baby Penguin Crochet Doll (Free Crochet Pattern)
Published: November 14, 2026
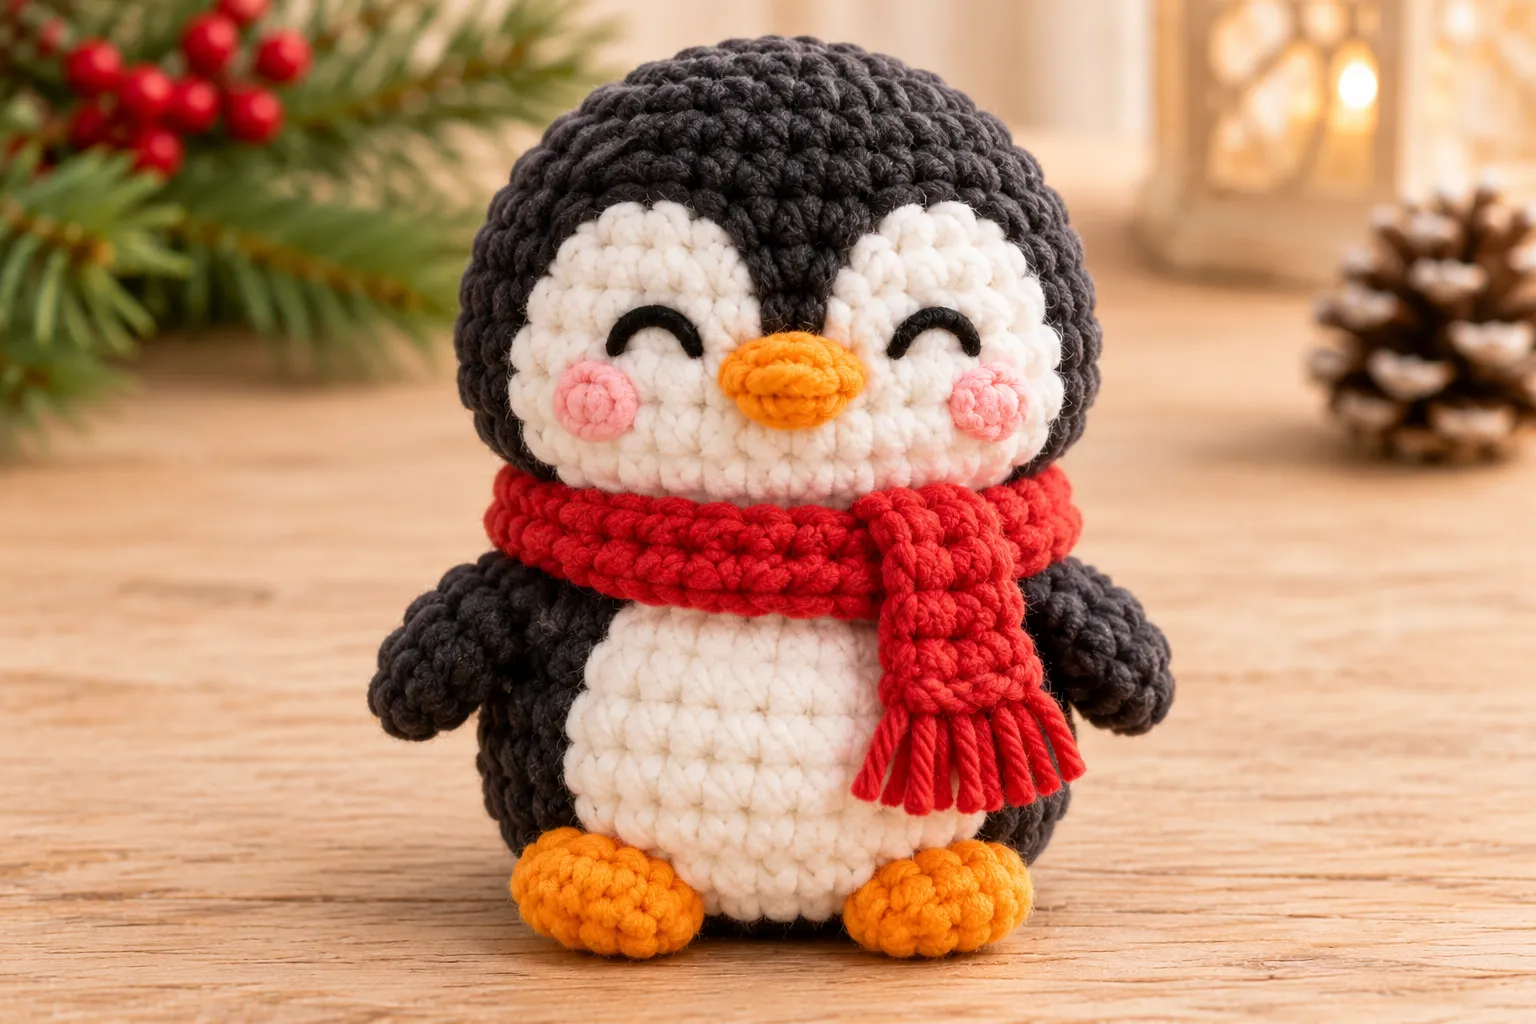
There’s something irresistible about a tiny crochet penguin with rosy cheeks, a cozy scarf, and little orange feet. This baby penguin is small enough to sit on a shelf, tuck into a stocking, or become a favorite winter companion.
This original free crochet pattern uses simple stitches to create the penguin’s body and head in one piece, so you can focus on the sweet details: the white belly, the round face patches, and the cheerful red scarf.
Whether you’re making a Christmas gift, decorating a nursery shelf, or adding a winter character to your crochet collection, this little penguin is a delightful project to make.
Introduction / Description
This original Yarnimals Crochet design features a round baby penguin with a charcoal-colored body, creamy-white belly and face patches, bright orange beak and feet, and a cozy red scarf. The head and body are made in one continuous piece. The belly, face patches, wings, beak, and feet are attached separately.
Difficulty: Confident beginner
Terminology: US crochet terms
Construction: One-piece body and head, separately attached details
Approximate working time: 2-3 hours
Materials
- Main yarn: Medium-weight (#4) cotton or soft acrylic yarn.
- Charcoal black: Approximately 35-45 yd (32-41 m), for body, head, and wings.
- Creamy white: Approximately 20-25 yd (18-23 m), for belly and facial patches.
- Bright orange: Approximately 8-10 yd (7-9 m), for beak and feet.
- Christmas red: Approximately 10-15 yd (9-14 m), for scarf.
- Black embroidery yarn: Small amount for eyes.
- Soft pink embroidery yarn: Small amount for cheeks.
- Crochet hook: 3.5 mm (US E/4).
- Polyester fiberfill.
- Yarn needle.
- Scissors.
- Stitch marker.
- Optional 6 mm safety eyes for display-only dolls.
Finished Size
Estimated dimensions using the specified yarn:
- Height: Approximately 4-5 inches (10-13 cm).
- Width: Approximately 3-3.5 inches (7.5-9 cm), including the wings.
The finished size depends on yarn, hook size, stuffing, and personal tension.
Gauge
Gauge is not critical for this project. Aim for dense, even stitches that hold the fiberfill securely. If the stuffing shows through, use a smaller hook. Your facial patches and belly panel should be slightly flexible so they can lie smoothly against the body.
Abbreviations
MR: Magic ring; ch: Chain; sc: Single crochet; inc: Increase, 2 sc into one stitch; dec: Invisible decrease; sl st: Slip stitch; st: Stitch; sts: Stitches; FO: Fasten off; RS: Right side; WS: Wrong side.
The stitch total at the end of each row or round appears in parentheses. Turning chains are not counted as stitches.
Pattern Notes
- The body and head are crocheted as one continuous piece from the bottom up.
- Work in continuous rounds unless instructed otherwise.
- Use a stitch marker to track each round.
- The penguin’s neck is shaped with decreases followed by increases.
- Stuff the lower body before closing the head.
- Sew on facial patches and add embroidery before completing the final head rounds whenever possible.
- Wings and feet should be attached symmetrically.
- Embroidered eyes are recommended for dolls that may be handled by children.
Step-by-Step Instructions
Part 1 – Penguin Body and Head – Using charcoal yarn:
Round 1: Work 6 sc into MR. (6)
Round 2: Inc in each stitch around. (12)
Round 3: Repeat [1 sc, inc] 6 times. (18)
Round 4: Repeat [2 sc, inc] 6 times. (24)
Round 5: Repeat [3 sc, inc] 6 times. (30)
Round 6: Sc in each stitch around. (30)
Round 7: Sc around. (30)
Round 8: Sc around. (30)
Round 9: Repeat [3 sc, dec] 6 times. (24)
Round 10: Sc around. (24)
Round 11: Repeat [2 sc, dec] 6 times. (18)
Round 12: Sc around. (18)
Add stuffing to the lower body.
Round 13: Repeat [2 sc, inc] 6 times to begin the head. (24)
Round 14: Repeat [3 sc, inc] 6 times. (30)
Round 15: Sc around. (30)
Round 16: Sc around. (30)
Round 17: Sc around. (30)
Round 18: Repeat [3 sc, dec] 6 times. (24)
Round 19: Repeat [2 sc, dec] 6 times. (18)
Pause to position the face patches and embroider facial details if desired. Stuff the head evenly.
Round 20: Repeat [1 sc, dec] 6 times. (12)
Round 21: Dec 6 times. (6)
FO, leaving a tail. Thread the tail through the front loops of the final six stitches and pull closed. Weave in the end.
Part 2 – Creamy White Belly Panel – Using creamy-white yarn:
Foundation: Ch 7. (7 chains)
Row 1: Starting in the second chain from the hook, sc in each chain across. (6)
Row 2: Ch 1, turn, inc in the first stitch, sc in the next 4 stitches, inc in the final stitch. (8)
Row 3: Ch 1, turn, sc across. (8)
Row 4: Ch 1, turn, sc across. (8)
Row 5: Ch 1, turn, dec, sc in the next 4 stitches, dec. (6)
Row 6: Ch 1, turn, sc across. (6)
FO, leaving a long tail. Position the belly panel at the center front of the lower body, approximately across Body Rounds 5-10. Sew around the edge using small, even stitches. Gently curve the panel to follow the shape of the body.
Part 3 – White Face Patches (Make 2) – Using creamy-white yarn:
Round 1: Work 6 sc into MR. (6)
Round 2: Inc in each stitch around. (12)
Round 3: Repeat [1 sc, inc] 6 times. (18)
FO, leaving a long attachment tail. Make a second identical patch. Position the patches side by side on the front of the head, approximately across Body Rounds 14-18. Sew the patches securely to the head.
Part 4 – Small Penguin Wings (Make 2) – Using charcoal yarn:
Round 1: Work 6 sc into MR. (6)
Round 2: Repeat [1 sc, inc] 3 times. (9)
Round 3: Sc around. (9)
Round 4: Sc around. (9)
Round 5: Sc around. (9)
FO, leaving a long tail. Flatten each wing gently without adding stuffing. Using a yarn needle, close the flattened opening with small stitches. Attach one wing to each side of the body, around Body Rounds 8-10, with the rounded ends pointing downward.
Part 5 – Orange Penguin Beak – Using orange yarn:
Foundation: Ch 4. (4 chains)
Round 1: Starting in the second chain from the hook, work 1 sc in each of the next 2 chains, 3 sc in the last chain, then continue along the other side of the foundation chain, working 1 sc in each of the next 2 chains and 3 sc in the final chain. (10) Sl st to join and FO, leaving a tail. Gently flatten the little oval. Sew the beak horizontally between the two white face patches, approximately at Body Round 16.
Part 6 – Orange Penguin Feet (Make 2) – Using orange yarn:
Foundation: Ch 5. (5 chains)
Round 1: Starting in the second chain from the hook, sc in each of the next 3 chains, work 3 sc in the final chain, then continue along the other side, working 1 sc in each of the next 3 chains and 3 sc in the final chain. (12) FO, leaving a long attachment tail. Repeat for the second foot. Position the two feet along the lower front edge of the body. Sew them securely so their rounded ends project slightly forward.
Part 7 – Red Winter Scarf – Using Christmas-red yarn:
Foundation: Ch 41. (41 chains)
Row 1: Starting in the second chain from the hook, sc across. (40)
Row 2: Ch 1, turn, sc across. (40)
FO. Wrap the scarf around the penguin’s narrow neck area near Body Rounds 11-12. Cross the ends at the front and secure the scarf with a few small stitches. For little tassels, thread short strands of red yarn through the ends and trim them evenly.
Part 8 – Embroider the Penguin’s Face – Using black embroidery yarn, create two closed, curved smiling eyes near the centers of the white face patches. Place them symmetrically on either side of the orange beak. Add a small embroidered pink cheek below each eye. For an alternate expression, replace the closed smiling eyes with two small black satin-stitched dots.
Finishing and Assembly – Check the placement of all facial details, wings, and feet. Adjust the stuffing so the head and body are rounded without becoming overly firm. Shape the beak gently with your fingers. Straighten the scarf, secure the crossing point, and hide any visible yarn tails. The finished penguin should sit upright, with its two orange feet pointing forward.
Tips & Variations
- Try a fluffy yarn. Chenille yarn can create an extra-cuddly penguin. Use an appropriate hook and expect a larger finished size.
- Change the scarf color. Try forest green, icy blue, mustard yellow, or classic Christmas stripes.
- Make a penguin family. Use different yarn weights and matching hooks to create different sizes.
- Keep the face simple. Embroidered closed eyes give the penguin a gentle, sleepy expression.
- Customize for winter. Add a small crocheted hat or a few embroidered snowflakes to the scarf.
Frequently Asked Questions
- Is this baby penguin crochet doll suitable for beginners? Yes. Confident beginners can make it using basic amigurumi increases, decreases, simple rows, and hand sewing.
- Are the head and body crocheted separately? No. The main body and head are crocheted in one continuous piece, with a slightly narrower neck between them.
- Can I make the penguin without safety eyes? Yes. Embroidered eyes are recommended and give the doll a sweet expression.
- How do I stop the stuffing from showing through? Use a smaller hook, keep your stitches even, and avoid overstuffing the doll.
- Can I make this penguin in different colors? Absolutely. Try navy blue, pastel blue, charcoal gray, or even soft lavender for a playful winter companion.
Conclusion / Final Thoughts
This baby penguin crochet doll is a sweet little winter project that’s full of handmade charm. With its cozy red scarf, rosy cheeks, and gentle smile, it’s perfect for Christmas gifts, winter displays, and cuddly companions. Save this free crochet pattern for later, gather your favorite winter yarn colors, and make your own adorable baby penguin!