Beautiful Tunisian Crochet Bag Pattern
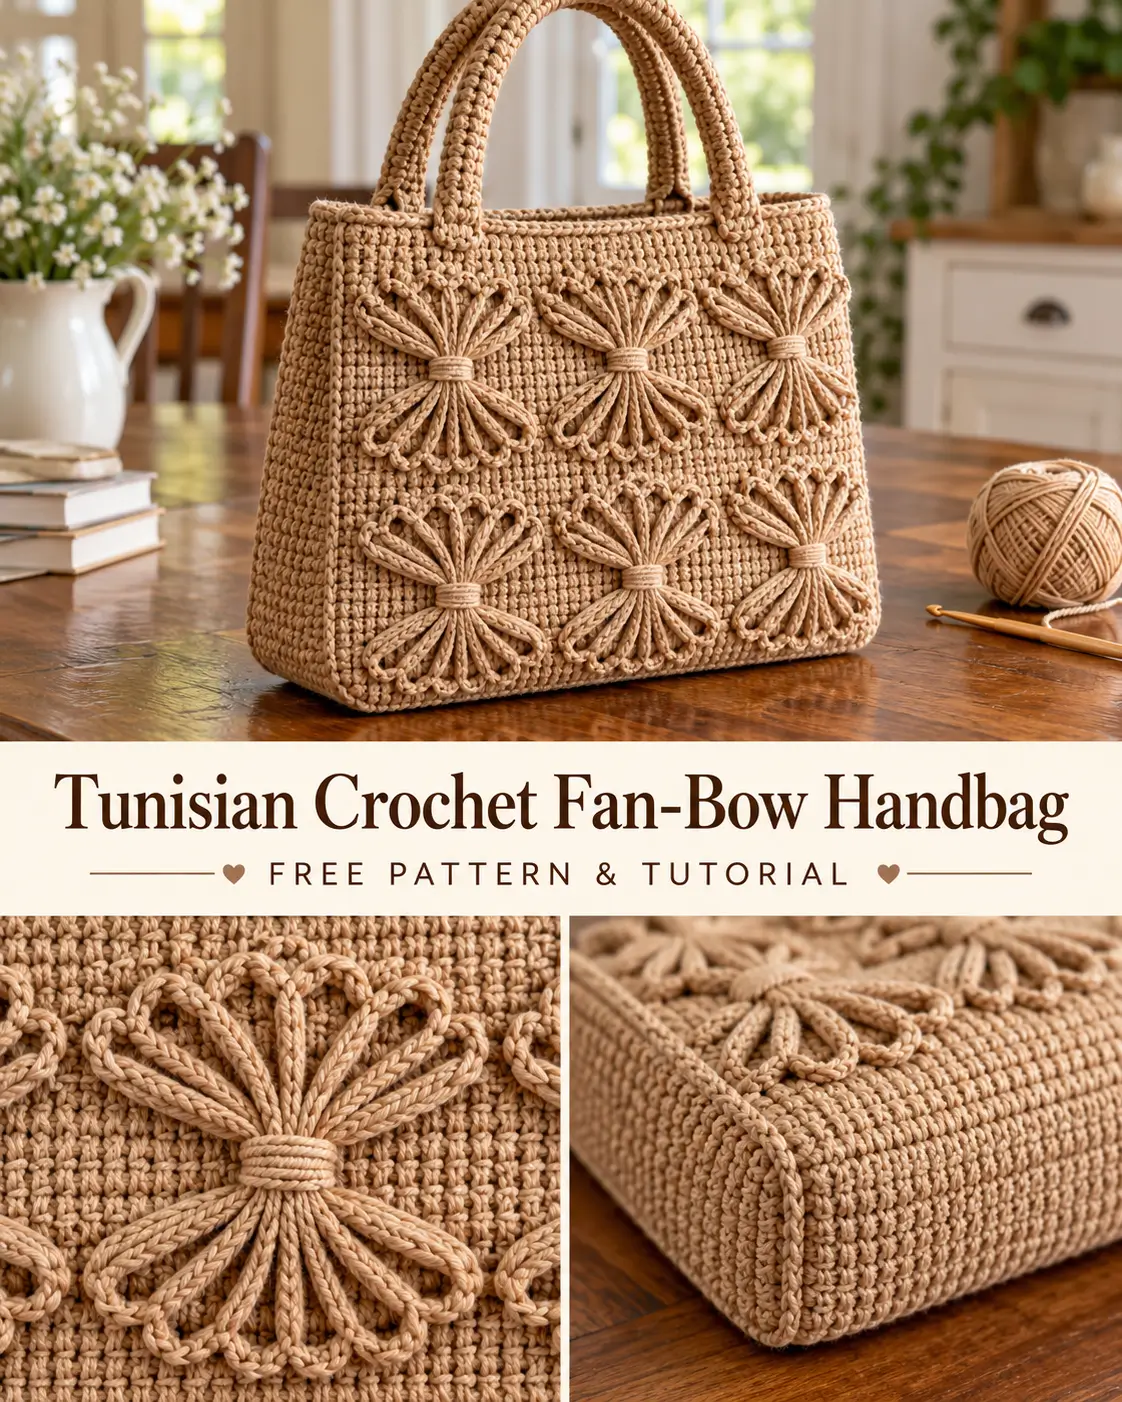
Some crochet designs immediately make you stop scrolling, and this elegant camel-colored handbag is a perfect example.
At first glance, the bag looks like an expensive boutique accessory. Its neutral color, beautifully textured fabric, rounded handles, and unusual raised decorations give it a sophisticated handmade appearance.
The most eye-catching detail is the fan-bow decoration.
Long raised crochet strands spread outward from a narrow wrapped center, creating beautiful bow-like shapes across the fabric.
For this project, we’ll combine a sturdy Tunisian crochet base with an original surface-crochet fan-bow technique to make a beautiful textured handbag.
And once you’ve learned the decorative technique, you can use it to make matching headbands, belts, and other handmade accessories.
Why You’ll Love This Tunisian Crochet Bag
- Elegant neutral color that works with almost any outfit.
- Beautiful raised fan-bow decorations.
- Dense Tunisian crochet fabric for the main body.
- Sturdy rectangular handbag construction.
- Comfortable crocheted handles.
- Customizable size and decorative placement.
- Optional fabric lining for everyday use.
- Matching headband and belt variations.
- A creative way to explore Tunisian crochet beyond ordinary flat fabric.
The main bag uses straightforward Tunisian simple stitch. The raised decorations are added afterward, so you can concentrate on learning one technique at a time.
Pattern Overview
Pattern name: Camel Fan-Bow Tunisian Crochet Handbag
Skill level: Intermediate
Crochet terminology: US terms
Construction: Two Tunisian crochet panels joined with a narrow gusset
Main stitch: Tunisian simple stitch (TSS)
Decorative technique: Surface-crocheted raised fan spokes
Yarn weight: Medium-weight #4 cotton or cotton-blend yarn
Suggested Tunisian hook: 5.5 mm with cable
Suggested regular crochet hook: 4 mm
Color: Warm camel beige
Bag dimensions: Approximately 10 inches wide × 9 inches high × 2 inches deep at the suggested gauge
Handles: Two matching folded crochet straps
Fan-bow decorations: Six on the front, with an optional six on the back
The stated dimensions are design targets. Actual measurements depend on your gauge.
Materials You’ll Need
- Medium-weight cotton or cotton-blend yarn in warm camel beige
- 5.5 mm Tunisian crochet hook with cable
- 4 mm regular crochet hook
- Tapestry needle
- Scissors
- Stitch markers
- Measuring tape
- Optional cotton fabric for lining
- Optional cotton tape for handle reinforcement
- Optional bag base insert
How Much Yarn Do You Need?
Yarn use depends on your gauge, bag dimensions, and decorative details.
For planning, set aside approximately 450–650 yards for a bag of this size, then verify the requirement using a sample panel and a finished fan decoration.
The matching accessories require additional yarn.
Because this version has not been physically sample-tested, these quantities are estimates rather than verified yardage.
Choosing the Best Yarn
For a structured crochet handbag, medium-weight cotton or a firm cotton blend is a practical choice.
A smooth yarn makes the Tunisian stitches easy to distinguish and helps the raised decorations retain their shape.
Choose a warm beige, camel, light caramel, or natural sand color.
Avoid extremely loose or stretchy yarn if you want a firm bag.
For the closest visual appearance to the inspiration photograph, use one consistent camel-colored yarn throughout the project.
Crochet Abbreviations
- Ch: Chain
- Sc: Single crochet
- Sl st: Slip stitch
- St: Stitch
- RS: Right side
- WS: Wrong side
- YO: Yarn over
- TSS: Tunisian simple stitch
- FwdP: Forward pass
- RetP: Return pass
- Rep: Repeat
Do You Need Knit Two Together?
The supplied video description includes the abbreviation k2tog, meaning knit two together.
This original adaptation does not use k2tog. It uses Tunisian simple stitch and separately formed surface decorations.
No knitting needles are required.
Part 1: Understanding Tunisian Simple Stitch
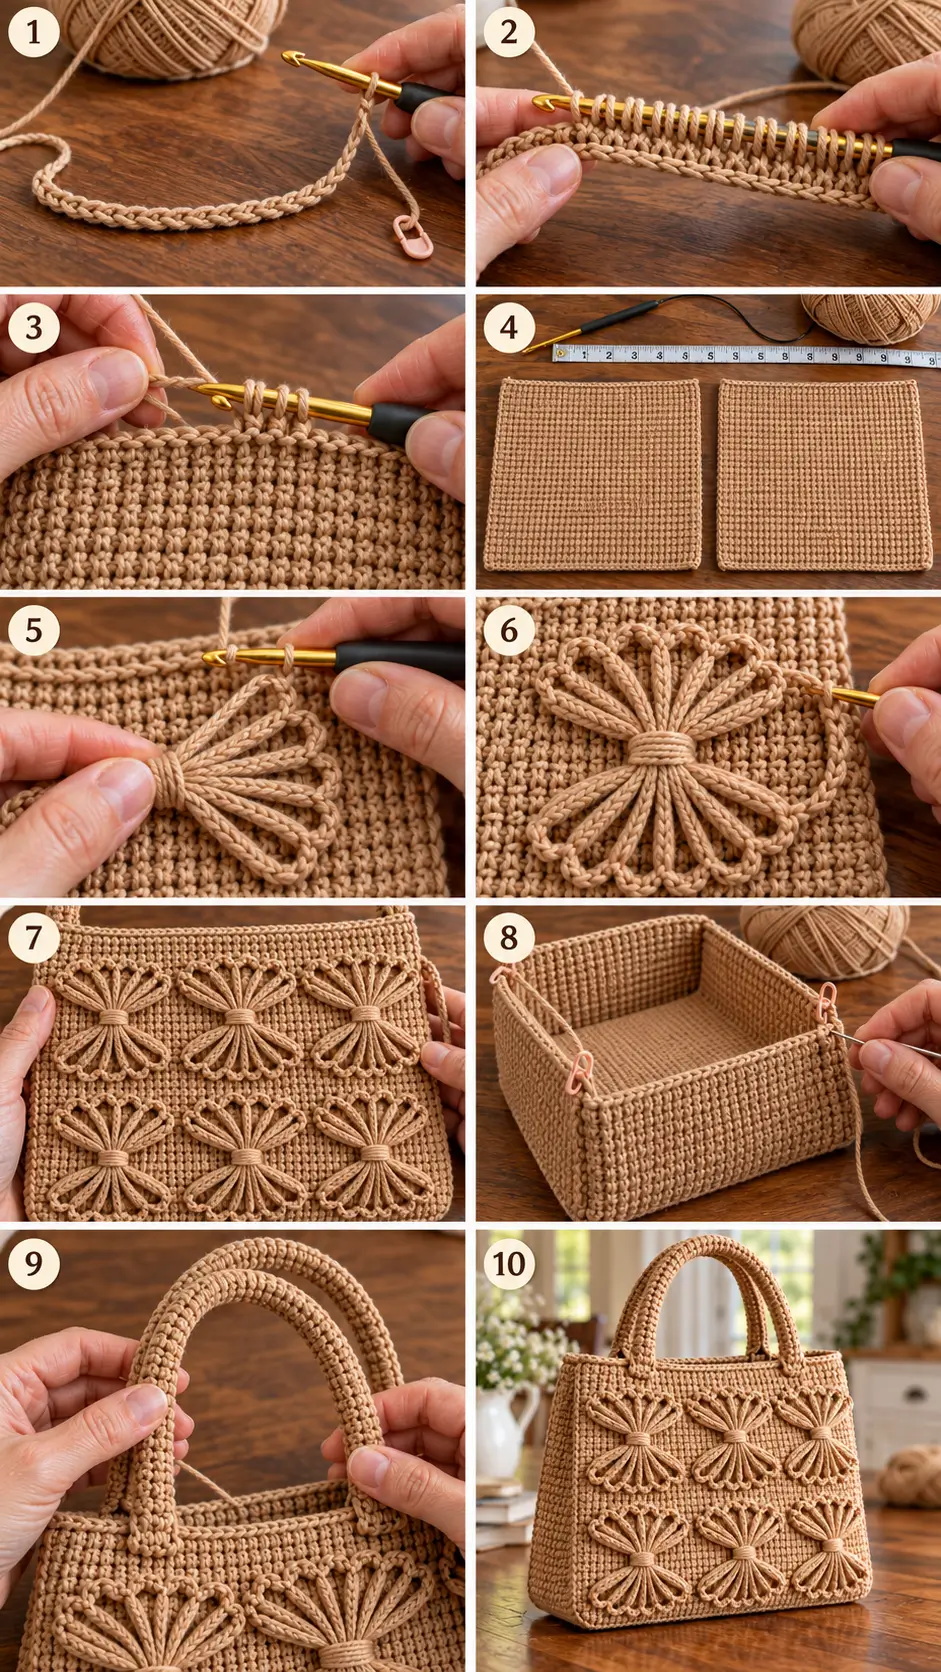
Tunisian crochet combines elements of traditional crochet and knitting.
Unlike ordinary crochet, where most stitches are completed individually, Tunisian crochet keeps several loops on the hook during the forward pass.
Those loops are then worked off during the return pass.
Each complete forward-and-return sequence forms one row.
The work is not turned between ordinary Tunisian simple stitch rows.
How to Make the Foundation Row
Using your Tunisian crochet hook, chain the number of stitches specified.
Insert your hook into the second chain from the hook.
Yarn over and pull up a loop.
Leave this loop on the hook.
Continue across the foundation chain, drawing up one loop from every remaining chain.
The working loop already on your hook counts as your first stitch.
For example, a chain of 40 produces 40 loops on the hook after the foundation forward pass.
Standard Tunisian Return Pass
- Yarn over.
- Pull through only the first loop on the hook.
- Yarn over again.
- Pull through the next two loops.
- Continue pulling through two loops at a time until only one loop remains.
One Tunisian row is complete.
Regular Tunisian Simple Stitch Row
With one loop remaining on the hook:
- Skip the first vertical bar at the right edge.
- Insert the hook from right to left beneath the next front vertical bar.
- Yarn over and pull up a loop.
- Leave that loop on the hook.
- Repeat across the row.
- At the last stitch, insert beneath both vertical edge loops to create a neat edge.
- Work a standard return pass.
Repeat these steps for every Tunisian simple stitch row.
Important Tip
Tunisian simple stitch fabric naturally tends to curl.
A slightly larger hook, relaxed tension, blocking, and a finishing border can help.
For a handbag, some firmness is useful, but excessive curling can make assembly difficult.
Part 2: Crochet the Main Handbag Panels
The bag begins with two matching rectangular Tunisian crochet panels.
One becomes the front and the other the back.
Front Panel
Using your camel-colored yarn and 5.5 mm Tunisian crochet hook:
Chain 40.
Foundation Row
Insert the hook into the second chain from the hook.
Draw up one loop in each chain across.
You should have 40 loops on the hook, including the original working loop.
Complete the standard return pass.
Rows 2–36
Work one Tunisian simple stitch forward pass and one standard return pass for each row.
Maintain 40 stitches in every row.
After completing Row 36, measure the panel.
At a planning gauge of 16 stitches and 16 rows over 4 inches, the panel would measure approximately 10 inches wide and 9 inches tall.
If your measurements differ, adjust the number of rows to achieve your preferred height.
Bind Off
To create a neat final edge:
- Insert your hook beneath the second vertical bar.
- Yarn over and draw through the bar and the loop already on your hook.
- Repeat in each subsequent vertical bar.
- Work the final edge stitch beneath both edge loops.
- Fasten off.
You should now have a firm rectangular crochet panel.
Back Panel
Repeat the entire process to create a second matching rectangle.
Make sure both panels have the same stitch count and finished measurements.
If you intend to decorate the back, it’s easiest to complete those decorations before assembling the bag.
Part 3: Create the Raised Fan-Bow Decorations
This is the feature that gives the handbag its distinctive appearance.
Rather than attempting to reproduce an undocumented stitch from the video, this version uses surface-crocheted chains anchored to the Tunisian fabric.
The result is a series of raised cords that spread outward from a narrow center.
Each decoration resembles a small fan-shaped bow or butterfly.
Understanding the Fan-Bow Shape
One decoration contains:
- Six raised spokes spreading upward.
- Six raised spokes spreading downward.
- A narrow wrapped center.
- Optional small decorative loops along the outer tips.
The finished fan-bow is approximately 2–2.5 inches wide, depending on your yarn and desired appearance.
Use the same camel yarn as the main bag.
Step 1: Mark the Fan Position
Lay the front Tunisian panel flat with its right side facing upward.
Choose the center position for your first decoration.
For a 10-inch-wide panel, arrange three fan-bows across each horizontal row.
Place the centers approximately 3¼ inches apart.
Leave space between the decorations and the bag edges.
For a two-row design, position one row of centers in the upper half and another in the lower half of the panel.
Make sure the lower decorations remain above the bottom seam allowance.
Step 2: Mark the Upper Fan Tips
For one decoration, place six stitch markers above the chosen center.
Arrange them in a shallow semicircle.
The outer markers should extend approximately one inch to either side of the center.
The tips should sit roughly one inch above the wrapped center.
Adjust the shape until the markers form a symmetrical fan.
Step 3: Crochet the First Raised Spoke
Join camel yarn through a sturdy vertical bar at the marked center.
Using the 4 mm crochet hook:
- Chain enough stitches to reach the first upper marker without stretching the Tunisian fabric.
- Insert your hook beneath a secure vertical bar at the marked tip.
- Make a slip stitch to anchor the chain.
- Turn the small chain toward you.
- Slip stitch back along the chain stitches until you return to the center.
- Slip stitch into the original center anchor.
You have created one raised, double-thickness crochet spoke.
The spoke should lie smoothly against the background fabric without pulling it out of shape.
Step 4: Make the Remaining Upper Spokes
Repeat the spoke technique for each of the remaining five upper markers.
Each spoke begins at the same center and extends toward a different upper tip.
Make the chains just long enough to reach their markers while lying flat.
The outermost spokes may need slightly more chain stitches because they travel diagonally.
When complete, the six cords should spread across the fabric like a handheld fan.
Step 5: Create the Lower Fan
Place six additional stitch markers beneath the center.
Arrange them in a mirrored semicircle.
Repeat the same process to make six raised spokes extending downward.
The upper and lower fans should meet at one narrow center.
You now have a complete twelve-spoke fan-bow decoration.
Step 6: Wrap the Center
Thread a length of matching camel yarn through a tapestry needle.
Wrap the yarn around the narrow central meeting point several times.
Pull the wraps firmly enough to create a defined waist, but not so tightly that the Tunisian fabric puckers.
Secure the yarn on the wrong side.
The center should resemble a small wrapped knot or narrow bow band.
Step 7: Add Optional Scalloped Fan Tips
For an appearance closer to the decorative edges in the inspiration image, add small chain loops along the outer tips.
Join yarn at the first tip of the upper fan.
Chain 2 or 3 and slip stitch into the next neighboring tip.
Repeat across the tips.
Fasten off.
Repeat along the lower fan.
These little connecting loops help create a softly scalloped outer outline.
Keep them short so they don’t pull the raised spokes out of position.
Step 8: Repeat Across the Bag
Make six matching fan-bow decorations on the front panel.
Arrange them as:
- Three across the upper row
- Three across the lower row
Use the same number of spokes and similar measurements for every decoration.
You may also make six matching fan-bows for the back panel.
Decorative Technique Tip
The raised spokes are attached to the surface rather than worked as part of the underlying Tunisian rows.
Secure every tip carefully.
If you plan to line the bag, the lining will also cover the reverse side of the decorative stitching.
Part 4: Crochet the Side and Bottom Gusset
The gusset gives the handbag its depth.
For this design, make one continuous strip that wraps around the left side, bottom, and right side of the main panels.
Using the 4 mm crochet hook:
Chain 9.
Row 1
Single crochet in the second chain from the hook and every remaining chain.
Stitch count: 8 sc.
Row 2
Chain 1 and turn.
Work 1 single crochet into each of the 8 stitches.
Repeat
Continue repeating Row 2 until the strip is long enough to travel down one side of your bag, across the bottom, and up the other side.
For panels measuring approximately 10 inches wide and 9 inches tall, the required strip length is approximately:
9 + 10 + 9 = 28 inches.
Check this against your actual panel measurements rather than relying only on the estimate.
The strip should measure approximately 2 inches wide. Adjust the strip’s starting chain if necessary to achieve your desired bag depth.
Fasten off, leaving a long tail for assembly.
Part 5: Assemble the Handbag
Attach the Gusset to the Front
Place the front panel with its right side facing inward toward the gusset’s right side.
Align the top of the gusset with the upper left corner of the panel.
Pin the strip along the left edge, around the bottom, and up the right edge.
Use a tapestry needle and matching yarn to sew the pieces together.
Keep the fabric flat as you sew.
Avoid stretching the gusset excessively at the corners.
Attach the Back Panel
Place the back panel against the remaining free edge of the gusset.
With the right sides facing together, sew the back panel to the gusset along both sides and the bottom.
Leave the entire top edge open.
Turn the bag right side out.
Gently shape the bottom corners with your fingers.
You should now have a structured rectangular handbag with a flat base and two side gussets.
Part 6: Crochet the Top Rim
The upper edging helps stabilize the bag opening.
Using the 4 mm crochet hook, join camel yarn at a side seam.
Round 1
Chain 1.
Work single crochet stitches evenly around the entire top opening.
If your panels each have 40 stitches across the top and your gusset ends each have 8 stitches, a working target is 96 single crochets around the opening.
Distribute stitches evenly at all joining seams.
Join with a slip stitch.
Rounds 2–3
Chain 1.
Work one single crochet into each stitch around.
Join with a slip stitch.
After the third round, fasten off.
The finished upper rim should be neat, firm, and reasonably flat.
Part 7: Crochet the Two Rounded Handles
To match the soft structured appearance of the reference bag, make two folded crochet handles.
Use camel yarn and your 4 mm crochet hook.
Handle 1
Chain 9.
Row 1
Single crochet in the second chain from the hook and across.
8 sc.
Row 2
Chain 1, turn, and work 8 sc across.
Continue
Repeat Row 2 until the strip measures approximately 15 inches long, or reaches your preferred handle length.
Fasten off, leaving a long sewing tail.
Form the Rounded Strap
Fold the strip lengthwise with the long edges meeting.
Sew those long edges together using matching yarn.
This forms a narrow, softly rounded crocheted handle.
For better durability, insert a narrow length of firm cotton tape before closing the strap.
Handle 2
Make a second identical handle.
Check that both handles match in length and thickness.
Part 8: Attach the Handles
Lay the bag flat.
Position one handle across the upper front.
Place the two ends symmetrically, approximately two inches inward from the outside edges.
Make sure the handle arches naturally above the opening.
Allow approximately 1½ inches of each end to overlap the inside of the bag.
Sew the ends securely to the firm upper section of the front panel.
Use several rows of reinforcing stitches.
Repeat on the back using the second handle.
Handle Safety
For a bag intended to carry more than very lightweight objects, reinforce the attachment points with fabric patches or cotton tape on the inside.
Test the handles gradually before using the bag regularly.
Decorative Tunisian crochet fabric should not be expected to support heavy loads without reinforcement.
Part 9: Add an Optional Fabric Lining
A lining makes the bag more practical and helps conceal the backs of the surface-crocheted decorations.
Choose a medium-weight cotton fabric in beige, cream, or a coordinating neutral shade.
Measure the inside of the completed bag.
Cut a front panel, back panel, and gusset from the lining fabric, allowing for seams.
Sew the lining into a matching rectangular bag shape.
Place it inside the crocheted bag.
Fold the upper fabric edge inward and hand-sew it below the crochet rim.
Keep the lining smooth and avoid stretching the crochet fabric.
If the bag has reinforced handles, incorporate the reinforcement patches into the lining area.
Part 10: Final Finishing
Inspect the finished handbag.
Check the raised fan-bow decorations and ensure every tip is securely attached.
Weave in all loose yarn ends.
Check the side seams and bottom corners.
Make sure the handles are secure and evenly positioned.
Gently shape the bag.
If appropriate for your yarn, lightly block the fabric without flattening the raised decorations.
Allow the bag to dry completely.
Your camel fan-bow Tunisian crochet handbag is now complete!
Matching Project 1: Tunisian Crochet Fan-Bow Headband
The same decorative technique can be used to make a beautiful matching headband.
For this version, create a relatively narrow Tunisian crochet band and decorate its front with raised fan-bows.
Materials
- Camel-colored medium-weight yarn
- 5.5 mm Tunisian hook
- 4 mm regular hook
- Yarn needle
- Measuring tape
Step 1: Crochet the Headband Base
Using the Tunisian crochet hook:
Chain 12.
Complete the foundation forward and return passes.
Continue working Tunisian simple stitch rows until the band is approximately one inch shorter than the intended wearer’s head circumference.
At the suggested sample gauge, the band is approximately three inches wide.
For many adult wearers, a starting length around 19–21 inches may be suitable, but measure the actual head and test the fit.
Bind off.
Step 2: Join the Ends
Bring the two short ends together with right sides facing.
Sew them together securely.
Turn the band right side out.
Check that it stretches comfortably around the head without excessive pressure.
Step 3: Add the Fan-Bow Decorations
Position three small fan-bows along the front-facing section of the headband.
Use the same upper-and-lower spoke method described for the handbag.
Adjust the height of the spokes so the entire decoration fits within the headband width.
Wrap and secure each center.
Weave in all ends.
The finished headband coordinates beautifully with the handbag.
Matching Project 2: Tunisian Crochet Fan-Bow Belt
The decorative band can also be adapted into a statement crochet belt.
This version uses a narrow Tunisian crochet strip with raised fan-bow decorations across the front.
Step 1: Make the Belt Base
Using camel yarn and your Tunisian hook:
Chain 9.
Work the Tunisian simple stitch foundation row.
Continue working in Tunisian simple stitch until the band measures approximately three inches less than your waist or intended wearing circumference.
The remaining length will be bridged by the adjustable ties.
Bind off neatly.
Step 2: Add the Raised Decorations
Lay the belt flat with the right side facing upward.
Mark evenly spaced centers across the portion that will be visible at the front.
Work smaller fan-bow decorations using the same technique as the handbag.
Keep the upper and lower spokes within the width of the belt.
Secure the wrapped centers carefully.
Step 3: Make the Ties
At one short end of the belt, join yarn near the middle.
Chain approximately 60, or enough to create a comfortable tying length.
Turn and slip stitch back along the chain to reinforce it.
Fasten off securely.
Repeat at the opposite end.
Step 4: Finish the Belt
Weave in all ends.
Try the belt on over a dress, cardigan, or long blouse.
Tie the two ends into a comfortable bow or knot.
The finished belt should function as a decorative fashion accessory rather than a load-bearing strap.
Tips for Beautiful Tunisian Crochet Accessories
Keep the Tunisian Fabric Even
Use consistent tension and work the last edge stitch beneath both edge loops.
This helps create straight panel edges.
Prevent Excessive Curling
Tunisian simple stitch naturally curls.
A suitable hook size, relaxed stitches, a finishing border, and blocking can all help.
Practice the Fan-Bow Decoration First
Before attaching decorations to your bag, practice one on a small Tunisian crochet swatch.
This helps determine the spoke lengths and spacing that work best for your yarn.
Keep the Spokes Consistent
Use the same number of upper and lower spokes across all matching decorations.
The individual chains may vary slightly in length to accommodate their position.
Don’t Pull the Center Wrapping Too Tightly
The narrow wrapped center should gather the decorative spokes without distorting the base fabric.
Reinforce Bag Handles
Cotton yarn may stretch with repeated use.
A lining and cotton-tape reinforcement make the bag more practical.
Choose a Smooth Yarn
The raised fan details are easier to see with smooth, firm yarn rather than very fuzzy fibers.
Frequently Asked Questions
Is this really Tunisian crochet?
The main handbag panels, headband base, and belt base use genuine Tunisian simple stitch.
The decorative fan-bows in this adaptation are made separately on the surface with ordinary crochet chains and slip stitches.
The original video’s exact decorative technique has not been verified.
Is this suitable for beginners?
It’s best for crocheters who already understand basic crochet stitches and are comfortable learning Tunisian crochet.
The raised fan-bow decoration adds an intermediate-level finishing technique.
Do I need a special hook?
A long Tunisian crochet hook or a hook with a cable is recommended for the main bag panels because all the working loops remain on the hook during the forward pass.
Can I use ordinary acrylic yarn?
Yes, although cotton generally offers better structure for a handbag.
Acrylic may create a softer and more stretchy result.
How many fan-bow decorations does the bag need?
This version uses six on the front.
You can optionally add another six to the back.
Can I make the bag larger?
Yes. Increase the number of Tunisian stitches for the width and work additional rows for the height.
Measure the completed panels before making the gusset.
Can I use a different color?
Absolutely.
The fan-bow texture would also look beautiful in ivory, chocolate brown, dusty rose, sage green, or muted terracotta.
Can I make a shoulder bag instead?
Yes. Make the handles longer or use a reinforced crossbody strap.
Ensure the attachment points are suitable for the intended weight.
Does the bag need a lining?
A lining is optional for light decorative use but recommended for a regularly used handbag.
It helps protect the decorative stitching and prevents small items from catching in the fabric.
More Crochet Projects You’ll Love
If you enjoyed this beautiful Tunisian crochet handbag, try these related projects:
- Red and White Floral Granny Square Tote Bag
- Daisy Meadow Crochet Drawstring Pouch
- Vintage Floral Granny Square Top
- Easy Crochet Bag for Beginners
- Textured Crochet Headband
- Crochet Bags With Unique Stitch Patterns
- Beginner Tunisian Crochet Stitch Guide
Final Thoughts
This Tunisian crochet handbag is a beautiful example of how simple crochet fabric can become something much more decorative with the right finishing details.
The warm camel color gives it an elegant, understated appearance, while the raised fan-bow decorations provide unusual texture and personality.
The matching headband and belt make the design even more versatile, allowing you to reuse one decorative technique across several handmade accessories.
Take your time practicing the Tunisian simple stitch, experiment with the fan-bow spacing, and enjoy turning a simple rectangular panel into a beautiful handmade bag.