Sage Green Sunburst & Puff Lace Crochet Blanket – Beautiful Textured Granny Square Pattern
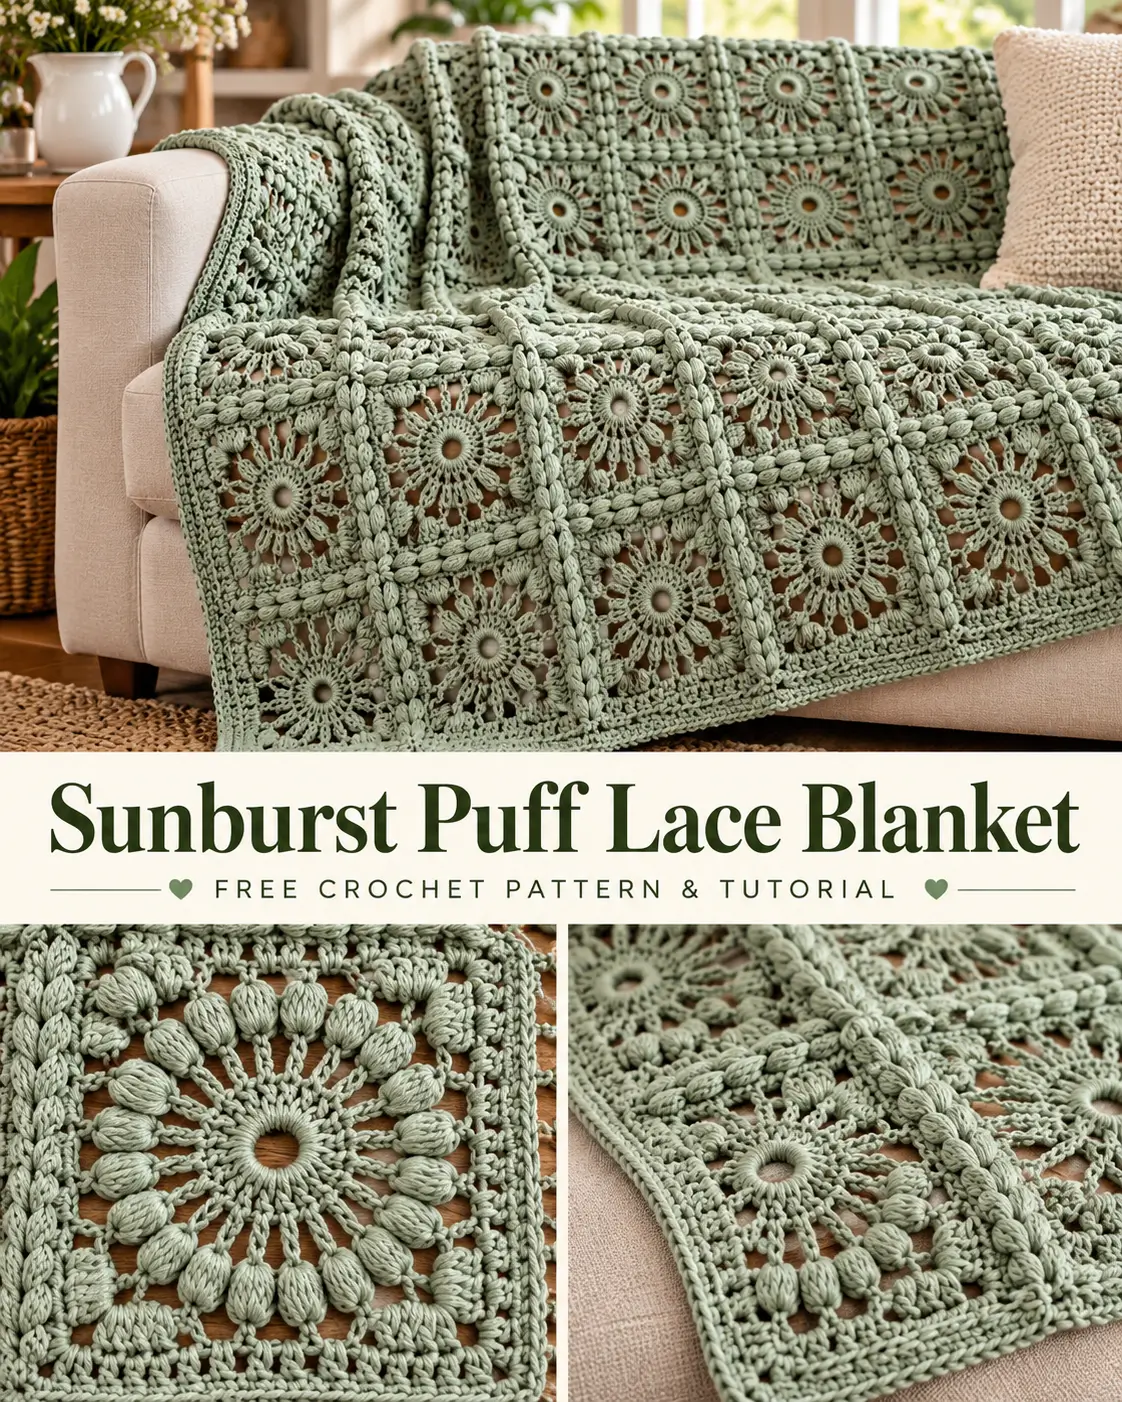
Some crochet stitches are so beautiful that they make you want to turn them into an entire blanket.
This gorgeous sage-green sunburst lace blanket is inspired by delicate circular crochet motifs, open fan-shaped stitches, and soft raised puff details.
The combination creates a wonderful contrast between airy lace and three-dimensional texture.
Each motif begins with a little circular opening in the center. Delicate crochet stitches radiate outward like sunbeams before transforming into a square. Raised puff stitches add dimension, while the soft sage-green yarn gives the finished project an elegant botanical appearance.
Instead of crocheting one enormous piece, you’ll make individual sunburst lace squares and join them into a beautiful rectangular throw.
This construction also makes the blanket easy to personalize. You can choose your own size, arrange the finished motifs before sewing, and work on individual squares whenever you have time.
The result is a lightweight decorative blanket that looks especially beautiful draped over a sofa, displayed at the foot of a bed, or given as a thoughtful handmade gift.
Why You’ll Love This Crochet Blanket
- Beautiful circular sunburst centers.
- Delicate openwork lace with radiating stitches.
- Raised puff-stitch details.
- Elegant single-color sage-green design.
- Individual squares are easy to work on in stages.
- Repeatable six-round motif.
- Customizable blanket size.
- Attractive textured appearance on both sides.
- Lovely for decorative throws and handmade gifts.
- A great project for practicing crochet lace and puff stitches.
Crochet Blanket Pattern Overview
Pattern name: Sage Sunburst Puff Lace Blanket
Skill level: Intermediate
Crochet terminology: US terms
Construction: Individual lace granny squares joined into a rectangular blanket
Main techniques: Chains, single crochet, double crochet, puff stitches, working in rounds, and seaming
Yarn weight: DK / light worsted (#3)
Suggested crochet hook: 4.5 mm, adjusted for gauge
Color: Muted sage green
Motifs: 63 squares
Arrangement: 7 columns × 9 rows
Target blocked motif size: 6.5 × 6.5 inches
Approximate finished blanket size: 47 × 60 inches with edging
Border: Two rounds of single crochet
This is an original motif adaptation with defined stitch counts. The finished dimensions and fabric have not been physically sample-tested.
Materials You’ll Need
- DK-weight cotton-blend or soft acrylic yarn in sage green
- 4.5 mm crochet hook
- Tapestry needle
- Scissors
- Stitch markers
- Measuring tape
- Blocking mats
- Rustproof blocking pins, if appropriate for your yarn
Choosing Your Sage-Green Yarn
The delicate color is an important part of this design.
Choose a muted sage-green shade with a slightly gray, botanical undertone.
The yarn should resemble dried eucalyptus leaves rather than bright grass green or deep forest green.
A smooth, evenly twisted yarn works best because it helps the individual lace stitches remain visible.
Cotton-blend yarn: Offers clear stitch definition and beautiful drape.
Light acrylic yarn: A practical choice for a lightweight blanket that is relatively easy to care for.
Cotton-bamboo yarn: Creates soft, flowing fabric, although it may feel heavier and stretch more.
Avoid extremely fuzzy yarn if you want the circular centers and puff stitches to stand out clearly.
How Much Yarn Do You Need?
The most reliable method is to complete one full six-round sunburst square and weigh it.
To estimate yarn:
- Crochet one complete square.
- Weave in the ends and block it.
- Weigh the dry finished motif.
- Multiply the weight by 63.
- Add yarn for joining and the outer border.
- Include a safety margin for differences in tension.
For example, if your completed motif uses 18 grams of yarn:
18 × 63 = 1,134 grams for the motifs alone.
You would then add yarn for seams, edging, and a safety margin.
This is an example calculation, not a verified yarn requirement for the pattern.
Crochet Abbreviations
All instructions use US crochet terminology.
- Ch: Chain
- Sc: Single crochet
- Dc: Double crochet
- Sl st: Slip stitch
- St: Stitch
- Sp: Space
- Rep: Repeat
- Puff: Puff stitch
- RS: Right side
- WS: Wrong side
Special Stitch: Seven-Loop Puff
The puff stitch creates the soft raised details around each sunburst motif.
To make one puff:
- Yarn over.
- Insert the hook into the indicated space.
- Yarn over and pull up a long loop.
- Yarn over and insert the hook into the same space again.
- Pull up another long loop.
- Repeat the yarn-over-and-pull-up movement one more time.
You should now have seven loops on your hook.
- Yarn over and pull through all seven loops.
One puff is complete.
The following chain stitches specified in the pattern secure the puff. Do not add an extra closing chain beyond those instructions.
Try to pull every elongated loop to approximately the same height.
Consistent puff stitches help the raised texture look neat and balanced.
Part 1: Crochet the Sunburst Puff Lace Square
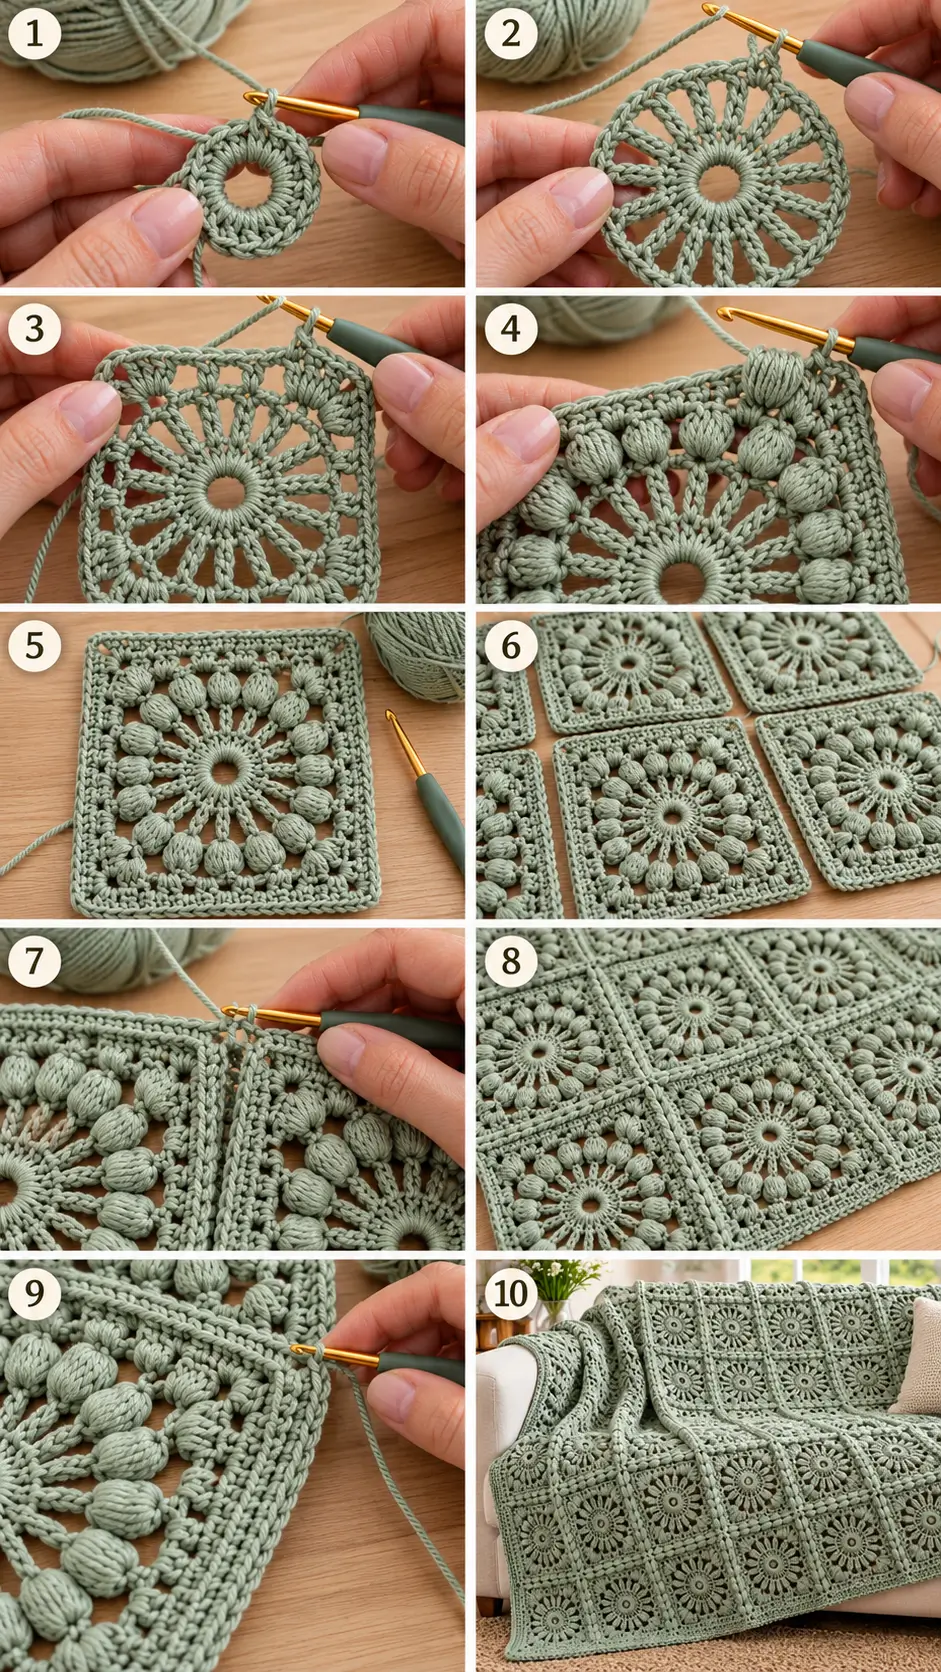
Each square is worked from the center outward.
The motif contains six rounds:
- Circular center ring
- Open radiating spokes
- Four-corner square shaping
- Raised puff-stitch frame
- Open granny-cluster border
- Final square-sizing round
Make one complete sample square before beginning the full blanket.
Round 1 – Create the Open Circular Center
Using sage-green yarn and your 4.5 mm crochet hook:
Chain 8.
Slip stitch into the first chain to form a ring.
Be careful not to twist the chain.
Next:
- Chain 1. This does not count as a stitch.
- Work 16 single crochet stitches into the center ring.
- Slip stitch into the first single crochet to join.
Stitch count: 16 sc.
The chain-8 ring leaves a decorative opening in the middle.
This is an important detail because the finished sunburst motif should have a visible circular center rather than a tightly closed magic ring.
Round 2 – Create the Radiating Sunburst Spokes
This round creates sixteen tall spokes extending outward from the circular center.
- Chain 3. This counts as the first double crochet.
- Chain 2.
- Work one double crochet into the next single crochet.
- Chain 2.
- Repeat one double crochet in the next single crochet followed by chain 2 around the circle.
- Slip stitch into the top of the beginning chain 3.
Stitch count: 16 dc and 16 chain-2 spaces.
What Round 2 Should Look Like
Your circular motif should now resemble a little wheel or sunburst.
The center is a small open ring.
Sixteen double crochet stitches radiate outward from it.
The chain-two spaces create delicate openings between the spokes.
Keep these spaces relaxed so the openwork lies flat.
Round 3 – Transform the Circle Into a Square
Now we’ll create four clear corners around the circular sunburst.
This round uses the sixteen chain-two spaces created in Round 2.
Move into any chain-2 space with slip stitches. This becomes your first corner position.
First Corner
- Chain 3. This counts as your first double crochet.
- Work 2 more double crochets into the same space.
- Chain 2.
- Work 3 additional double crochets into the same space.
You’ve created the first square corner.
First Side
- Chain 1.
- Work 3 double crochets into the next chain-2 space.
- Chain 1.
- Work 3 double crochets into the following chain-2 space.
- Chain 1.
- Work 3 double crochets into the next chain-2 space.
- Chain 1.
Next Corner
- In the next chain-2 space, work 3 dc, ch 2, 3 dc.
Repeat the same side instructions between the remaining corners.
Each corner is placed in every fourth original chain-two space.
Continue until you have four corners and four sides.
Slip stitch into the top of the beginning chain 3.
Round 3 count:
- 60 double crochet stitches
- 4 chain-2 corner spaces
- 16 chain-1 side spaces
Your sunburst has now become a square.
The open circular center remains visible, while the taller granny clusters form the four outer corners.
Round 4 – Add the Raised Puff-Stitch Frame
This is the decorative round that adds the thick raised texture.
Keep using sage-green yarn.
Slip stitch into the nearest chain-2 corner space.
First Corner
- Work one puff stitch into the corner space.
- Chain 2.
- Work another puff stitch into the same corner space.
- Chain 1.
First Side
- Work one puff into the next chain-1 space.
- Chain 1.
- Continue working one puff into each of the next three chain-1 spaces, chaining one after every puff.
There are four side chain-1 spaces between each pair of corners in Round 3.
Remaining Corners and Sides
In every corner, work:
Puff, ch 2, puff.
Chain 1 after completing the corner.
Along each side, work one puff in each of the four chain-1 spaces, with chain 1 after each puff.
Repeat around all four sides.
Join to the first puff with a slip stitch.
Round 4 count:
- 24 puff stitches
- 4 chain-2 corner spaces
- 20 chain-1 side spaces
What the Raised Round Should Look Like
The puff stitches form a decorative textured frame around the open sunburst center.
The longer loops create small raised oval shapes.
When multiple motifs are joined together, the repeated puff rounds create rich textured lines between the neighboring lace sections.
Tip: If the square starts to curl, check that your puff loops are long enough and that the connecting chains aren’t too tight.
Round 5 – Add the Open Granny Border
This round creates the next layer of the square and stabilizes the puff-stitch frame.
Slip stitch into a corner chain-2 space.
First Corner
- Chain 3. Counts as the first double crochet.
- Work 2 more double crochets.
- Chain 2.
- Work 3 double crochets into the same corner space.
- Chain 1.
Along the Side
Work 3 double crochet stitches into the next chain-1 space.
Chain 1.
Repeat in each of the remaining four side chain-1 spaces.
There are five chain-1 spaces between consecutive corners in Round 4.
Repeat Around
In each corner, work:
3 dc, ch 2, 3 dc.
In each side chain-1 space, work:
3 dc, ch 1.
Also chain 1 after each completed corner group before beginning its side.
Continue around all four sides and join to the first double crochet.
Round 5 count:
- 84 double crochet stitches
- 4 chain-2 corners
- 24 chain-1 side spaces
This round helps the lace square become more defined while preserving the raised puff texture beneath it.
Round 6 – Complete the Square
This final round enlarges the square and provides a consistent outer edge for joining.
Remain with sage-green yarn.
Move to a corner chain-2 space.
- Work 3 dc, ch 2, 3 dc into the corner.
- Chain 1.
- Work 3 dc into each of the next six chain-1 spaces, making chain 1 after each cluster.
- Work 3 dc, ch 2, 3 dc into the next corner.
- Chain 1.
- Repeat the side and corner sequence around the remaining sides.
- Join with a slip stitch.
Round 6 count:
- 96 double crochet stitches
- 4 chain-2 corner spaces
- 28 chain-1 side spaces
Fasten off, leaving a yarn tail long enough to weave in.
Your Completed Motif
Your finished square now has:
- One central circular opening
- Sixteen radiating openwork spokes
- Four defined square corners
- Twenty-four raised puff stitches
- A decorative granny-style outer frame
- A consistent edge suitable for joining
Lay the motif flat and measure it.
Our target is approximately 6.5 inches square after blocking.
If the square is smaller or larger, adjust your hook size or yarn choice and make another sample. Do not force the fabric to stretch excessively to match the target.
If you decide to add another granny round for sizing, add it to every motif.
Part 2: Crochet All the Sunburst Squares
For the standard blanket, make:
63 identical sunburst puff lace squares.
Each square must have the same number of rounds, the same stitch counts, and approximately the same finished dimensions.
The standard layout is:
7 squares across × 9 squares down.
Alternative Blanket Sizes
| Blanket Style | Motif Layout | Total Squares |
|---|---|---|
| Small decorative blanket | 5 × 6 | 30 |
| Lap blanket | 6 × 8 | 48 |
| Standard throw | 7 × 9 | 63 |
| Large throw | 8 × 10 | 80 |
The actual measurements depend on your blocked motif size and border.
For this article, we’ll continue with the 63-square layout.
Tips for Making All the Motifs
Keep the Centers Consistent
Use the same starting chain count for every square.
Check the Corners
Every square must have four proper chain-2 corners.
Count the Puff Stitches
Round 4 should contain exactly 24 puff stitches.
Use the Same Hook
Avoid changing hook sizes halfway through the project unless you’re deliberately correcting a gauge problem.
Weave in Ends as You Go
With 63 motifs, it’s much easier to finish yarn ends gradually rather than saving all of them until the end.
Part 3: Block the Finished Squares
Blocking is especially helpful for lace motifs because it helps the openwork settle into shape.
Check the care instructions for your chosen yarn.
For fibers that tolerate wet blocking:
- Gently dampen the completed squares.
- Place them on blocking mats.
- Shape each square to the same dimensions.
- Use pins around the edges and corners if necessary.
- Open the circular centers and chain spaces gently.
- Allow the motifs to dry completely.
Do not stretch the raised puff stitches flat.
They should remain slightly dimensional.
When the motifs are dry, compare their sizes before joining.
Part 4: Arrange the Blanket
Lay all 63 finished squares on a large flat surface.
Arrange them into nine horizontal rows of seven squares.
Because this version uses only one shade of sage green, the arrangement is simple.
However, you should still check the orientation of the motifs.
Position all squares with the same side facing upward.
If you prefer the puff stitches to be more prominent, use the side with the fullest raised texture as the right side of the blanket.
Make sure the corners and outer edges align.
Take a photograph of the completed layout so you can refer to it while sewing.
Part 5: Join the Sunburst Squares
Use the same sage-green yarn for joining.
A mattress stitch creates a relatively flat, unobtrusive join.
A loose whip stitch is another practical choice.
Join the First Row
- Place two squares together with their right sides facing outward.
- Align the corresponding corner spaces.
- Thread sage-green yarn through a tapestry needle.
- Sew through matching outer stitch loops along the edges.
- Catch corresponding chain spaces neatly without pulling them closed.
- Continue until you reach the opposite corner.
- Secure the seam.
- Add the next square.
Repeat until seven squares are joined into one horizontal row.
Join the Remaining Rows
Make nine horizontal strips, each containing seven squares.
All nine strips should have approximately the same length.
Join the Rows Together
Place the first two completed strips side by side.
Align the square corners and seam intersections.
Join the long edges with the same sewing method.
Continue adding the remaining strips.
Maintain relaxed seam tension.
The openings between lace motifs should remain visible rather than being pulled closed.
After joining all nine rows, you’ll have one large rectangular blanket.
Part 6: Add the Sage-Green Border
Because the center of the blanket is already highly decorative, a simple border works beautifully.
Use the same sage-green yarn.
Border Round 1 – Single Crochet
Join yarn at one outer corner.
- Chain 1.
- Work single crochet stitches evenly along the first edge.
- Work into stitch tops and chain spaces, maintaining a flat edge.
- At the blanket corner, work sc, ch 2, sc into the corner space.
- Continue along the next side.
- Repeat around all four sides.
- Join with a slip stitch.
Adjust the number of stitches near the seams as needed to keep the edging smooth.
Avoid stuffing too many stitches into the open chain spaces, which can cause rippling.
Border Round 2 – Neat Finished Edge
Chain 1.
Work single crochet stitches evenly around the previous round.
At each corner chain-2 space, work:
Sc, ch 2, sc.
Continue around and join with a slip stitch.
Fasten off and weave in the yarn.
The border should be simple, narrow, and neatly finished.
Optional Delicate Picot Edging
If you’d like a more lace-like outer border, you can replace the second round with small decorative picots.
For example:
- Work three single crochet stitches.
- Chain 3.
- Slip stitch into the first chain to form a picot.
- Continue around, repeating the picots at even intervals.
Keep the picots small so they don’t distract from the sunburst motifs.
Part 7: Weave in All Remaining Ends
Use a tapestry needle to weave the remaining yarn ends into nearby stitches.
Follow the paths of the crocheted clusters wherever possible.
Change direction to secure each tail.
Avoid pulling tightly around the lace openings.
Trim the excess yarn only after the ends are secure.
Part 8: Final Blocking and Finishing
Lay the completed blanket flat.
Check that all seams are neat and the overall shape is rectangular.
If needed, lightly block the finished blanket according to the yarn’s care instructions.
Gently straighten the corners and align the puff-stitch sections.
Let the blanket dry completely.
Your sage-green sunburst puff lace blanket is now complete!
Tips for Beautiful Results
Practice the Puff Stitch First
Make one complete square before beginning all the others.
This helps you become comfortable with drawing up long loops and forming consistent raised puffs.
Maintain the Circular Centers
The chain-8 rings should remain open.
Avoid pulling surrounding stitches so tightly that the center holes close.
Keep the Lace Open
The chain spaces are an important part of this design.
Tight chains can make the motif stiff and distort the sunburst shape.
Make Every Square the Same Size
Even small differences can accumulate across a large blanket.
Check dimensions regularly.
Use Smooth Yarn
Smooth, softly twisted yarn is particularly effective for showing the sunburst openings and raised puff texture.
Don’t Overtighten the Seams
The joined squares should remain flexible.
If the seams are too tight, the blanket may feel stiff or develop puckering.
Creative Ways to Customize the Blanket
Make a Soft Ivory Version
Replace the sage green with creamy ivory for a beautiful neutral lace blanket.
Try Dusty Blue
Powder blue or muted denim blue creates a soft vintage appearance.
Use Two Coordinating Colors
Make the sunburst center in cream and the outer puff rounds in sage green.
This highlights the circular motif structure.
Create a Larger Bed Throw
Add more squares to the width and length.
Keep all motifs the same size.
Make a Matching Cushion Cover
Join four or nine completed sunburst squares into a decorative cushion front.
Add a fabric backing or another crochet panel.
Create a Lightweight Summer Blanket
Use a finer cotton-blend yarn and adjust the hook accordingly.
Keep in mind that the finished motifs will be smaller.
Frequently Asked Questions
Is this crochet blanket suitable for beginners?
The individual stitches are familiar, but the openwork shaping, puff stitches, and motif joining make it better suited to intermediate crocheters or confident beginners.
How many squares are needed?
The standard version uses 63 sunburst lace squares, arranged seven across and nine down.
Is this exactly the stitch in the reference video?
No. This is an original sunburst-and-puff granny-square adaptation. The exact pattern shown in the video could not be fully verified from the accessible information.
Can I make the blanket without puff stitches?
You can replace the puff stitches with ordinary double crochet stitches, but that will change the texture and possibly the shape. Make a sample and check the sizing before using that modification throughout the blanket.
Why are my square corners curling?
Tight chain spaces, uneven puff loops, or inconsistent tension can cause curling.
Try a slightly larger hook or relax your stitch tension.
Can I use cotton yarn?
Yes. Cotton and cotton-blend yarns produce crisp stitch definition.
However, a large cotton blanket may be heavier than one made with acrylic yarn.
Does the blanket need a border?
A simple border is recommended because it helps stabilize the joined lace squares and creates a cleaner finished edge.
Is this suitable for a baby blanket?
The motif can be made into a decorative baby-sized blanket, but the openwork has spaces that may catch small fingers. Follow current infant safe-sleep guidance and never place loose blankets in a baby’s sleep space.
More Crochet Projects You’ll Love
If you enjoy beautiful decorative crochet textures, explore these projects next:
- Cream Star Lace Crochet Blanket
- Reverse Blanket Stitch Crochet Throw
- Interlocking Block Stitch Blanket
- Floral Granny Square Cardigan
- Vintage Floral Granny Square Top
- Textured Granny Square Blanket
- Easy Openwork Crochet Shawl
These projects offer more ways to explore raised stitches, decorative lace, and beautiful handmade fabric.
Final Thoughts
This sage-green sunburst puff lace blanket combines delicate crochet openings with beautiful raised texture.
The circular centers create a lovely sunburst effect, while the puff stitches add dimension and help each square stand out.
The muted botanical color gives the finished blanket a soft, timeless appearance that works beautifully in neutral living rooms and cozy bedrooms.
And because the project is constructed from individual squares, it’s easy to work on a few motifs at a time before assembling the finished blanket.
Take your time with the first sample, enjoy watching the openwork develop, and have fun creating your own beautiful sage-green crochet throw.
Happy crocheting! 🌿🧶