Crochet Wildflower Baby Blanket With Trinity Stitch
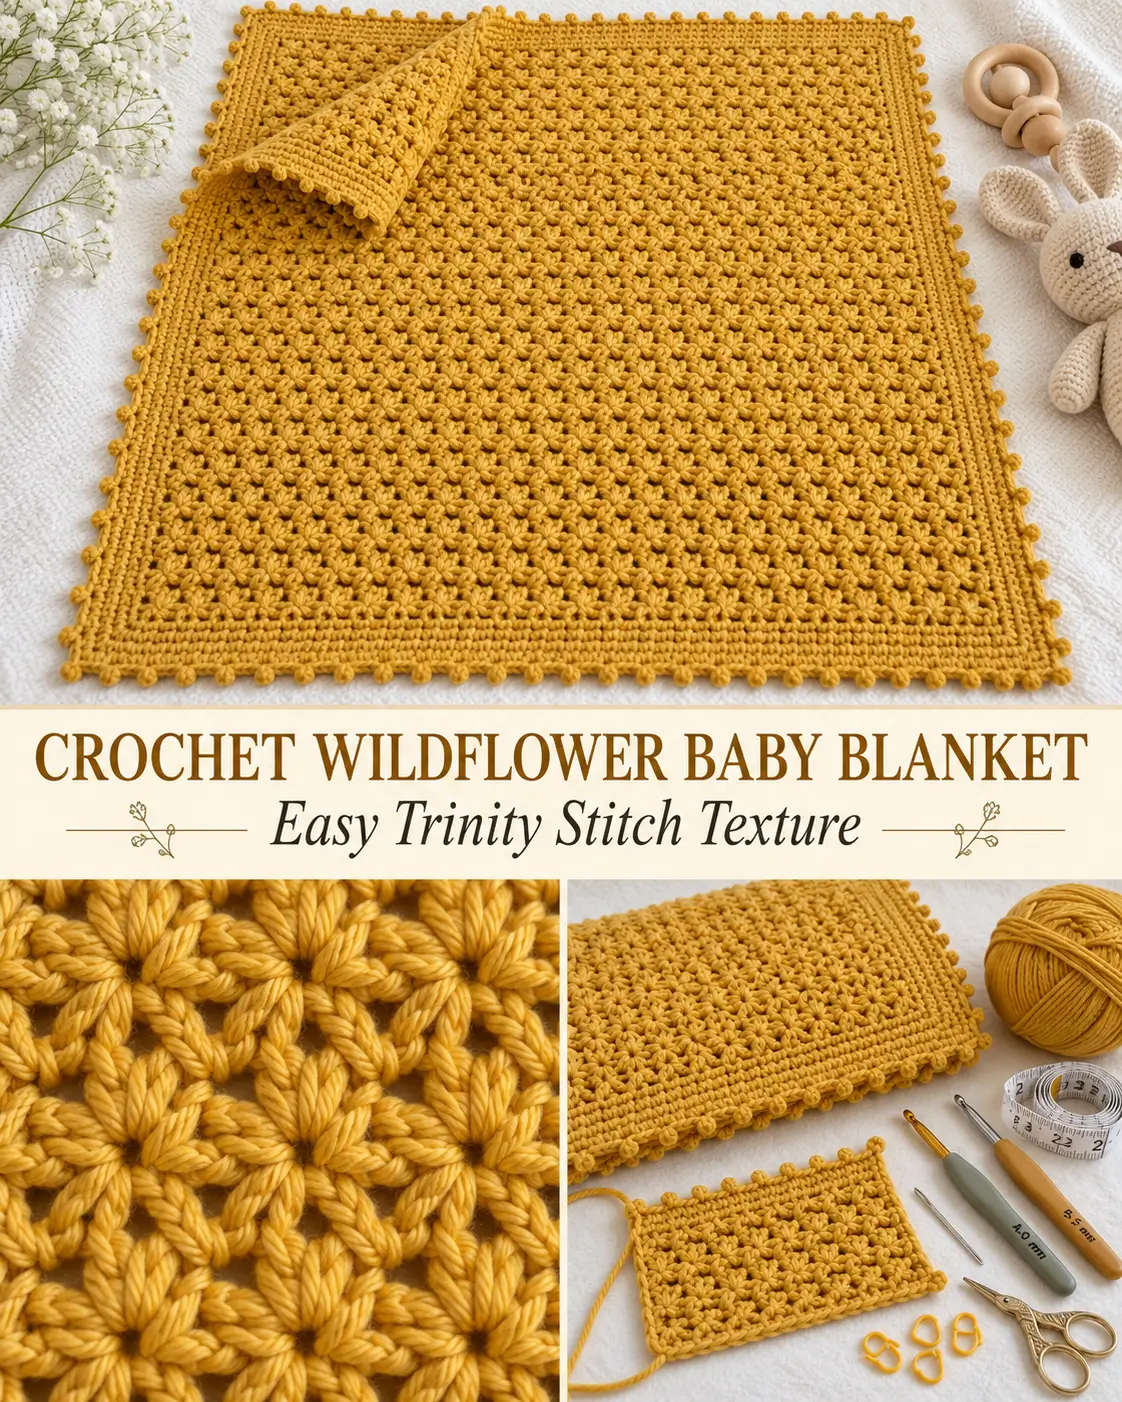
This warm golden crochet baby blanket uses the Trinity Stitch, a compact textured stitch made from overlapping single crochet 3 together clusters. The little three-legged clusters line up across the fabric and create the tiny flower-like texture visible in the blanket.
The entire blanket is worked in one solid mustard-gold color so the stitch definition remains clear. A simple single-crochet frame finishes the blanket, followed by a tiny picot edge that adds just enough detail without competing with the textured center.
The finished blanket measures approximately:
28 × 28 inches / 71 × 71 cm.
Materials
- #3 light/DK weight cotton-blend yarn
- Approximately 4 skeins
- Color: Golden / mustard yellow
- 4 mm / G crochet hook for the foundation chain
- 5.5 mm / I crochet hook for the main blanket
- Scissors
- Tapestry needle
- Stitch markers, optional
A smooth cotton or cotton-blend yarn works especially well because it keeps the small flower-like stitches crisp and visible.
Use a solid color rather than highly variegated yarn if you want the Trinity Stitch texture to stand out clearly.
Skill Level
Confident beginner
You should know:
- chain
- single crochet
- working several partial stitches together
- chain spaces
- crocheting around a blanket edge
- slip stitch
The pattern becomes very repetitive once you understand the Trinity Stitch.
Abbreviations
US crochet terminology:
ch — chain
sc — single crochet
SC3TOG — single crochet 3 together
sl st — slip stitch
st / sts — stitch / stitches
rep — repeat
Special Stitch — Trinity Stitch / SC3TOG
The textured center is made from overlapping SC3TOG stitches.
Unlike an ordinary decrease, these stitches do not reduce the width of the blanket because each cluster is followed by a chain.
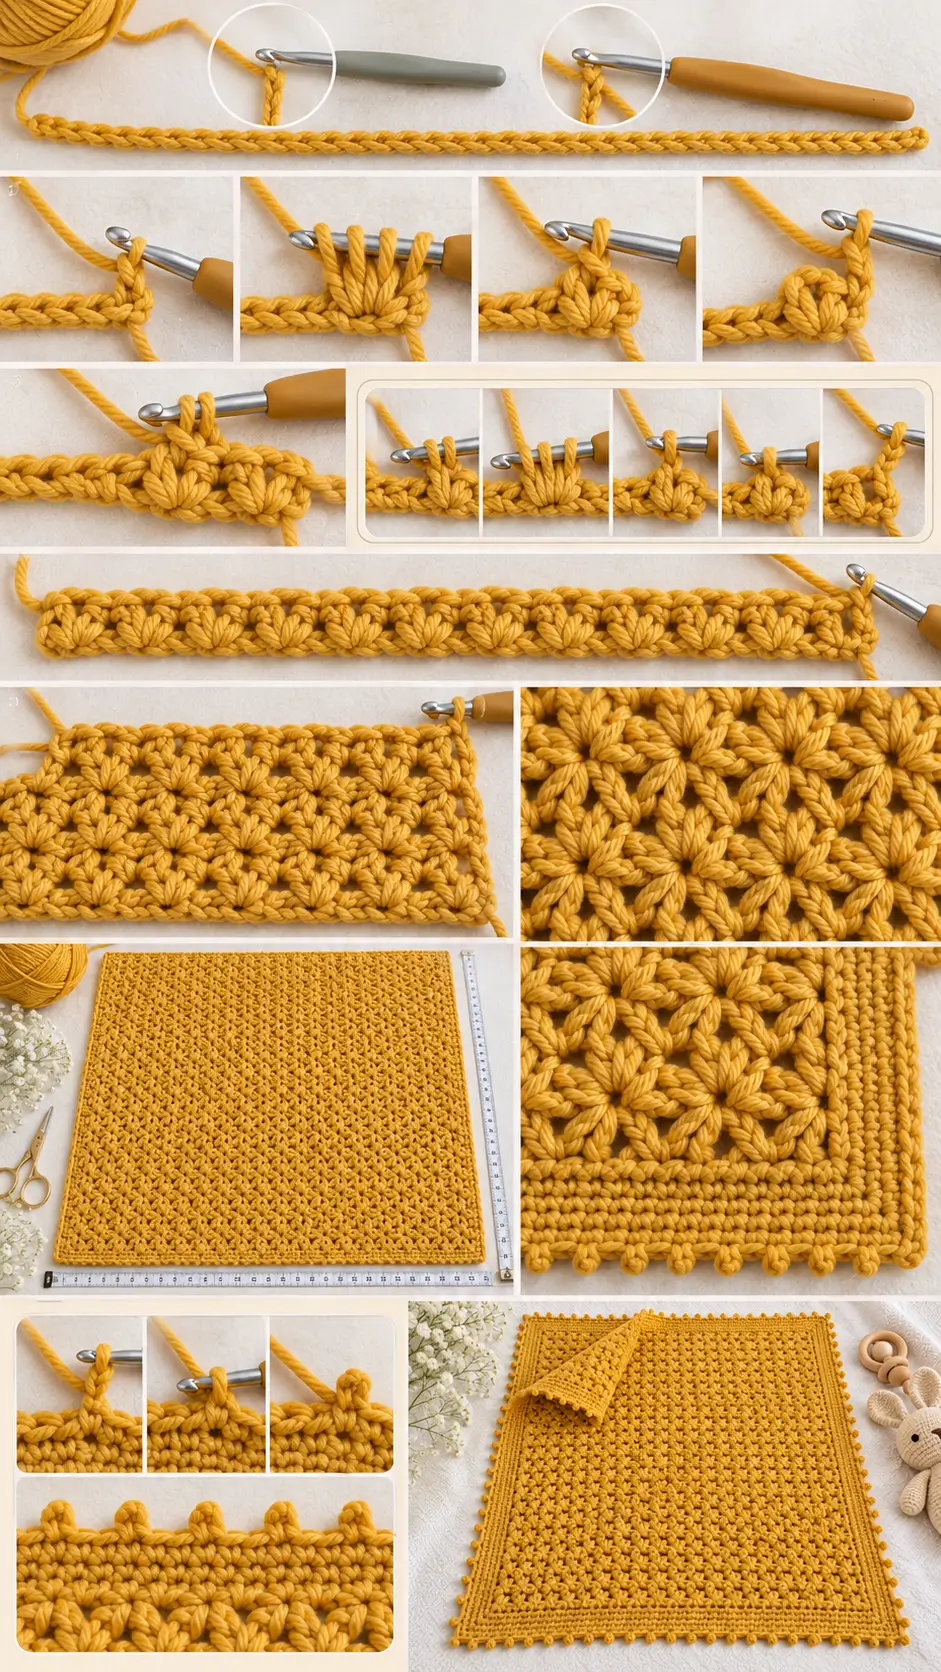
To make one SC3TOG:
Insert the hook into the first indicated stitch.
Yarn over and pull up a loop.
Do not finish the single crochet.
Insert the hook into the next stitch.
Yarn over and pull up another loop.
Insert the hook into the third stitch.
Yarn over and pull up another loop.
You should now have:
4 loops on the hook
Yarn over.
Pull through:
all 4 loops
One SC3TOG is complete.
Then:
ch 1
The chain creates the small space beside the cluster.
The Most Important Part of the Stitch
Every new cluster overlaps the previous cluster.
After completing one SC3TOG, the third stitch used by that cluster becomes the first stitch of the next cluster.
That overlapping construction is what creates the connected three-point flower texture.
Do not simply skip ahead three new stitches for every cluster.
Hook Size
Use the:
4 mm hook
for the foundation chain.
Then switch to:
5.5 mm
for the Trinity Stitch body.
The larger hook is intentional.
The Trinity Stitch can become very dense if worked too tightly, so the larger hook gives the fabric more drape and makes it easier to insert the hook into the clustered stitches.
Gauge
Approximately:
8 SC3TOG clusters plus their ch-1 spaces = 4 inches / 10 cm
and approximately:
7 rows = 4 inches / 10 cm
Check your gauge after working several rows.
More important than matching the gauge perfectly is creating fabric that feels:
- soft
- flexible
- not stiff
- easy to work into
Foundation Chain
With the:
4 mm hook
ch:
110
You can change the blanket width by beginning with any even number of chains.
Keep the foundation chain relaxed.
After completing the chain, switch to the:
5.5 mm hook
for the main blanket.
Row 1
Beginning in the:
2nd chain from the hook
work:
1 sc
Now begin the first Trinity Stitch.
Insert the hook into the same chain where you just made the sc.
Yarn over and pull up a loop.
Insert the hook into the:
next chain
Yarn over and pull up a loop.
Insert the hook into the:
following chain
Yarn over and pull up a loop.
Yarn over.
Pull through all loops on the hook.
You have completed the first:
SC3TOG
Ch:
1
Continue Row 1
For the next cluster:
Insert the hook into the same chain that held the third leg of the previous cluster.
Pull up a loop.
Insert the hook into the next chain.
Pull up a loop.
Insert the hook into the following chain.
Pull up a loop.
Yarn over.
Pull through all loops.
Ch:
1
Repeat this overlapping SC3TOG across the foundation.
Finish Row 1
Continue until only enough stitches remain for the final cluster and edge stitch.
Work the final:
SC3TOG
Do not ch 1 after the final cluster.
Instead:
work:
1 sc
into the final stitch, which is also the stitch where the third leg of the final cluster was worked.
Ch:
1
Turn.
The first textured row is complete.
Row 2
Sc in the first stitch.
Now begin the first cluster in the:
same stitch
where you just worked the sc.
Pull up a loop.
Insert the hook into the next stitch or available stitch position.
Pull up a loop.
Insert the hook into the following stitch.
Pull up another loop.
Yarn over.
Pull through all loops.
Ch:
1
Continue Row 2
For every following cluster:
begin the first leg in the same stitch where the third leg of the previous SC3TOG was worked.
Then use the next two stitch positions for the second and third legs.
Complete the SC3TOG.
Ch:
1
Repeat across.
At the final cluster:
omit the last ch 1.
Sc into the final stitch where the third leg of the final SC3TOG was worked.
Ch:
1
Turn.
Row 3 and Every Following Body Row
Repeat:
Row 2
for the entire blanket.
That is the main stitch pattern.
Continue until the blanket is approximately:
28 inches / 71 cm long
or until you reach your preferred length.
What the Correct Stitch Should Look Like
After several rows, the fabric should show:
- tiny three-point clusters
- little star or flower-like shapes
- compact horizontal rows
- small openings between clusters
- dense but flexible texture
- identical texture repeating from row to row
The stitch should resemble tiny wildflowers scattered in neat rows.
It should not look like:
- puff stitches
- bobbles
- large stars
- shell stitches
- popcorns
Keep Your Tension Relaxed
This stitch is easier when worked loosely.
If your tension becomes too tight:
- inserting the hook into the three stitch positions becomes difficult
- the blanket may become stiff
- the edges may begin pulling inward
Let the loops remain comfortably tall while building each SC3TOG.
Checking Your Width
After approximately:
6–8 rows
lay the blanket flat.
The sides should remain straight.
If the blanket narrows:
you may be missing the final edge stitch.
If it widens:
you may be adding an extra cluster near an edge.
Every row should begin and end consistently.
Finishing the Blanket Body
Continue repeating Row 2 until the blanket reaches approximately:
28 × 28 inches
before or after light blocking depending on your tension.
Do not fasten off after the final row.
You can begin the border immediately.
BORDER
The border has:
4 rounds of single crochet
followed by:
1 picot edging round
This creates the narrow textured frame visible around the golden blanket.
Border Round 1
After finishing the final blanket row:
Ch:
1
Turn.
Sc in the first stitch.
Across the top edge:
work:
2 sc in the next stitch
Then repeat:
skip 1 stitch
2 sc in the next stitch
across.
Adjust the final repeat if necessary so the edge remains flat.
First Corner
At the corner work:
3 sc
This creates the turn.
First Side
Work down the side of the blanket.
A useful distribution is:
2 sc for every other row
Keep the stitches evenly spaced.
Do not cram too many stitches into the side edge.
Bottom Edge
At the next corner:
3 sc
Continue across the foundation edge, spacing the stitches evenly.
Use the same general rhythm as the top edge.
Second Side
Work:
3 sc
in the next corner.
Continue evenly up the second side.
At the final corner work:
3 sc
Continue directly into the next border round.
Do not turn.
Border Round 2
Work:
1 sc in every stitch
around.
At every corner:
work:
3 sc
into the center stitch of the previous 3-sc corner.
Do not turn.
Border Round 3
Repeat Border Round 2:
1 sc in every stitch
and:
3 sc in each corner
Do not turn.
Border Round 4
Repeat once more:
1 sc in every stitch
with:
3 sc in every corner
The blanket should now have a clean, narrow solid frame surrounding the Wildflower texture.
Border Round 5 — Picot Edge
Now add the tiny decorative bumps visible around the finished blanket.
Sc in the first stitch.
Then repeat:
ch 3
Sc back into the:
same stitch
where the previous sc was worked.
This creates one small picot.
Then:
sc in each of the next 4 stitches
Repeat:
picot, 4 sc
around the blanket.
At the end:
join with a sl st.
Fasten off.
What the Picot Border Should Look Like
The finished border should have:
- tiny evenly spaced points
- approximately four plain sc between each point
- delicate decoration
- no large scallops
- no dramatic lace edge
The picots should look like tiny raised buds around the blanket.
They should complement the small flower-like center texture rather than overpower it.
Weave In the Ends
Thread each yarn tail onto a tapestry needle.
Weave through several stitches.
Change direction.
Weave through another section.
Trim the excess.
Because this blanket uses one solid color, the ends should disappear easily into the textured fabric.
Blocking
Light blocking will help:
- square the blanket
- straighten the border
- open the Trinity Stitch slightly
- make the flower texture more consistent
Dampen according to the yarn care instructions.
Lay the blanket flat.
Shape it into an even:
28-inch square
Straighten all four edges.
Shape the picots gently with your fingers.
Allow the blanket to dry completely.
If the Trinity Stitch Is Too Tight
Try one or more of the following:
- relax your yarn tension
- pull each loop slightly higher
- use a larger hook
- practice on a small swatch first
The stitch should not feel difficult to enter.
If the Blanket Looks Like Star Stitch
The stitches are related visually, but this pattern uses only:
3 legs
for each cluster.
Do not pull up five or more loops as you would with many star-stitch variations.
Each Wildflower cluster should have exactly:
3 insertion points
before closing.
If the Flowers Are Not Visible
Check that each new SC3TOG begins in:
the same stitch used for the third leg of the previous cluster
This overlap is essential.
If you start every cluster in three completely new stitches, you will not create the correct connected texture.
If the Blanket Is Getting Narrower
Check both edges.
At the end of every row:
- complete the last SC3TOG
- omit the final ch 1
- sc into the final stitch
Do not accidentally omit that final sc.
If the Blanket Is Getting Wider
Make sure you are not placing:
ch 1
after the final cluster.
The final cluster goes directly into the edge sc.
Also make sure the first SC3TOG begins in the same stitch as the first sc rather than adding an extra stitch beside it.
If the Border Ruffles
There are too many stitches along the edges.
Remove a few single crochets evenly from the side sections.
Pay special attention to the row-end edges.
The border should lie completely flat before you add the picot round.
If the Border Pulls Inward
Add a few more single crochets evenly along the side edges.
Do not increase excessively at the corners.
Each corner needs:
3 sc
Making a Larger Blanket
The starting chain can be:
any even number
For a larger blanket:
- make an even-number foundation chain
- work the Trinity Stitch pattern
- continue until the length matches the width or reaches your preferred measurement
- add the same border
For a rectangular blanket, simply continue adding rows after reaching the desired width proportion.
Color
For the same appearance as the reference, use:
warm golden mustard yellow
throughout.
Do not add stripes.
Do not use multiple colors.
The solid golden shade allows the tiny Trinity Stitch flowers and shadows to become the main visual feature.
Final Pattern at a Glance
Foundation
With 4 mm hook:
Ch 110
Switch to 5.5 mm hook.
Row 1
Sc in second chain.
Work overlapping:
SC3TOG, ch 1
across.
Each new SC3TOG begins in the same stitch used for the third leg of the previous cluster.
For the final cluster:
omit ch 1.
Sc in final stitch.
Ch 1.
Turn.
Row 2
Sc in first stitch.
Work overlapping:
SC3TOG, ch 1
across.
Omit ch 1 after the last cluster.
Sc in final stitch.
Ch 1.
Turn.
Body
Repeat:
Row 2
until approximately:
28 inches / 71 cm
long.
Border
Work:
4 rounds of single crochet
with:
3 sc in every corner
Then work the final picot round:
sc, ch 3, sc in same stitch
followed by:
sc in next 4 stitches
Repeat around.
Fasten off.
The finished blanket should be a warm golden square filled with tiny three-point flower-like Trinity Stitch clusters, framed by a narrow solid single-crochet border and finished with delicate evenly spaced picots, matching the simple textured appearance of the reference.