Easy Off-White Textured Crochet Baby Blanket With Woven Post Stitch
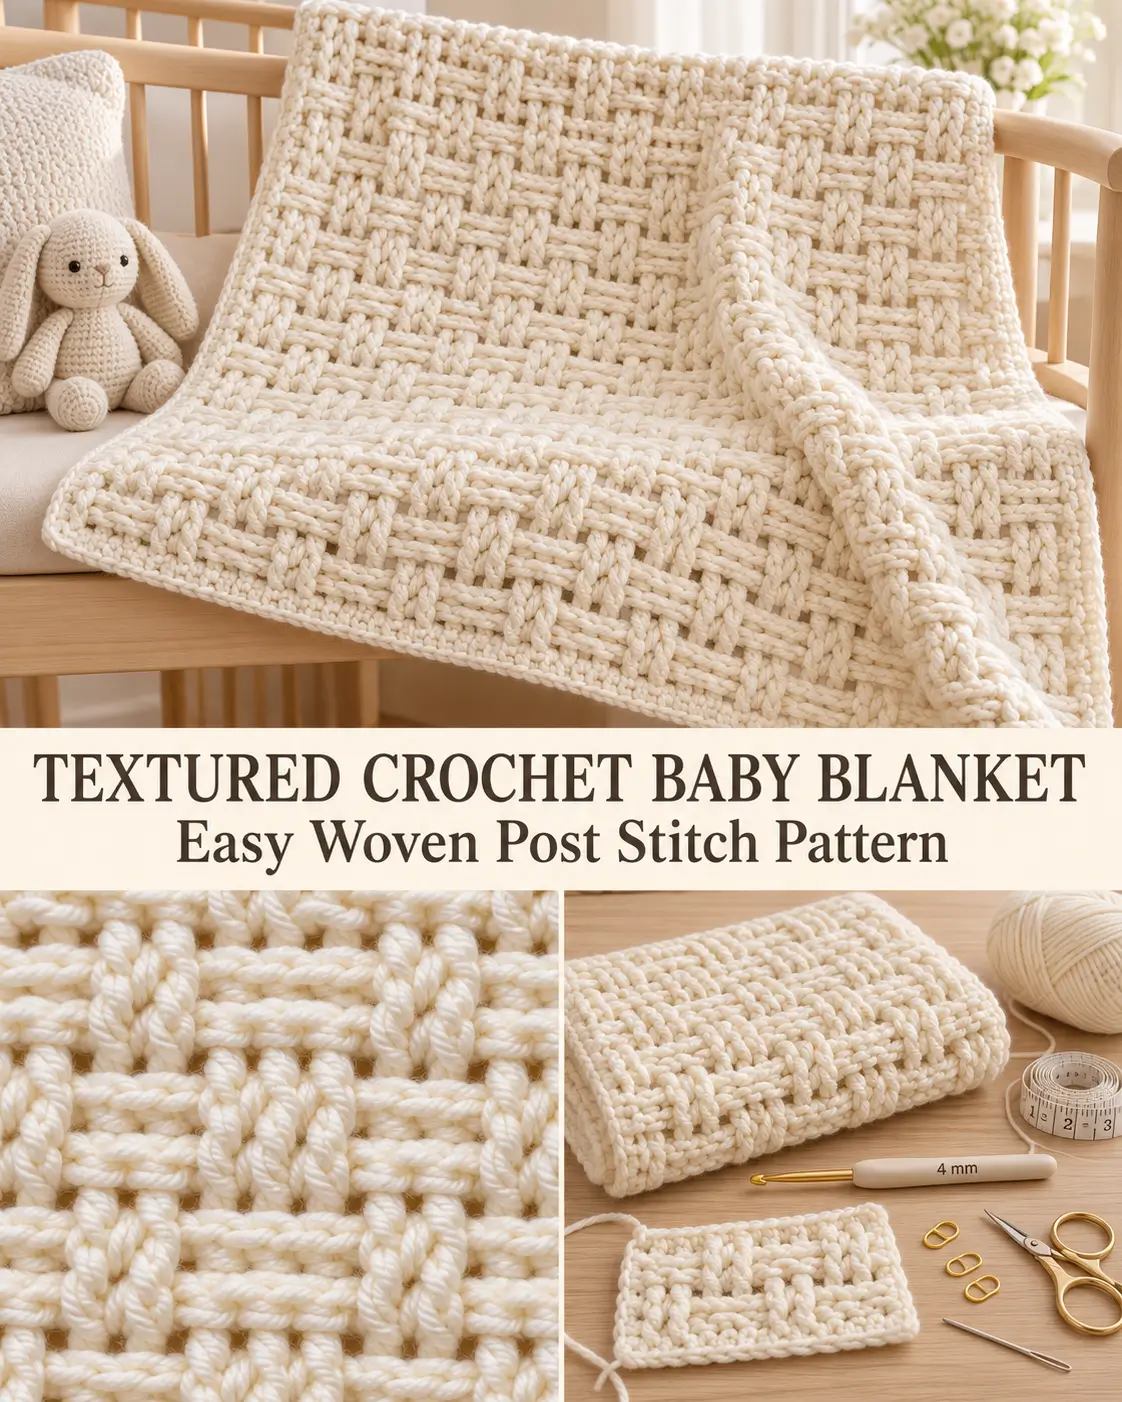
This beautiful crochet texture combines front-post and back-post double crochet stitches in groups of three, separated by small chain spaces. The post stitches create raised blocks that appear to weave over and under one another, giving the fabric a rich dimensional look without using complicated cables.
For this version, use only one color throughout:
warm off-white / ivory / blanc cassé
Do not change colors between sections. Keeping the entire project in one soft cream shade makes the raised texture and shadows the main feature.
Finished Size
For a baby blanket, a useful finished size is approximately:
30–32 inches / 76–81 cm wide
by:
36–40 inches / 91–102 cm long
Because this pattern can be started with any multiple of 4 + 2, you can easily adjust it for:
- baby blankets
- throws
- scarves
- bags
- cushion covers
- hats
- runners
Materials
- #3 light / DK weight yarn
- Color: warm off-white / ivory / blanc cassé
- 4 mm / G crochet hook
- Yarn needle
- Scissors
- Stitch markers
- Measuring tape
For a baby blanket, plan on approximately:
1,125–1,250 yards / 1,030–1,145 meters
depending on your tension and finished size.
Use one continuous cream color for the entire project.
Skill Level
Confident beginner
You should know:
- chain
- single crochet
- double crochet
- front post double crochet
- back post double crochet
- working into chain spaces
- working flat in rows
Once the post-stitch placement becomes familiar, the pattern is highly repetitive.
Abbreviations
US crochet terminology:
ch — chain
sc — single crochet
dc — double crochet
FPdc — front post double crochet
BPdc — back post double crochet
st / sts — stitch / stitches
sp — space
rep — repeat
Important Pattern Notes
The foundation chain must be:
a multiple of 4 + 2
Examples:
- ch 34
- ch 42
- ch 50
- ch 82
- ch 98
- ch 114
- ch 130
- ch 146
Use a smaller number for a practice swatch.
For a blanket, crochet a short swatch first and measure it before committing to a large foundation chain.
Turning Chains
When a row begins with:
ch 1
the chain does not count as a stitch.
When a row begins with:
ch 3
the chain does count as the first dc.
This is important for keeping both edges straight. massive-crochet-6a1986416af769-…
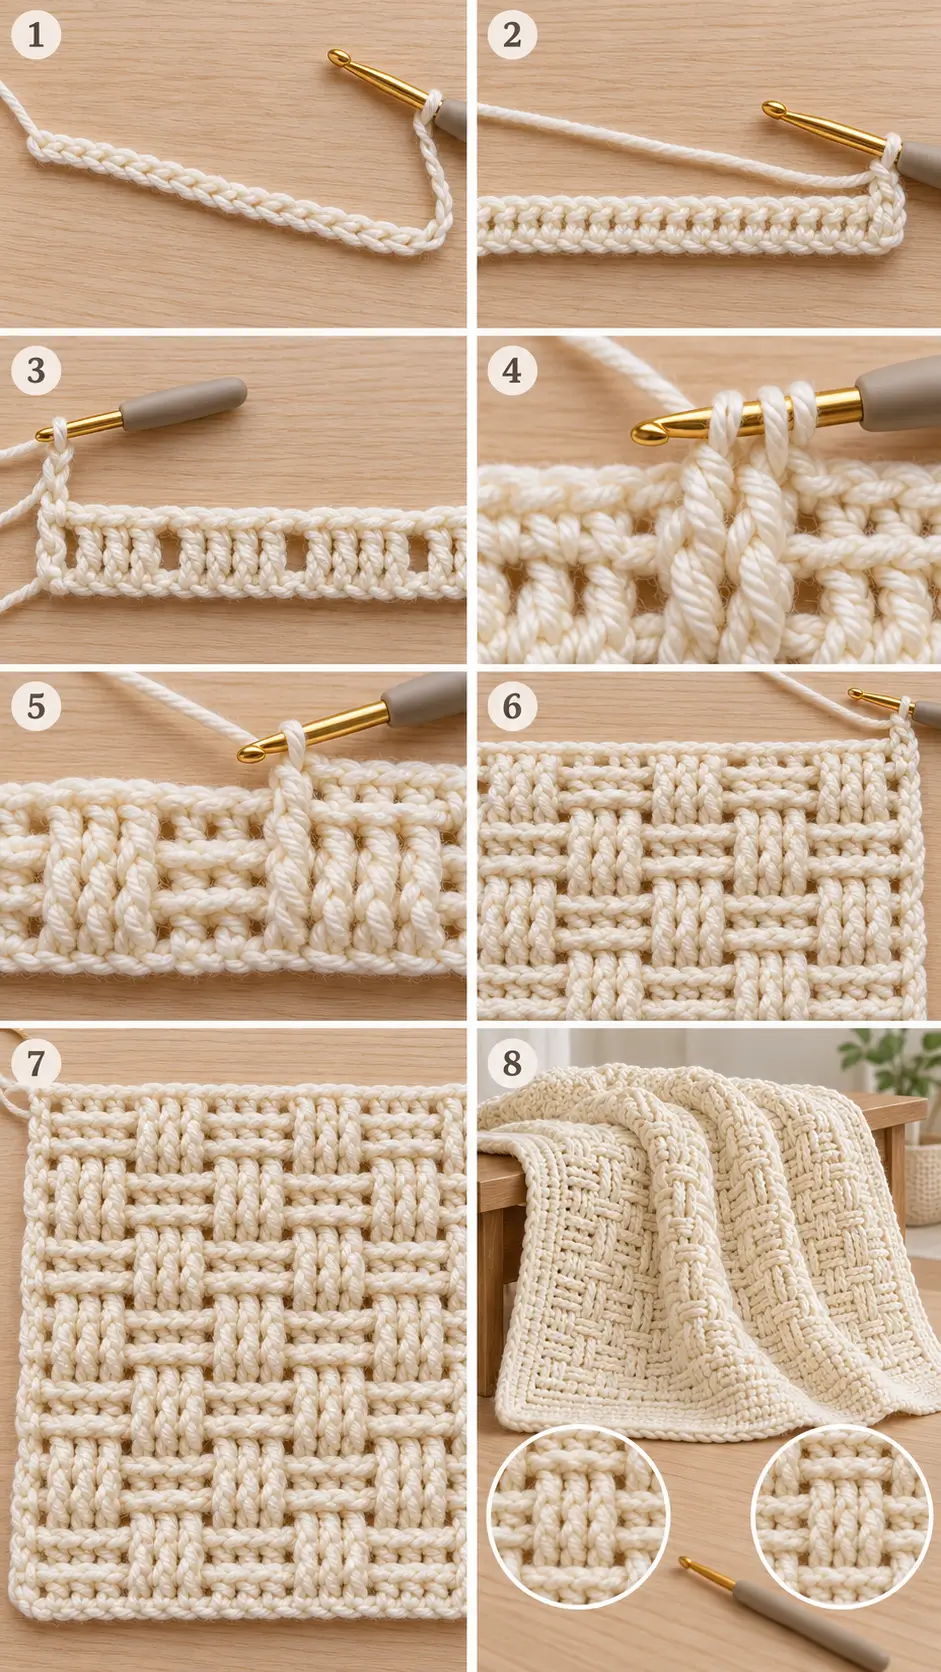
Special Stitch — Front Post Double Crochet
Yarn over.
Insert the hook:
from front to back, then back to front
around the post of the indicated stitch.
The stitch post should sit in front of your hook.
Yarn over.
Pull up a loop.
You should have:
3 loops
on the hook.
Yarn over.
Pull through:
2 loops
Yarn over again.
Pull through the final:
2 loops
One FPdc is complete.
The stitch should project toward the front of the fabric.
Special Stitch — Back Post Double Crochet
Yarn over.
Insert the hook:
from back to front, then front to back
around the post of the indicated stitch.
The stitch post should sit behind your hook.
Yarn over.
Pull up a loop.
Yarn over.
Pull through 2 loops.
Yarn over.
Pull through the remaining 2 loops.
One BPdc is complete.
The stitch recedes toward the back of the fabric.
Understanding the Texture
The fabric is divided into repeating groups of:
3 post stitches
Each group is separated by:
ch 1
One section begins with:
3 FPdc
followed by:
3 BPdc
Then the raised orientation changes so the next block begins:
3 BPdc
followed by:
3 FPdc
Repeating those two arrangements creates the woven, block-like texture.
FOUNDATION
Using the off-white yarn:
make a foundation chain in a:
multiple of 4 + 2
For a small practice swatch, you could begin with:
ch 34
For a full blanket, increase the foundation chain until it reaches your desired width.
Do not make the chain tightly.
Row 1 — Single Crochet Foundation
Skip the first chain from the hook.
Beginning in the:
2nd chain
work:
1 sc in every chain across
Ch:
1
Turn.
This creates a sturdy foundation underneath the post-stitch pattern.
Row 2 — Double Crochet Setup Row
Ch:
3
Turn.
Remember: the ch-3 counts as the first dc.
Skip the first stitch.
Work:
1 dc in each of the next 3 stitches
Now repeat:
ch 1
skip 1 stitch
dc in each of the next 3 stitches
Repeat across until:
1 stitch remains
Work:
1 dc in the final stitch
Turn.
You should now see repeating groups of:
3 dc
separated by:
ch-1 spaces
The turning chains form the edge stitches.
Rows 3–4 — First Raised Block Section
Ch:
3
Turn.
Skip the first stitch because the ch-3 already represents that edge stitch.
Around the posts of the next:
3 stitches
work:
3 FPdc
Ch:
1
Skip the next ch-1 space.
Around the next group of 3 stitches work:
3 BPdc
Ch:
1
Skip the next ch-1 space.
Continue across, alternating:
3 FPdc
then:
3 BPdc
with:
ch 1
between every group.
At the end of the row:
work:
1 dc in the top of the turning ch-3
Turn.
Repeat this exact instruction for:
Row 4
The first raised texture section is now established.
What Rows 3–4 Should Look Like
You should see:
- groups of 3 raised vertical stitches
- groups of 3 recessed stitches
- narrow horizontal openings between groups
- straight edges
- no large holes
Do not crochet into the ch-1 spaces.
Simply:
ch 1 and skip over them
Rows 5–7 — Reverse the Post-Stitch Direction
Now reverse which groups project forward.
Ch:
3
Turn.
Skip the first stitch.
Around the next 3 posts work:
3 BPdc
Ch:
1
Skip the chain space.
Around the next 3 posts work:
3 FPdc
Ch:
1
Skip the next chain space.
Continue across, alternating:
3 BPdc
then:
3 FPdc
Finish with:
1 dc in the top of the turning ch-3
Repeat the same sequence for:
Rows 6 and 7
This creates the next textured block.
Why the Direction Changes
The stitch arrangement changes from:
FPdc → BPdc
to:
BPdc → FPdc
This makes the raised areas shift across the fabric.
The result is the interlocking woven appearance visible in the reference.
Rows 8–10 — Switch Back
For the next three rows, return to the first arrangement.
Ch:
3
Turn.
Work:
3 FPdc
around the next 3 posts.
Ch 1.
Skip the chain space.
Work:
3 BPdc
around the next 3 posts.
Continue alternating:
3 FPdc → ch 1 → 3 BPdc → ch 1
across.
Finish with:
1 dc in the top of the turning ch-3
Repeat this same arrangement for:
Rows 9 and 10
MAIN PATTERN REPEAT
From this point forward, repeat:
Rows 5–10
until your project reaches the desired length. massive-crochet-6a1986416af769-…
That means:
3 rows
Start with:
3 BPdc
then alternate with:
3 FPdc
Next 3 rows
Start with:
3 FPdc
then alternate with:
3 BPdc
Continue switching every three rows.
Important — Use Only Off-White
Do not cut the yarn when the texture changes.
Do not change colors.
Continue with the same:
warm off-white / ivory yarn
throughout the entire project.
The texture change comes entirely from the placement of FPdc and BPdc stitches.
Last Row — Straighten the Top Edge
When the project reaches your desired length, finish after completing a full pattern section.
Ch:
1
Turn.
Work:
1 sc in every stitch
and:
1 sc in every ch-1 space
across.
Work the final sc in the top of the turning ch-3.
Fasten off.
This converts the open post-stitch pattern back into a solid straight upper edge.
BABY BLANKET VERSION
For a baby blanket:
Make a gauge swatch first using approximately:
34–42 chains
Work through at least:
10 rows
Allow the swatch to relax.
Measure its width.
Then determine how many 4-stitch repeats you need for approximately:
30–32 inches
Always finish the calculation with:
+2 chains
Example Width Calculation
Suppose your swatch shows that:
4 foundation chains produce approximately 1 inch
and you want a:
30-inch blanket
You would need approximately:
30 × 4 = 120 chains
Then adjust to a valid multiple of 4 and add 2.
For example:
ch 122
This is only an example.
Your actual gauge may differ, so measuring your own swatch is more reliable.
Blanket Length
Continue repeating:
Rows 5–10
until the blanket body measures approximately:
36–39 inches
Then work the final single-crochet row.
If adding the optional border below, stop the main body slightly shorter.
OPTIONAL SIMPLE BORDER
The stitch pattern is already highly decorative, so use a simple border in the same off-white yarn.
Do not introduce another color.
Border Round 1
Join yarn at any corner.
Ch:
1
Sc evenly around the entire blanket.
Across the top and bottom:
work:
1 sc in every stitch
Along the side edges:
distribute sc evenly into the row ends.
At each corner work:
3 sc
Join with sl st.
Border Round 2
Ch 1.
Sc in every stitch around.
At each corner:
work:
3 sc in the center corner stitch
Join.
Fasten off.
This creates a narrow clean frame without distracting from the post-stitch texture.
Blocking
Light blocking will improve the final appearance.
Dampen the blanket according to the yarn-care instructions.
Lay it flat.
Straighten:
- top edge
- bottom edge
- both side edges
- four corners
Gently arrange the raised stitch groups.
Do not press them flat.
Allow the blanket to dry completely.
What the Correct Texture Should Look Like
The finished fabric should show:
- repeating rectangular raised sections
- groups of exactly 3 vertical post stitches
- narrow ch-1 gaps between groups
- alternating raised and recessed blocks
- strong horizontal bands
- one solid cream color
- dense but flexible fabric
The effect should look woven or lightly cabled without actually using traditional cable crossings.
If the Texture Looks Flat
Check that you are actually working:
around the stitch posts
rather than into the top loops.
FPdc and BPdc create the three-dimensional texture.
Ordinary dc worked into the top loops will produce a much flatter fabric.
If the Raised Blocks Are in the Wrong Position
Check which three-row section you are working.
One section begins:
3 BPdc
The next begins:
3 FPdc
Do not switch direction every row.
The same arrangement must be repeated for:
3 consecutive rows
before changing.
If the Chain Spaces Disappear
Every group of 3 post stitches must be followed by:
ch 1
Then skip the chain space below.
The ch-1 openings create the horizontal separation visible between the textured blocks.
If the Fabric Gets Wider
You may be accidentally crocheting into:
- the ch-1 spaces
- the turning chain twice
- an extra edge stitch
Maintain the original group structure throughout.
If the Fabric Gets Narrower
Make sure you are not skipping one of the 3 post stitches.
Each textured group must always contain:
exactly 3 stitches
The pattern never decreases.
If the Edges Look Uneven
Remember:
ch 3 counts as the first dc
At the end of every textured row:
work:
1 dc in the top of the previous turning ch-3
This keeps the outer edges consistent.
If the Fabric Feels Too Stiff
The post stitches create a naturally dense texture.
Try:
- relaxing your tension
- moving up to a 4.5 mm hook
Make a swatch before changing hook size for the full project.
If the Fabric Is Too Loose
Try:
- slightly firmer tension
- a 3.5 mm hook
The chain spaces should remain small and controlled.
MAKE A SCARF
Use a narrower foundation chain such as:
ch 34 or ch 42
Work the complete stitch repeat until the scarf reaches your desired length.
Finish with the single-crochet final row.
Add the optional sc border if desired.
Keep the entire scarf:
off-white
for a classic textured look.
MAKE A BAG PANEL
Crochet two matching rectangles using the same pattern.
For each panel:
- choose the desired width using the multiple of 4 + 2
- work until the rectangle reaches your desired height
- finish with the final sc row
Place both panels together.
Sc through both layers around:
- first side
- bottom
- second side
Leave the top open.
Add handles or a strap.
For a stronger bag, add a fabric lining.
MAKE A CUSHION COVER
Create two squares or rectangles using identical foundation counts and row counts.
Finish both pieces with the final sc row.
Join three sides with:
single crochet
Insert the cushion form.
Close the remaining edge.
MAKE A HAT
For a simple beanie, crochet a rectangle using the textured pattern.
Make the rectangle long enough to wrap comfortably around the head.
Seam the short edges together.
Gather one long edge to form the crown.
Fold the opposite edge upward for a brim if desired.
Remember that this stitch is fairly thick, so check the fit before seaming.
Color
For this project use only:
warm off-white / ivory / blanc cassé
No stripes.
No pink.
No gray.
No contrasting border.
No second color.
The monochrome cream version lets the light and shadow created by the post stitches define the entire pattern.
Final Pattern at a Glance
Foundation
Multiple of 4 + 2
Row 1
Skip first chain.
Sc across
Row 2
Ch 3.
Dc next 3.
Repeat:
ch 1, skip 1, dc next 3
Finish with dc in final stitch.
Rows 3–4
Start with:
3 FPdc
Then alternate:
3 BPdc / 3 FPdc
with ch 1 between groups.
Rows 5–7
Start with:
3 BPdc
Then alternate:
3 FPdc / 3 BPdc
with ch 1 between groups.
Rows 8–10
Start with:
3 FPdc
Then alternate:
3 BPdc / 3 FPdc
with ch 1 between groups.
Repeat
Repeat:
Rows 5–10
to the desired length.
Final Row
Ch 1.
Sc in:
- every stitch
- every chain space
Fasten off.
The finished fabric should be a single warm off-white crochet textile with repeating groups of three raised post stitches, recessed groups between them, narrow horizontal openings, and a strong woven geometric texture suitable for baby blankets, bags, scarves, cushions, and hats.