Beautiful Basketweave Crochet Baby Blanket Pattern
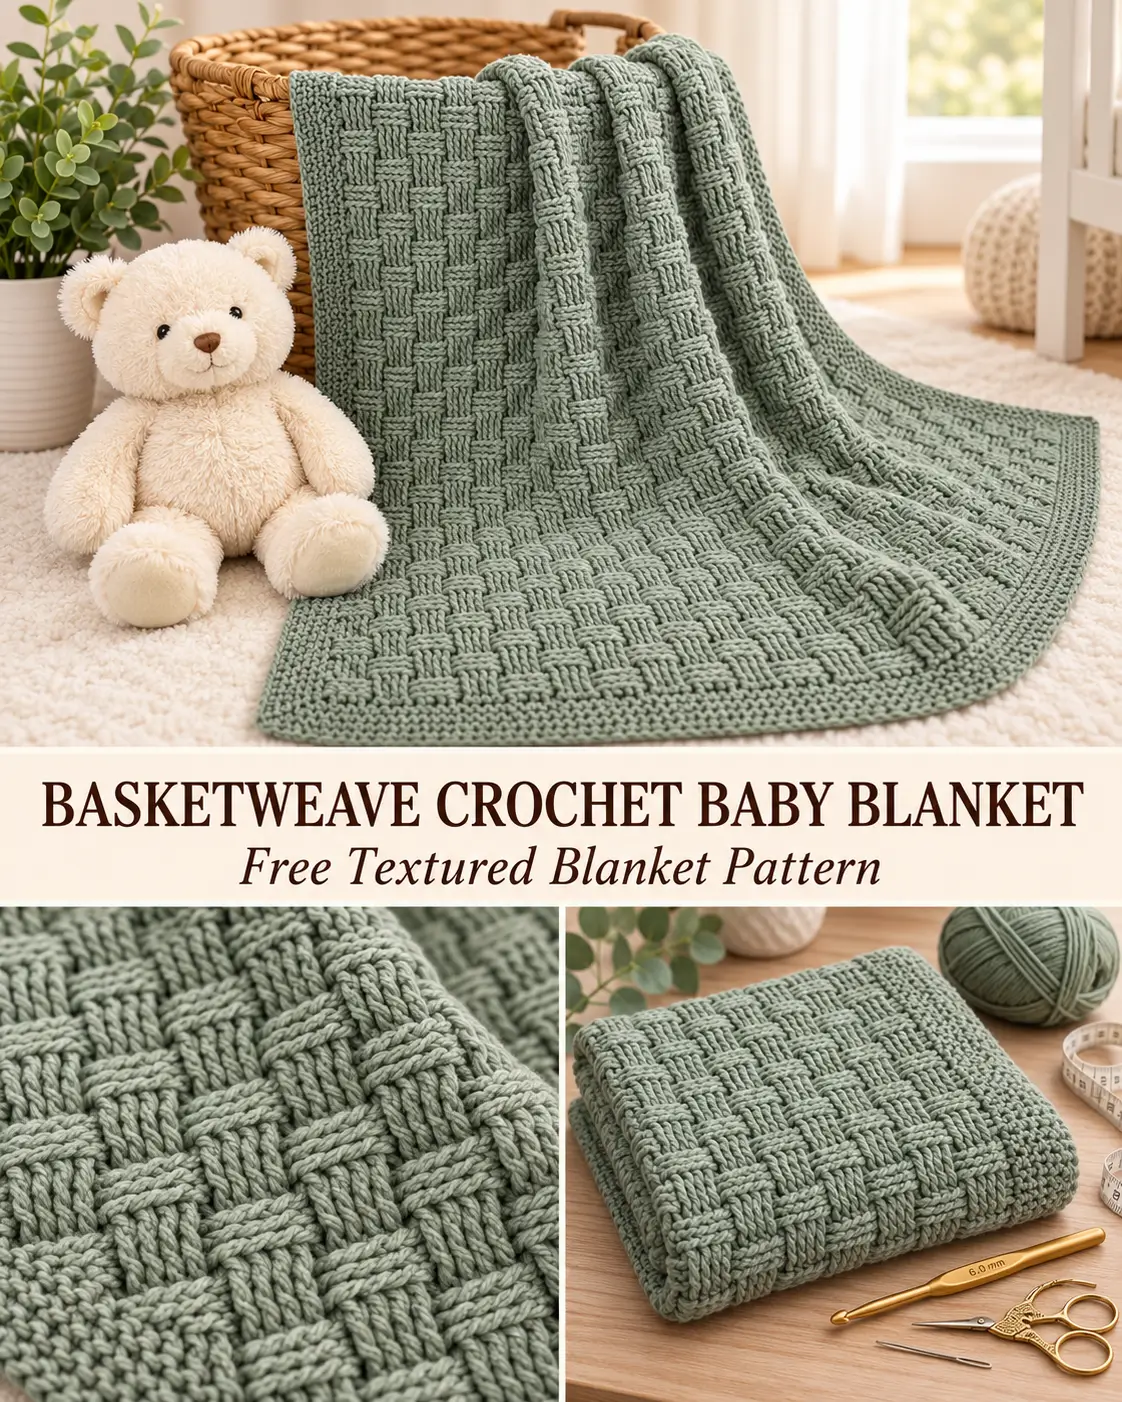
There’s something special about a handmade crochet baby blanket with rich texture and a beautifully simple design. This basketweave crochet baby blanket combines the cozy appearance of woven fabric with the softness of crochet, creating a gorgeous blanket that’s perfect for snuggling, gifting, and decorating a nursery.
The raised basketweave pattern features alternating blocks of stitches that appear to cross over and under one another. The result is a beautiful woven texture that looks surprisingly intricate but is created with just a few familiar crochet techniques.
For this version, we’re using a gorgeous muted eucalyptus sage green yarn. This soft, natural shade gives the blanket a calm, modern appearance that looks lovely in neutral nurseries, cozy bedrooms, and farmhouse-inspired spaces.
A simple moss-stitch border completes the blanket, framing the textured center without taking attention away from the woven design.
Whether you’re making a thoughtful baby shower gift, a keepsake for a new arrival, or a cozy handmade blanket for your home, this pattern is a rewarding project.
Why You’ll Love This Basketweave Crochet Blanket
This blanket combines timeless texture with a practical, easy-to-customize construction.
- Beautiful woven appearance: Alternating raised crochet stitches create the look of an intricate woven basket.
- Soft and cozy texture: The dense stitch pattern creates a substantial blanket with a comfortable feel.
- Elegant sage green color: A muted eucalyptus shade complements modern, farmhouse, and neutral nurseries.
- Attractive on both sides: The front and back display textured basketweave blocks.
- Simple repeating pattern: Once you understand the stitch arrangement, the four-row repeat becomes easy to follow.
- Customizable size: Make a smaller baby blanket, a larger nursery blanket, or a cozy throw.
- Neat finishing border: A delicate moss-stitch edging gives the blanket a beautifully finished appearance.
The best part is watching the textured squares gradually appear as you crochet each row.
Basketweave Crochet Blanket Pattern Details
Skill level: Intermediate beginner
Crochet terminology: US terms
Construction: Worked flat in turned rows
Main stitch: Front-post and back-post double crochet
Pattern repeat: Four rows
Recommended yarn: Light weight (#3) yarn
Yarn color: Muted eucalyptus sage green
Crochet hook: 6.0 mm (J/10) for the blanket body
Border hook: 6.5 mm (K/10.5), if needed for a relaxed edge
Target finished size: Approximately 35 × 35 inches, depending on gauge
Estimated yarn: Approximately 1,700–2,000 yards, allowing for the body and border
Foundation chain: 124 chains
Stitch count: 122 stitches per row
The finished dimensions and yarn usage are estimates. Your results will depend on yarn thickness, stitch tension, and gauge.
Materials You’ll Need
Gather the following supplies before beginning:
- Approximately 1,700–2,000 yards of soft DK or light worsted (#3) yarn in muted eucalyptus sage green
- 6.0 mm crochet hook for the main blanket
- Optional 6.5 mm crochet hook for the border
- Yarn needle
- Scissors
- Stitch markers
- Measuring tape
Choosing the Best Yarn
For a soft baby blanket, choose yarn that feels comfortable against the skin and is easy to care for.
A good-quality DK acrylic, washable merino blend, or soft cotton-acrylic blend can work beautifully.
Lightweight yarn helps the raised basketweave pattern remain flexible rather than becoming overly thick or stiff.
For this version, select a soft, medium-light sage green with slightly gray undertones.
Avoid a very dark forest green or extremely pale mint. A muted eucalyptus shade offers a lovely balance between visible stitch texture and a calm, elegant appearance.
If the blanket will be used for a baby, choose yarn suitable for frequent washing and follow the fiber manufacturer’s care instructions.
Crochet Abbreviations
| Abbreviation | Meaning |
|---|---|
| ch | Chain |
| sl st | Slip stitch |
| sc | Single crochet |
| hdc | Half double crochet |
| dc | Double crochet |
| FPdc | Front-post double crochet |
| BPdc | Back-post double crochet |
| st / sts | Stitch / stitches |
| sp | Space |
| rep | Repeat |
| RS | Right side |
| WS | Wrong side |
Special Stitches Explained
The basketweave effect is created by working around the vertical posts of stitches rather than through their ordinary top loops.
Front-Post Double Crochet (FPdc)
A front-post double crochet creates a raised stitch on the side facing you.
- Yarn over.
- Insert your hook from front to back beside the post of the indicated stitch.
- Bring your hook back to the front on the other side of the same post.
- Yarn over and pull up a loop around the post.
- Yarn over and pull through 2 loops.
- Yarn over and pull through the remaining 2 loops.
You have completed one FPdc.
Back-Post Double Crochet (BPdc)
A back-post double crochet pushes the stitch away from the side facing you.
- Yarn over.
- Insert your hook from back to front beside the post of the indicated stitch.
- Bring the hook back behind the fabric on the other side of the post.
- Yarn over and pull up a loop around the post.
- Yarn over and pull through 2 loops.
- Yarn over and pull through the remaining 2 loops.
You have completed one BPdc.
Why These Stitches Create Basketweave Texture
When groups of front-post stitches sit beside groups of back-post stitches, they create alternating raised and recessed sections.
Changing the arrangement after two rows produces a checkerboard-like woven appearance.
As the blanket grows, these groups form small rectangles that resemble strands woven over and under each other.
Important Pattern Notes
Before beginning, keep these instructions in mind.
- The blanket is crocheted flat in rows, turning after every row.
- Beginning chains do not count as stitches.
- The first and last stitches of the basketweave rows are half double crochet.
- Every row contains 122 stitches.
- The basketweave section contains 120 post stitches, arranged in groups of four.
- The pattern has a four-row repeat.
- FPdc and BPdc are worked around the posts of the stitches below, not through their top loops.
- Keep your edges straight by counting the first and last stitches carefully.
- Do not fasten off after completing the blanket body if you’re ready to add the border.
Step-by-Step Instructions
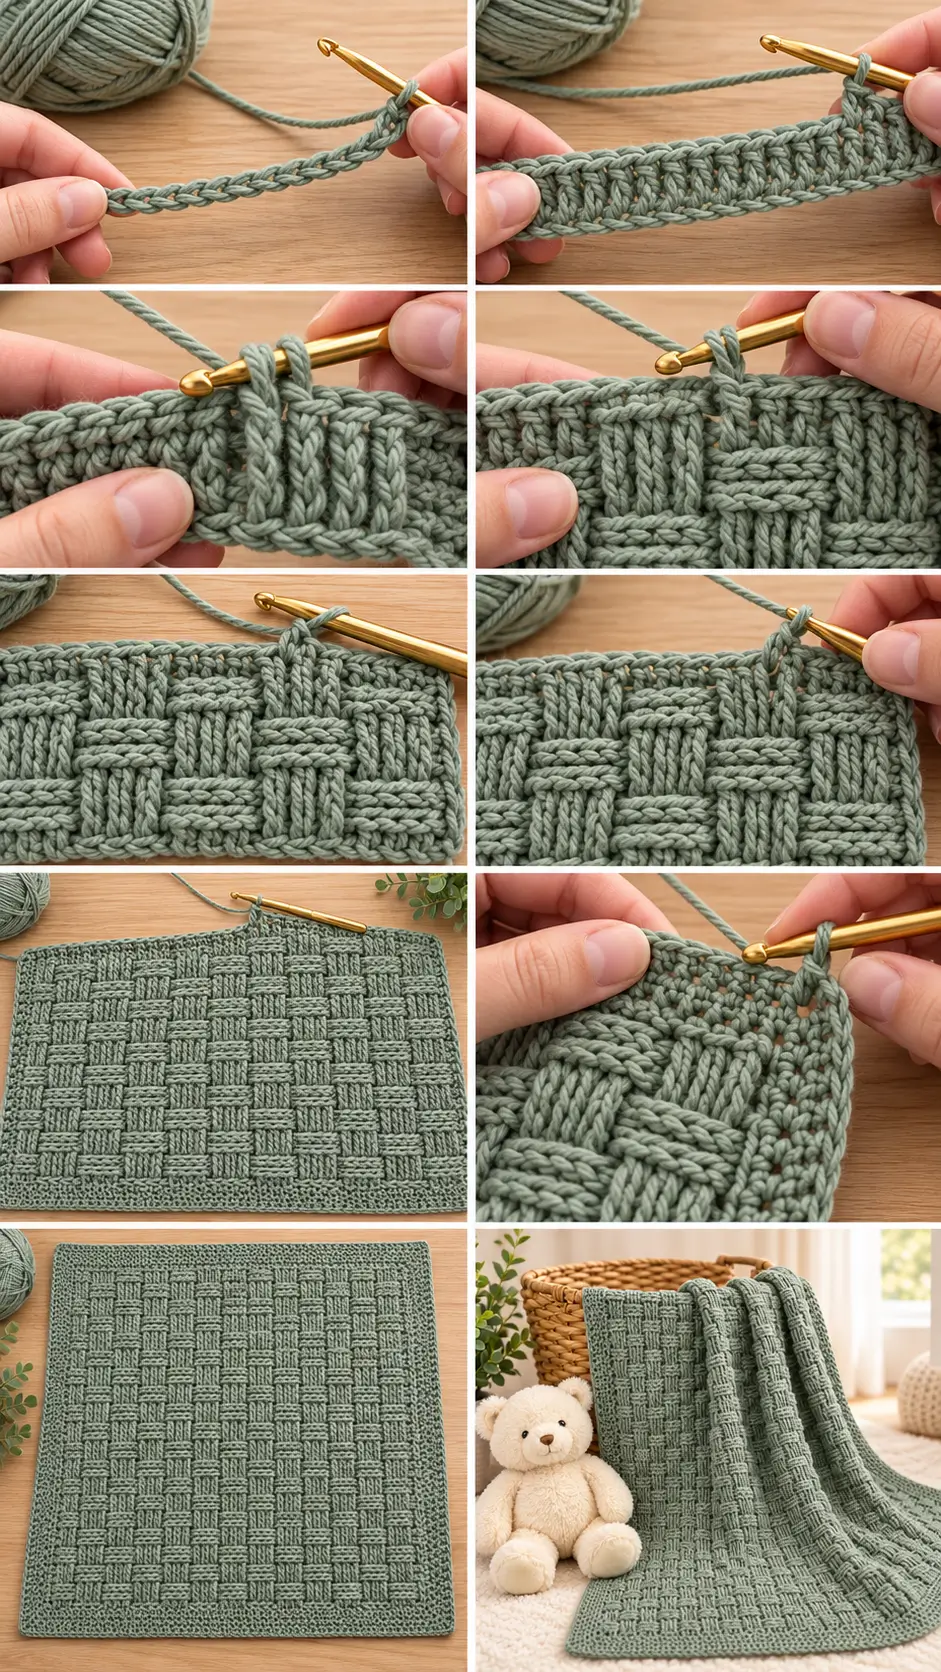
Part 1: Create the Foundation
Step 1 – Make the Starting Chain
Using your eucalyptus sage green yarn and 6.0 mm crochet hook:
Chain 124.
Make the foundation chain with even, relaxed tension.
Avoid pulling the chains too tightly, because this may cause the bottom edge of the blanket to draw inward.
If you tend to crochet tightly, consider using a slightly larger hook for the foundation chain before returning to the main 6.0 mm hook.
Step 2 – Crochet the Foundation Row
Row 1 (RS):
Work 1 double crochet into the third chain from the hook.
Continue working 1 dc in every remaining chain across.
Turn your work.
Stitch count: 122 dc.
The first two skipped chains do not count as a stitch.
This row creates the vertical posts that you will work around to form the basketweave texture.
Before continuing, count your stitches to confirm that you have exactly 122.
Part 2: Crochet the First Basketweave Blocks
Step 3 – Begin the Basketweave Pattern
Row 2 (WS):
Chain 1 and turn.
Work 1 hdc into the first stitch.
Now work the following sequence:
Work 1 FPdc around each of the next 4 stitches.
Work 1 BPdc around each of the following 4 stitches.
Repeat this eight-stitch sequence 15 times in total.
Work 1 hdc into the final stitch.
Stitch count: 122 stitches.
The breakdown is:
- 1 beginning hdc
- 60 FPdc
- 60 BPdc
- 1 ending hdc
The first raised and recessed sections should now be visible.
Step 4 – Complete the First Pair of Basketweave Rows
Row 3 (RS):
Chain 1 and turn.
Work 1 hdc into the first stitch.
Work FPdc around the next 4 stitches, then BPdc around the following 4 stitches.
Repeat this sequence 15 times.
Work 1 hdc into the final stitch.
Stitch count: 122 stitches.
Although the stitches alternate in the same written order as the previous row, turning your work changes which physical blocks you encounter first.
This helps maintain the same raised and recessed basketweave sections across the two rows.
At this point, the fabric should begin showing small rectangular blocks.
Part 3: Change the Direction of the Woven Texture
Step 5 – Reverse the Post Stitch Groups
Row 4 (WS):
Chain 1 and turn.
Work 1 hdc into the first stitch.
Now reverse the stitch arrangement:
Work BPdc around each of the next 4 stitches.
Work FPdc around each of the following 4 stitches.
Repeat this eight-stitch sequence 15 times.
Work 1 hdc into the last stitch.
Stitch count: 122 stitches.
Reversing the order changes the raised and recessed sections.
The groups that previously appeared raised will transition into the opposite texture, helping create the woven checkerboard appearance.
Step 6 – Complete the Second Pair of Rows
Row 5 (RS):
Chain 1 and turn.
Work 1 hdc into the first stitch.
Work BPdc around the next 4 stitches, followed by FPdc around the next 4 stitches.
Repeat this sequence 15 times.
Work 1 hdc into the final stitch.
Stitch count: 122 stitches.
You have now completed the first full basketweave pattern repeat.
Look closely at the fabric.
You should see alternating groups of raised stitches that resemble small woven blocks.
Part 4: Continue the Basketweave Pattern
Step 7 – Repeat Rows 2–5
Continue working the four-row sequence:
Row A: 4 FPdc, 4 BPdc, repeated across the center.
Row B: 4 FPdc, 4 BPdc, repeated across the center.
Row C: 4 BPdc, 4 FPdc, repeated across the center.
Row D: 4 BPdc, 4 FPdc, repeated across the center.
Every row begins and ends with one hdc.
Repeat these four rows until the blanket body reaches approximately 32–33 inches in length, or your preferred measurement.
A useful target is approximately 89 total rows, including the foundation row, but your actual row count should be determined by your measured gauge.
For a balanced finish, stop after completing a Row D repeat, corresponding to Row 5.
Do not fasten off.
How to Check the Pattern
Every completed row should contain 122 stitches.
The 120 center stitches are organized into groups of four.
If the pattern begins shifting unexpectedly, inspect the posts carefully.
You may have accidentally worked around the same post twice or skipped a post.
Correcting the problem early is much easier than discovering it several rows later.
Part 5: Measure and Check the Blanket
Step 8 – Check the Shape
Place your blanket on a clean, flat surface.
Measure its width and length.
For a square baby blanket, aim to make the textured body approximately equal in width and height.
The moss-stitch border will add additional width and length.
If the body is slightly rectangular, you can add or remove complete four-row repeats until you’re happy with the proportions.
Avoid stretching the blanket excessively while measuring.
Check the Texture
The finished basketweave fabric should have:
- Repeating raised and recessed rectangles
- Even vertical stitch groups
- Consistent horizontal texture transitions
- Straight side edges
- A flexible but substantial feel
The woven pattern should be visible on both sides, although the direction of the relief may differ slightly.
Part 6: Add the Moss-Stitch Crochet Border
A subtle moss-stitch border provides a lovely finishing touch.
Moss stitch uses single crochet stitches and chain spaces to create a light, flexible edging.
For the cleanest finish, the border should lie flat without pulling inward or forming ruffles.
You can use the same eucalyptus sage yarn to create a continuous, elegant look.
Step 9 – Prepare for the Border
After your final basketweave row, keep your working yarn attached.
Switch to the 6.5 mm hook if your edge stitches tend to be tight.
Keep the right side of the blanket facing you.
Do not turn.
Border Round 1 – Single Crochet Foundation
Chain 1.
At the upper-right corner, work:
(1 sc, ch 2, 1 sc) into the final stitch of the blanket body.
Work down the right side, placing single crochet stitches evenly into the ends of the rows.
A useful starting approach is to alternate two single crochets into one row end and one single crochet into the next row end.
This gives approximately three border stitches for every two rows.
Adjust the spacing if necessary to keep the edge flat.
At the lower-right corner, work:
(1 sc, ch 2, 1 sc) into the corner of the foundation row.
Work single crochet evenly across the bottom foundation edge.
At the lower-left corner, work another:
(1 sc, ch 2, 1 sc).
Continue working single crochet evenly up the left side, matching the stitch distribution used on the opposite edge.
At the upper-left corner, work:
(1 sc, ch 2, 1 sc).
Finally, work single crochet across the top edge, placing one sc into each available stitch between the corners.
Join with a slip stitch into the first single crochet.
You now have four clearly defined corner chain spaces.
Border Round 2 – Begin the Moss Stitch
Slip stitch into the nearest corner chain-2 space.
Work:
(1 sc, ch 2, 1 sc) into the corner space.
Across the next side, repeat:
Chain 1, skip the next stitch, work 1 sc into the following stitch.
Continue toward the next corner.
If the remaining stitch count does not fit the repeat perfectly, adjust the final skipped stitch so the border remains evenly spaced.
Chain 1 before the corner.
Work (1 sc, ch 2, 1 sc) into the next corner chain space.
Repeat this process around all four sides.
Join to the first single crochet with a slip stitch.
The alternating chains and single crochet stitches begin creating the moss-stitch texture.
Border Round 3 – Continue the Moss Stitch
Slip stitch into the nearest corner chain-2 space.
Work:
(1 sc, ch 2, 1 sc) into the corner.
Chain 1.
Work 1 sc into the next chain-1 space along the side.
Continue repeating:
Chain 1, work 1 sc into the next chain-1 space.
At the next corner, chain 1 and work:
(1 sc, ch 2, 1 sc) into the corner space.
Continue around all four sides.
Join with a slip stitch.
Your border should now show a subtle, evenly spaced textured appearance.
Border Round 4 – Final Moss-Stitch Round
Repeat Border Round 3, working single crochet into the chain spaces and maintaining the chain-2 corners.
Join neatly with a slip stitch.
Check the border carefully.
If you want a wider border, repeat the same moss-stitch round one or two additional times, maintaining consistent corner spacing.
When you’re satisfied with the width, fasten off.
Border Tips
- Work loosely so the border does not pull the blanket inward.
- Keep the corner chain spaces open and evenly shaped.
- If the border curls, you may need a larger hook or more evenly distributed stitches.
- If the edges ruffle, you may have placed too many stitches along the sides.
- Lay the blanket flat between rounds to check its shape.
Part 7: Finish the Basketweave Blanket
Step 10 – Fasten Off
Cut the yarn, leaving approximately 6–8 inches.
Pull the tail through the final loop to secure it.
Thread the yarn tail onto a yarn needle.
Weave it through several nearby stitches along the wrong side of the border.
Change direction at least once to help secure the end.
Trim the remaining excess yarn.
Repeat for the starting yarn tail and any additional yarn ends.
Step 11 – Wash and Shape
Check the washing instructions on your yarn label.
If suitable for your yarn, gently wash the finished blanket to help the stitches relax.
Lay it flat to dry or follow the manufacturer’s recommended drying method.
Gently arrange the edges and corners so the blanket dries into a neat square.
Avoid aggressively stretching the fabric, particularly around the raised basketweave blocks.
Once dry, your beautiful sage green basketweave crochet blanket is ready.
How to Change the Basketweave Blanket Size
The woven pattern is easy to customize once you understand its stitch multiple.
The main body uses:
A multiple of 8 stitches, plus 2 edge stitches.
Because Row 1 begins in the third foundation chain, add two additional chains to your desired row stitch count.
The foundation chain formula is therefore:
Multiple of 8 + 4 chains.
Suggested Starting Chains
| Starting chains | Stitches per row | Woven groups |
|---|---|---|
| 92 | 90 | 11 |
| 108 | 106 | 13 |
| 124 | 122 | 15 |
| 140 | 138 | 17 |
| 156 | 154 | 19 |
Each woven group contains eight stitches.
Smaller foundation chains produce narrower blankets, while longer foundations create wider projects.
For the height, simply continue the four-row basketweave repeat until you reach the desired length.
Always measure your gauge before making a large size adjustment.
Making a Baby Blanket
A blanket approximately 35 inches square makes a practical size for supervised cuddling, stroller use, and gifting.
Choose soft, washable yarn and avoid attaching buttons, beads, or other small decorations.
For infant safety, keep loose blankets out of cribs and other unattended infant sleep spaces.
Making a Larger Throw Blanket
For a cozy living room throw, begin with a wider foundation chain that follows the same multiple.
Continue the basketweave pattern until the blanket reaches your preferred length.
A larger blanket will require substantially more yarn.
Weigh your swatch and calculate your expected yarn needs before purchasing supplies.
Why Basketweave Crochet Looks So Beautiful
The basketweave crochet stitch creates texture using the positions of stitches rather than different yarn colors.
Front-post double crochet stitches rise toward the crocheter, while back-post double crochet stitches recede.
When these stitches alternate in groups, the fabric begins to look woven.
Changing the arrangement after two rows adds the illusion of horizontal and vertical strips crossing each other.
The result is a distinctive three-dimensional pattern.
In a solid color such as muted sage green, the texture is especially noticeable because shadows naturally form between the raised and recessed blocks.
This makes basketweave an excellent choice for a single-color blanket.
Tips for Making a Beautiful Basketweave Blanket
Keep Your Post Stitches Even
Work around the posts consistently rather than pulling the loops too tightly.
Uneven post stitches can create raised blocks of different heights.
Try to maintain a relaxed rhythm as you work each group of four.
Count Every Row
It’s easy to lose track of a stitch when working around the posts.
Every completed row must contain 122 stitches for this version.
Use stitch markers at the edges if necessary.
Check the Stitch Direction
Pay close attention to whether the current row calls for front-post or back-post stitches.
The woven design depends on alternating the direction of the groups at the correct point.
Avoid Pulling the Foundation Chain Tight
A foundation chain that’s too tight can make the starting edge shorter than the rest of the blanket.
Use a comfortable tension or a slightly larger hook for the foundation.
Choose Yarn That Shows Texture
Very fluffy or fuzzy yarn can hide the raised basketweave blocks.
Smooth yarn with good stitch definition is usually the best choice for this design.
Take Breaks While Crocheting
Post stitches can require more hand movement than ordinary double crochet stitches.
Take occasional breaks and maintain a comfortable grip to avoid unnecessary strain.
Common Basketweave Crochet Problems and Solutions
Why Isn’t My Basketweave Pattern Visible?
You may be inserting your hook through the top loops instead of working around the posts.
Make sure your front-post and back-post double crochet stitches are correctly positioned.
Why Are the Blocks Uneven?
Check that each group contains exactly four post stitches.
A missed or extra stitch can shift the woven pattern.
Why Is My Blanket Curling?
Tight tension, an undersized hook, or a tight foundation chain may cause curling.
Try making a swatch with a slightly larger hook.
Why Is My Blanket Becoming Narrower?
You may be skipping the last edge stitch.
Make sure each row begins and ends with one half double crochet.
Why Is My Border Ruffling?
Too many stitches along the blanket sides may cause the edging to ripple.
Reduce the number of side stitches or adjust your hook size.
Why Is the Blanket Stiff?
Basketweave produces a dense texture.
If the fabric feels excessively rigid, try a larger hook or a softer, more flexible yarn.
Frequently Asked Questions
Is Basketweave Crochet Difficult?
The basketweave stitch is manageable for crocheters who already understand basic double crochet.
The main new skills are front-post and back-post double crochet.
Once you’ve practiced the repeat, the stitch arrangement becomes much easier to remember.
Is This Pattern Suitable for Beginners?
It’s best for adventurous beginners or intermediate crocheters.
If you’re completely new to crochet, practice FPdc and BPdc on a small swatch before beginning the full blanket.
How Much Yarn Do I Need?
For the suggested baby blanket, approximately 1,700–2,000 yards of light-weight yarn is a planning estimate.
Actual yarn usage will depend on your gauge, yarn construction, finished dimensions, and border width.
Can I Use Worsted-Weight Yarn?
Yes, but the finished fabric will generally be heavier and thicker.
Use a suitable larger hook and crochet a sample before beginning the full blanket.
You may also need fewer foundation chains to achieve the same width.
Can I Make This Blanket in One Color?
Absolutely.
A solid color works beautifully because the basketweave texture becomes the main visual feature.
Muted eucalyptus sage green is especially attractive, but cream, oatmeal, dusty rose, and warm beige are lovely alternatives.
Is Basketweave Crochet Reversible?
Basketweave fabric has textured blocks on both sides.
The raised and recessed areas may appear slightly different when viewed from the opposite side, but both surfaces are decorative.
Can I Make a Matching Basketweave Pillow?
Yes.
The same stitch pattern works well for square pillow panels.
Crochet two pieces to your desired dimensions, then join them around a suitable removable pillow insert.
What Is the Best Border for a Basketweave Blanket?
A moss-stitch border works well because its small stitches contrast with the thicker woven texture.
You could also use a simple single crochet border for a more minimal finish.
Should I Block the Blanket?
Blocking is optional and depends on the yarn.
A gentle wash and reshaping may be sufficient.
Always follow your yarn’s care instructions before using water, steam, or heat.
More Cozy Crochet Projects to Try
If you love the woven texture of this basketweave blanket, consider exploring other projects that use raised crochet stitches.
Basketweave crochet scarves, textured pillow covers, chunky winter throws, and matching nursery accessories all look beautiful with this stitch.
You can also experiment with other textured crochet techniques, such as waffle stitch, alpine stitch, or raised post-stitch patterns.
Each creates a different three-dimensional effect while using familiar crochet techniques.
A matching sage green textured pillow or smaller stroller blanket could also make a lovely coordinating handmade gift.
Final Thoughts
This beautiful basketweave crochet baby blanket is a wonderful combination of rich texture, cozy comfort, and timeless handmade style.
The alternating front-post and back-post stitches create a woven appearance that looks detailed without requiring complicated construction.
The soft eucalyptus sage green yarn gives the finished blanket a calm, elegant look, while the simple moss-stitch border provides a neat finishing touch.
Whether you’re making a baby shower gift, a nursery keepsake, or a cozy blanket for your home, this pattern offers plenty of opportunities to customize the size and color.
Once you learn the four-row basketweave repeat, the project becomes a relaxing way to create something beautiful, one textured row at a time.
Choose a soft sage green yarn, grab your crochet hook, and enjoy creating a gorgeous basketweave blanket filled with handmade texture and warmth!