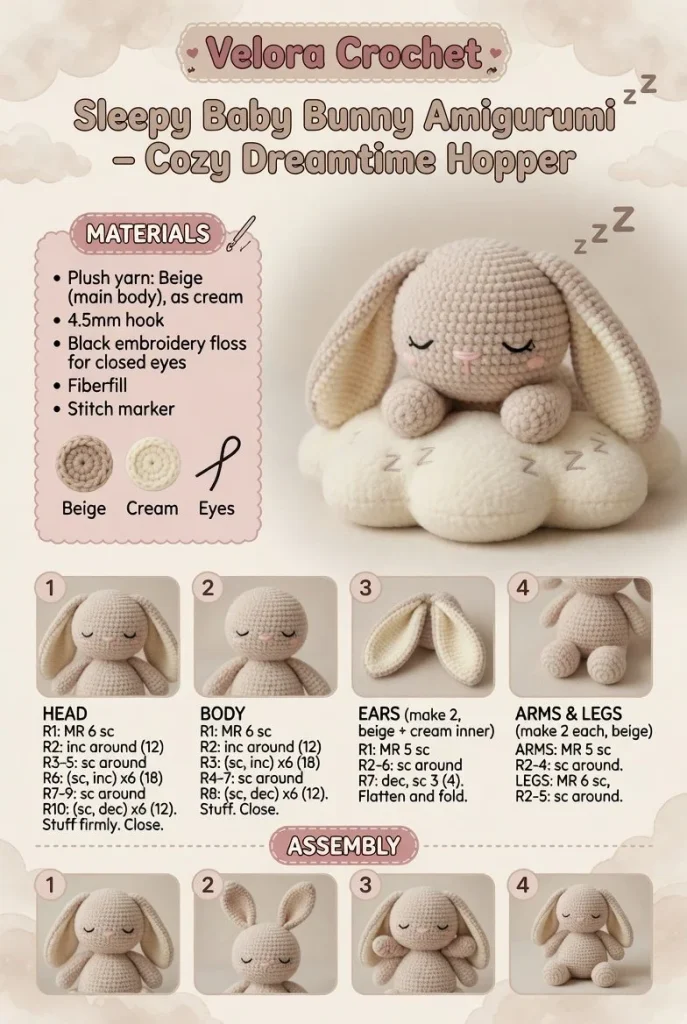
Creating an adorable amigurumi creation can be a rewarding experience, and making the Sleepy Baby Bunny is a perfect project for both beginners and seasoned crocheters. This cozy little hopper is not only cute but also a lovely addition to any nursery or playroom. Let’s dive into the crochet pattern that will guide you through crafting your very own Sleepy Baby Bunny.
Materials
- Worsted weight yarn in soft colors (white, beige, and pink)
- 3.5 mm (E) crochet hook
- Polyester filling
- Yarn needle
- Stitch marker
- Scissors
- Safety eyes or black yarn for eye embroidery
Abbreviations
- ch = chain
- sc = single crochet
- dc = double crochet
- inc = increase (2 sc in the same st)
- dec = decrease (sc 2 together)
- sl st = slip stitch
- R = round
Pattern Instructions
Head
- Begin with a magic ring.
- R1: 6 sc in the magic ring (6)
- R2: inc in each st around (12)
- R3: sc in next st, inc repeat around (18)
- R4-8: sc in each st around (18)
- R9: sc in next st, dec repeat around (12)
- Start stuffing the head gently.
- R10: dec around (6)
- Finish off, leaving a long tail for sewing.
Body
- Start with a magic ring.
- R1: 6 sc in the magic ring (6)
- R2: inc in each st around (12)
- R3: sc in next st, inc repeat around (18)
- R4-10: sc in each st around (18)
- R11: sc in next st, dec repeat around (12)
- Stuff the body lightly.
- R12: dec around (6)
- Finish off, leaving a long tail.
Arms
(make 2)
- Start with a magic ring.
- R1: 6 sc in the magic ring (6)
- R2-5: sc in each st around (6)
- Finish off, leaving a long tail for sewing. Lightly stuff if desired.
Legs
(make 2)
- Start with a magic ring.
- R1: 6 sc in the magic ring (6)
- R2: inc in each st around (12)
- R3-6: sc in each st around (12)
- Finish off, leaving a long tail for sewing. Lightly stuff if desired.
Ears / Details
(make 2)
- Ch 14, sk 1 ch, sc in next ch (12)
- R2: sc in each ch across (12)
- R3: dec, sc in next 10, dec (10)
- R4: dec, sc in next 8, dec (8)
- R5: dec, sc in next 6, dec (6)
- Fold ear in half and sc along the edge to close it.
Accessories (if any)
You may stitch a tiny bow around the neck using a contrasting color of yarn for added charm.
Assembly & Finishing
- Sew the head to the body using the tail you left.
- Attach arms to the sides, and sew legs to the base.
- Position the ears on top of the head; secure them with stitches.
- If using safety eyes, attach them now. If embroidering, use black yarn to create the eyes.
- Embroider a small nose and mouth to give the bunny personality.
Tips for Best Results
- Maintain consistent tension for a smooth finish.
- Use a stitch marker to keep track of your rounds.
- Lightly stuff your pieces to achieve a cuddly look without overstuffing.
- Experiment with yarn colors to customize your bunny’s appearance.
- Practice basic crochet stitches to gain confidence before starting.
Conclusion
Crafting the Sleepy Baby Bunny amigurumi pattern is an enjoyable way to enhance your crochet skills, especially for beginners. This delightful bunny can bring joy to both the maker and any little ones who become enchanted by its charm. Grab your materials and start stitching; your cozy Dreamtime Hopper awaits!



