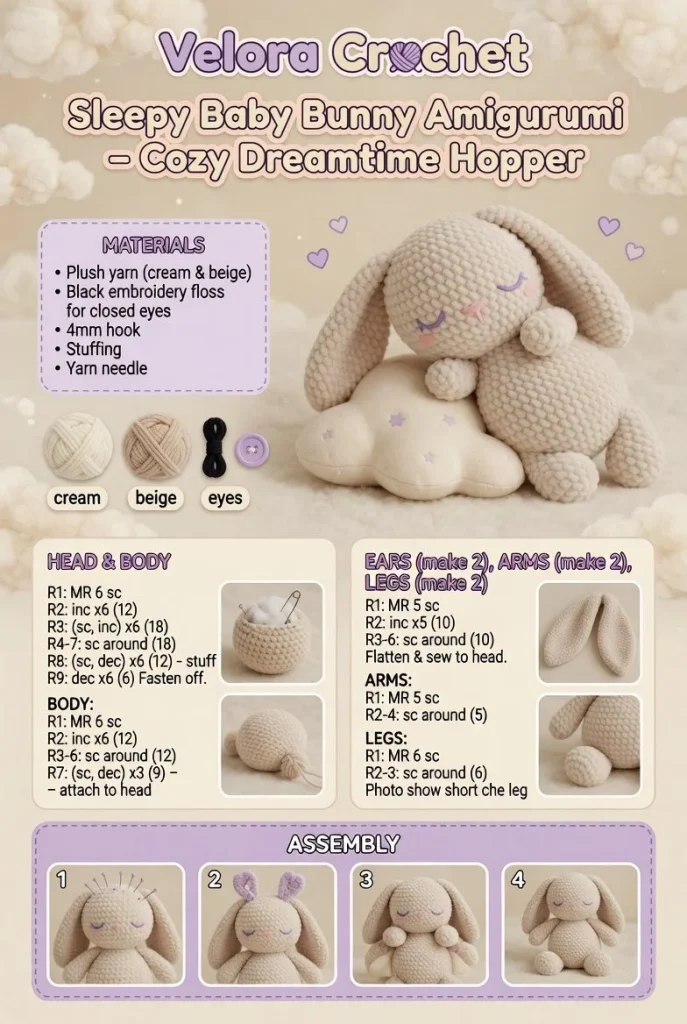
Creating your very own Sleepy Baby Bunny Amigurumi is a delightful project that will charm anyone who sees it. This cozy dreamtime hopper is perfect for all skill levels, particularly beginners looking to hone their crochet techniques. Follow this easy-to-understand crochet pattern to make a charming mini crochet bunny that’s ideal for cuddles or as a lovely gift.
Materials
- Yarn: Soft worsted weight yarn in three colors (body, ears, and accents)
- Hook: Size G (4.0 mm) crochet hook
- Safety eyes: 8 mm (or you can use yarn to embroider eyes)
- Fiberfill stuffing
- Tapestry needle for sewing and weaving ends
- Scissors
- Stitch marker (optional)
Abbreviations
- ch: chain
- sc: single crochet
- inc: increase (2 sc in one stitch)
- dec: decrease (single crochet two together)
- sl st: slip stitch
- st: stitch
Pattern Instructions
Head
- Begin with a magic ring.
- Round 1: 6 sc in the magic ring (6).
- Round 2: inc in each stitch around (12).
- Round 3: sc in next st, inc in next st repeat around (18).
- Round 4-6: sc in each st around (18).
- Round 7: sc in next st, dec in next st repeat around (12).
- Round 8: dec around (6).
- Stuff the head firmly and close it with a sl st.
Body
- Start with a magic ring.
- Round 1: 6 sc in the magic ring (6).
- Round 2: inc in each stitch around (12).
- Round 3: sc in next st, inc in next st repeat around (18).
- Round 4-7: sc in each st around (18).
- Round 8: sc in next st, dec in next st repeat around (12).
- Round 9: dec around (6).
- Stuff the body and use a sl st to close.
Arms
- Begin with a magic ring.
- Round 1: 6 sc in the magic ring (6).
- Round 2: inc in each stitch around (12).
- Round 3-5: sc in each st around (12).
- Round 6: dec around (6).
- Leave a long tail for sewing and stuff lightly.
Legs
- Start with a magic ring.
- Round 1: 6 sc in the magic ring (6).
- Round 2: inc in each stitch around (12).
- Round 3-6: sc in each st around (12).
- Round 7: dec around (6).
- Leave a long tail and stuff lightly.
Ears / Details
- Begin with a magic ring.
- Round 1: 6 sc in the magic ring (6).
- Round 2: inc in each stitch around (12).
- Round 3: sc in next st, inc in next st repeat around (18).
- Round 4: sc in each st around (18).
- Round 5: sc in next st, dec in next st repeat around (12).
- Finish off, leaving a long tail for attaching the ears.
Assembly & Finishing
- Sew the arms to the sides of the body.
- Attach the legs to the bottom of the body.
- Position the head on top of the body and secure it with stitches.
- Sew on the ears at the top of the head.
- If using safety eyes, attach them securely; if embroidering, stitch the eyes with yarn.
Tips for Best Results
- Using a stitch marker can help keep track of your rounds more easily.
- Check your tension throughout the project to ensure uniformity.
- Don’t hesitate to adjust your stuffing to achieve your desired firmness.
- Take breaks, especially if you’re new to crocheting, to avoid fatigue.
- Experiment with different yarn colors to personalize your bunny.
Conclusion
Crafting a Sleepy Baby Bunny Amigurumi can be a rewarding experience, allowing you to create a lovely, handmade item that’s perfect for gifts or cozy decor. Whether you’re a seasoned crocheter or just starting your journey into the world of amigurumi, this crochet pattern will help you develop your skills and enjoy the process. Happy crocheting!



