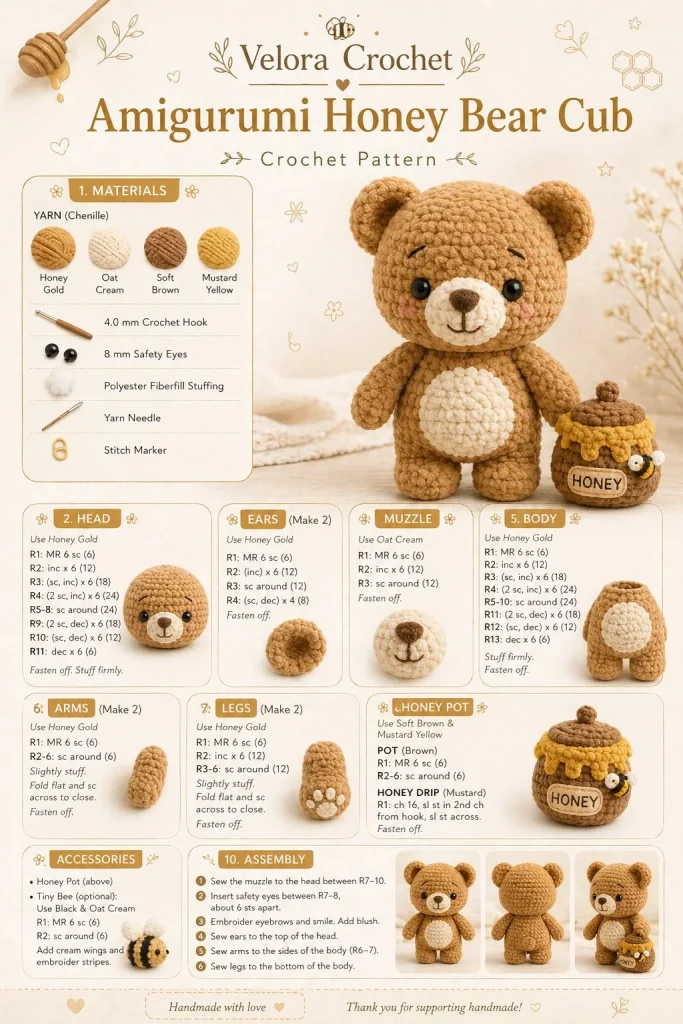
When it comes to crafting adorable gifts that bring a smile, creating a cozy amigurumi honey bear cub is the perfect project! This design is not only delightful to look at but also a joy to make. Whether you’re a beginner or looking for a sweet item to sell at local markets, this simple standing teddy bear with a charming honey pot accessory is sure to become a favorite. Let’s dive into the cozy world of crochet with this easy crochet tutorial!
Materials
- Soft plush yarn in warm honey-gold (e.g., Bernat Blanket yarn)
- Cream yarn for the muzzle
- Black embroidery floss for the nose
- 3.5 mm (E) crochet hook (or size that matches your yarn tension)
- Fiberfill stuffing (for plushness)
- Yarn needle for sewing pieces together
- Scissors
Abbreviations
- ch: chain
- sc: single crochet
- inc: increase (2 sc in the same stitch)
- dec: decrease (single crochet two together)
- sl st: slip stitch
Pattern Instructions
Head
- Begin with the honey-gold yarn.
- Start with a magic ring. Round 1: 6 sc in the ring (6).
- Round 2: inc in each stitch around (12).
- Round 3: sc in next stitch, inc repeat around (18).
- Rounds 4-8: sc in each stitch (18).
- End with finishing off, leaving a long tail for sewing later.
Body
- Using the same honey-gold yarn, start with a magic ring.
- Round 1: 6 sc in the ring (6).
- Round 2: inc in each stitch around (12).
- Round 3: sc in next stitch, inc repeat around (18).
- Round 4: sc in next 2 stitches, inc repeat around (24).
- Rounds 5-9: sc in each stitch (24).
- Round 10: sc in next 2 stitches, dec repeat around (18).
- Stuff the body and finish off, leaving a long tail.
Arms
- Make two: with honey-gold yarn, start with a magic ring.
- Round 1: 6 sc in the ring (6).
- Rounds 2-4: sc in each stitch (6).
- Stuff lightly. Finish off, leaving a long tail for attaching.
Legs
- Make two: with honey-gold yarn, start with a magic ring.
- Round 1: 6 sc in the ring (6).
- Rounds 2-5: sc in each stitch (6).
- Stuff lightly. Finish off, leaving a long tail for attaching.
Ears / Details
- Make two: with honey-gold yarn, start with a magic ring.
- Round 1: 6 sc in the ring (6).
- Round 2: inc in each stitch around (12).
- Finish off, leaving a tail for sewing.
- Attach a cream muzzle: create a small oval of cream yarn, embroider a tiny black nose at the center, and attach below the head when assembling.
Accessories (Honey Pot)
- Use a small amount of honey-gold yarn and cream yarn.
- Start with a magic ring for the base: Round 1: 6 sc (6).
- Round 2: inc in each stitch (12).
- Round 3: sc in next stitch, inc (18).
- Switch to cream for the top. Round 4: sc in each stitch for several rounds (18).
- Finish off and stuff lightly. Optional: embroider small bees on the pot with black yarn.
Assembly & Finishing
- Sew the head onto the body securely.
- Attach arms and legs, placing them in a standing position.
- Position and sew on ears at the top of the head.
- Attach the cream muzzle below the head and sew on the tiny nose.
{image_template}
Tips for Best Results
- Keep your tension consistent throughout to ensure all pieces fit together nicely.
- For easier shaping, consider using stitch markers to keep track of your rounds.
- When stuffing, don’t overstuff—this helps maintain the soft, plush feel of your bear.
- If your stitches feel tight, try increasing the hook size one step to achieve the desired look.
- Take your time with assembly to ensure that all parts align correctly and your bear looks adorable.
Conclusion
Creating this charming honey bear cub amigurumi is sure to be a delightful experience. Whether you’re crafting for a child, a friend, or even as a booth item for local markets, this handmade toy will surely be a hit! Get creative with colors or add personal touches to customize your bear. Happy crocheting, and enjoy the cozy crafting journey!



