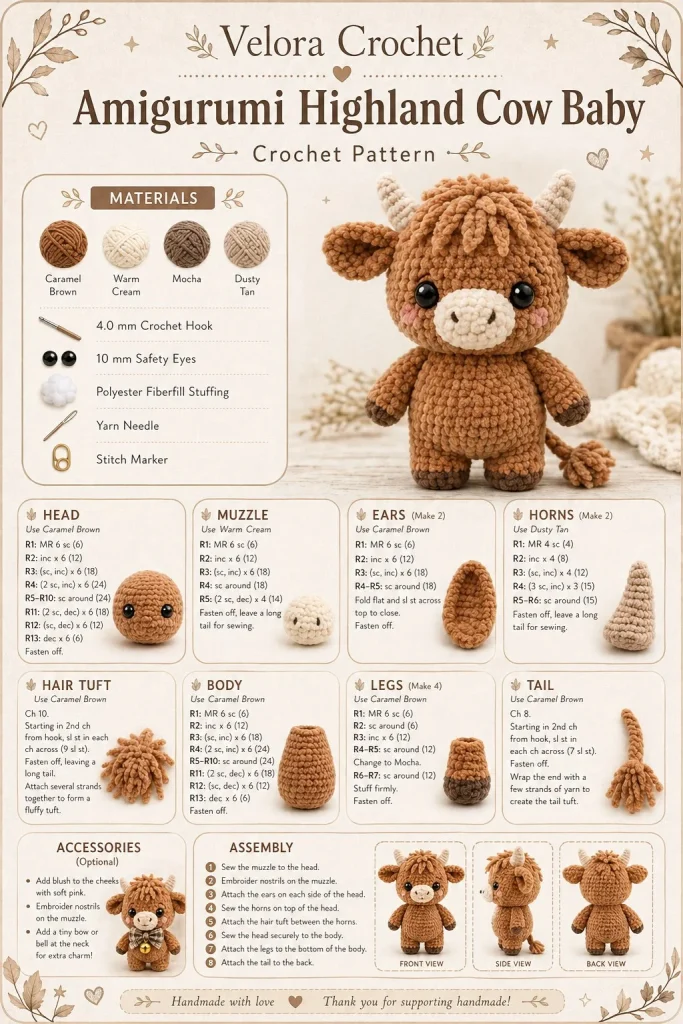
Creating a cute baby highland cow amigurumi is a delightful project that’s sure to bring joy whether you’re making it for a little one or adding it to your handmade toy collection. This plush-style design features a caramel-brown round body, a soft cream muzzle, petite curved horns, floppy ears, short legs, a tiny tail, and a sweet tuft of hair on its forehead. The result is a charming, chunky little cow that’s perfect for beginners and gives off all the warm farmhouse vibes!
Materials
- Yarn: Caramel-brown and cream worsted weight yarn (medium weight, like Red Heart Super Saver)
- Crochet Hook: 4.0 mm (G/6)
- Stuffing: Fiberfill or small soft pillow stuffing
- Safety Eyes: 12 mm (optional, for added cuteness)
- Yarn Needle: For sewing pieces together
- Stitch Markers: To keep track of your rounds
- Scissors
Abbreviations
- ch: chain
- sc: single crochet
- inc: increase (2 sc in same stitch)
- dec: decrease (sc2tog)
- sl st: slip stitch
- st(s): stitch(es)
Pattern Instructions
Head
- With caramel-brown yarn, make a magic ring.
- Round 1: 6 sc in magic ring (6).
- Round 2: inc in each st around (12).
- Round 3: sc in next st, inc in next st around (18).
- Rounds 4-7: sc in each st around (18).
- Round 8: sc in next 2 st, dec around (12).
- Round 9: dec around (6).
- Fasten off and leave a long tail for sewing.
Body
- With caramel-brown yarn, create a magic ring.
- Round 1: 6 sc in magic ring (6).
- Round 2: inc in each st around (12).
- Round 3: sc in next st, inc in next st around (18).
- Rounds 4-9: sc in each st around (18).
- Round 10: sc in next 2 st, dec around (12).
- Round 11: dec around (6).
- Fasten off and leave a long tail for sewing.
Arms
- With caramel-brown yarn, make a magic ring.
- Round 1: 6 sc in magic ring (6).
- Round 2: inc in each st around (12).
- Rounds 3-4: sc in each st around (12).
- Round 5: dec around (6).
- Fasten off and leave a long tail. Make two arms.
Legs
- Repeat the same steps as for the arms to create four legs.
- You may want to slightly elongate them by adding one additional round of sc if you prefer longer legs.
Ears / Details
- With caramel-brown yarn, ch 7.
- Row 1: sc in 2nd ch from hook and in next 5 (6).
- Row 2: ch 1, turn, sc in each st (6).
- Row 3: dec, sc in next 4 (5).
- Row 4: ch 1, turn, sc in each st (5).
- Fasten off and leave a long tail. Make two ears.
- For the muzzle: Using cream yarn, create a larger round by following the body instructions but stop at Rounds 4-5.
Accessories (if any)
- For the horns, use cream yarn, make a ch of 4, and sc back down (3). Fasten off.
Assembly & Finishing
- Attach the head to the body using the long tails.
- Position the arms on each side of the body and secure.
- Sew on the legs at the bottom, ensuring they are placed evenly.
- Attach the ears on the top and adjust their positions for that floppy look.
- Secure the small horns just above the ears.
- Position the muzzle slightly lower on the face and sew it on.
- Add safety eyes or embroider eye features with black yarn for added charm.
{image_template}
Tips for Best Results
- Maintain even tension: If your stitches feel tight, try using a larger hook to keep the plush look intact.
- Use a small amount of stuffing: For the limbs, keeping them a bit floppy will enhance that cuddly feel.
- Stitch markers are your best friend: Use them to keep track of your rounds while crocheting, especially when working on the body.
- Don’t skip the shaping: After sewing the parts together, gently shape the body to achieve that cute chunky look.
- Don’t rush with placement: Take your time positioning the ears and horns; it makes a significant difference in the overall cuteness.
Conclusion
This adorable baby highland cow amigurumi is not only a fun project to crochet, but it’s also a perfect gift idea for a baby shower or a charming decoration for your home. Add your personal touch or even try different color palettes for a unique twist. Enjoy your crafting time, and happy crocheting!



