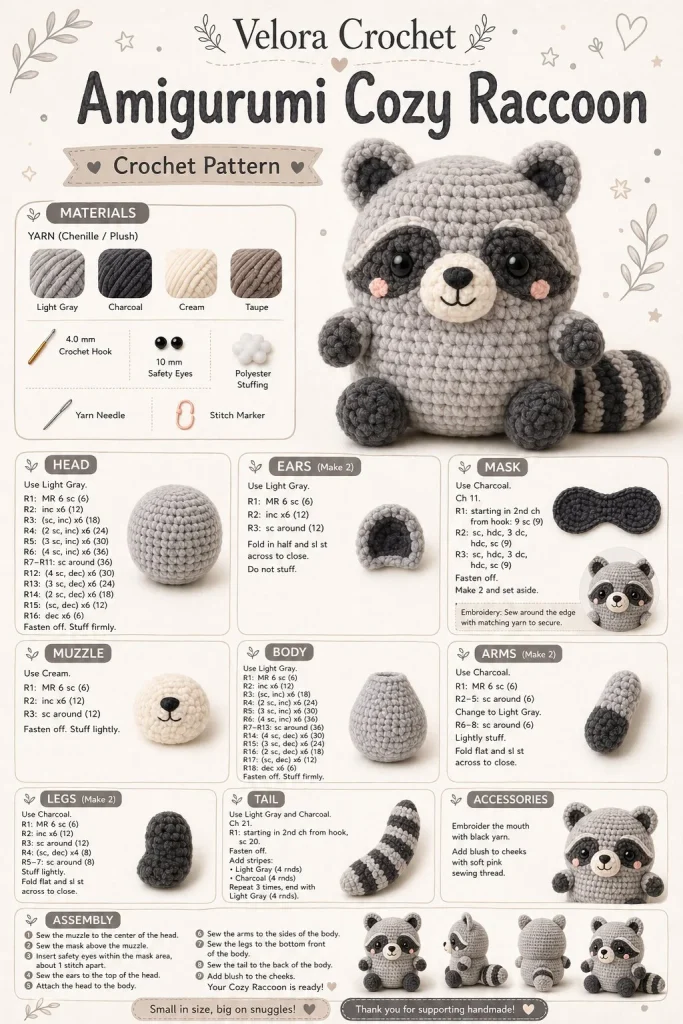
I love sharing cozy crochet patterns, and today I have a delightful amigurumi project for you—a charming raccoon made from soft, plush gray yarn. This little fellow is not only adorable but also a beginner-friendly project, perfect for making heartfelt gifts or adding a woodland touch to your décor. With a simple design featuring a rounded shape and playful details like a striped tail and embroidered mask, this raccoon is bound to bring joy to anyone who receives it.
Materials
- Soft gray plush yarn (e.g., Bernat Blanket or equivalent)
- Cream-colored yarn for the muzzle
- Black yarn for the mask and nose
- 3.5 mm crochet hook (or hook size suitable for your yarn)
- Safety eyes (optional, or you can embroider them)
- Polyester fiberfill stuffing
- Yarn needle
- Stitch marker (helpful for keeping track of rounds)
Abbreviations
- ch: chain
- sc: single crochet
- sl st: slip stitch
- inc: increase
- dec: decrease
- st: stitch
Pattern Instructions
Head
- Start with a magic ring and work 6 sc into it.
- Increase in each st around (12)
- Sc in the next st, inc in the next around (18)
- Sc in the next 2 st, inc in the next around (24)
- Sc in the next 3 st, inc in the next around (30)
- Sc in each st for 3 rounds.
- Sc in the next 3 st, dec in the next around (24)
- Sc in the next 2 st, dec in the next around (18)
- Begin inserting safety eyes if using, and stuff the head lightly.
- Sc in the next st, dec in the next around (12)
- Dec around (6) and fasten off, leaving a long tail for sewing.
Body
- Start with a magic ring and work 6 sc into it.
- Inc in each st around (12)
- Sc in the next st, inc in the next around (18)
- Sc in the next 2 st, inc in the next around (24)
- Sc in the next 3 st, inc in the next around (30)
- Sc in each st for 4 rounds.
- Begin to stuff the body.
- Sc in the next 3 st, dec in the next around (24)
- Sc in the next 2 st, dec in the next around (18)
- Sc in the next st, dec in the next around (12)
- Dec around (6), and fasten off leaving a long tail for sewing.
Arms
- Start with a magic ring and work 6 sc into it.
- Inc in each st around (12)
- Sc in each st for 4 rounds.
- Stuff lightly and fasten off, leaving a long tail for sewing.
Legs
- Similar to arms.
- Start with a magic ring and work 6 sc into it.
- Inc in each st around (12)
- Sc in each st for 5 rounds.
- Stuff lightly, then fasten off leaving a long tail for sewing.
Ears / Details
- Start with a magic ring and work 6 sc into it.
- Inc in each st around (12)
- Sc in each st for 2 rounds.
- Fold in half and sl st across the top to close. Fasten off, leaving a long tail for sewing.
Striped Tail
- Start with a chain of 15.
- Sc in the second ch from the hook and across (14)
- Ch 1, turn and sc in each st for 5 more rows, changing colors every two rows to create stripes.
- Stuff lightly and fasten off, leaving a long tail for sewing.
Mask Embroidery
- Using black yarn, stitch a mask shape over the eyes, outlining the area where the eyes are (this gives that classic raccoon look).
- Use simple back stitch or whip stitch for a secure look.
Nose
- Using black yarn, create a small oval shape and attach it to the muzzle area with a few stitches.
Assembly & Finishing
- Attach the head to the body using the long tail.
- Sew the arms and legs onto the body, positioning them as desired.
- Attach the ears on top of the head.
- Position the tail on the back of the body.
- Weave in all ends and give your raccoon a gentle squeeze to shape it.
{image_template}
Tips for Best Results
- Make sure to keep your tension consistent throughout the project. This will help maintain a uniform look and ensure the stuffing holds well.
- When stuffing, take care not to overstuff your raccoon; a gently stuffed amigurumi looks soft and huggable.
- Utilize stitch markers to help you keep track of your rows and round beginnings. They can be especially handy in projects where you need to count stitches often.
- For a neat finish, gently shape the head and body as you go, so that it remains rounded and fluffy.
- Experiment with different yarn colors to create your unique woodland creature!
Conclusion
I hope you find as much joy in making this cozy raccoon amigurumi as I did! It’s a perfect project for aspiring crocheters, a lovely handmade gift for someone special, or even a delightful addition to any craft market. Feel free to get creative with colors and embellishments—the options are endless! Happy crocheting!



