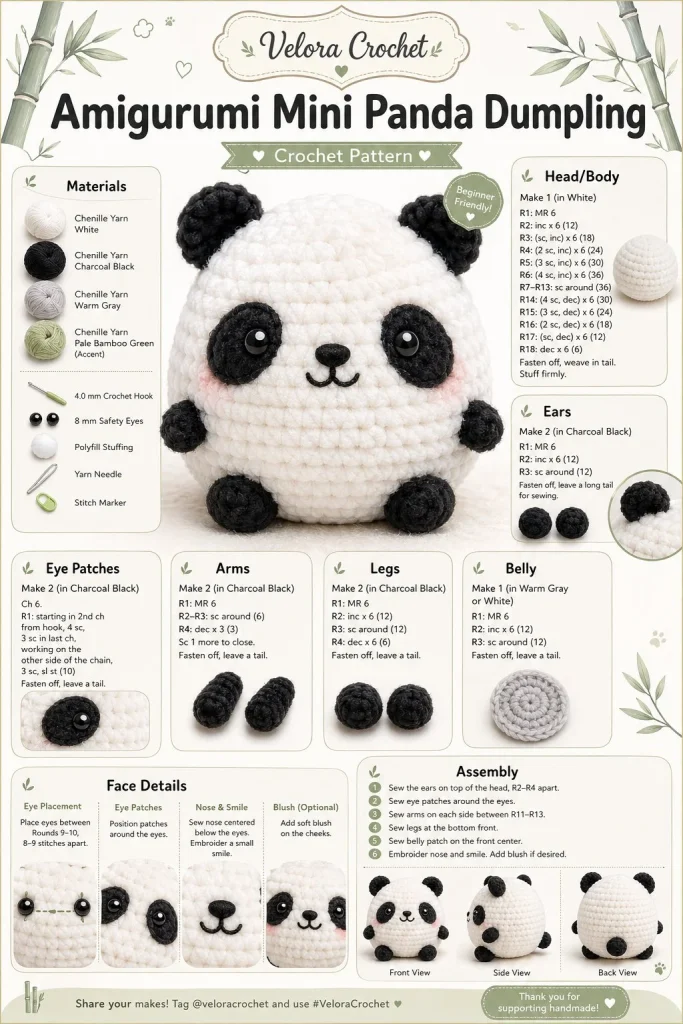
Creating a mini panda amigurumi is a delightful project perfect for beginners and crafting sweet handmade gifts. I find that these adorable little creatures have a charm all their own, and their dumpling-like rounded body makes them irresistibly cute. This pattern is a fantastic way to practice basic crochet skills while achieving something visually striking in the classic black-and-white contrast. Plus, their tiny proportions make them easy to photograph and share, which is always a bonus for fellow crocheters!
Materials
- Yarn:
- White plush yarn for the body
- Black yarn for the ears and eye patches
- Crochet hook: Size G6 (4.0 mm)
- Stitch marker (optional, but helpful for tracking rounds)
- Fiberfill stuffing
- Yarn needle for weaving in ends
- Scissors
Abbreviations
- CH: Chain
- SC: Single Crochet
- INC: Increase (2 SC in the same stitch)
- DEC: Decrease (Crochet 2 stitches together)
- RND: Round
Pattern Instructions
Head
- With white yarn, make a magic circle.
- Round 1: 6 SC in the magic circle. (6)
- Round 2: INC in each stitch around. (12)
- Round 3: SC in next stitch, INC; repeat around. (18)
- Rounds 4-7: SC in each stitch around. (18)
- Round 8: SC in next stitch, DEC; repeat around. (12)
Body
- Round 9: SC in each stitch around. (12)
- Round 10: SC in next stitch, INC; repeat around. (18)
- Round 11: SC in each stitch around. (18)
- Round 12: SC in next stitch, DEC; repeat around. (12)
- Round 13: DEC around until you have a small opening left. (6)
- Stuff firmly with fiberfill, then close the opening.
Arms
- With white yarn, make a magic circle.
- Round 1: 6 SC in the magic circle. (6)
- Rounds 2-4: SC in each stitch around. (6)
- Fasten off and leave a long tail for sewing.
Legs
- With white yarn, make a magic circle.
- Round 1: 6 SC in the magic circle. (6)
- Rounds 2-3: SC in each stitch around. (6)
- Fasten off and leave a long tail for sewing.
Ears / Details
- With black yarn, make a magic circle.
- Round 1: 5 SC in the magic circle. (5)
- Rounds 2: INC in each stitch. (10)
- Fasten off and leave a long tail for sewing.
- Repeat for the second ear.
Nose Embroidery
- Using black yarn, stitch a small oval shape for the nose on the front of the head.
- Feel free to adjust the size based on your preference!
Assembly & Finishing
- Attach the eyes by placing the black patches on the head and sewing them in place using the yarn needle.
- Position the ears at the top of the head and sew them on securely.
- Attach the arms and legs to the body.
- Finally, ensure all loose yarn ends are tucked in, giving your panda a neat finish.
{image_template}
Tips for Best Results
- Maintaining consistent tension throughout your project is key to achieving that lovely round shape. I often find that relaxing my grip helps with this.
- When stuffing the panda, be sure to use just enough fiberfill to give it a soft but stable form. It’s easy to overstuff, which can distort those adorable proportions!
- Using stitch markers can really help keep track of your rounds, especially as the pattern grows. I can’t recommend this enough for beginners!
- For shaping, remember to pull your yarn snug but not too tight, especially around those increases and decreases.
- Lastly, take your time with the assembly; it can really elevate your finished project when everything is placed just right.
Conclusion
I hope you enjoy creating this cute mini panda amigurumi as much as I did! It’s not just a fun project; it’s a charming handmade toy that makes for perfect gifts or a delightful addition to any collection. You can easily make variations by changing yarn colors or adding different accessories. Happy crocheting!



