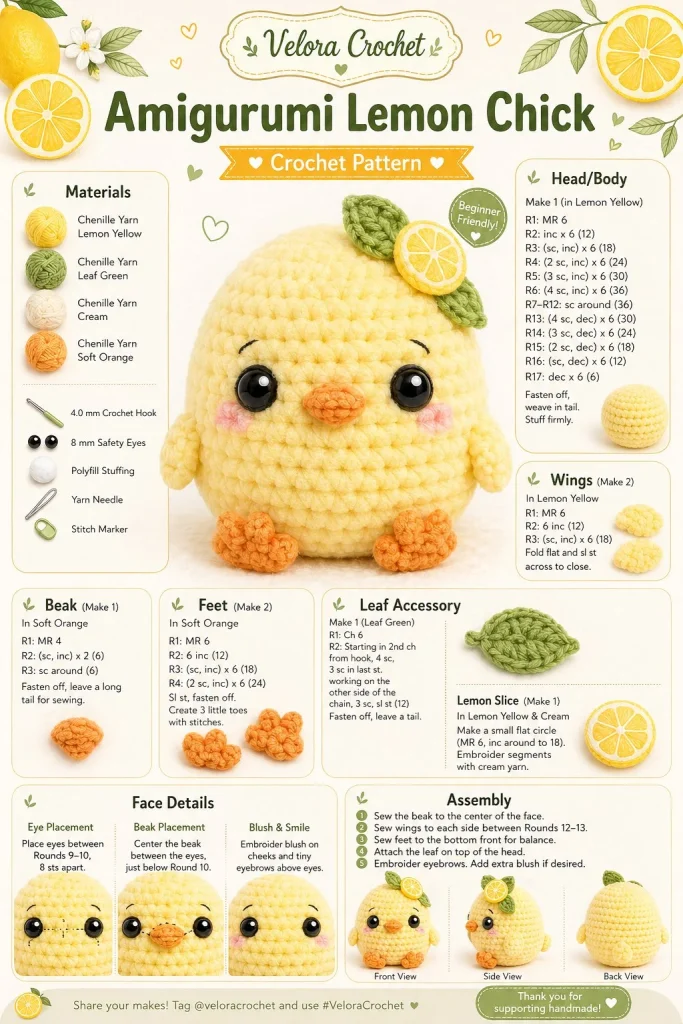
Creating vibrant crochet pieces can be both a joy and a therapeutic experience, and this lemon-themed chick amigurumi is no exception! Perfect for beginners and seasoned crocheters alike, this cheerful little creation brings a touch of sunshine to any collection. Whether you’re looking for a unique handmade toy, planning a delightful gift, or just hoping to brighten your space, this DIY crochet project will make you smile.
Materials
- Yarn: Bright yellow (medium weight), orange (for beak and feet), blush pink (for cheeks), green (for leaf)
- Hook: 3.5 mm (E) or size needed for gauge
- Fiberfill or stuffing of choice
- Tapestry needle for weaving in ends
- Safety eyes (optional, or embroider the eyes)
- Stitch markers (helpful for tracking your rounds)
Abbreviations
- ch = chain
- sc = single crochet
- inc = increase (2 sc in 1 st)
- dec = decrease (sc 2 stitches together)
- st = stitch
- rnd = round
Pattern Instructions
Head
- Start with a magic ring and ch 1.
- Round 1: 6 sc into the magic ring (6 sts).
- Round 2: inc in each st around (12 sts).
- Round 3: sc in next st, inc repeat around (18 sts).
- Rounds 4-6: sc in each st around (18 sts).
- Round 7: sc in next st, dec repeat around (12 sts).
- Round 8: dec around (6 sts). Fasten off, leaving a long tail for sewing.
Body
- Start with a magic ring and ch 1.
- Round 1: 6 sc into the magic ring (6 sts).
- Round 2: inc in each st around (12 sts).
- Round 3: sc in next st, inc repeat around (18 sts).
- Round 4: sc in next 2 sts, inc repeat around (24 sts).
- Rounds 5-7: sc in each st around (24 sts).
- Round 8: sc in next 2 sts, dec repeat around (18 sts).
- Now is a good time to stuff the body firmly.
- Round 9: sc in next st, dec repeat around (12 sts).
- Round 10: dec around (6 sts). Fasten off, leaving a long tail for assembly.
Arms
- With orange yarn, ch 5.
- Row 1: starting from the second ch from the hook, sc across (4 sts).
- Repeat Row 1 for 3 more rows.
- Fasten off, leaving a long tail for sewing. Make 2 arms.
Legs
- With orange yarn, ch 6.
- Row 1: sc across (5 sts).
- Repeat Row 1 for 4 more rows.
- Fasten off, leaving a long tail for sewing. Make 2 legs.
Ears / Details
- For blush cheeks, use a little bit of blush pink yarn.
- Create small circles with 2 sc into a magic ring. Make 2 for the cheeks.
- For the leaf, with green yarn, ch 4, sc in the second ch from the hook, hdc in next ch, dc in last ch, then slip stitch back down.
Accessories
- To give your chick a vibrant touch, attach the mini lemon leaf to the top of the head with a few stitches.
- Play around with placing the blush cheeks to find the perfect expressions!
Assembly & Finishing
- Position the eyes (safety eyes or embroidered) securely on the head.
- Sew the head to the body with the long tail thread.
- Attach the arms to the sides and legs to the bottom of the body.
- Embroider the tiny orange beak between the eyes, following a simple triangle shape.
- Sew on the blush cheeks on both sides of the beak.
{image_template}
Tips for Best Results
- Ensure your tension is consistent, as this will help maintain shape throughout your amigurumi.
- When stuffing, start with small amounts; it’s easier to add more than to remove excess.
- Use stitch markers to help keep track of each round; this really saves time and frustration.
- For shaping, firm stuffing ensures your chick holds its vibrant round form.
- Take breaks to admire your progress; it can be heartening to see your little chick come to life!
Conclusion
This lemon-themed chick amigurumi is sure to be a delightful addition to any crochet enthusiast’s collection. It’s perfect for gifting or selling at markets, and you can easily customize it with different colors or accessories. I hope you enjoy this pattern and find joy as you watch your little chick come to life. Happy crocheting!



