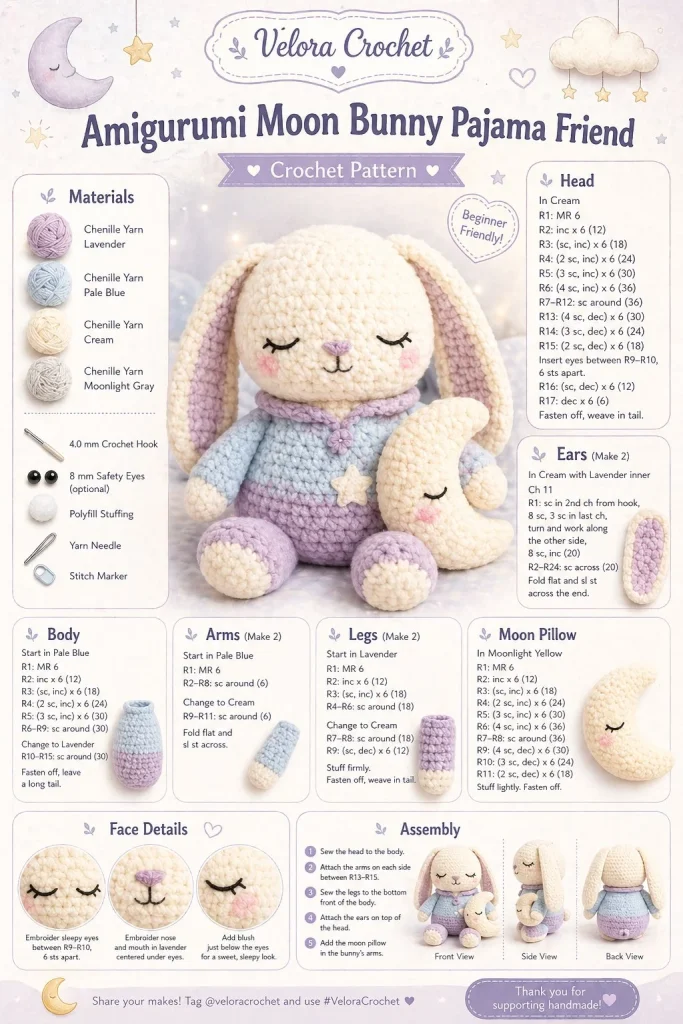
The Velora Crochet pattern for a sleepy moon bunny amigurumi is a delightfully calming project perfect for both novice crocheters and seasoned artisans alike. Ideal for creating a cozy nursery atmosphere or as a thoughtful gift, this cuddly bunny will surely stand out as a handmade treasure. With its soft cream or lavender body, long droopy ears, and little crescent moon pillow accessory, it’s not just a toy; it embodies the spirit of warmth and comfort.
Materials
- Worsted weight yarn in cream or lavender (100% acrylic recommended for softness)
- Crochet hook size G/4.0mm
- Safety eyes (9mm) or embroidery thread for eyes if preferred
- Polyester stuffing
- Yarn needle for sewing pieces together
- Stitch markers (helpful for tracking rounds)
Abbreviations
- Ch = chain
- Sl st = slip stitch
- Sc = single crochet
- Inc = increase (2 sc in the same stitch)
- Dec = decrease (sc2tog)
- Rnd = round
Pattern Instructions
Head
- Begin with a magic ring.
- Round 1: 6 sc into the ring (6).
- Round 2: Inc in each stitch around (12).
- Round 3: (Sc in next st, Inc) repeat around (18).
- Rounds 4-7: Sc in each stitch around (18).
- Round 8: (Sc in next st, Dec) repeat around (12).
- Stuff lightly, then close the head with a dec in each stitch around (6), fasten off.
Body
- Begin with a magic ring.
- Round 1: 6 sc into the ring (6).
- Round 2: Inc in each stitch around (12).
- Round 3: (Sc in next st, Inc) repeat around (18).
- Rounds 4-8: Sc in each stitch around (18).
- Round 9: (Sc in next st, Dec) repeat around (12).
- Round 10: (Dec) around (6), stuff well, fasten off.
Arms
- Begin with a magic ring.
- Round 1: 6 sc into the ring (6).
- Round 2-4: Sc in each stitch around (6).
- Fasten off, leave a long tail for sewing.
Legs
- Begin with a magic ring.
- Round 1: 6 sc into the ring (6).
- Round 2-4: Sc in each stitch around (6).
- Fasten off, leave a long tail for sewing.
Ears / Details
- For each ear, begin with a chain of 10.
- Row 1: Sc in the second ch from the hook and in each across (9).
- Row 2: Ch 1, turn, sc in each (9).
- Repeat Row 2 four more times, then decrease by one stitch at the end of each row (down to 6 stitches).
- Stitch the ears closed and attach to the head.
Accessories (Moon Pillow)
- Begin with a magic ring.
- Round 1: 6 sc into the ring (6).
- Round 2: Inc in each stitch around (12).
- Round 3: (Sc in next st, Inc) repeat around (18).
- Round 4: (Dec) around (9), fasten off, stuff lightly.
Assembly & Finishing
- Sew the arms to the sides of the body, positioning them below the head level.
- Attach the legs to the bottom of the body.
- Position the ears on the top of the head; make sure they are evenly spaced and let them fall naturally.
- For the face, stitch or glue the safety eyes and embroider a sleepy expression beneath them.
- Optionally, add a belly patch for added charm.
- Secure the moon pillow either in the bunny’s arms or next to it for that cozy touch.
{image_template}
Tips for Best Results
- Keep your tension consistent throughout the project; this will help your bunny have a uniform appearance.
- When stuffing, go slowly; aim for a slightly firm fill, especially in the head for better shaping.
- Using stitch markers can help keep track of rounds, especially if you’re working in the round.
- If your stitches feel tight at any point, don’t hesitate to switch to a larger hook to maintain a comfy feel.
- Test the placement of the eyes and features before securing them to ensure they fit your vision perfectly.
Conclusion
Creating the sleepy moon bunny amigurumi is a delightful and rewarding experience. Whether you’re making this for a little one or as a gift for a friend, it’s bound to bring smiles and comfort. Consider personalizing your bunny with different colors or additional accessories to make it uniquely yours. Happy crocheting!



