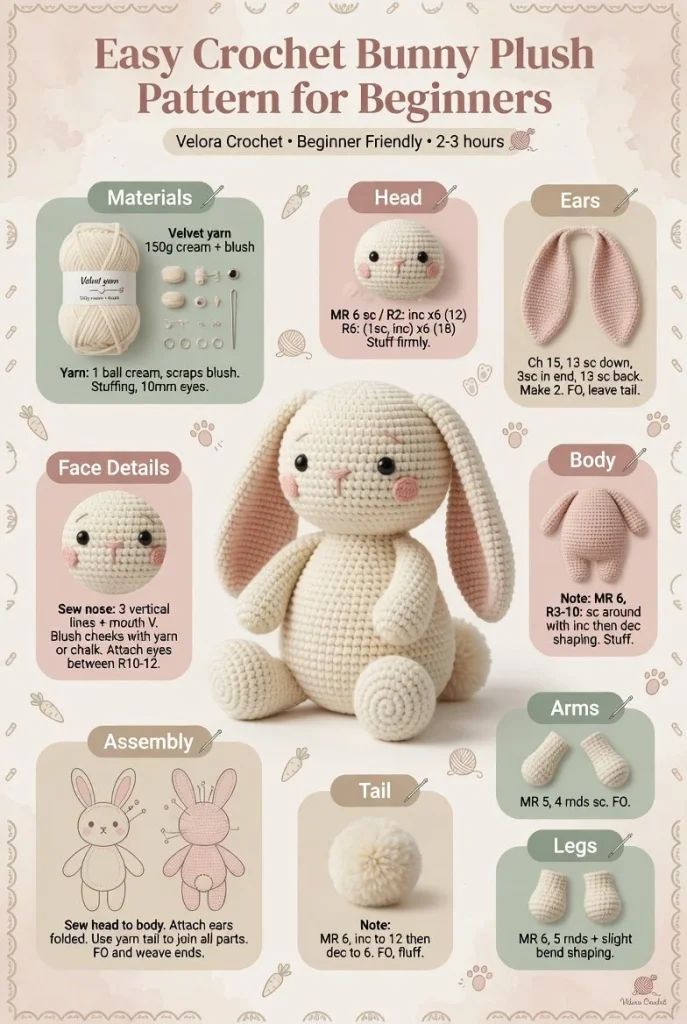
Creating a handmade crochet bunny plush can be an incredibly rewarding experience, especially when it’s as charming and cuddly as this easy beginner project. This delightful bunny features a soft rounded body, long floppy ears, and a tiny stitched nose, making it the perfect gift, nursery decor, or a cozy addition to your spring crochet collection. Let’s dive into the crochet pattern and bring this adorable bunny to life.
Materials
- Yarn: Soft worsted weight yarn in your choice of colors (main color and optional contrasting color for the nose)
- Crochet Hook: Size G (4.0 mm)
- Yarn Needle: For weaving in ends and sewing pieces
- Safety Eyes or Black Yarn: For the eyes
- Scissors: For trimming yarn
- Stuffing: Polyester fiberfill for a plush feel
Abbreviations
- MR: magic ring
- ch: chain
- sc: single crochet
- inc: increase
- dec: decrease
- sl st: slip stitch
Head
- Start with a magic ring.
- Round 1: 6 sc in MR (6).
- Round 2: Inc in each stitch around (12).
- Round 3: 1 sc, inc repeat around (18).
- Rounds 4-7: Continue to sc in each stitch for 4 rounds (18).
- Attach safety eyes or embroider eyes with black yarn.
- Stitched nose: Use a contrasting color to create a small stitch in the center.
Body
- Start a new magic ring.
- Round 1: 6 sc in MR (6).
- Round 2: Inc in each stitch around (12).
- Round 3: 1 sc, inc repeat around (18).
- Rounds 4-10: Continue to sc in each stitch for 7 rounds (18).
- Begin to stuff the body and keep it soft but firm.
Ears
(Make 2)
- Start with a magic ring.
- Round 1: 5 sc in MR (5).
- Round 2: Inc in each stitch around (10).
- Rounds 3-4: Sc in each stitch for 2 rounds (10).
- Fasten off, leaving a long tail for sewing.
Arms
(Make 2)
- Start with a magic ring.
- Round 1: 6 sc in MR (6).
- Round 2-4: Sc in each stitch for 3 rounds (6).
- Fasten off, leaving a long tail for sewing.
Legs
(Make 2)
- Start with a magic ring.
- Round 1: 6 sc in MR (6).
- Round 2: Inc in each stitch around (12).
- Rounds 3-5: Sc in each stitch for 3 rounds (12).
- Fasten off, leaving a long tail for sewing.
Tail
- Start with a magic ring.
- Round 1: 6 sc in MR (6).
- Round 2: Inc in each stitch around (12).
- Fasten off, leaving a long tail for sewing.
Assembly
- Sew the head to the body securely.
- Attach the ears to the top of the head, positioning them as desired.
- Sew arms to each side of the body.
- Position the legs at the bottom of the body and sew into place.
- Attach the tail to the back of the body.
- Weave in any remaining ends.
By following this pattern, you’ll create a delightful bunny plush that captures warmth and charm. Remember, you can customize your bunny with different colors and embellishments if you wish. If you’re excited to learn more about creating similar charming handmade toys, don’t forget to check out this easy crochet bunny pattern.
Tips for the Best Result
- Ensure your stitches are tight enough to prevent stuffing from showing through.
- Use stitch markers to help keep track of your rounds, especially in the body.
- It’s beneficial to stuff the pieces gradually so that they keep their shape without becoming too firm.
Creating this crochet bunny is not just about crafting; it’s also about the joy of creating something special with your own hands. Each stitch contributes to a cozy, soft handmade creation perfect for gifting or even decorating your home. Enjoy the process and happy crocheting!



