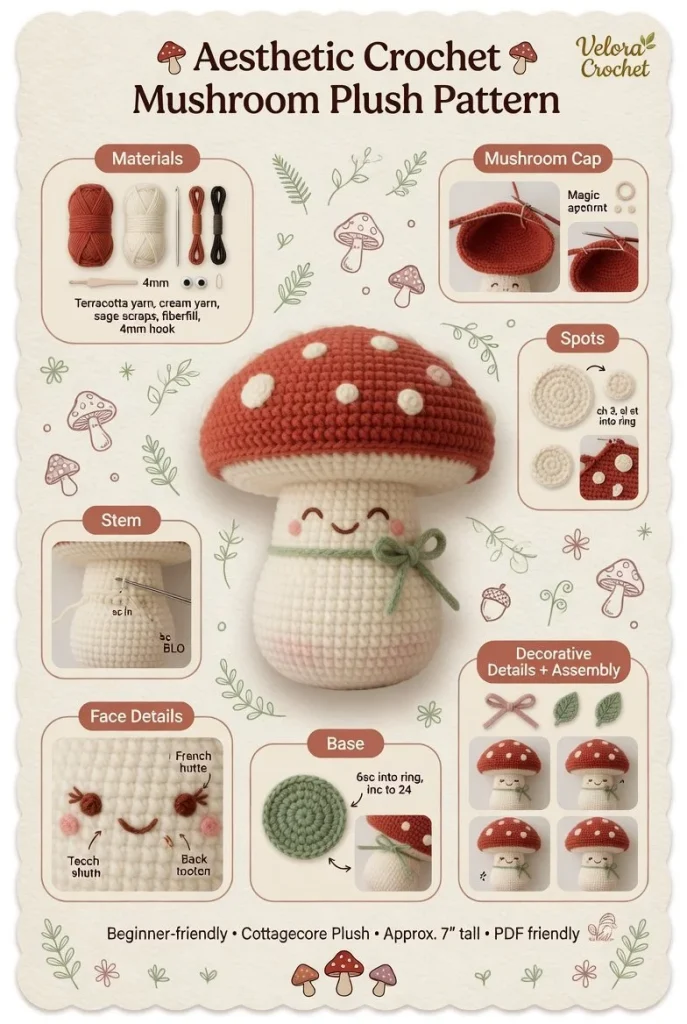
Creating your own aesthetic crochet mushroom plush is an enjoyable way to bring a touch of coziness and whimsy into your space. With its rounded cap, soft stem, and charming little face, this delightful project is perfect for adding character to your home decor or giving as a handmade gift. Let’s dive into the pattern and gather everything you need to create your very own mushroom plush!
Materials
- Worsted weight yarn in the following colors:
- Main color for the cap
- Contrast color for the stem
- Optional colors for the spots
- Crochet hook (size G/4.0mm)
- Yarn needle
- Embroidery thread for facial features
- Fiberfill stuffing
- Stitch markers (optional)
Abbreviations
- MR: magic ring
- ch: chain
- sc: single crochet
- hdc: half double crochet
- dc: double crochet
- inc: increase
- dec: decrease
- sl st: slip stitch
Mushroom Cap
- Using the main color, start with a magic ring.
- Round 1: 6 sc into the ring (6 stitches).
- Round 2: Inc in each st around (12 stitches).
- Round 3: Sc in next st, inc in next st repeat around (18 stitches).
- Round 4: Sc in next 2 sts, inc in next st repeat around (24 stitches).
- Rounds 5-7: Sc in each stitch around (24 stitches).
- Round 8: Sc in next 2 sts, dec over next 2 sts repeat around (18 stitches).
- Round 9: Sc in next st, dec over next 2 sts repeat around (12 stitches).
- Stuff the cap lightly and continue.
- Round 10: Dec around (6 stitches).
- Fasten off, leaving a long tail for sewing.
Optional Spots
- With the contrast color, create small circles, using a magic ring and working 6 sc into the ring.
- Fasten off, leaving a tail for sewing.
Attaching Spots
- Sew the spots onto the top of the mushroom cap, spacing them as you like to add a whimsical touch.
Stem
- Using the contrast color, create a magic ring.
- Round 1: 6 sc into the ring (6 stitches).
- Round 2: Inc in each st around (12 stitches).
- Rounds 3-6: Sc in each stitch around (12 stitches).
- Round 7: Sc in next st, dec over next 2 sts repeat around (8 stitches).
- Rounds 8-10: Sc in each stitch around (8 stitches).
- Stuff the stem firmly.
- Fasten off, leaving a long tail for sewing.
Face Details
- With embroidery thread, stitch a cute face on the front of the mushroom, positioning the eyes and mouth to reflect your desired expression. You might even find inspiration in other crochet plush patterns, like the ones in this whimsical fairycore plush.
Base
- Using the main color, create a magic ring.
- Round 1: 6 sc into the ring (6 stitches).
- Round 2: Inc in each st around (12 stitches).
- Round 3: Sc in next st, inc in next st repeat around (18 stitches).
- Round 4: Sc in next 2 sts, inc in next st repeat around (24 stitches).
- Rounds 5-6: Sc in each stitch around (24 stitches).
- Fasten off, leaving a long tail for sewing.
Decorative Details
- Feel free to add additional decorative elements such as small sewn flowers or leaves around the stem or near the base to enhance the cottagecore aesthetic.
Assembly
- Begin by attaching the stem to the bottom of the mushroom cap, using the long tail from the stem.
- Secure the base to the bottom of the stem with the long tail from the base, ensuring everything is tightly joined.
- Adjust the positioning to achieve a balanced look and add more stuffing if necessary.
Tips for the Best Result
- Use stitch markers to keep track of your rounds and avoid losing your place.
- Don’t overstuff your pieces to ensure they retain their cute shapes.
- Experiment with different colors for the mushroom cap and spots to make it uniquely yours.
In conclusion, creating your own crochet mushroom plush is not just a great way to practice your skills but also results in a charming addition to your decor or a thoughtful handmade gift. Try out different color variations to create an entire family of mushrooms! Happy crocheting!



