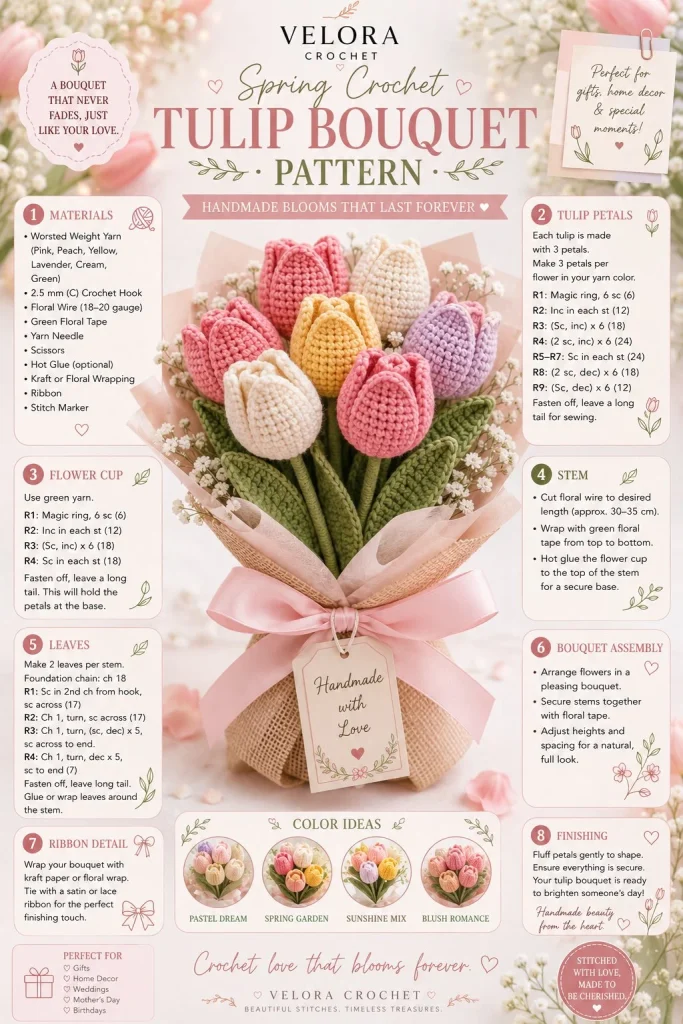
Springtime is the perfect season to bring a touch of color and elegance into your home with a handcrafted crochet tulip bouquet. This project features delicate tulip flowers with soft petals, vibrant green stems, and lush leaves, all beautifully assembled into a charming bouquet that makes for an ideal gift or delightful home decor. Let’s dive into this crochet pattern, and get your hooks ready for an enjoyable DIY crochet project!
Materials
- Worsted weight yarn in various colors for tulips (choose spring-inspired shades)
- Worsted weight green yarn for stems and leaves
- 4mm crochet hook
- Scissors
- Yarn needle
- Floral wire (optional for reinforcement)
- Ribbon or twine for bouquet wrap
Abbreviations
- MR: magic ring
- ch: chain
- sc: single crochet
- hdc: half double crochet
- dc: double crochet
- inc: increase
- dec: decrease
- sl st: slip stitch
Tulip Petals
- Start with your chosen tulip color. Make a magic ring (MR).
- Round 1: ch 2, (1 dc, 1 hdc, 2 dc) all in the MR, then ch 2 and sl st to the top of the first dc (6 stitches).
- Round 2: Ch 2, (1 dc, 1 hdc, 2 dc, ch 2, sl st) in the next stitch, repeat 2 additional times. Finish off and weave in ends.
Repeat this process to create as many tulip petals as desired.
Flower Cup
- Using the same color as your petals, start with an MR.
- Round 1: Ch 1, 6 sc in MR, pull the ring tight. Join with a sl st to the first sc (6 stitches).
- Round 2: 2 sc in each stitch around (12 stitches).
- Round 3: 1 sc in the next stitch, 2 sc in the next stitch; repeat around (18 stitches).
- Round 4: 1 sc in the next 2 stitches, 2 sc in the next stitch; repeat around (24 stitches).
- Round 5: Sc in each stitch around. Finish off, leaving a long tail for assembly.
Stem
- With your green yarn, ch 20 (or desired length for the stem).
- Row 1: Starting from the second ch from the hook, sc in each ch back to the beginning (19 stitches).
- Finish off, leaving a long tail for attachment.
Leaves
- With green yarn, ch 10.
- Row 1: Starting from the second ch from the hook, hdc in the next 3 ch, dc in the next 3 ch, hdc in the next 3 ch, ch 1 and turn.
- Row 2: Working on the opposite side, hdc in the next 3 ch, dc in the next 3, hdc in the next 3, ch 1 and fasten off, leaving a long tail for assembly.
Make a pair of leaves for each tulip.
Bouquet Assembly
- Take one flower cup and insert the corresponding petals inside, arranging them to your liking.
- Position the stem into the cup so it is firmly held in place. If desired, use floral wire for added support.
- Attach leaves around the base of the flower cup, sewing or knotting them securely to the stem.
- Repeat for additional tulip flowers, ensuring a balanced look for your bouquet.
Ribbon Detail
To add an elegant touch, wrap a piece of ribbon or twine around the stems where they are joined. Tie it in a bow for a charming finish that enhances the bouquet’s appearance.
Finishing
Make sure all ends are woven in and secure. You can also gently block the petals and leaves, ensuring they maintain their shape. Display your beautiful tulip bouquet in a vase or gift it to someone special!
Tips for the Best Result
- Use consistent tension while crocheting to ensure your tulip petals are uniform.
- Keep your stitches neat, especially on the tulip cup, as it will be visible in the finished project.
- Blocking the petals before assembly can help them lay nicely and look polished.
Creating this crochet tulip bouquet is not only a rewarding project but also a delightful gift for friends and family. The vibrant colors and fresh spring feels can brighten up any room. For more spring inspiration, check out this adorable cute chick crochet pattern! Happy crocheting!



