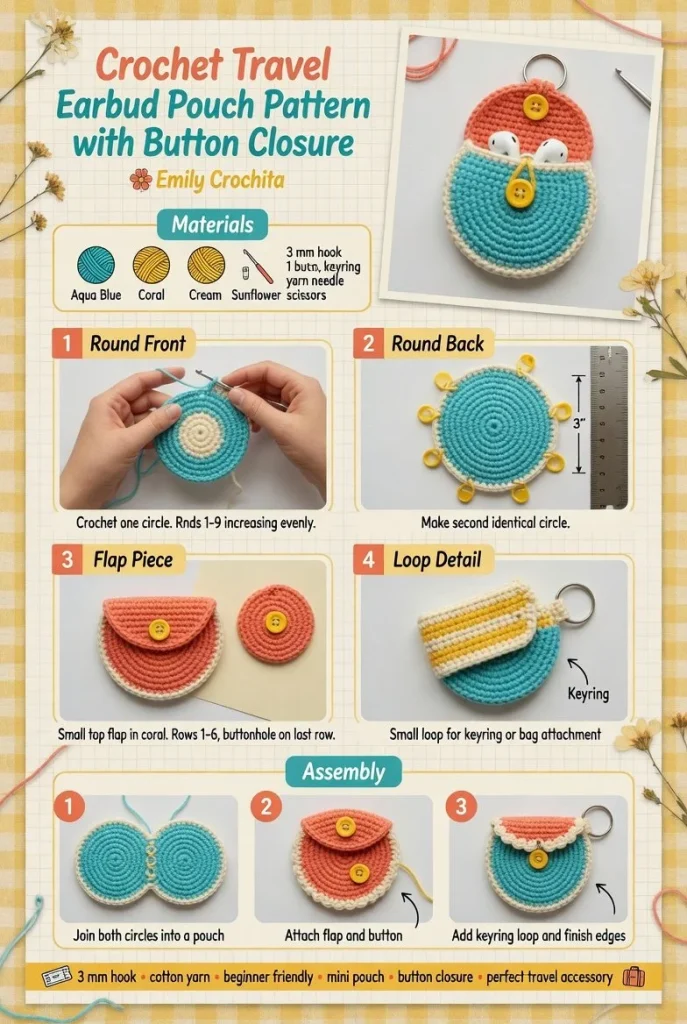
Crocheting a small round pouch is an enjoyable project that’s perfect for storing your earbuds or coins. This beginner-friendly pattern is a quick and colorful summer project, making it a delightful accessory or thoughtful handmade gift. With a bright aqua blue body, a coral flap, cream edging, and a cheerful yellow button accent, this pouch is sure to brighten anyone’s day. Let’s dive into this cute and functional DIY crochet project!
Materials
- Worsted weight yarn in aqua blue (for the body)
- Worsted weight yarn in coral (for the flap)
- Worsted weight yarn in cream (for the edging)
- Worsted weight yarn in yellow (for the button)
- Size H (5 mm) crochet hook
- Yarn needle
- Button (for closure)
- Keyring (for attaching)
Abbreviations
- MR: magic ring
- ch: chain
- sc: single crochet
- hdc: half double crochet
- inc: increase
- sl st: slip stitch
Instructions
Base
- Start with a magic ring (MR).
- Round 1: 6 sc in MR (6).
- Round 2: inc in each st around (12).
- Round 3: sc in next st, inc in next st repeat around (18).
- Round 4: sc in next 2 sts, inc in next st repeat around (24).
- Round 5: sc in next 3 sts, inc in next st repeat around (30).
- Round 6-8: sc in each st around (30).
Pouch Body
- Continue working in rounds without joining.
- Rounds 9-12: sc in each st around (30).
Flap
- Change to coral yarn.
- Round 13: sc in first 15 sts, ch 1, turn.
- Row 1: sc in each st across (15).
- Row 2: ch 1, turn, sc in each st across (15).
- Fasten off.
Edging
- Attach cream yarn at the bottom of the pouch.
- Work around the entire opening with a sc, making sure to create a smooth edge.
- For the flap, work 1 sc in each of the 15 sts, then sl st to join.
Button Loop
- Ch 8 and sl st to the base of the pouch flap to create a loop for the button.
- Attach your yellow button to the flap securely.
Keyring Loop
- At the top of the pouch, make a small ch 10, then sl st back to the same stitch to form a loop.
- Weave in all ends to finish.
Tips for the Best Result
- Maintain a firm tension while crocheting so your pouch holds its shape and can securely hold your items inside.
- Feel free to personalize this pouch with different colors or embellishments to match your style or make it a unique gift.
- Blocking the finished piece will help it maintain a crisp shape, especially around the edges.
This small round crochet pouch is a lovely addition to your accessories or makes a fantastic gift for friends and family. Enjoy making this simple, stylish pouch, and consider trying your hand at other projects, such as this adorable amigurumi pattern I recommend. Happy crocheting!



