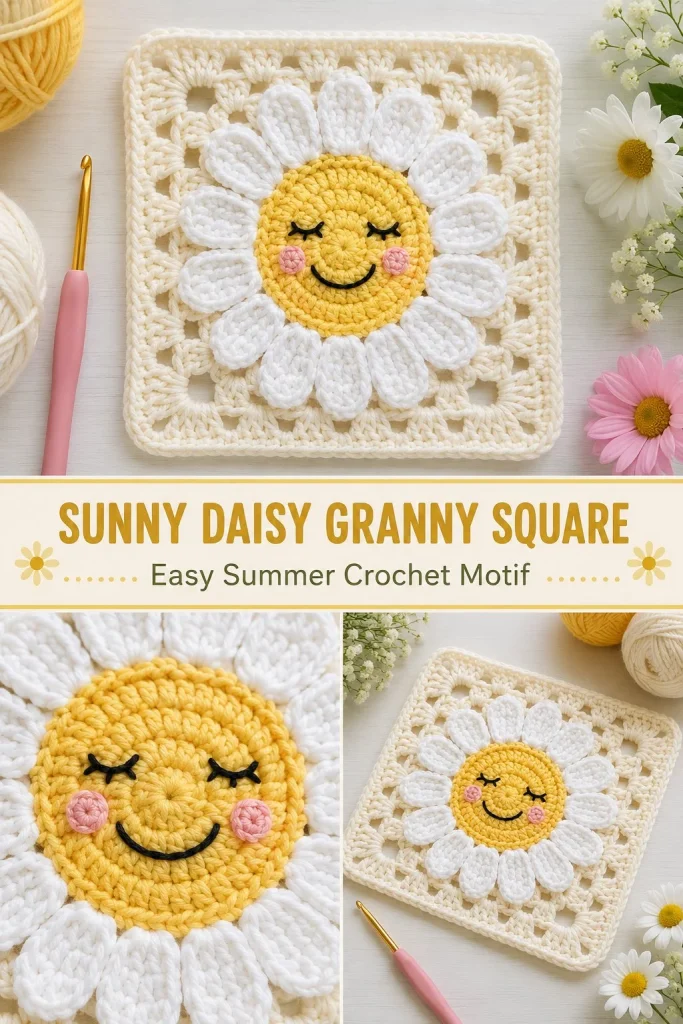
This Sunny Daisy Granny Square is a delightful little crochet motif perfect for adding a touch of cheer to any project. With its bright yellow center, white petals, and cute embroidered face, it’s both decorative and cozy—a great addition to blankets, bags, or even as sweet appliqués. The square shape and modest size make it versatile, and the pattern uses basic stitches with some fun textural details that keep it interesting but manageable for beginners. Working the yellow center in joined rounds helps maintain a neat circle, which is key to getting those petals to fan out beautifully. I’ve found that taking your time with the petals’ front loop only technique really lets each one stand out for that charming daisy look. If you enjoy crafting spring-inspired motifs, you might also appreciate the vibrant look you get with different yarn weights and combinations—as I did when testing this pattern alongside a summery granny square tote design.
Why You’ll Love This Crochet Pattern
- The cheerful daisy motif adds a whimsical touch to any project.
- It’s worked mostly in rounds, making it straightforward to follow.
- The pattern includes simple embroidery to personalize your square with a smiley face.
- Great for beginner to intermediate crocheters looking to enhance their skills with loops and texture.
- Finished squares can be joined for blankets, cushions, or bags, offering lots of creative uses.
- Testing this pattern showed how blocking brings out the shape beautifully without stretching the face.
Finished Size
The finished square measures approximately 14 cm (5.5 inches) across. Keep in mind the size can vary slightly depending on your yarn choice, hook size, and personal tension while crocheting. Blocking your square gently after finishing helps even out the edges and sets the piece to its intended dimensions.
Skill Level
Intermediate beginner. While the stitches themselves are basic—single crochet (sc), half double crochet (hdc), and double crochet (dc)—this pattern introduces working in joined rounds and using front loop only (FLO) stitches for the petals, plus embroidery for the facial features. These techniques are approachable for beginners with some experience in foundational crochet skills.
Materials Needed
- DK or light worsted cotton yarn: yellow (approx. 20 g), white (15 g), cream (25 g), pink and black yarn scraps for facial detailing
- 3.5 mm (E/4) crochet hook
- Yarn needle for weaving in ends and embroidery
- Scissors
- Stitch marker to mark rounds (helpful for beginners)
- Blocking pins and mat for shaping the square
Stitches and Abbreviations
- MR = magic ring, a technique to start rounds with a closed center circle
- ch = chain, forming the foundation or turning stitches
- sl st = slip stitch, used for joining or moving yarn without adding height
- sc = single crochet, a tight, dense stitch
- hdc = half double crochet, slightly taller than sc
- dc = double crochet, taller stitch with more openness
- inc = increase, working 2 stitches in the same stitch
- FLO/BLO = front or back loop only, working into only one loop of the stitch for texture
Gauge and Tension Notes
Gauge is not critical for this motif since it’s a decorative square, but keeping an even tension throughout will help maintain a neat shape. Avoid stitches that are too tight, especially in rounds where petals are worked in front loops only, as tight tension can distort the petals or make embroidery harder. Testing tension with swatches can give you confidence before starting.
Pattern Notes Before You Start
This square is crocheted in joined rounds for the yellow daisy center, then the white petals are crocheted in the front loops of the last round’s stitches. The cream background square is worked separately in rounds using only the back loops of the last daisy round, giving a subtle border texture. The eyes, smile, and cheeks are embroidered and sewn on after the crocheting is complete. Weaving in ends securely and blocking the whole piece gently without stretching preserve the square’s shape and the face’s integrity.
If you’re inspired by flower granny squares, you might enjoy exploring similar floral designs in projects like this crochet daisy granny square tote pattern, which uses a complementary motif approach.
Step-by-Step Crochet Instructions
Yellow Center
- R1: Make a magic ring (MR), work 6 sc into ring; join with sl st to first sc. (6 sts)
- R2: Ch 1 (does not count as a stitch), inc in every stitch; join. (12 sts)
- R3: Ch 1, (sc, inc) around; join. (18 sts)
- R4: Ch 1, (2 sc, inc) around; join. (24 sts)
- R5: Ch 1, (3 sc, inc) around; join. (30 sts)
- R6: Ch 1, (4 sc, inc) around; join and fasten off. (36 sts)
Face Embroidery and Cheeks
- Using black yarn, embroider two curved closed eyes spanning rounds 4 to 5, about 8 stitches apart.
- Stitch a small U-shaped smile centered between the eyes on the same rounds.
- For cheeks, make two small magic rings, 6 sc each, join and fasten off. Sew them on with pink yarn beside the smile on rounds 4 to 5.
White Petals
- Join white yarn in the front loop only (FLO) of any stitch on round 6 of yellow center.
- Repeat 12 times: sl st in FLO of next stitch; in FLO of next stitch work (sl st, ch 2, 3 dc, ch 2, sl st); sl st in FLO of next stitch.
- Fasten off. Twelve petals should be visible.
Cream Square Background
- Join cream yarn in any unused back loop only (BLO) around round 6 of the daisy.
- Square R1: Ch 1, sc in next 8 BLO, (sc, ch 2, sc) in next BLO; repeat from * 4 times; join. (40 sc, 4 ch-2 corners)
- Square R2: Ch 3 (counts as first dc), dc in each sc around; in each ch-2 corner work (2 dc, ch 2, 2 dc); join. (56 dc)
- Square R3: Ch 1, sc in every dc around; sc, ch 2, sc in each corner; join. (64 sc)
- Square R4: Ch 2 (does not count as stitch), hdc in every sc around; in each corner work (2 hdc, ch 2, 2 hdc); join and fasten off. (4 corners)
Weave in all ends thoroughly and block gently on a mat to even out edges, taking care not to stretch the embroidered face.
Assembly and Finishing
Sew the pink cheery cheeks securely in place beside the smile with small, even stitches. Use a tapestry needle to weave in ends tightly on all yarn tails to prevent unraveling. Blocking helps give your square precise edges and well-shaped petals—pin it gently without stretching the face area for the best results. If you plan on joining multiple squares, use whip stitch or slip stitch join methods to preserve texture.
Helpful Tips
- Take your time embroidering the facial features to keep them neat and expressive.
- Use a stitch marker at the start of each round to avoid losing your place during joined rounds.
- When working petals in the front loops only, gently pull the loops forward to make insertion easier.
- Blocking is essential for this square to look its best—blocking pins and a firm mat make this step easier.
- Use smooth cotton yarn for clearer stitch definition and a durable square.
Common Mistakes to Avoid
- Missing a stitch in increases, which can throw off the petal count; count stitches carefully each round.
- Pulling too tight on the FLO petals, causing them to pucker or distort; keep tension gentle.
- Embroidering before fully finishing the crochet work, which can cause misalignment; finish crocheting first.
- Incorrectly joining rounds (missing a sl st or joining in the wrong stitch); verify the join point each time.
- Skipping blocking, which leads to a less even, less square finished piece.
Customization Ideas
- Change yarn colors for a different seasonal or color-themed daisy look.
- Experiment with yarn textures, like a soft bamboo or linen blend, for a different feel.
- Use a larger hook and heavier yarn to create an oversized daisy square for blankets or pillows.
- Add beads as the flower center or incorporate metallic threads in the petals for a bit of sparkle.
How to Use or Display This Crochet Project
This Sunny Daisy Granny Square can brighten up accessories like tote bags or scarves, or be joined with multiples for blankets, cushion covers, or table runners. Its cheerful character also makes it a great gift item or a cute wall hanging when framed or mounted on canvas. The embroidery makes each square feel extra personal and playful.
Care Instructions
For best care, gently hand wash your finished square in cool water using a mild detergent, especially if you used cotton yarn. Lay flat to dry and reshape as necessary. Avoid machine drying or heavy agitation to keep embroidery intact and the crochet fabric in good shape. Store flat or folded gently to avoid creasing.
Frequently Asked Questions
Q: Can I use acrylic yarn for this pattern?
A: Yes, but cotton yarn is preferable for stitch definition and blocking. Acrylic may not block as neatly, but it’s fine for a more casual look.
Q: What if I’m new to working in front loops only?
A: Take it slow and insert your hook only under the front loop of the stitch marked, which creates the petal effect. Practicing on scrap yarn first helps.
Q: How do I avoid twisting rounds when joining?
A: Use a stitch marker and always join to the top of the first stitch in the round. Count your stitches and double check alignment.
Q: Can I adjust the square size?
A: Yes, using a thicker yarn or larger hook will make the square bigger. Just keep your stitch counts the same and block accordingly.
Q: Is it necessary to embroider the face?
A: No, you can skip embroidery for a simple daisy, or swap in buttons or beads for eyes and cheeks to add your own twist.
Final Thoughts
Creating the Sunny Daisy Granny Square brings a little burst of sunshine to your crochet projects, whether you’re making one or many. Its balance of simple stitches with playful details makes it rewarding without feeling intimidating. I hope you enjoy bringing this happy flower to life as much as I did, and find plenty of ways to showcase its charm in your crochet work.



