
The Suzette stitch creates a dense, softly textured crochet fabric using a simple combination of single crochet and double crochet. The basic repeat places 1 sc and 1 dc into the same stitch, skips the next stitch, and repeats, producing a closed fabric with plenty of movement and texture.
This baby blanket version keeps that beautiful texture simple and repetitive, with straight edges, a solid border, and optional color changes for stripes or color blocking.
Skill Level
Beginner / Confident Beginner
You should know how to:
- chain
- single crochet
- double crochet
- half double crochet
- turn rows
- change colors
- work a simple border
Finished Size
Approximately:
34 × 40 inches
The pattern is easy to resize.
Materials
- Medium weight #4 yarn
- Approximately 1,150–1,350 yards
- 5.5 mm crochet hook
- Yarn needle
- Scissors
- Stitch markers
- Measuring tape
For a baby blanket, choose a soft washable yarn.
Abbreviations — US Terms
ch – chain
sc – single crochet
dc – double crochet
hdc – half double crochet
sl st – slip stitch
st(s) – stitch(es)
Special Stitch — Suzette Stitch
The main repeat is:
skip 1 stitch, work 1 sc and 1 dc into the next stitch
Both the sc and dc are worked into the same stitch.
On subsequent rows, these stitch pairs are worked into the single crochet stitches from the previous row.
That placement creates the characteristic bumpy, woven-looking texture.
Starting Chain
The edge construction used here works from an odd-numbered foundation chain. (Daisy Cottage Designs)
For this baby blanket:
Chain 121.
This produces:
120 working stitches
after the foundation row.
Gauge
Approximately:
14 stitches = 4 inches
in the established Suzette stitch.
Gauge does not need to be exact if you are happy to measure the blanket as you work.
The most important things are:
- straight edges
- consistent tension
- soft drape
- identical stitch count on every row
Pattern Notes
- Ch 1 does not count as a stitch.
- Turn after every row.
- Keep 120 stitches across.
- Mark the first and last stitches if you tend to lose edge stitches.
- The Suzette pairs are always worked into the sc stitches of the previous pattern row.
- Finish the blanket body with a plain sc row before adding the border.
- The blanket can be worked in one color, stripes, or blocks.
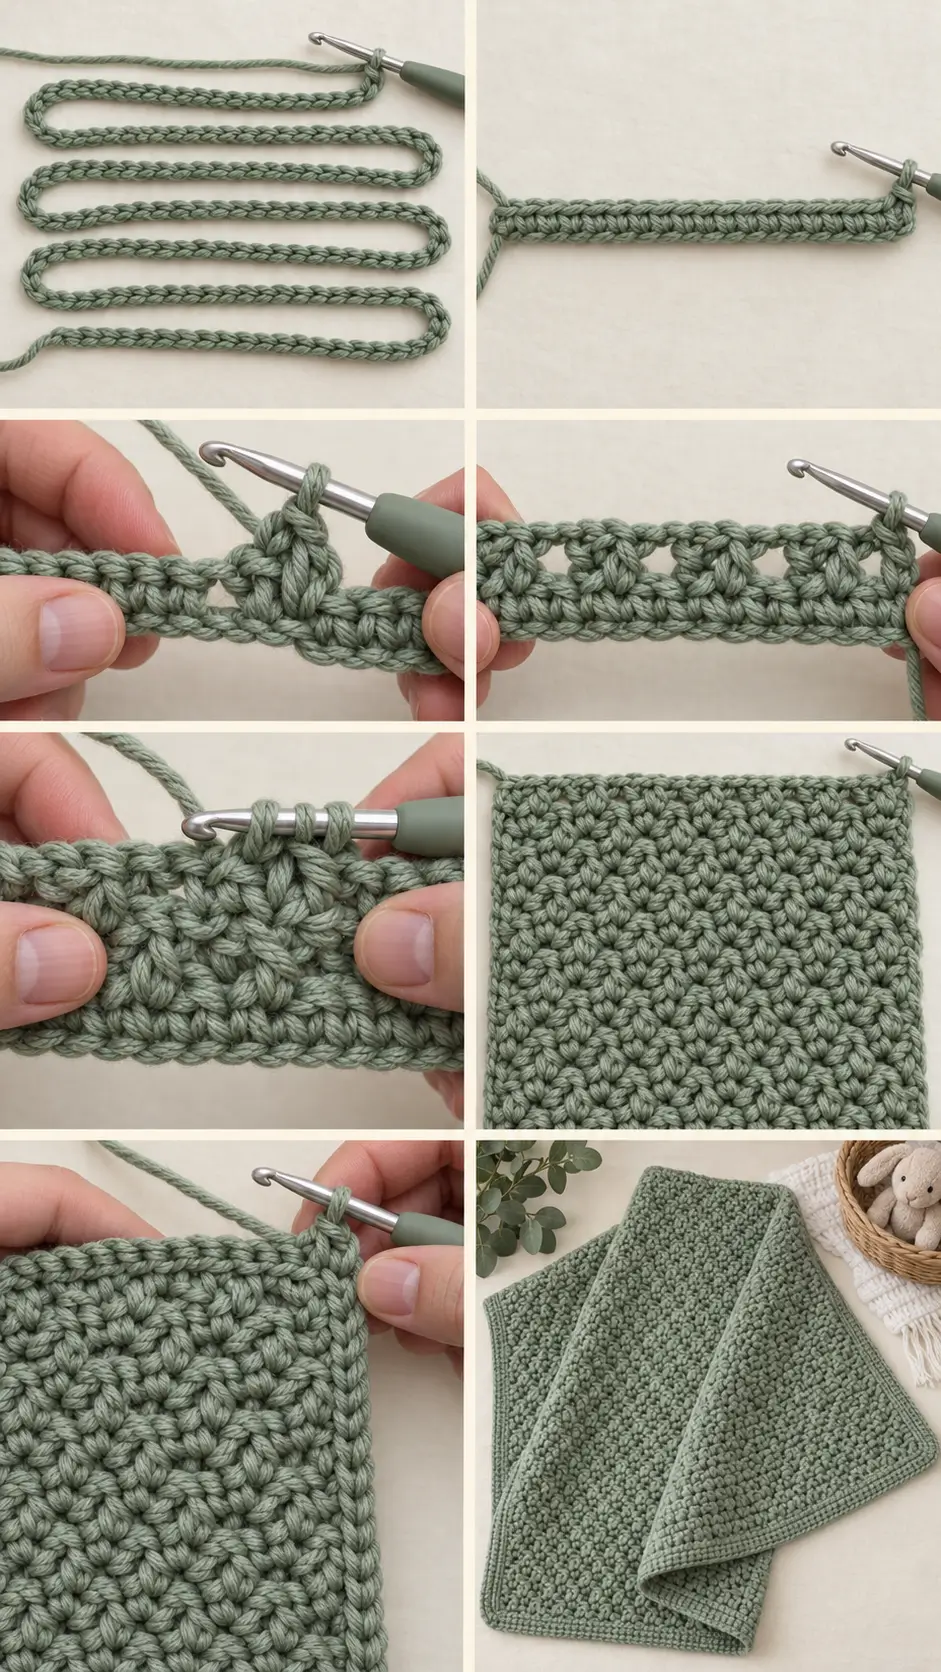
PART 1 — Foundation Chain
Using your main color:
Ch 121 loosely.
If your chains tend to be tight, use a 6 mm hook for the foundation chain and switch to the 5.5 mm hook afterward.
Row 1 — Foundation Single Crochet Row
Sc in the second chain from the hook.
Sc in every chain across.
You should have:
120 sc
Ch 1.
Turn.
This solid row gives you a clean foundation for the textured stitch.
Row 2 — First Suzette Stitch Row
Hdc in the first stitch.
Now repeat:
*skip the next stitch, work 1 sc and 1 dc in the following stitch*
Repeat across until 1 stitch remains.
Hdc in the final stitch.
You should still have:
120 stitches total
made up of:
- 1 hdc at the beginning
- repeated sc/dc pairs
- 1 hdc at the end
Ch 1.
Turn.
Understanding the Row
The first hdc creates a stable edge.
Then the main fabric alternates:
skip one → sc + dc together
The final hdc creates the second straight edge.
This keeps the dense Suzette texture from pulling awkwardly at the sides.
Row 3 — Establish the Repeat
Hdc in the first stitch.
Now look across the previous row.
Each pattern group contains:
- one sc
- one dc
You will work into the sc stitches.
Repeat:
*skip the dc, work 1 sc and 1 dc in the next sc*
Continue across.
Hdc in the final stitch.
Ch 1.
Turn.
Row 4 and All Following Pattern Rows
Repeat Row 3:
Hdc in first st, *skip next st, sc and dc in next st*, repeat across, hdc in final st.
Ch 1.
Turn.
Continue until the blanket body measures approximately:
38½–39 inches long
before the final body row and border.
What the Fabric Should Look Like
As the blanket grows, you should see:
- small raised bumps
- dense interlocking texture
- subtle diagonal movement
- no large holes
- almost identical texture on both sides
- straight side edges
The stitch should feel substantial but not stiff.
Final Body Row
When the blanket reaches the desired length, work one plain row.
Ch 1.
Turn.
Sc in every stitch across.
120 sc
Do not fasten off if you are using the same color for the border.
PART 2 — Simple Single Crochet Border
A simple border works especially well with the Suzette stitch because the blanket body already contains plenty of texture.
Border Round 1
Ch 1.
Work sc evenly across the top edge.
At the first corner:
3 sc
Work sc evenly down the first long side.
At the second corner:
3 sc
Work sc across the foundation edge.
At the third corner:
3 sc
Work sc evenly up the second side.
At the final corner:
3 sc
Join with a sl st to the first sc.
Side Border Placement
Do not crowd the side edge with too many stitches.
Work approximately:
1 sc per row end
as a starting point.
Then check the fabric.
If the border ruffles, remove several stitches.
If it pulls inward, add a few more.
The blanket should lie flat without forcing it.
Border Round 2
Ch 1.
Sc in every stitch around.
At each corner, locate the center stitch of the previous 3-sc corner.
Work:
3 sc in that center stitch
Continue around.
Join with a sl st.
Border Round 3 — Optional
For a slightly wider frame:
Repeat Border Round 2 once more.
Fasten off.
Finishing
Cut the yarn, leaving approximately a 6-inch tail.
Pull the tail through the final loop.
Thread onto a yarn needle.
Weave through several stitches on the wrong side.
Change direction and weave through another section.
Trim the excess.
Repeat for every remaining yarn tail.
Blocking
Light blocking can make the finished stitch pattern look especially neat.
Follow the yarn care instructions.
Lay the blanket flat.
Straighten:
- top
- bottom
- both long sides
- all four corners
Gently smooth the textured stitches with your hands.
Allow the blanket to dry completely.
Do not aggressively stretch the fabric.
One-Color Version
The Suzette stitch has enough texture to look beautiful in one solid shade.
Good choices include:
- cream
- sage
- dusty rose
- pale blue
- oatmeal
- terracotta
- lavender
- soft gray
A light or medium solid color makes the stitch definition especially easy to see.
Two-Color Stripe Version
For simple stripes, change color every:
6 rows
For example:
Rows 1–6
Cream
Rows 7–12
Sage
Rows 13–18
Cream
Rows 19–24
Sage
Continue alternating.
This creates wide, calm stripes while keeping the texture visible.
Narrow Stripe Version
Change color every:
2 pattern rows
Try:
- cream
- blush
- sage
- cream
- mustard
- dusty blue
This creates a more playful scrap-blanket appearance.
Color-Block Version
Another attractive option is dividing the blanket into three large sections.
For example:
Lower Third
Dusty rose
Middle Third
Cream
Upper Third
Sage
Keep the border cream to connect the three sections.
How to Change Colors
On the final hdc of the old color:
Yarn over.
Insert hook.
Yarn over and pull up a loop.
You now have 3 loops on the hook.
Drop the old yarn.
Yarn over with the new color.
Pull the new color through all 3 loops.
Ch 1.
Turn.
Continue the next row.
This keeps the color transition close to the side edge.
How to Make the Blanket Wider
This version begins with:
121 chains
To change the width while keeping this edge construction, use another odd number of foundation chains.
For example:
Smaller
Chain 101
Medium
Chain 121
Wider
Chain 141
Large
Chain 161
Make a few rows before deciding whether the width is right.
How to Make the Blanket Longer
Simply continue repeating the Suzette pattern row.
No shaping changes are required.
When the blanket reaches the desired length:
- work one plain sc row
- add the border
Stroller Blanket
For a smaller stroller blanket:
Chain 101
Work until approximately:
30–34 inches long
Add the same border.
Larger Baby Blanket
For a roomier baby blanket:
Chain 141
Work until approximately:
42–44 inches long
Then add the border.
Lap Blanket
Try:
Chain 161
Work until approximately:
50–54 inches long
Throw Blanket
For a sofa throw, use a foundation chain long enough to measure approximately:
48–52 inches
while keeping an odd chain count.
Then repeat the pattern until approximately:
58–64 inches long.
Because the Suzette stitch is dense, larger blankets can use a substantial amount of yarn.
How to Make a Suzette Stitch Scarf
The same texture works beautifully for scarves.
Try:
Chain 29 or 31
depending on your desired width.
Work the same foundation row and Suzette repeat until approximately:
65–70 inches long.
Finish with a plain sc row.
You can leave the ends plain or add fringe.
How to Make a Cushion Cover
Crochet two identical rectangles using the Suzette stitch.
Make each panel slightly smaller than your cushion insert so the finished cover stays full.
Place the panels together.
Sc around three sides.
Insert the cushion form.
Sc the final side closed.
For a removable cover, add buttons or a zipper instead.
Why This Stitch Works Well for Baby Blankets
The stitch creates a relatively closed fabric.
That means there are no large decorative openings throughout the main body.
The mixture of short and tall stitches also creates texture without requiring:
- bobbles
- large clusters
- post stitches
- complicated counting
Once the first pattern rows are established, the repeat becomes easy to recognize.
Best Yarn for the Suzette Stitch
Smooth yarn gives the clearest stitch definition.
Good options include:
- soft acrylic
- cotton-acrylic blends
- smooth cotton
- washable wool blends
- baby yarn
For blankets, choose yarn that can handle regular washing.
Avoid extremely fuzzy yarn while learning because it can make the sc and dc stitches harder to distinguish.
Choosing the Hook
A 5.5 mm hook works well with many #4 yarns.
If the fabric feels too stiff:
move up to 6 mm.
If the stitches feel too loose:
try 5 mm.
You want the blanket to feel:
- dense
- soft
- flexible
- comfortable
not rigid.
How to Identify the Single Crochet
This is the key to maintaining the pattern.
Look at each sc/dc pair from the previous row.
The sc is:
- shorter
- tighter
- closer to the base of the fabric
The dc is:
- taller
- more visible
- slightly raised beside it
Your new:
sc + dc
should be worked into the shorter sc stitch.
The taller dc is skipped.
Use Stitch Markers While Learning
Place a marker in:
- first stitch
- final stitch
You can also place markers every 20–30 stitches across a large blanket if counting helps you.
Remove them once the stitch pattern becomes easy to recognize.
Common Problems
Blanket Gets Narrower
You are probably missing one of the edge stitches.
Make sure you work:
1 hdc in the first stitch
and:
1 hdc in the final stitch
of every pattern row.
Blanket Gets Wider
You may accidentally be working into the turning chain.
The ch-1 does not count as a stitch.
Texture Looks Different From One Row to the Next
Check where you are placing your stitch pairs.
You should be working:
sc + dc into the sc
from the previous row.
I Keep Working Into the Double Crochet
Pause and identify the shorter stitch before inserting your hook.
The sc is the anchor for the next sc/dc pair.
Edges Lean Sideways
Count the total stitches.
For this blanket you should maintain:
120 stitches
across every pattern row.
Fabric Feels Too Stiff
Increase the hook size.
The Suzette stitch is naturally dense, so a slightly larger hook can dramatically improve the drape.
Fabric Looks Too Open
Use a smaller hook or slightly thicker yarn.
Border Ruffles
There are too many stitches around the side edges.
Undo that section and space the sc stitches farther apart.
Border Pulls In
Add several more stitches along each long side.
Tips for Clean Texture
Keep the Single Crochet Relaxed
Do not make the sc extremely tight.
You need to find it again on the following row.
Keep Both Stitches in the Same Place
The sc and dc must both go into the same stitch.
Do Not Skip Between the Pair
Work:
sc, then dc immediately into the same stitch
before moving to the next repeat.
Count Occasionally
Even after you understand the stitch, check your count every 10–15 rows.
Finding a missing stitch quickly is much easier than correcting dozens of rows.
Easy Suzette Stitch Baby Blanket
The Suzette stitch gets its rich texture from an extremely simple repeat: skip one stitch, then work a single crochet and double crochet together into the next.
Because the stitches have different heights, the fabric develops tiny raised areas and a beautiful woven appearance without complicated techniques.
Worked in one color, it becomes a calm textured baby blanket. Add stripes or color blocks and the same stitch creates a completely different look, making it an easy pattern to reuse for blankets, scarves, cushions, dishcloths, and other everyday crochet projects.


