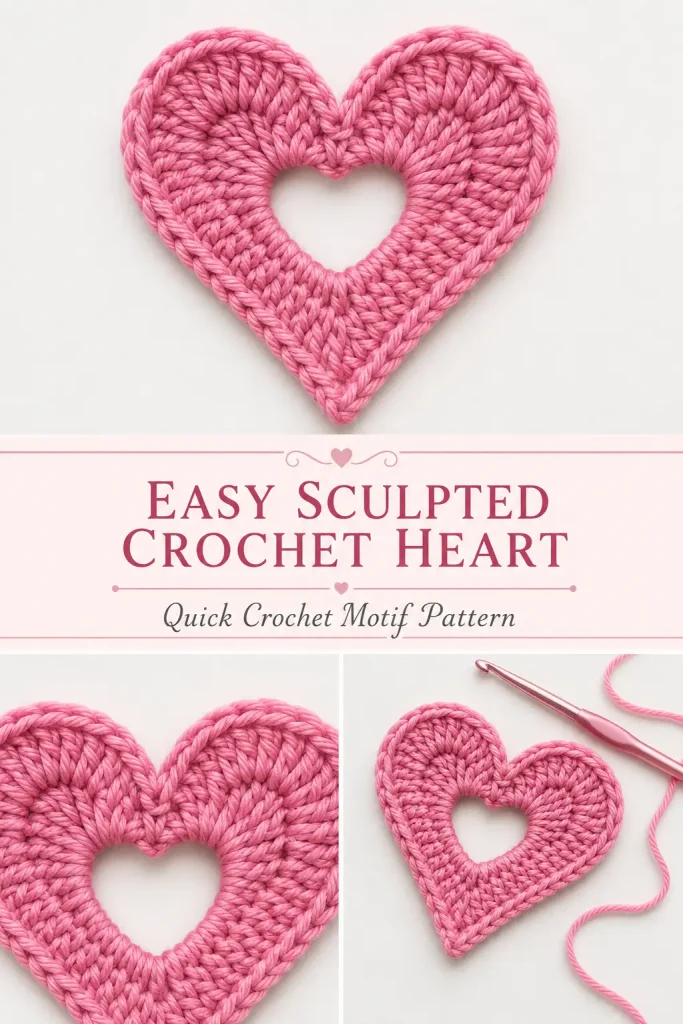
This small crochet heart is worked in one compact round and shaped with a tight slip-stitch outline. The graduated stitch heights create two rounded lobes and a defined lower point, while the smaller finishing hook helps the motif keep its crisp, sculpted shape.
Use these hearts for appliqués, garlands, Valentine decorations, gift wrapping, bookmarks, hair accessories, or handmade cards. The pattern is quick to crochet and works with cotton, acrylic, or crochet thread.
Description
The finished crochet heart has two full rounded lobes, a small open center, and a clearly shaped lower point. It begins with a six-chain ring filled with groups of treble and double crochet stitches. A final contour of slip stitches tightens and defines the outer edge, giving the motif a smooth, modeled appearance rather than a loose or floppy shape.
Materials
- Cotton yarn, cotton cord, or acrylic yarn
- 3 mm crochet hook for the main heart
- 2–2.5 mm crochet hook for the finishing outline
- Yarn needle
- Scissors
The original demonstration mentions both a 2 mm and a 2.5 mm finishing hook. Use a hook approximately 0.5–1 mm smaller than the main hook. A 2.5 mm hook matches the hook change demonstrated during the shaping section.
Abbreviations
- ch: chain
- dc: double crochet
- sc: single crochet
- sl st: slip stitch
- tr: treble crochet
- st: stitch
Pattern Notes
- This pattern uses US crochet terminology.
- Keep the stitches short, firm, and close together.
- Do not pull the tall stitches upward while working them.
- Leave a beginning tail approximately 6 inches long.
- The heart is crocheted into one foundation ring.
- Switch to the smaller hook before working the single crochet and slip-stitch contour.
- Adjust the tension of every contour stitch so it follows the curve without puckering or becoming loose.
- Finished size depends on the yarn and hook combination.
- The center opening is part of the visible design.
Step-by-Step Instructions
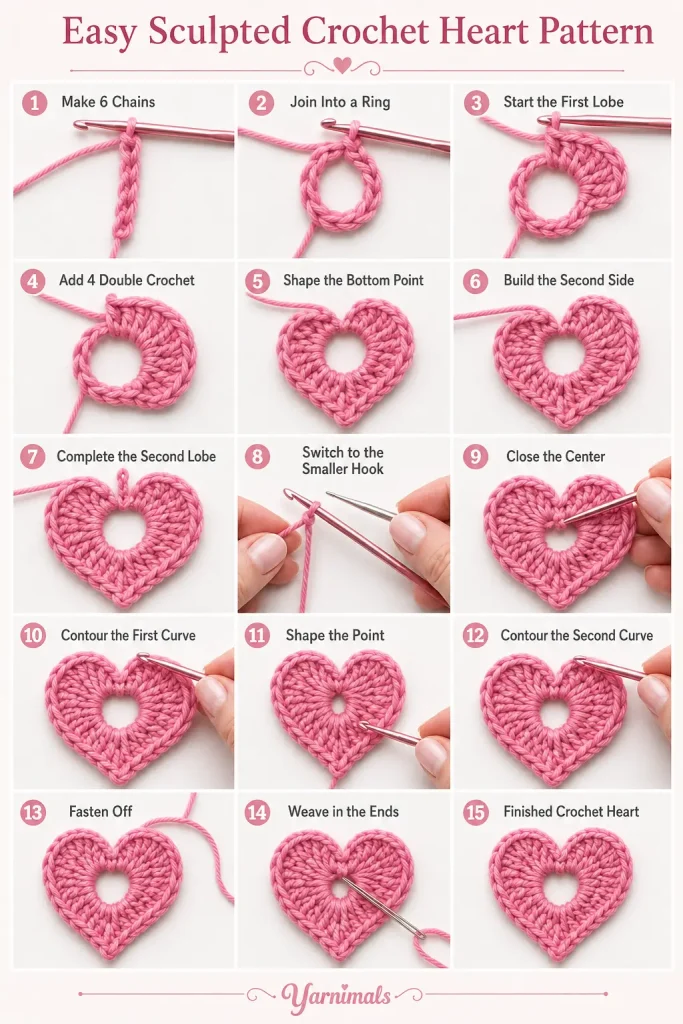
Make the Foundation Ring
Leave a yarn tail approximately 6 inches long.
Make a slip knot.
Using the 3 mm crochet hook, ch 6.
Insert the hook into the slip knot or first chain.
Join with a sl st to form a ring.
Take care not to twist the chain.
Crochet the First Heart Lobe
Ch 4.
Keep these chains firm rather than loose.
Work 4 tr into the center of the ring.
To make each treble crochet:
- Yarn over twice.
- Insert the hook through the center ring.
- Yarn over and pull up a loop.
- Yarn over and pull through 2 loops.
- Yarn over and pull through 2 loops.
- Yarn over and pull through the final 2 loops.
Push the completed stitches close together around the ring.
Shape the First Side
Work 4 dc into the center ring.
Keep all four stitches compact and close to the treble crochet group.
You have now completed the first rounded lobe and upper side of the heart.
Make the Bottom Point
Ch 1.
Work 1 tr into the center ring.
Ch 1.
This sequence forms the lower point:
- Ch 1
- 1 tr
- Ch 1
Crochet the Second Side
Work 4 dc into the center ring.
Push the stitches close together so the second side mirrors the first side.
Crochet the Second Heart Lobe
Work 4 tr into the center ring.
Keep the stitches firm and at the same height as the first treble crochet group.
Ch 3.
At this stage, the heart contains:
- Ch 4
- 4 tr
- 4 dc
- Ch 1
- 1 tr
- Ch 1
- 4 dc
- 4 tr
- Ch 3
All tall stitches are worked into the same center ring.
Change to the Smaller Hook
Remove the 3 mm hook carefully while keeping the working loop secure.
Place the working loop onto the 2–2.5 mm hook.
Tighten the loop gently to fit the smaller hook.
Insert the hook through the center ring.
Work 1 tight sc into the ring.
This single crochet closes the working round and organizes the center of the heart.
Do not work this stitch loosely.
Begin the Slip-Stitch Contour
The outer contour is worked with the smaller hook.
The slip stitches should follow the existing shape without pulling it inward.
Slip Stitch Along the Starting Chains
Work 1 sl st into each of the 3 visible chains along the first upper curve.
3 sl sts
Insert the hook carefully through each chain and keep the stitches close to the fabric.
Contour the First Side
Continue working 1 sl st through both top loops of each stitch around the first side.
Work 10 sl sts along this section, following the rounded lobe and continuing toward the lower point.
Adjust each loop carefully:
- Do not pull so tightly that the heart curls.
- Do not leave the loop so loose that it sits above the edge.
- Allow every slip stitch to follow the natural curve.
Define the Lower Point
When you reach the lower point, ch 1 tightly.
This tight chain emphasizes and sharpens the point of the heart.
Do not make a loose chain.
Contour the Second Side
Continue working 1 sl st through both top loops along the second side.
Work 9 sl sts, following the curve from the lower point toward the second upper lobe.
Keep the tension consistent with the first side.
Finish the Second Curve
When you reach the final ch-3 section, work 1 sl st into each of the 3 chains.
3 sl sts
These stitches complete the rounded upper curve and return you to the beginning of the contour.
Fasten Off
Pull the working loop upward until the tail measures approximately 6 inches.
Cut the yarn.
Pull the tail completely through.
Thread the finishing tail onto a yarn needle.
Insert the needle through the top center of the beginning chain section to close the final contour gap.
Bring the finishing tail toward the beginning tail at the center ring.
Tie the two tails together with one loose knot.
Check the heart shape before tightening.
When the lobes and point are even, tie a second firm knot.
Hide the Yarn Ends
Thread one tail through the center stitches toward the lower half of the heart.
Repeat with the second tail from the opposite direction.
Bring both ends toward the lower center.
Pull gently to refine the shape without closing the center opening completely.
Trim the excess yarn close to the back of the motif.
Final Shaping
Hold the heart between your fingers.
Gently shape:
- The first rounded lobe
- The center indentation
- The second rounded lobe
- Both side curves
- The lower point
The slip-stitch border should sit smoothly around the entire edge.
A small center opening should remain visible.
Tips & Variations
Use smooth cotton yarn for crisp stitch definition and a firm heart shape.
Acrylic yarn creates a softer motif that works well for blankets, scarves, and wearable appliqués.
For a smaller heart, use fine crochet thread with smaller hooks.
For a larger heart, use worsted-weight yarn with hooks appropriate for the yarn.
Keep the treble crochet stitches short and controlled. Pulling the working loops too high can make the lobes uneven.
The contour hook should be smaller than the main hook. This helps the slip-stitch border define the shape.
Use the hearts individually or join several together for:
- Valentine garlands
- Bag decorations
- Baby blanket appliqués
- Gift tags
- Hair clips
- Keychains
- Bunting
- Card decorations
For a hanging ornament, attach a small chain loop at the center indentation after completing the heart.
FAQ
Why is my crochet heart curling?
The contour slip stitches may be too tight. Work them firmly but allow each loop to follow the outer curve naturally.
Why are the two lobes different sizes?
Check that both sides contain the same groups of four double crochet and four treble crochet stitches. Keep the stitch height and tension consistent on both sides.
Can I use only one hook?
Yes, but the smaller finishing hook produces a tighter and more defined outline. When using one hook, work the contour slip stitches with firmer tension.
Conclusion
This sculpted crochet heart pattern uses graduated tall stitches, a defined center point, and a carefully worked slip-stitch contour to create a neat, rounded motif. Once you understand the stitch sequence, the heart is quick to repeat in different yarn weights and colors.
Make a collection in pink, red, cream, or your favorite shades, then use the finished hearts to decorate gifts, accessories, garments, blankets, and handmade crochet projects.



