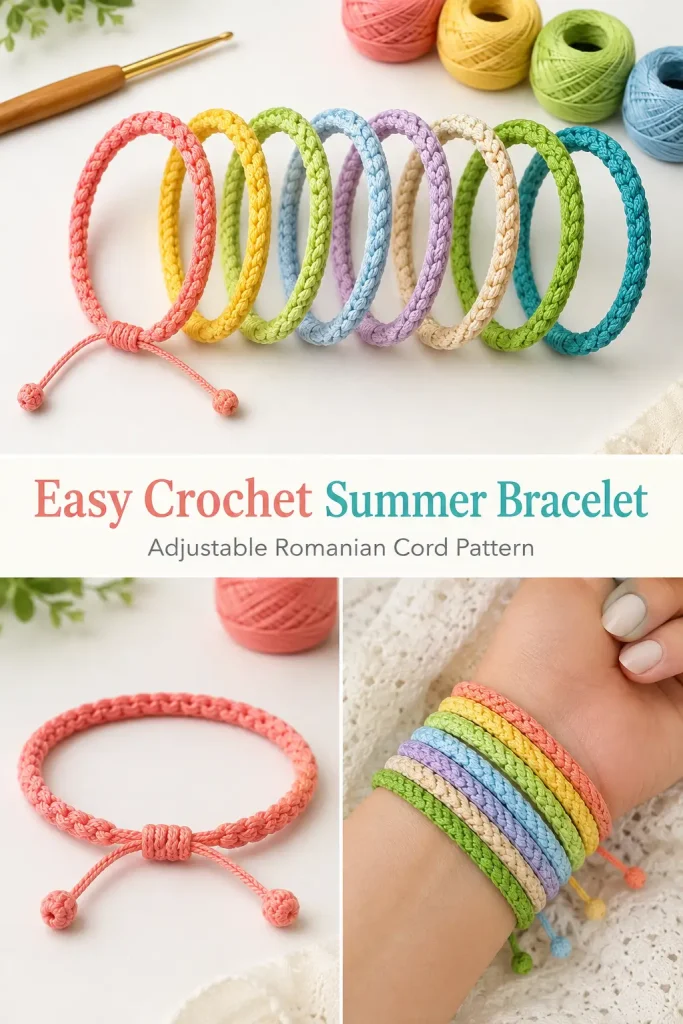
These slim crochet bracelets are quick to make, comfortable to wear, and perfect for using small amounts of colorful yarn. The bracelet body is worked as a three-dimensional Romanian crochet cord, giving it a rounded, braided texture that looks attractive from every angle.
An adjustable sliding knot makes the bracelet easy to open, put on, and tighten around the wrist. You can finish the cord ends with simple knots or add small beads for a polished handmade accessory that works beautifully as a summer gift, craft-fair item, or beginner crochet project.
Description
The finished crochet bracelet is a narrow, flexible cord with a firm three-dimensional braided texture. It is crocheted in one continuous strip, then shaped into a loop with overlapping ends. A separate wrapped sliding knot holds the two ends together while allowing them to move, so the bracelet can be enlarged for putting it on and tightened for a secure fit. The design can be made in bright colors, soft pastels, neutrals, or shiny thread for a more elegant finish.
Materials
- Cotton yarn, crochet thread, or another smooth yarn
- Crochet hook suitable for the selected yarn
- Scissors
- Yarn needle
- Measuring tape
- One small drinking straw, optional
- Two small beads with holes large enough for the yarn, optional
Abbreviations
- ch – chain
- sc – single crochet
- st – stitch
Pattern Notes
- This pattern uses US crochet terminology.
- The bracelet body is made with a three-dimensional Romanian cord.
- The slip knot is treated as the first chain in the original construction.
- Leave a beginning tail of approximately 15 cm.
- Rotate the cord slightly after each single crochet to locate the next two side strands.
- Use smooth yarn that does not split easily.
- Thicker yarn creates a thicker bracelet.
- The bracelet can be finished with beads or simple knots.
- The sliding closure is made with a separate strand approximately 30 cm long.
- Work with firm but comfortable tension. Very tight stitches can make the cord difficult to rotate.
Step-by-Step Instructions
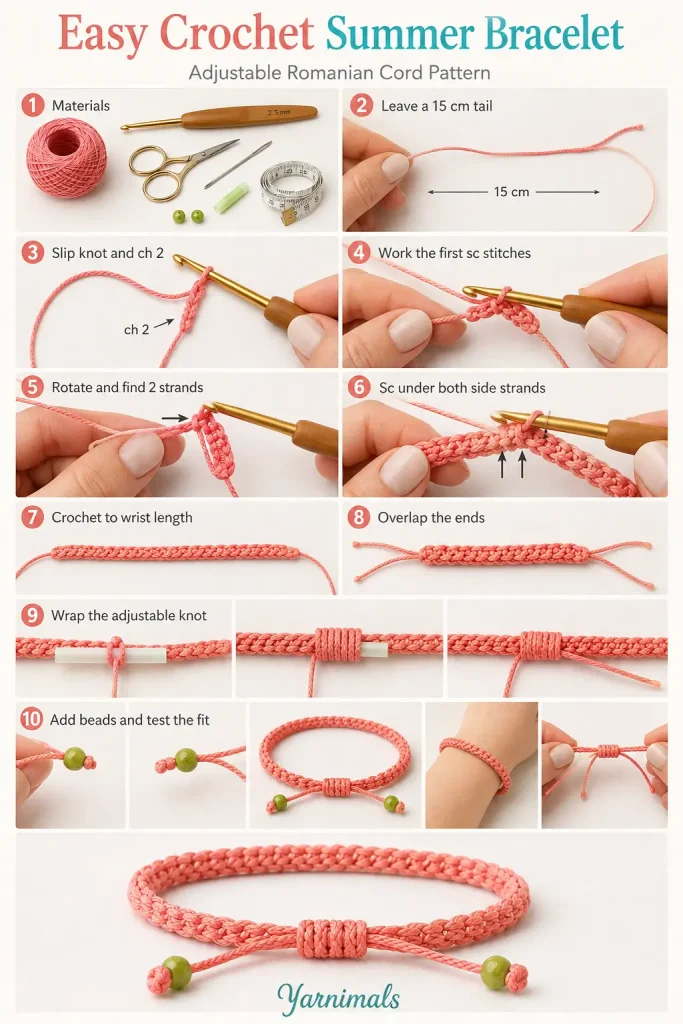
Make the Beginning Loop
Leave a yarn tail approximately 15 cm long.
Make a slip knot, but do not pull it extremely tight. Treat this slip knot as the first chain.
Ch 2 more.
You should now have the slip-knot chain plus two additional chains.
Establish the Romanian Cord
Insert the hook into the lower thread of the first chain section.
Work 1 sc.
Locate the next chain section. Insert the hook under the visible thread and the lower thread beneath it.
Work 1 sc.
Move to the third visible chain section.
Insert the hook under the visible side thread and the thread directly beneath it.
Work 1 sc.
These first stitches establish the rounded structure of the bracelet cord.
Continue the Three-Dimensional Cord
Rotate the work slightly.
Look immediately after the sc you just completed. You should see two side strands running close together.
Insert the hook under both strands.
Yarn over and pull up a loop.
Yarn over and pull through both loops to complete 1 sc.
Rotate the cord slightly again.
Locate the next two side strands immediately after the stitch you just made.
Insert the hook beneath both strands and work 1 sc.
Continue repeating:
- Rotate the cord slightly.
- Find the next two side strands.
- Insert the hook beneath both strands.
- Work 1 sc.
As the cord grows, the two strands used for each new stitch will become easier to identify.
The cord should form a narrow, rounded braid rather than a flat strip.
Check the Bracelet Length
Continue crocheting until the cord fits comfortably around the wrist.
Before finishing, place the cord around the wrist and overlap the two ends slightly. The bracelet should be long enough to fit comfortably but should not be so long that the adjustable ends hang excessively.
For an adjustable bracelet, allow enough room for the ends to overlap and slide through the closure knot.
Keep the 15 cm beginning tail untrimmed.
Finish the Crochet Cord
When the bracelet reaches the required length, insert the hook into the next available side stitch.
Yarn over and pull the yarn through.
Insert the hook into the following side stitch.
Yarn over and pull the yarn through the stitch and the loop already on the hook to close the cord neatly.
Ch 1 as a securing chain.
Cut the yarn, leaving a generous finishing tail.
Pull the tail through the final loop and tighten.
You should now have one completed Romanian crochet cord with a yarn tail at each end.
Make the Adjustable Sliding Closure
Prepare the Bracelet Ends
Shape the crochet cord into a bracelet.
Lay the two cord ends over one another so they point in opposite directions.
The overlapping section should be long enough for both ends to slide through the closure while the bracelet opens and closes.
Keep the cords parallel and avoid twisting them.
Cut the Closure Strand
Cut a separate piece of yarn approximately 30 cm long.
For the most discreet finish, use yarn in the same color as the bracelet.
A contrasting color may be used while practicing so the construction is easier to see.
Fold this strand so one end is short and the other end is much longer.
Lay the folded closure strand alongside the two overlapping bracelet ends.
The folded loop or short section should remain visible at one side.
Optional Straw Method
Place a short piece of drinking straw on top of the overlapping bracelet ends.
Lay it parallel to the cords.
The straw creates a clear tunnel for passing the closure yarn through after wrapping. This is especially useful for beginners.
Wrap the Sliding Knot
Take the long end of the closure strand.
Wrap it around:
- both overlapping bracelet ends
- the short closure strand
- the straw, when using one
Make 3 to 5 wraps.
Place each wrap neatly beside the previous one.
Do not allow the wraps to cross or overlap.
Three wraps create a small closure. Five wraps produce a wider and more noticeable knot.
Keep the wraps firm, but do not tighten them so much that the bracelet ends cannot slide.
Secure the Wrapped Knot
After making the final wrap, pass the long closure end through the straw.
Bring it out at the opposite side of the wrapped section.
Hold the wraps in place and carefully remove the straw.
When not using a straw, pass the long end through the small tunnel or folded loop formed beneath the wraps.
Pull gently on both ends of the closure strand:
- pull one side slightly
- then pull the other side
- continue alternating until the wraps are secure
The wrapped section should now form a small barrel-shaped sliding knot around the two bracelet ends.
Test the bracelet.
The two crochet ends should slide through the knot so the bracelet can become larger or smaller.
Do not tighten the closure until the ends stop moving.
Finish the Closure Ends
Secure the two small closure tails.
You may:
- tie them together and trim them short
- weave them carefully beneath the wrapped knot
- trim them close after checking that the knot is secure
Avoid cutting too close before testing the closure several times.
Finish the Bracelet Cord Ends
Open the bracelet to its widest comfortable size.
Check the length of the two sliding ends.
Trim them only when you are satisfied with the fit.
Choose one of the following finishes.
Option 1 – Simple Knotted Ends
Tie a firm knot near the end of each bracelet tail.
Trim the excess yarn, leaving a small neat end.
The knots prevent the cord ends from sliding completely through the adjustable closure.
Option 2 – Beaded Ends
Thread one bead onto each bracelet tail.
Make sure the bead hole is large enough for the yarn.
Slide the bead to the desired position.
Tie a firm knot beneath the bead.
Trim the excess yarn.
The beads add a decorative finish and prevent the bracelet ends from pulling through the sliding knot.
Option 3 – Small Yarn Knots
Tie several compact knots at each end to create a simple decorative stopper.
Keep both finished ends approximately the same length.
Final Fit Check
Pull the two bracelet ends outward to enlarge the opening.
Slide the bracelet over the hand.
Pull the ends gently to tighten it around the wrist.
The bracelet should sit comfortably without pressing tightly into the skin.
Check that:
- the Romanian cord is not twisted
- the sliding knot moves smoothly
- the end knots or beads cannot pass through the closure
- all trimmed yarn ends are secure
Tips and Variations
Use mercerized cotton for a smooth bracelet with crisp stitch definition and a light sheen.
Fine crochet thread creates a delicate bracelet suitable for stacking. Medium cotton yarn makes a thicker and more casual accessory.
Choose a hook that creates firm stitches without making the side loops difficult to enter.
Rotate the cord in the same direction after every stitch. Consistent rotation creates a more even three-dimensional braid.
When locating the next insertion point, look directly after the most recent single crochet. The two side strands should sit beside one another.
For a coordinated bracelet set, make several cords in different colors but keep the yarn weight and finished length consistent.
Add one bead to each end for a simple finish, or use small metallic, wooden, glass, or ceramic beads.
A single bracelet looks delicate, while several bracelets stacked together create a colorful summer accessory.
To make a matching anklet, crochet a longer cord and use the same adjustable closure method.
For children’s bracelets, ensure the sliding knot and end beads are securely fastened. Avoid small detachable beads for very young children.
Frequently Asked Questions
What is Romanian crochet cord?
Romanian cord is a narrow three-dimensional crochet braid. It is made by rotating the work and repeatedly crocheting into the side strands created by the previous stitch.
How do I know where to insert the hook?
After each single crochet, rotate the cord slightly. Look immediately beside the stitch you just made. Two horizontal or diagonal strands should be visible. Insert the hook beneath both strands.
Why is my bracelet becoming flat?
The cord may not be rotating consistently, or the hook may be inserted into only one side strand. Rotate after every stitch and crochet beneath both visible strands.
How long should the bracelet be?
Crochet until the cord fits around the wrist with enough extra length for the ends to overlap inside the sliding closure. Measure directly on the intended wearer for the best fit.
Can I make the bracelet without beads?
Yes. Tie a secure knot at each cord end. The knots serve as stoppers and keep the bracelet ends from sliding out of the adjustable closure.
Conclusion
This easy crochet summer bracelet is a satisfying way to turn a small amount of yarn into a useful handmade accessory. Once you learn how to rotate the Romanian cord and locate the next two strands, the bracelet grows quickly. Make one in a favorite color, create a stack of bright bracelets, or prepare several as simple handmade gifts.




Merci pour le partage
I really like these bracelets, especially the bracelet cord ends that look like crocheted round beads. Would you be kind enough to let me know how you made them? Thank you so much!