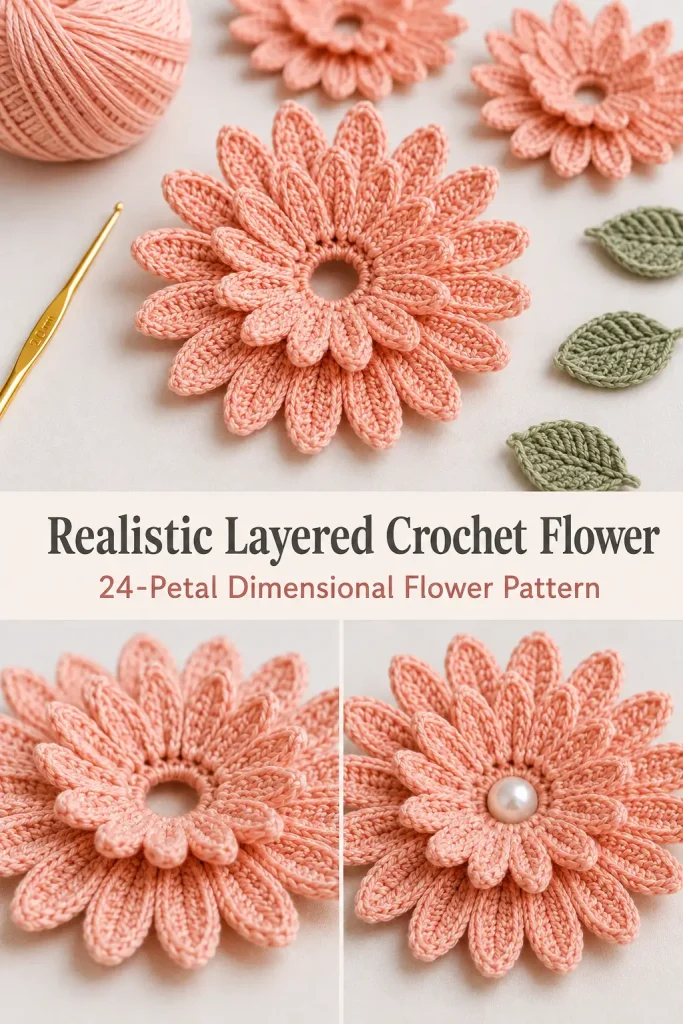
This dimensional crochet flower is a beautiful little project when you want something more sculptural than a flat crochet motif. The overlapping petals stand upward naturally, giving the flower the full, almost-real appearance shown in the inspiration.
The entire flower is made from one small circular base with two separate layers of elongated petals. Keep the center open for the simple floral version, or sew a pearl bead into the middle for an elegant finishing touch. These flowers are lovely for bags, hair accessories, brooches, bouquets, gift wrapping, and handmade home decor.
Description
The finished flower has a compact round center surrounded by 24 dimensional petals arranged in two layers. The outer layer contains 12 longer peach-pink petals, while the inner layer contains 12 slightly shorter petals that stand more upright and overlap the first layer. Each petal is crocheted around a short chain to form a narrow padded oval rather than a flat fan-shaped petal. The construction leaves a small opening in the center, matching the flower without a bead, while an optional round pearl can be sewn over that opening for the second finished look.
With fine cotton yarn and a 2 mm hook, the finished flower measures approximately 7–8 cm across.
Materials
- Fingering or sport-weight mercerized cotton yarn in peach, coral pink, or your preferred flower color
- 2 mm crochet hook
- Yarn needle
- Scissors
- Stitch marker
- Optional 10–12 mm pearl bead
- Matching sewing thread and needle if adding a pearl
Abbreviations
- ch – chain
- dc – double crochet
- hdc – half double crochet
- MR – magic ring
- sc – single crochet
- sl st – slip stitch
- st – stitch
- sts – stitches
Pattern Notes
- This pattern uses US crochet terminology.
- The flower is worked from a small circular base.
- Make exactly 12 outer petals and 12 inner petals.
- The two petal layers are attached to different loops of the same foundation round.
- Outer petals are longer and lie slightly flatter.
- Inner petals are shorter and naturally stand more upright.
- Work fairly tightly so the petals hold their sculptural shape.
- Do not heavily block the finished flower.
- The pearl center is optional.
- For a flower close to the reference, use smooth tightly twisted cotton rather than fuzzy yarn.
Step-by-Step Instructions
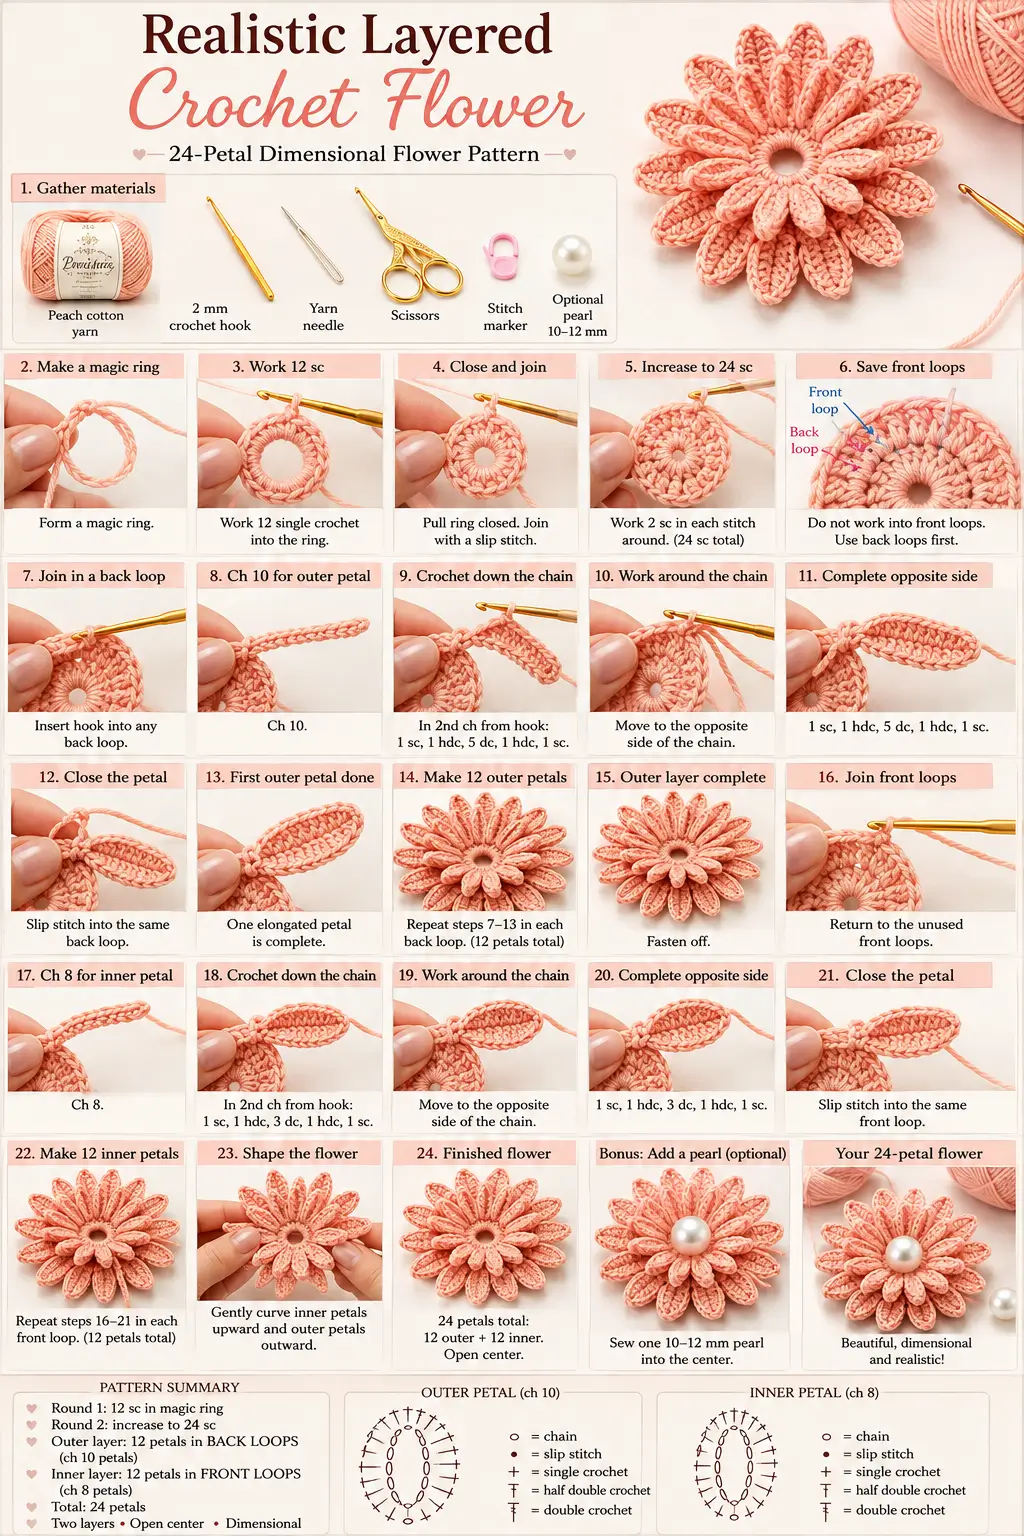
Part 1: Crochet the Flower Base
Using peach yarn, make a magic ring.
Round 1
Ch 1.
Work 12 sc into the MR.
Pull the ring almost closed, but do not cinch it so tightly that the center completely disappears.
Join with a sl st in the first sc.
12 sts
Round 2
Ch 1.
Work 2 sc in every st around.
Join with a sl st in the first sc.
24 sts
Do not fasten off.
This 24-stitch round provides the anchor points for both layers of petals.
The outer petals will be worked using the back loops, while the inner petals will later use the front loops.
Part 2: Outer Petal Layer
The outer layer contains 12 long petals.
Each petal uses 2 stitches from Round 2.
Work only in the back loops for this section.
Outer Petal 1
Sl st in the BLO of the first st.
Ch 10.
Starting in the second ch from the hook, work:
- 1 sc
- 1 hdc
- 1 dc in each of the next 5 ch
- 1 hdc
- 1 sc
You have reached the end of the foundation chain.
Now continue around the opposite side of the chain.
Working into the unused loops underneath the chain, work:
- 1 sc
- 1 hdc
- 1 dc in each of the next 5 loops
- 1 hdc
- 1 sc
Sl st back into the same BLO where the petal began.
This creates one long narrow oval petal.
Sl st into the BLO of the next stitch.
The first petal is complete.
Outer Petals 2–12
In the following BLO:
Repeat:
- Ch 10
- Sc in second ch
- Hdc in next
- Dc in next 5
- Hdc in next
- Sc in next
- Work back along the opposite side with sc, hdc, 5 dc, hdc, sc
- Sl st into the same base stitch
- Sl st into the next BLO
Continue until you have 12 evenly spaced outer petals.
After Petal 12, join neatly near the first petal.
Fasten off.
Shape the Outer Petals
Use your fingers to arrange the 12 petals evenly around the flower.
Do not flatten them.
Instead:
- Curve each petal gently upward.
- Allow neighboring petals to overlap slightly.
- Angle the petal tips outward.
- Keep the bases close together around the center.
The flower should already begin looking full and dimensional.
Part 3: Inner Petal Layer
The inner petals are attached to the unused front loops of Round 2.
They are slightly shorter so they sit above the outer layer.
Turn the petals aside gently so you can see the center.
Join the same peach yarn in the FLO of any stitch from Round 2.
Again, each petal uses two stitches.
Inner Petal 1
Sl st in the first available FLO.
Ch 8.
Starting in the second ch from the hook, work:
- 1 sc
- 1 hdc
- 1 dc in each of the next 3 ch
- 1 hdc
- 1 sc
Continue along the opposite side of the chain:
- 1 sc
- 1 hdc
- 1 dc in each of the next 3 loops
- 1 hdc
- 1 sc
Sl st into the same FLO where the petal began.
Sl st into the next FLO.
One inner petal is complete.
Inner Petals 2–12
Repeat the same construction around until you have exactly 12 inner petals.
After the final petal, join neatly and fasten off.
Shape the Inner Layer
Gently lift the inner petals upward.
Arrange them so that each inner petal lies approximately between two outer petals.
This staggered placement gives the flower its full layered appearance.
The inner petals should:
- Stand slightly more upright
- Overlap each other lightly
- Curve toward the flower center
- Remain shorter than the outer petals
Do not pull them flat.
Part 4: Refine the Flower Center
After both petal layers are complete, check the middle.
You should see a small circular opening or recessed center.
For the simple version, leave this opening visible.
Use your yarn needle to hide any loose tails underneath the flower base.
Pull the center gently into a neat circle, but do not completely close it.
This creates the open-centered flower visible in the first reference design.
Part 5: Optional Pearl Center
For the pearl version, use one round pearl approximately 10–12 mm in diameter.
Position it directly over the flower’s center opening.
Using matching sewing thread and a fine needle:
- Bring the needle from the back of the crochet base to the center.
- Pass through the pearl.
- Bring the needle back through the crochet base.
- Repeat several times.
- Secure the thread firmly at the back.
The pearl should sit slightly recessed among the inner petals rather than floating above them.
Do not pull so tightly that the flower center puckers.
Part 6: Final Petal Shaping
Hold the flower in your palm.
Starting with the outer layer:
Gently bend each petal lengthwise so it forms a slightly folded, raised shape.
Then shape the inner layer.
Lift the inner petals toward the center and allow them to overlap naturally.
The finished flower should have:
- 12 longer outer petals
- 12 shorter inner petals
- Dense layered construction
- Rounded raised petal surfaces
- A small open center or pearl center
- No flat fan-shaped petals
Part 7: Secure the Back
Turn the flower over.
Use a yarn needle to weave every crochet tail beneath several base stitches.
Change direction once or twice before trimming.
The underside should remain relatively flat so the flower can easily be attached to another project.
Finished Design Check
Your completed flower should have:
- One small circular crochet base
- 24 total petals
- 12 long outer petals
- 12 shorter inner petals
- Peach or coral-pink yarn throughout
- Elongated oval petals
- Two clearly layered petal levels
- Compact raised flower shape
- Optional pearl at the center
- No leaves unless added separately
- No flat granny-style petals
Tips & Variations
For the closest look to the reference, use smooth mercerized cotton with a slight sheen. It shows the dense stitches along each elongated petal beautifully.
Use a hook slightly smaller than the yarn normally recommends. Tight stitches help the petals stand upright.
If the petals are too floppy, reduce the hook size by 0.25–0.5 mm.
If they curl too tightly, loosen your tension or use a slightly larger hook.
For a larger flower, make the outer petals with ch 12 and the inner petals with ch 9 or 10.
For a smaller flower, try ch 8 for the outer layer and ch 6 for the inner layer.
You can also use the same pattern in:
- Dusty rose
- Cream
- Soft lavender
- Burgundy
- White
- Pale peach
- Coral
For floral arrangements, crochet leaves separately in olive or sage green and sew them underneath the flower base.
For a brooch, stitch a brooch pin to the back.
For a hair clip, sew the flower firmly to a felt circle before attaching the clip.
For a bouquet, attach floral wire or a crocheted stem securely to the underside.
FAQ
How many petals does this flower have?
This version uses 24 petals total: 12 outer petals and 12 shorter inner petals.
Why are the petals worked around a chain?
Crocheting along both sides of a foundation chain creates the narrow elongated oval shape visible in the flower. It also gives each petal more structure than a traditional shell-style crochet petal.
Why use front and back loops separately?
Using different loops lets both petal layers share the same compact base while remaining independent. The outer petals sit slightly lower, while the inner petals naturally rise above them.
Can I add the pearl after the flower is finished?
Yes. Complete and shape the entire flower first, then sew the pearl securely into the middle.
Can I make the flower without the pearl?
Yes. The small recessed opening creates a beautiful finished center on its own and matches the open-center flower style shown in the inspiration.
Conclusion
This realistic layered crochet flower is a lovely small project when you want something dimensional, elegant, and different from a flat flower motif. The combination of 12 long outer petals and 12 shorter inner petals creates the full sculptural shape, while the optional pearl gives it a polished finish for accessories and gifts. Make one as a statement embellishment or crochet several in matching shades for a handmade floral bouquet.