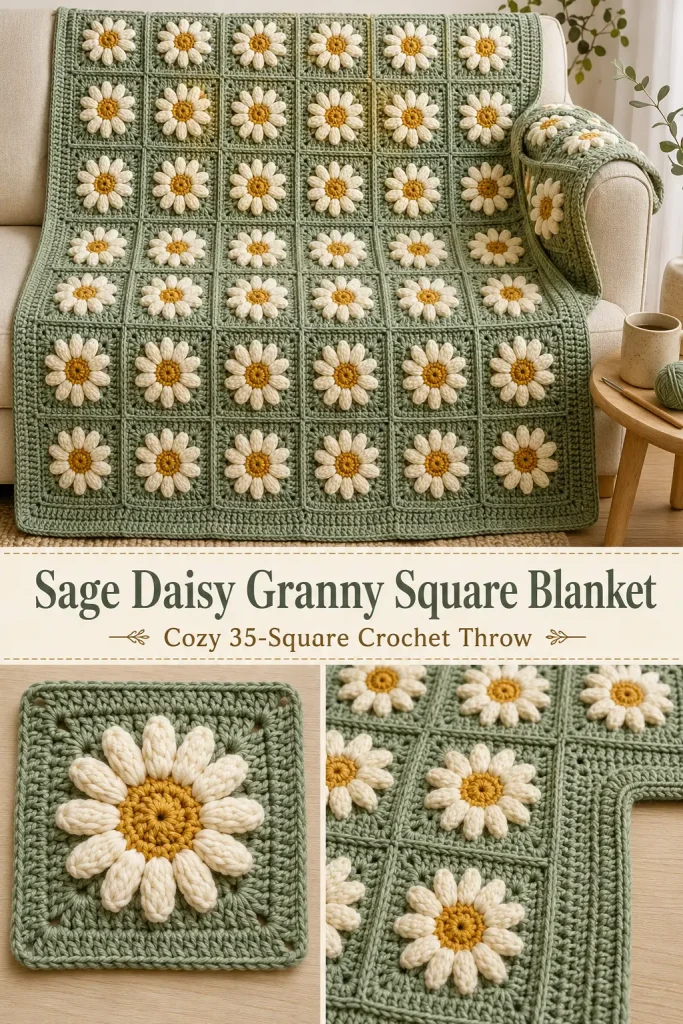
This cozy daisy granny square blanket combines oversized dimensional flowers with a soft sage-green background for a warm vintage look. Each square features a golden center, twelve raised cream petals, and a solid sage border before the motifs are joined into one large floral blanket.
The finished design uses 35 matching daisy squares arranged 5 across by 7 down, followed by a simple sage border. Bulky yarn gives the daisies their thick, soft texture and helps the blanket work up faster than a traditional fine-yarn granny square blanket.
Description
The finished crochet blanket is approximately 49 × 67 inches when made with 9-inch blocked squares and the border described below.
Each motif has four distinct parts:
- Textured golden-mustard flower center
- Exactly 12 raised cream petals
- Sage-green background worked behind the petals
- Solid square-shaped sage border
The flowers stay dimensional rather than being flattened into the square. Once all 35 motifs are joined with matching sage yarn, the result is a continuous field of daisies with subtle square seams and a softly structured outer border.
This pattern works especially well as a sofa blanket, large lap blanket, bed throw, or handmade floral gift.
Materials
- Bulky weight #5 yarn
- Sage green: approximately 1,600–1,900 yards
- Warm cream or ivory: approximately 450–550 yards
- Golden mustard: approximately 180–250 yards
- 6 mm crochet hook
- Yarn needle
- Scissors
- Stitch markers
- Blocking mats
- Rustproof pins
Choose a soft bulky yarn with enough stitch definition to keep the petals visible.
Abbreviations
- BLO – back loop only
- ch – chain
- dc – double crochet
- FLO – front loop only
- MR – magic ring
- sc – single crochet
- sl st – slip stitch
- sp – space
- st – stitch
- sts – stitches
- yo – yarn over
Finished Measurements
Sample motif after blocking:
Approximately 9 × 9 inches
Motif layout:
5 squares across × 7 squares down
Before border:
Approximately 45 × 63 inches
After border:
Approximately 49 × 67 inches
Exact measurements depend on yarn and tension.
Pattern Notes
- US crochet terminology is used.
- Make 35 identical squares.
- Each flower has exactly 12 petals.
- Petals are worked into the FLO of the mustard center.
- The sage background is worked into the unused BLO behind the petals.
- This allows the flower to remain raised while the square lies flat.
- Keep the same hook and tension for every motif.
- Block all motifs to exactly the same size before joining.
- Join all motifs with sage yarn.
- The sample layout is 5 × 7.
- The finished blanket has no fringe or tassels.
Special Stitch: Long Puff Petal
The raised petals are made with a long puff.
In the indicated stitch:
- Ch 3.
- Yo.
- Insert hook into the same stitch.
- Yo and pull up a tall loop approximately the height of the ch 3.
- Repeat Steps 2–4 four more times.
You should have 11 loops on the hook.
Yo and carefully pull through all loops.
Ch 1 to close the puff.
Ch 3.
Sl st into the same stitch.
One long puff petal is complete.
Keep every pulled-up loop approximately the same height so all twelve petals match.
Step-by-Step Instructions
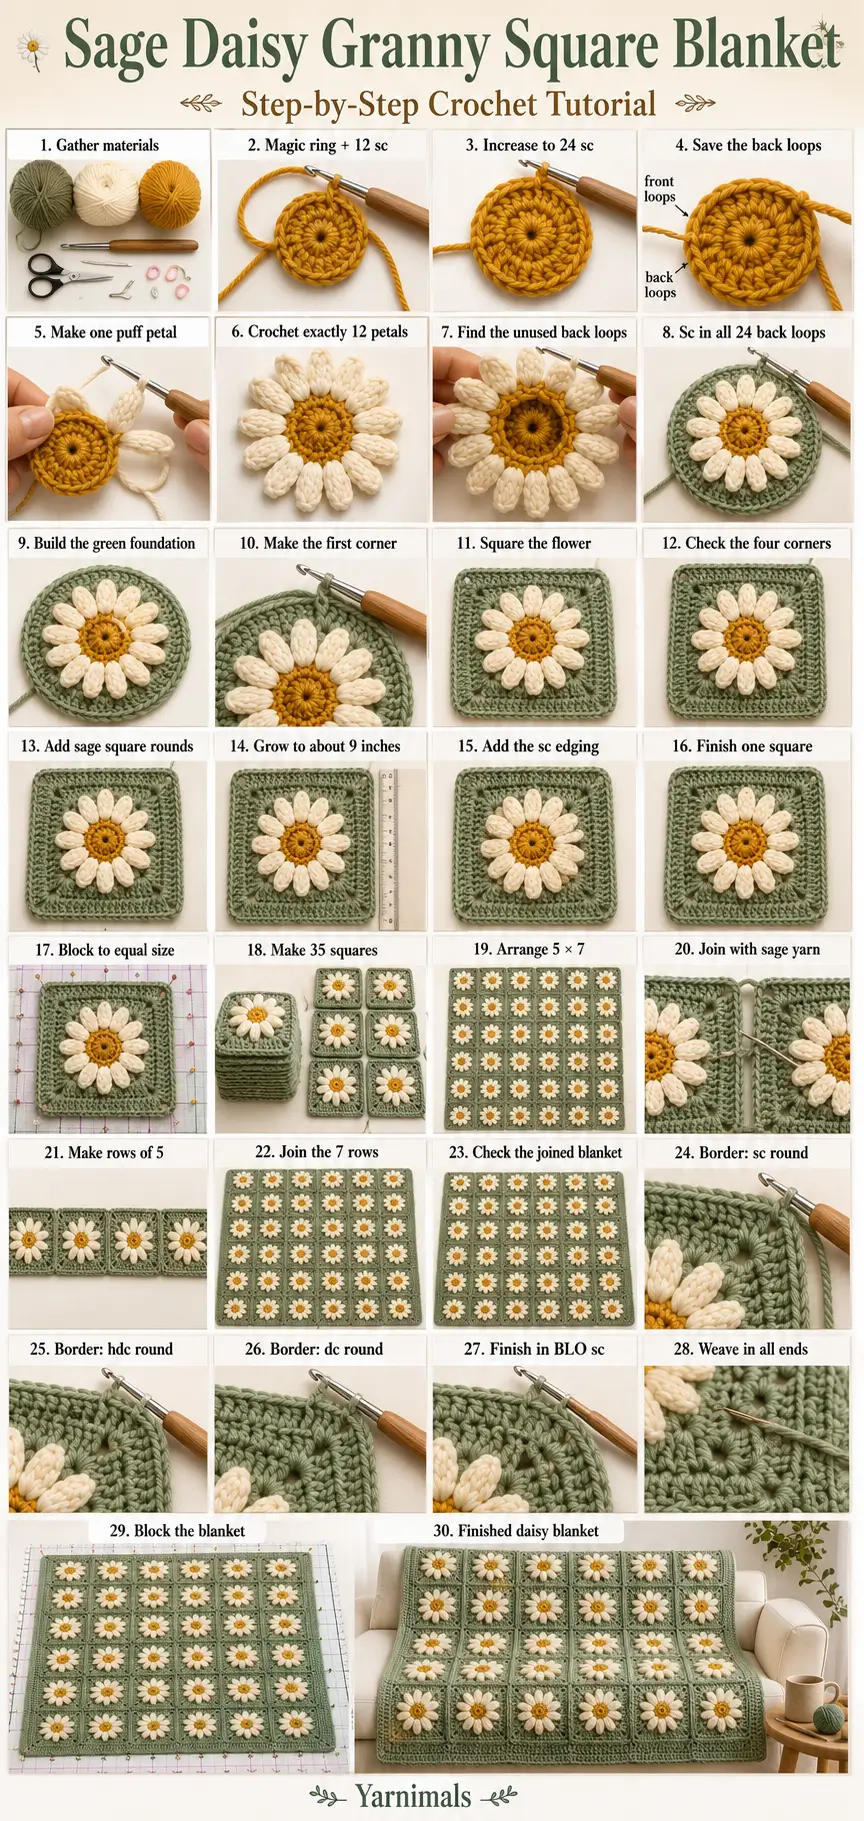
Part 1: Crochet the Golden Daisy Center
Using mustard yarn, make an MR.
Round 1
Ch 1.
Work 12 sc into the MR.
Pull the ring firmly closed.
Join with a sl st in the first sc.
12 sts
Round 2
Ch 1.
Work 2 sc in every st around.
Join with a sl st in the first sc.
24 sts
Fasten off mustard.
Do not tighten the center so aggressively that it cups.
Part 2: Crochet the 12 Cream Petals
The petals are worked only into the front loops of Round 2.
This leaves the back loops available for the sage background.
Join cream yarn in the FLO of any stitch.
Petal Round
Repeat the following sequence 12 times:
- Sl st in FLO of the next st.
- Work 1 Long Puff Petal in FLO of the next st.
Each repeat uses 2 center stitches.
After the twelfth petal, join neatly at the base of the first petal.
Fasten off cream.
You should now have:
- 1 mustard center
- 12 cream petals
- 24 unused back loops behind the flower
Gently pull each puff outward with your fingers so the flower is evenly rounded.
Part 3: Create the Sage Foundation Behind the Daisy
Turn the motif slightly so you can see the unused back loops from Mustard Round 2.
Join sage yarn in any unused BLO.
Sage Foundation Round
Ch 1.
Sc in the same BLO.
Work 1 sc in every remaining unused BLO around.
Join with a sl st in the first sc.
24 sc
The sage round should sit behind the flower rather than covering the petals.
Push all twelve cream petals toward the front before continuing.
Part 4: Square the Round Flower
Now convert the 24-stitch circle into four sides.
Square Round 1
Ch 3. This counts as the first dc.
In the same stitch work:
- 2 dc
- ch 2
- 3 dc
This creates Corner 1.
Work 1 dc in each of the next 5 sts.
In the next st work:
3 dc, ch 2, 3 dc
This creates Corner 2.
Repeat:
- Dc in next 5 sts.
- 3 dc, ch 2, 3 dc in next st.
Repeat twice more.
After the fourth corner, dc in the remaining 5 sts.
Join with a sl st in the top of the beginning ch 3.
You should now clearly have:
- 4 corners
- 4 straight sides
The flower remains raised in the center.
Part 5: Enlarge the Sage Square
Square Round 2
Sl st across to the first corner ch-2 sp.
Ch 3.
In the same corner work:
- 2 dc
- ch 2
- 3 dc
Dc in every dc across the side.
In the next corner work:
3 dc, ch 2, 3 dc
Continue around, working:
- 1 dc in every side stitch
- 3 dc, ch 2, 3 dc in every corner
Join in the top of the beginning ch 3.
Square Round 3
Repeat Square Round 2.
The motif should now have a generous sage background around the daisy.
Square Round 4
Repeat the same construction once more if needed to reach the sample size.
For the blanket shown here, work this round so the blocked motif finishes close to:
9 × 9 inches
All 35 squares must contain the same number of rounds.
Part 6: Final Square Edging
Ch 1.
Sc in each dc across the first side.
In the corner ch-2 sp work:
1 sc, ch 1, 1 sc
Continue around.
Work 1 sc in every stitch and:
1 sc, ch 1, 1 sc
in every corner.
Join with a sl st.
Fasten off.
Part 7: Make 35 Daisy Squares
Repeat the complete motif until you have exactly:
35 squares
Every motif must contain:
- 1 mustard center
- 12 cream puff petals
- Sage background
- 4 square corners
- Same number of sage rounds
- Same final measurement
Do not begin assembly until all 35 squares are complete.
Part 8: Block Every Square
Blocking is important for this blanket because even small differences become obvious once 35 motifs are joined.
Lightly dampen each square.
Lay it on a blocking mat.
Pin each motif to:
9 × 9 inches
Make sure:
- All four corners are square.
- Every side is straight.
- The daisy is centered.
- Petals face forward.
- The motif does not twist.
Allow the squares to dry completely.
Part 9: Arrange the Blanket
Arrange the 35 motifs in 7 rows of 5 squares.
□ □ □ □ □
□ □ □ □ □
□ □ □ □ □
□ □ □ □ □
□ □ □ □ □
□ □ □ □ □
□ □ □ □ □
Before joining, rotate any motif that looks visually uneven so the flowers all appear balanced.
Because every square uses the same colors, no special color sequence is necessary.
Part 10: Join the Squares
Use sage yarn.
For the clean appearance visible in this style of blanket, use a mattress-style seam or a flat whip-stitch seam.
Mattress-Stitch Method
Place two squares side by side with right sides facing upward.
Thread a long strand of sage yarn onto a yarn needle.
Beginning at the corner, pass the needle under the corresponding edge loops of one square and then the other.
Continue matching:
- Stitch to stitch
- Corner to corner
- Side to side
Pull the yarn gently every few stitches.
The seam should close without puckering.
Do not pull so tightly that the flower squares fold inward.
Recommended Joining Order
First create seven horizontal rows.
Join five squares in each row.
Then join the seven completed rows together.
This is easier than attaching squares randomly.
Part 11: Check the Joined Blanket
Lay the complete 5 × 7 panel flat.
Check:
- All flowers face the same side.
- No square is upside down or twisted.
- Horizontal seams remain straight.
- Vertical seams remain straight.
- Outer corners align.
- No joining yarn tails are loose.
Weave in the major joining ends before adding the border.
Part 12: Crochet the Blanket Border
Use sage yarn.
The border should remain simple so the dimensional daisies stay the focus.
Border Round 1
Join sage yarn in any outer corner.
Ch 1.
Work sc evenly around the complete blanket.
Across each square edge, work approximately 1 sc in every edging stitch.
Where two squares meet, work across the seam without adding unnecessary stitches.
At every blanket corner work:
2 sc, ch 2, 2 sc
Join with a sl st in the first sc.
Check the blanket before continuing.
If the border ripples strongly, you have too many stitches.
If the blanket edges pull inward, add a few evenly spaced stitches.
Border Round 2
Ch 2.
Hdc in every st around.
In each corner ch-2 sp work:
2 hdc, ch 2, 2 hdc
Join.
Border Round 3
Ch 3.
Dc in every st around.
In each corner work:
2 dc, ch 2, 2 dc
Join.
Border Round 4
Ch 1.
Working in BLO, sc in every stitch around.
At each corner work:
2 sc, ch 1, 2 sc
Join and fasten off.
The final BLO round creates a subtle ridge and gives the blanket a neat finished edge.
Part 13: Weave In All Ends
Thread each yarn end through nearby stitches of the same color.
Weave in one direction.
Change direction and weave through another section.
For bulky yarn, change direction at least twice before trimming.
Pay special attention to:
- Mustard centers
- Cream petal joins
- Sage motif joins
- Square seams
- Border joins
Do not simply cut tails close to knots.
Part 14: Final Blocking
Spread the completed blanket on a large clean surface.
Lightly mist or dampen according to the yarn care instructions.
Straighten:
- Top edge
- Bottom edge
- Both sides
- Four corners
- Square seams
Arrange each flower so all twelve petals are visible.
Allow the blanket to dry completely.
Final Design Check
The finished blanket should have:
- 35 total motifs
- 5 motifs across
- 7 motifs down
- 12 cream petals per flower
- 35 mustard centers
- Sage-green square backgrounds
- Raised dimensional flowers
- Matching sage joining seams
- Wide rectangular blanket shape
- Simple sage outer border
- No tassels
- No fringe
- No appliqués sewn over completed squares
- No random flower sizes
Tips & Variations
For the closest cozy look, use a soft bulky yarn rather than worsted-weight yarn. The thicker fiber gives the petals their plush dimensional appearance.
If your petals disappear into the background, gently pull them forward after completing the first sage round.
Keep the sage stitches behind the petals. Crocheting over the flower edges will flatten the daisy.
Make one complete test square first. Block and measure it before making the remaining 34.
For a smaller baby blanket, make 20 squares and arrange them 4 × 5.
For a medium throw, use 30 squares in a 5 × 6 layout.
For a larger bed throw, use 48 squares in a 6 × 8 layout.
You can also change the palette while keeping the exact construction:
- Dusty blue background, cream petals, mustard center
- Lavender background, white petals, gold center
- Warm beige background, ivory petals, brown center
- Dusty rose background, cream petals, ochre center
FAQ
How many squares do I need?
This version uses 35 daisy granny squares arranged 5 × 7.
How many petals are on each flower?
Each daisy has exactly 12 raised puff petals.
Why is the sage background worked in the back loops?
The cream petals use the front loops of the mustard center. Working the sage background into the unused back loops gives the square a secure foundation without flattening the raised flower.
Can I use worsted-weight yarn?
Yes, but your squares will be smaller and the petals less chunky. You can add more sage rounds or increase the number of motifs.
Do I need to block all the motifs?
Yes. Blocking makes the 35 squares equal in size and makes assembly much cleaner.
Can I join the squares with crochet instead of sewing?
Yes. A slip-stitch or single-crochet join can be used with sage yarn, but it will create a more visible ridge than mattress stitching.
Conclusion
This sage daisy granny square blanket brings together thick dimensional flowers, calming green crochet, and simple modular construction. Once the 35 matching motifs are complete, the blanket becomes an enjoyable joining project with a beautiful repeated floral pattern. The mustard centers, cream puff petals, and soft sage background create a cozy vintage-style crochet blanket that works beautifully as a large throw, handmade gift, or statement piece for the home.