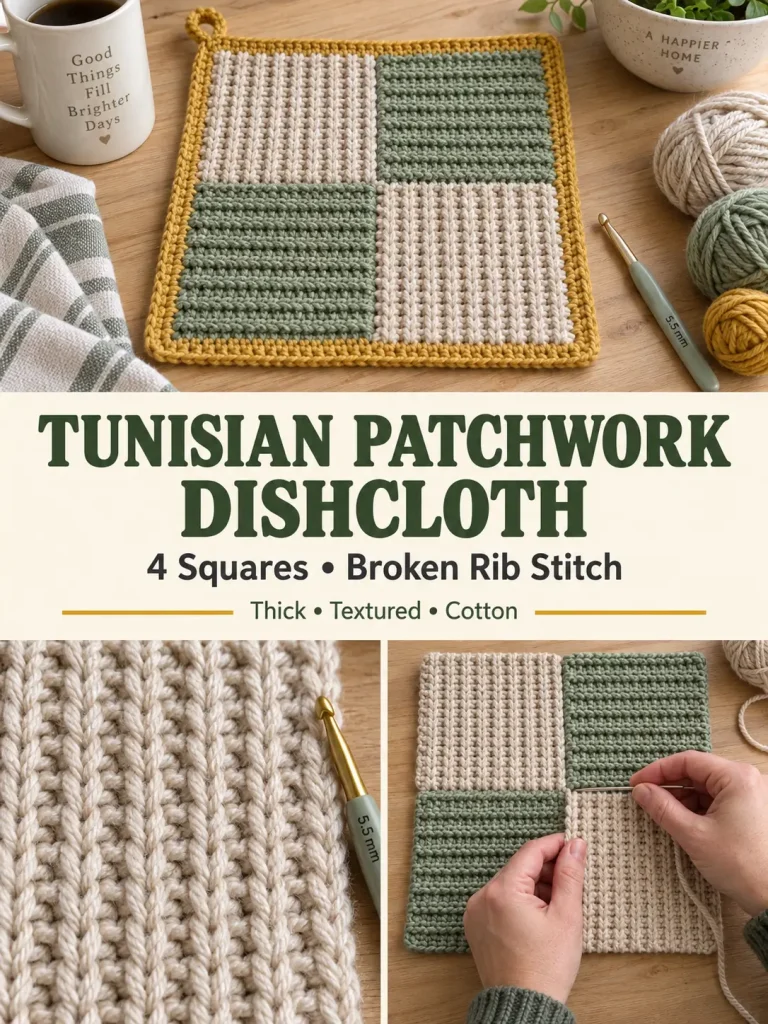
This textured Tunisian crochet dishcloth is made from four small squares arranged in a quarter-turn layout. Alternating Tunisian simple and purl stitches create a broken rib texture, while rotating the finished squares makes the stitches appear to change direction across the cloth.
The construction is small enough that you can make each square on a regular crochet hook with a reasonably straight shaft—no long cable is needed.
Use smooth cotton yarn for a thick, absorbent dishcloth, washcloth, reusable cleaning cloth, or small kitchen gift.
Pattern at a Glance
Skill level: Intermediate
Terminology: US crochet terms
Technique: Tunisian crochet
Finished size: Approximately 9½ × 9½ inches
Construction: Four separate squares joined in a 2 × 2 layout
Individual square: Approximately 4¼ × 4¼ inches
Yarn: Worsted / Category 4 cotton
Main hook: 5.5 mm
Border: 2 rounds
Main texture: Tunisian broken rib
Colors: Oatmeal, sage, mustard gold
Materials
You will need:
Color A — Warm Oatmeal
Approximately 45–55 yards
Color B — Soft Sage
Approximately 45–55 yards
Color C — Mustard Gold
Approximately 20–30 yards
Also:
- 5.5 mm crochet hook with a reasonably straight shaft
- yarn needle
- scissors
- stitch markers
- measuring tape
- blocking mats and pins, optional
A smooth 100% cotton or cotton-rich yarn works especially well for kitchen cloths.
Finished Measurements
Each blocked square:
Approximately 4¼ × 4¼ inches
Four-square body after joining:
Approximately 8½ × 8½ inches
Finished with border:
Approximately 9½ × 9½ inches
Exact size is not critical for a dishcloth.
The important thing is making all four squares identical.
Gauge
Approximately:
18 Tunisian stitches × 17 rows = 4¼ inches
in the broken-rib pattern after light blocking.
If your square is smaller, try a 6 mm hook.
If it is larger, try a 5 mm hook.
Abbreviations
- ch = chain
- sc = single crochet
- sl st = slip stitch
- st = stitch
- sts = stitches
- lp = loop
- yo = yarn over
- Tss = Tunisian simple stitch
- Tps = Tunisian purl stitch
- Tslst = Tunisian slip stitch
Understanding Tunisian Crochet Rows
Every Tunisian row has two parts:
Forward Pass
You collect loops onto the hook.
Return Pass
You work the loops back off the hook.
Do not turn the work after each pass.
The right side remains facing you throughout each square.
Standard Return Pass
At the end of every forward pass:
Ch 1.
Then repeat:
Yo, pull through 2 loops
until only:
1 loop
remains on the hook.
That remaining loop becomes the first stitch of the next row.
Tunisian Simple Stitch — Tss
Skip the first vertical bar directly underneath the loop already on your hook.
Insert the hook:
from right to left
under the next front vertical bar.
Yarn over.
Pull up one loop.
Leave the loop on the hook.
Tunisian Purl Stitch — Tps
Bring the working yarn to the front of the fabric.
Keep the yarn in front while you insert the hook:
from right to left
under the next front vertical bar.
Move the working yarn back behind the hook.
Yarn over.
Pull up one loop through the vertical bar.
Leave the new loop on the hook.
The strand held at the front creates the small horizontal bump that gives the purl stitch its texture.
Last Stitch of Every Forward Pass
Do not work the final stitch under only one vertical bar.
Insert the hook underneath:
both outer vertical strands
of the final stitch.
Yarn over.
Pull up one loop.
This creates a cleaner, stronger side edge for joining.
Broken Rib Stitch Pattern
The textured square is based on groups of:
2 Tss + 2 Tps
for two rows.
Then those positions reverse:
2 Tps + 2 Tss
for two rows.
That creates small broken sections instead of continuous straight ribs.
PART 1 — FIRST SQUARE
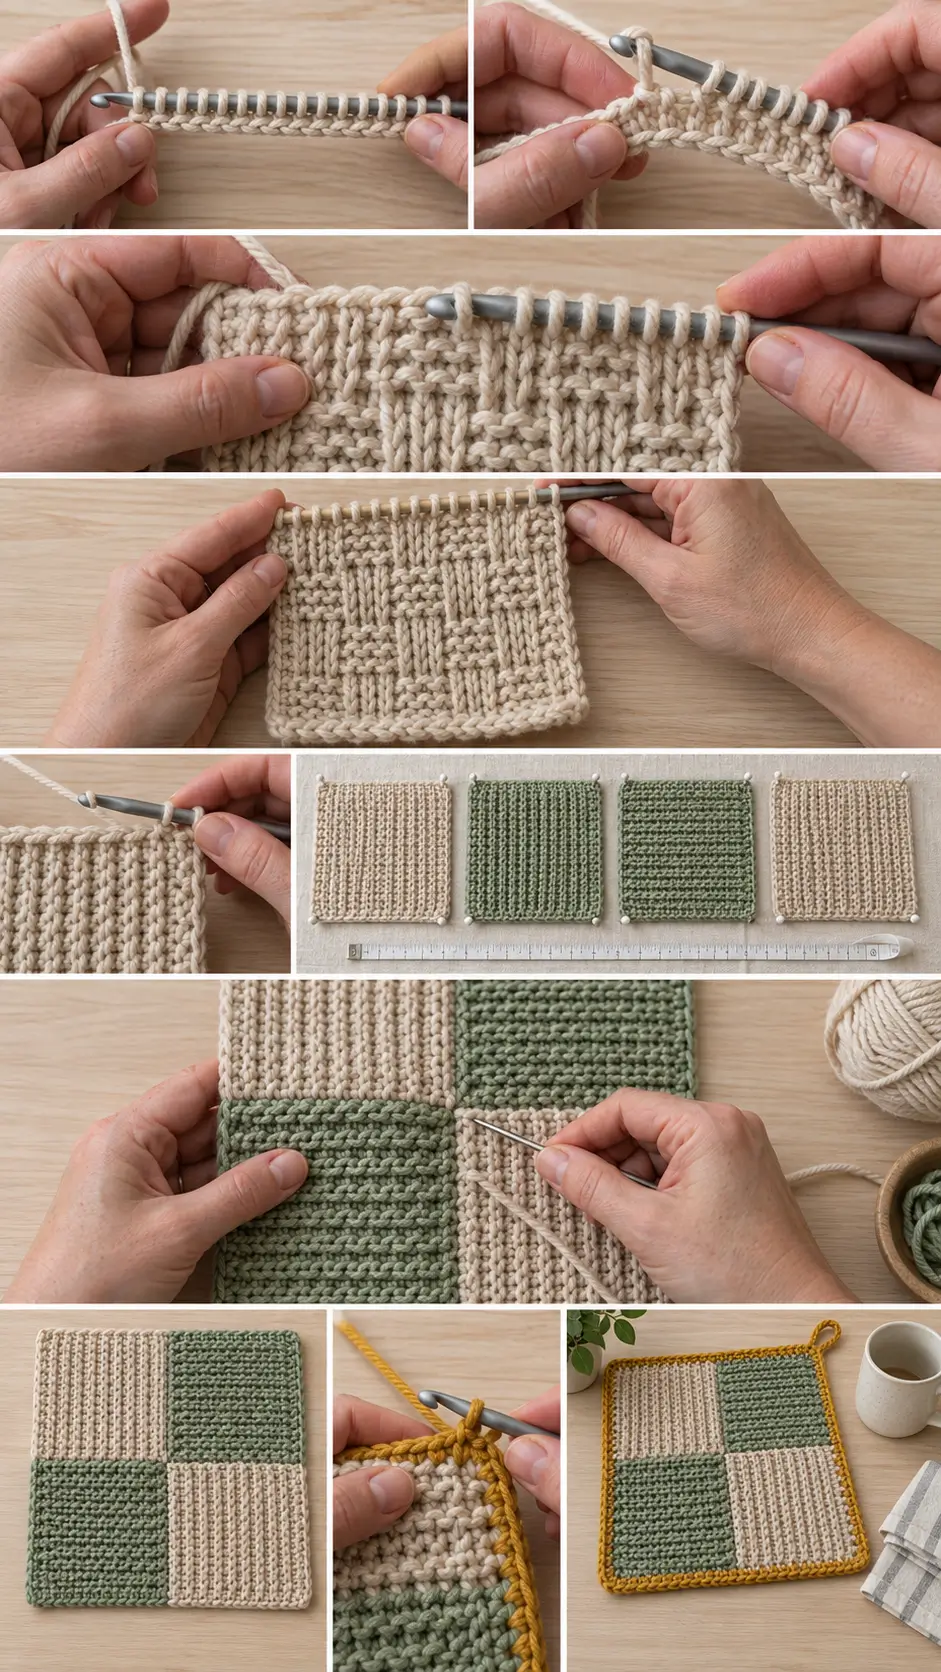
Using Color A and the 5.5 mm hook:
Ch 18.
Foundation Forward Pass
Turn the foundation chain slightly so you can see the back bumps.
Beginning in the second chain from the hook:
Insert the hook into each back bump.
Yarn over.
Pull up one loop.
Leave each loop on the hook.
Continue across.
At the end you should have:
18 loops on the hook.
Foundation Return Pass
Ch 1.
Then repeat:
Yo, pull through 2 loops
until one loop remains.
This foundation row counts as:
Row 1.
Row 2
Skip the first vertical bar.
Repeat 4 times:
Tss in next 2 sts, Tps in next 2 sts.
You have worked 16 patterned stitches.
Work the final edge stitch underneath both outer vertical strands.
You should have:
18 loops.
Complete the standard return pass.
Row 3
Repeat Row 2:
Tss 2, Tps 2
across the patterned section.
Work final edge stitch.
Complete return pass.
Row 4
Now reverse the texture.
Skip first vertical bar.
Repeat 4 times:
Tps in next 2 sts, Tss in next 2 sts.
Work final edge stitch.
Complete return pass.
Row 5
Repeat Row 4:
Tps 2, Tss 2
across.
Work final edge stitch.
Complete return pass.
Rows 6–17
Repeat:
Rows 2–5
three more times.
You will finish with:
17 total Tunisian rows
including the foundation row.
Your square should be close to 4¼ inches tall.
Bind-Off Row
Do not work a normal return pass after this row.
Skip the first vertical bar.
Insert the hook under the next vertical bar as for Tss.
Yarn over.
Pull through:
- the vertical bar
- and the loop already on the hook
in one movement.
Continue working Tunisian slip stitches across.
For the final stitch, insert underneath both outer vertical strands and slip stitch through.
Fasten off, leaving a long tail if you want to use it during assembly.
PART 2 — MAKE FOUR SQUARES
Make:
Color A — Oatmeal
2 squares
Color B — Sage
2 squares
All four squares must use exactly the same:
- 18-stitch width
- 17-row height
- broken-rib sequence
- hook size
Block the Squares
Tunisian crochet naturally curls.
Light blocking makes assembly much easier.
Pin each square to:
4¼ × 4¼ inches.
Make sure:
- all four corners are square
- side edges are straight
- upper and lower edges match
- the textured surface is not overstretched
Allow them to dry completely.
PART 3 — QUARTER-TURN LAYOUT
The directional layout is what makes this simple stitch look much more interesting.
Arrange the four squares:
Top Left
Oatmeal — normal orientation
Top Right
Sage — rotate 90 degrees clockwise
Bottom Left
Sage — rotate 90 degrees counterclockwise
Bottom Right
Oatmeal — normal orientation
The broken ribs should now appear to move in different directions across the finished dishcloth.
Check the Layout
Before sewing:
Make sure the outer edges form one large square.
Every individual block should still measure approximately:
4¼ inches
on every side.
PART 4 — JOIN THE FIRST TWO SQUARES
Place the top-left oatmeal square beside the top-right sage square.
Keep both right sides facing upward.
Thread a yarn needle with Color A or another neutral joining color.
Beginning at one corner, use a mattress-style seam.
Pass the needle through a small edge loop on the oatmeal square.
Then pass through the corresponding edge loop on the sage square.
Continue alternating from side to side.
Every few stitches, gently pull the seam closed.
Do not pull hard enough to gather the fabric.
Join the Bottom Pair
Join:
Bottom-left Sage
to:
Bottom-right Oatmeal
using the same method.
You now have:
2 horizontal strips.
Join the Two Strips
Place the two strips together.
Carefully align the center intersection.
Begin at one end and mattress stitch the long horizontal seam.
When you reach the center:
Pass the yarn securely through the corner of all adjoining sections.
Continue to the opposite edge.
The finished center should be neat without a large hole.
Alternative Flat Crochet Join
If you prefer using your hook:
Place two squares wrong sides together.
Using Color C:
Insert the hook through corresponding edge loops.
Work relaxed slip stitches across.
Repeat for all four seams.
This creates a subtle raised mustard cross between the four squares.
For a flatter washcloth, use the sewn mattress seam instead.
PART 5 — BORDER
Using Color C — Mustard Gold and the 5.5 mm hook:
Join yarn at any outer corner.
Border Round 1
Ch 1.
Sc evenly around the entire dishcloth.
Along each 4¼-inch square edge, aim for approximately:
16–18 sc.
You do not need an exact stitch count as long as the border lies flat.
At each outer corner work:
3 sc.
Continue around.
Join with sl st to first sc.
Check the Border
Lay the dishcloth flat.
If the border ripples:
You have worked too many stitches.
Remove a few stitches evenly along that side.
If the border pulls inward:
Add a few stitches.
Correct Round 1 before continuing.
Border Round 2
Ch 1.
Sc in every stitch around.
At each corner:
Work:
3 sc
into the center corner stitch from the previous round.
Join with sl st.
Fasten off.
Optional Hanging Loop
At one corner during Border Round 2:
Work:
sc, ch 10, sc
into the center corner stitch.
After completing the round, sl st around the ch-10 loop if you want a firmer hanging loop.
Finished Dishcloth
Your finished cloth should measure approximately:
9½ × 9½ inches.
It should have:
- four distinct textured quadrants
- two oatmeal blocks
- two sage blocks
- directional rib texture
- flat center joins
- mustard border
- dense cotton fabric
Why Rotate the Squares?
If all four motifs face the same direction, the texture reads as one continuous pattern.
Rotating neighboring blocks changes the direction of the vertical Tunisian bars.
That creates the illusion of four separately woven sections even though every square uses exactly the same stitch pattern.
One-Color Version
Make all four squares in one color.
Rotate them in exactly the same layout.
The light catches the Tunisian ribs differently in each quadrant, so the patchwork remains visible even without contrasting yarn.
Good solid colors include:
- cream
- mustard
- sage
- terracotta
- charcoal
- dusty blue
Two-Color Checker Version
Use:
Color A
Cream
Color B
Forest Green
Arrange:
A – B
B – A
Finish with Color A around the border.
This creates a clean traditional checkerboard.
Four-Color Version
Make every square different.
For example:
- cream
- rust
- olive
- mustard
Use charcoal or oatmeal for the border.
This is especially useful for leftover cotton yarn.
Larger Kitchen Cloth
To make each square approximately:
5 inches
begin with:
Ch 22
and work the broken-rib pattern until the piece is square.
Make four blocks and assemble them the same way.
The finished cloth will measure approximately:
11 inches square
after bordering.
Smaller Washcloth
For smaller squares:
Ch 14.
Work until each motif measures approximately:
3¼ inches square.
Four motifs produce a finished cloth around:
7½–8 inches
after joining and border.
Turning the Pattern Into a Baby Blanket
The same square can become a larger patchwork.
For example:
6 × 8 Layout
Make:
48 squares.
At approximately 4¼ inches each, the body will measure around:
25½ × 34 inches
before border.
Throw Blanket Version
Use:
10 squares across × 12 down.
Total:
120 squares.
Body size approximately:
42½ × 51 inches
before border.
Rotate neighboring squares to create a basket-like directional texture.
Pillow Version
Make:
16 squares.
Arrange:
4 × 4
for the front of a textured cushion.
For the back, use:
- another 16-square panel
- one solid Tunisian panel
- or fabric backing
The small directional blocks create an especially strong pillow texture.
Why Is My Tunisian Crochet Curling?
Some curling is normal.
The fabric pulls toward the front because of the structure of Tunisian stitches.
Help control it by:
- using a slightly larger hook
- keeping the return pass relaxed
- blocking each square
- adding the final border
Do not aggressively loosen only the first or last stitch.
Why Is My Square Wider Than It Is Tall?
Add another pattern row before binding off.
Because everyone’s row gauge differs slightly, the square should be judged primarily by its physical dimensions.
Stop when:
width = height.
Why Is My Square Too Tall?
Remove one full row before the bind-off.
Keep all four squares at exactly the same row count once you determine the correct measurement for your yarn.
Why Is One Edge Loose?
Make sure the final stitch of every forward pass is worked underneath:
both outer vertical strands.
Working under only one strand can stretch the outer edge.
Why Does My Purl Stitch Look Loose?
Keep the yarn comfortably against the front of the work before inserting the hook.
Do not pull the new loop excessively high.
The loop only needs to reach the same height as the other loops on your hook.
Why Are My Squares Different Sizes?
Check:
- hook size
- stitch count
- row count
- yarn thickness
- tension
Even two colors from the same yarn line can occasionally behave a little differently.
Make one test square in each color before crocheting multiples.
Can I Use a Regular Crochet Hook?
Yes.
Because each square holds only:
18 loops
you do not need a long cable.
A regular crochet hook works well as long as enough of the shaft is available to hold the loops comfortably.
Hooks with extremely large ergonomic handles directly behind the shaft may be less convenient.
Can I Use a Tunisian Hook?
Absolutely.
A short Tunisian hook or interchangeable hook works perfectly.
For larger blanket panels, a cable hook becomes much more useful.
Can I Use Acrylic Yarn?
You can, especially if you want to turn the motif into:
- blanket
- scarf
- pillow
- bag
For a dishcloth or washcloth, cotton is usually the more practical choice because it is absorbent and withstands repeated washing well.
Yarn for a Dishcloth
A smooth worsted cotton makes the stitches easy to see and gives the finished cloth substance.
This is also a good project for using partial cotton balls because each individual square requires relatively little yarn.
Washing and Care
Follow the care instructions on your yarn label.
Cotton dishcloths often soften considerably after several washes.
After washing:
- reshape the cloth
- flatten the corners
- allow it to dry thoroughly
A little relaxation in the Tunisian texture is normal.
Beginner Tip
If Tunisian purl stitch feels awkward at first, practice one short row before starting the square.
The important sequence is:
yarn forward → insert hook → yarn back → pull up loop.
Once the movement becomes familiar, the broken-rib repeat becomes very rhythmic.
Quick Pattern Repeat
Once the foundation is complete, remember:
Rows 2–3
2 Tss, 2 Tps
Rows 4–5
2 Tps, 2 Tss
Then repeat those four rows.
That is the entire textured section.
Final Thoughts
The interesting part of this dishcloth is not complicated shaping or dozens of stitches.
It comes from combining three simple ideas:
Tunisian simple stitch + Tunisian purl stitch + rotated squares.
Make four identical textured blocks.
Rotate the neighboring squares.
Join them into one large square.
Add a contrasting border.
The result is a thick, woven-looking Tunisian dishcloth that can easily be reused as the starting point for washcloths, cushions, tote panels, or much larger patchwork blankets.