Intro
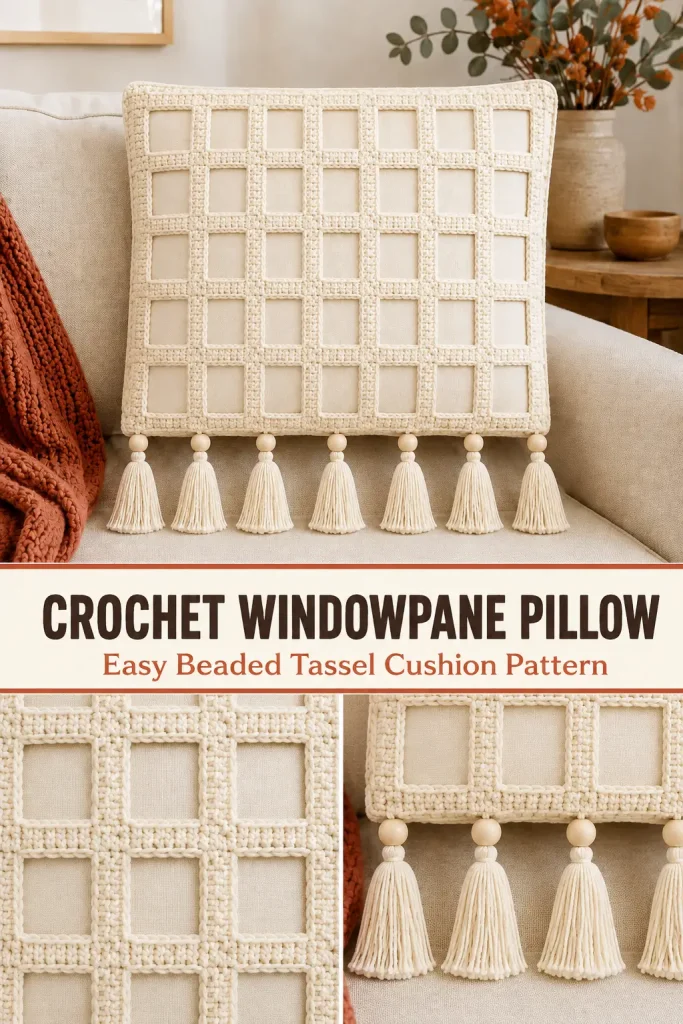
This crochet windowpane pillow cover turns a simple cushion into a beautiful piece of textured home decor. The oversized square openings create the clean geometric lattice visible in the reference, while a row of chunky tassels and round beads along the bottom adds the soft boho finish that makes the design stand out.
The construction is intentionally straightforward. Rather than trying to force oversized square openings from a complicated mesh stitch, the decorative front is built from narrow crochet bands arranged into a 6-column × 5-row windowpane grid. The intersections are secured, the outside is bordered, and the finished lattice is joined to a simple cushion back.
Make it in warm ivory for a soft neutral room, or use the same construction in rust, terracotta, sage, charcoal, or another home-decor color.
Description
The finished cushion cover is designed for a 40 × 40 cm / 16 × 16 inch pillow insert.
The front features:
- 6 large square openings across
- 5 large square openings vertically
- 7 narrow vertical crochet rails
- 6 narrow horizontal crochet rails
- a firm crochet perimeter border
- 7 decorative tassels along the bottom
- 1 round bead above each tassel
The open lattice allows the plain cushion insert beneath it to remain visible, creating the striking contrast seen in the inspiration.
A solid crochet back supports the pillow insert while the upper edge is left as a discreet opening with internal ties, making the cover removable without adding a visible zipper or buttons.
Finished Measurements
Designed for:
40 × 40 cm / 16 × 16 inch cushion insert
Approximate finished cover:
- Width: 41–42 cm
- Height: 41–42 cm
- Grid openings: approximately 5–5.5 cm square
- Crochet rails: approximately 1.5–2 cm wide
- Tassel length: approximately 9–11 cm
- Beads: approximately 14–18 mm
Materials
- Worsted weight #4 cotton, cotton-blend, or sturdy home-decor yarn
- Approximately 350–450 g yarn for the full cushion cover
- 4.5 mm crochet hook
- Yarn needle
- Scissors
- Measuring tape
- Blocking mat and pins
- 7 round wooden or washable beads with holes large enough for yarn
- Piece of cardboard approximately 11 cm long for making tassels
- 40 × 40 cm / 16 × 16 inch pillow insert
- Stitch markers or safety pins
Yarn Color Ideas
For the closest look to the reference:
- warm ivory
- natural cream
- oatmeal
- rust
- burnt terracotta
A pale cushion insert gives the most visible contrast through darker lattice colors.
Abbreviations
- ch – chain
- sc – single crochet
- hdc – half double crochet
- sl st – slip stitch
- st – stitch
- sts – stitches
Pattern Notes
- US crochet terminology is used.
- Difficulty: confident beginner.
- The decorative front is constructed from separate crochet rails.
- Make 7 vertical rails and 6 horizontal rails.
- The rails are arranged into a 6 × 5 windowpane grid.
- All crossings are sewn securely from the back.
- The solid cushion back is worked separately.
- Front and back are joined along the two sides and bottom.
- The top remains removable and closes with hidden crochet ties.
- Seven tassels are attached along the lower edge.
- Each tassel sits directly below one vertical grid rail.
- Use a fairly firm tension so the lattice keeps its shape.
- Block the rails before assembling the grid.
Gauge
Approximately:
16 hdc × 12 rows = 10 cm / 4 inches
for the solid back panel.
Gauge on the grid strips is less important than finished measurements.
Step-by-Step Instructions
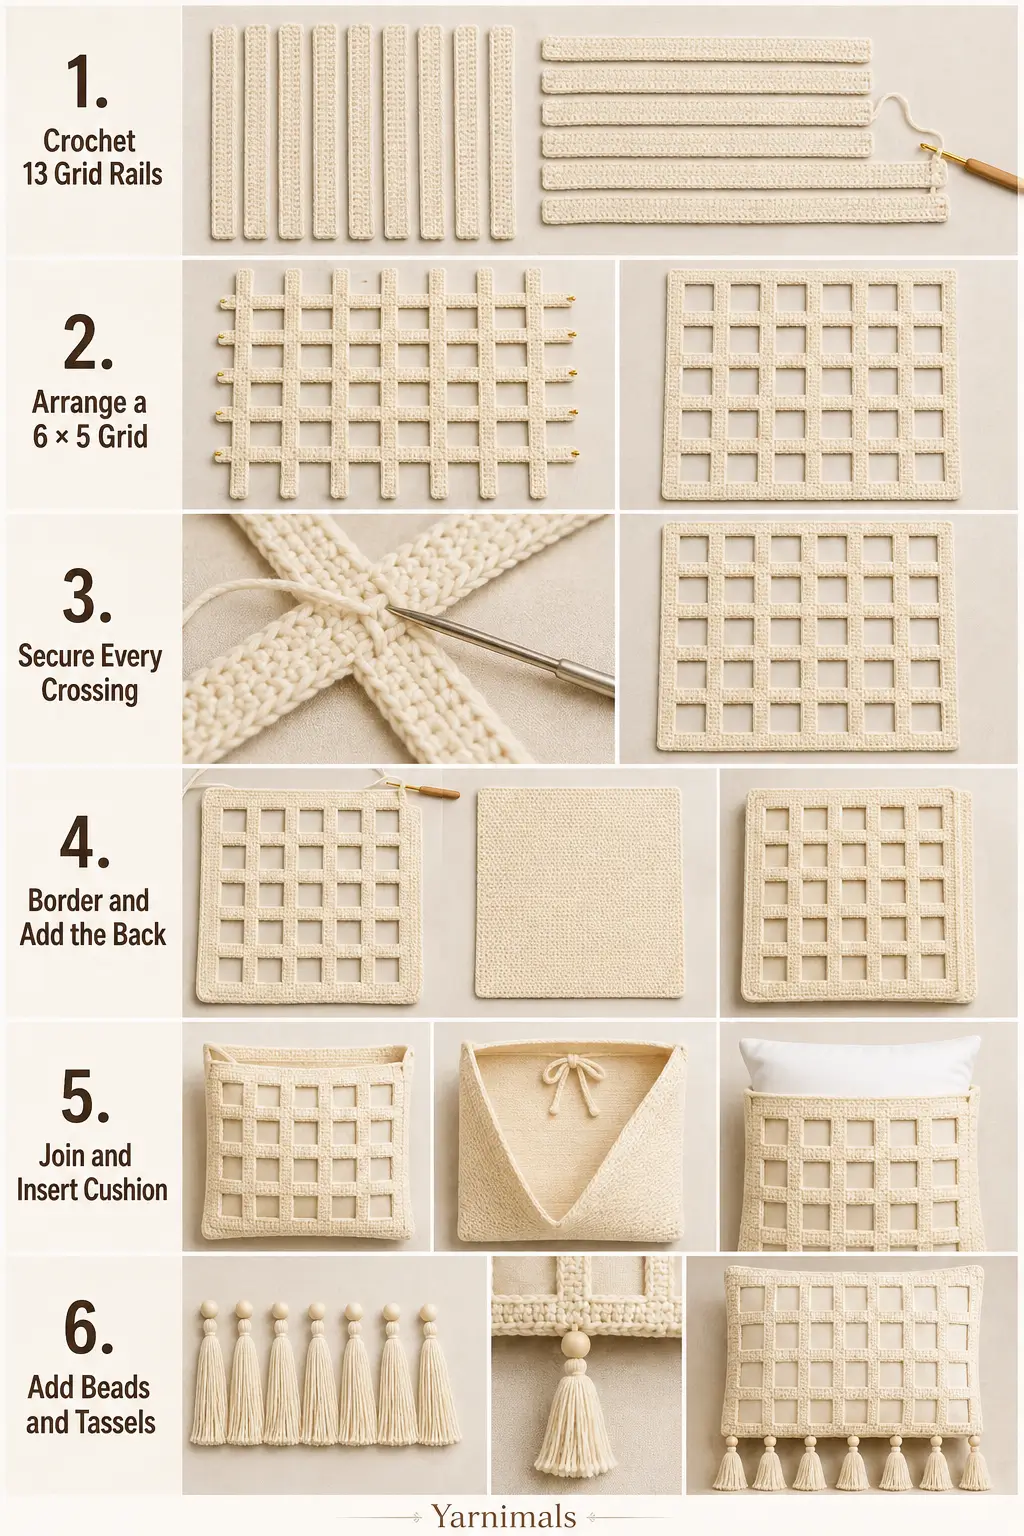
Part 1: Make the Vertical Grid Rails
Make 7 identical rails.
Using your main lattice color:
Ch 5.
Row 1
Sc in the second ch from the hook and across.
4 sc
Ch 1 and turn.
Row 2
Sc across.
4 sc
Ch 1 and turn.
Repeat Row 2 until the strip measures approximately:
40 cm / 16 inches
Fasten off.
Make 7 strips total.
The strips should each measure approximately:
- 40 cm long
- 1.5–2 cm wide
Do not worry if your row count differs. Matching the finished length is more important.
Part 2: Make the Horizontal Grid Rails
Make 6 identical horizontal rails.
Use the exact same construction:
Ch 5.
Row 1
Sc in second ch from hook and across.
4 sc
Remaining Rows
Sc across each row until the strip measures:
40 cm / 16 inches
Fasten off.
Make 6 horizontal strips total.
You should now have:
- 7 vertical strips
- 6 horizontal strips
Part 3: Block the Rails
Lightly wet block all 13 strips.
Pin them straight to approximately:
40 cm long
Make sure all strips have:
- similar width
- straight edges
- no twisting
- no curling
Allow them to dry completely before assembly.
This step makes the final windowpane grid much easier to assemble evenly.
Part 4: Arrange the Vertical Rails
Lay the 7 vertical strips parallel on a large flat surface.
Place:
- one rail at the far left
- one rail at the far right
- five rails evenly spaced between them
The finished arrangement should create:
6 equal openings across
Measure carefully.
For a 40 cm finished panel, each open section should measure approximately:
5–5.5 cm wide
depending on your rail width.
Pin the top and bottom ends temporarily in place.
Part 5: Add the Horizontal Rails
Place the 6 horizontal strips across the vertical rails.
Position:
- one rail along the top
- one along the bottom
- four evenly spaced between them
This creates:
5 rows of large square openings
The layout should now contain:
6 columns × 5 rows
or:
30 open squares total
Adjust the spacing until the openings appear as square as possible.
Part 6: Check the Grid Measurements
Before sewing anything, measure the complete panel.
Aim for approximately:
40 × 40 cm
Check several openings.
They should be visually consistent.
Straighten every rail.
The grid should look like a large handmade windowpane pattern rather than ordinary small crochet mesh.
Part 7: Secure the Grid Intersections
Thread matching yarn onto a yarn needle.
At every point where a horizontal rail crosses a vertical rail, sew the two pieces together from the back.
Use several small stitches.
Pass through:
- the back loops of the horizontal rail
- the back loops of the vertical rail
Avoid pulling so tightly that the rails pucker.
Secure every intersection.
There are:
7 vertical rails × 6 horizontal rails = 42 intersections
All 42 crossings should be attached.
This step is important. Do not rely only on the outside border to hold the grid together.
Part 8: Reinforce the Outer Corners
Pay particular attention to the four outer corners.
Sew each corner firmly through both crossing rails.
Make several passes in two directions.
The decorative front panel should now lift as one stable piece without the rails shifting.
Part 9: Crochet the Outer Border
Join the main yarn at one outer corner.
Border Round 1
Ch 1.
Work sc evenly around the entire perimeter.
Along each strip edge, space the sc stitches evenly.
At each corner work:
3 sc
Continue around.
Join with sl st.
Border Round 2
Ch 1.
Sc in every stitch around.
At each corner work:
3 sc in the center corner stitch
Join.
Border Round 3
Repeat Round 2.
Fasten off.
The border should form a neat solid frame around the entire windowpane panel.
Finished front measurement should be approximately:
41–42 cm square
Part 10: Crochet the Solid Back Panel
Using the same yarn or a coordinating neutral:
Ch 66.
Row 1
Hdc in the third ch from the hook.
Hdc across.
64 hdc
Ch 2 and turn.
Row 2
Hdc in every stitch across.
64 hdc
Ch 2 and turn.
Repeat Row 2 until the panel measures approximately:
40–41 cm high
This will usually require approximately 48–50 rows, depending on tension.
Fasten off.
The back should be close to the finished size of the bordered front panel.
Part 11: Optional Contrast Back
If you are making the rust or terracotta version, you can keep the back panel cream or ivory.
A pale backing makes the large open squares stand out dramatically through the darker crochet lattice.
For the cream version, use matching cream yarn throughout.
Part 12: Prepare the Hidden Top Ties
The inspiration has a clean upper edge with no obvious zipper or button closure.
To keep that appearance, make 4 pairs of small internal ties.
Make 8 cords.
For each cord:
Ch 20.
Beginning in second ch from hook:
Sl st back through every chain.
Fasten off, leaving a sewing tail.
Each cord should measure approximately:
8–10 cm
Part 13: Position Front and Back
Place the solid back panel flat.
Place the lattice front directly on top.
Right sides should face outward because the joining border will be visible around the edge.
Align:
- left edge
- right edge
- bottom edge
- top corners
Use stitch markers around three sides.
Leave the top open.
Part 14: Join the First Side
Join yarn at the upper-left corner.
Working through both the front border and back panel:
Sc evenly down the entire left side.
At the bottom-left corner work:
3 sc
Part 15: Join Across the Bottom
Continue working through both layers.
Sc evenly across the entire bottom.
At the bottom-right corner work:
3 sc
Part 16: Join the Second Side
Sc evenly up the right edge.
Stop at the upper-right corner.
Fasten off.
The top remains open for inserting the cushion.
Part 17: Edge the Back of the Top Opening
Join yarn to the upper edge of the solid back panel.
Work:
1 row of sc evenly across
Fasten off.
This prevents the back edge from stretching.
Part 18: Edge the Front Top Opening
The upper horizontal rail already creates a strong front edge.
If desired, join yarn and work one additional row of:
sl st loosely across
Fasten off.
Keep this edge straight.
Part 19: Attach the Hidden Ties
Turn the cover so you can access the inside.
Sew four tie cords evenly along the inside of the front top edge.
Position them approximately at:
- 6 cm from left corner
- 16 cm
- 26 cm
- 36 cm or near the right corner
Sew the four matching cords to corresponding positions along the back edge.
The ties should remain completely hidden inside when the cushion is closed.
Part 20: Insert the Cushion
Slide the 40 × 40 cm cushion insert through the open top.
Push it fully into the lower corners.
Smooth the pillow filling so it sits evenly behind all 30 open squares.
Tie the four internal pairs securely.
Do not make the knots extremely tight.
The upper opening should now stay closed while preserving the clean exterior appearance.
Part 21: Make the Tassels
Make exactly:
7 tassels
Use the same yarn as the lattice.
Cut a piece of cardboard approximately:
11 cm long
Wrap yarn around the cardboard:
35–40 times
for each tassel.
Cut the yarn along one end.
Fold the bundle in half.
Use a strong piece of yarn approximately 30 cm long to tie firmly around the center fold.
This becomes the attachment cord.
Part 22: Form the Tassel Neck
Cut another piece of yarn approximately 30 cm long.
Wrap it firmly around the tassel approximately:
1.5–2 cm below the top
Wrap several times.
Tie securely.
Hide the knot inside the tassel.
Trim the lower yarn ends evenly.
Finished tassel length should be approximately:
9–11 cm
Make all 7 tassels the same size.
Part 23: Add the Beads
Before attaching each tassel to the pillow, thread one round bead onto the tassel’s attachment cord.
Use:
1 bead per tassel
You will need:
7 beads total
Slide the bead down until it sits directly above the tassel head.
The finished arrangement should be:
crochet border → round bead → tassel
Part 24: Position the Tassels
Lay the pillow flat.
Position one tassel directly below each vertical grid rail.
You should have:
- left outer rail
- inner rail
- inner rail
- center rail
- inner rail
- inner rail
- right outer rail
This creates 7 evenly spaced tassels across the lower edge.
The tassels should correspond visually with the vertical architecture of the grid.
Part 25: Attach the Tassels
Using the tassel attachment cord, sew through the solid bottom crochet border.
Make several passes through the border.
Pull the bead firmly against the lower edge without crushing the crochet.
Tie securely at the back.
Weave the ends into the border.
Repeat for all 7 tassels.
Part 26: Final Shape Check
Stand the finished pillow upright.
Check:
- all 30 open squares are even
- vertical rails remain straight
- horizontal rails remain level
- the cover sits smoothly over the insert
- all 7 beads align
- all 7 tassels hang at the same height
Trim any tassels that are noticeably longer than the others.
Design Consistency Lock
To create the same overall appearance as the reference, preserve these details.
Front Grid
Use exactly:
- 7 vertical crochet rails
- 6 horizontal crochet rails
- 6 openings across
- 5 openings high
- 30 large open squares
The squares should be large and architectural.
Do not replace them with ordinary small chain mesh.
Outer Shape
Keep the pillow:
- square
- approximately 40–42 cm
- softly structured
- without scallops
- without granny squares
- without floral motifs
Tassels
Use exactly:
7 tassels
Place one beneath every vertical rail.
Beads
Use:
7 round beads
Place one directly above every tassel.
For the cream version, pale natural or cream beads work beautifully.
For the rust version, natural wooden or ivory beads create a strong contrast.
Color
For Version 1:
- warm ivory lattice
- ivory cushion
For Version 2:
- rust / burnt terracotta lattice
- pale cream cushion insert
Both versions use the same construction.
Tips & Variations
Make the Rust Version
Use burnt rust or terracotta for:
- all 13 rails
- outer border
- joining edge
- tassels
Use a light cream pillow insert beneath the lattice.
Natural pale wooden beads complete the look.
Keep the Openings Square
The most important part of this project is the layout.
Before sewing the grid, measure:
- full width
- full height
- several individual openings
Adjust the rail spacing until the openings are square.
Use Cotton for Better Definition
Cotton or a cotton-rich blend gives the rails a crisp architectural shape.
Very soft acrylic may cause the grid to sag.
Make a Larger Pillow
For a 50 × 50 cm cushion, keep the same:
6 × 5 grid layout
but make the rails longer and increase the spacing between them.
This preserves the visual design while enlarging the cushion.
Make a Matching Window Panel
The same windowpane grid construction can be used without a cushion back to make decorative crochet window panels.
Add tassels along the lower edge for the same coordinated home-decor look.
FAQ
Is the square grid crocheted as ordinary mesh?
No. For this version, the large windowpane effect is created from separate narrow crochet rails. This keeps the openings large, clean, and truly square while giving the intersections the thick dimensional appearance seen in the finished cushion.
How many tassels do I need?
Use exactly 7 tassels, with one tassel aligned below each of the seven vertical grid rails.
Can I use a fabric cushion instead of crocheting the back?
Yes. You can sew the finished crochet lattice onto a plain removable fabric pillow cover if you prefer. A pale fabric cover will show beautifully through the open squares.
Can I leave off the beads?
Yes, but the bead-and-tassel combination is an important part of the visible design. For the closest finished look, use one round bead above every tassel.
Conclusion
This crochet windowpane pillow cover uses a surprisingly simple construction to create a bold geometric home-decor piece. Separate crochet rails form the large open squares, a solid border keeps the lattice stable, and seven bead-topped tassels finish the lower edge with the same soft boho character seen in the inspiration.
Make the warm ivory version for calm neutral decor, or switch to burnt terracotta for a richer statement cushion while keeping the exact same grid, tassel, and bead construction.



