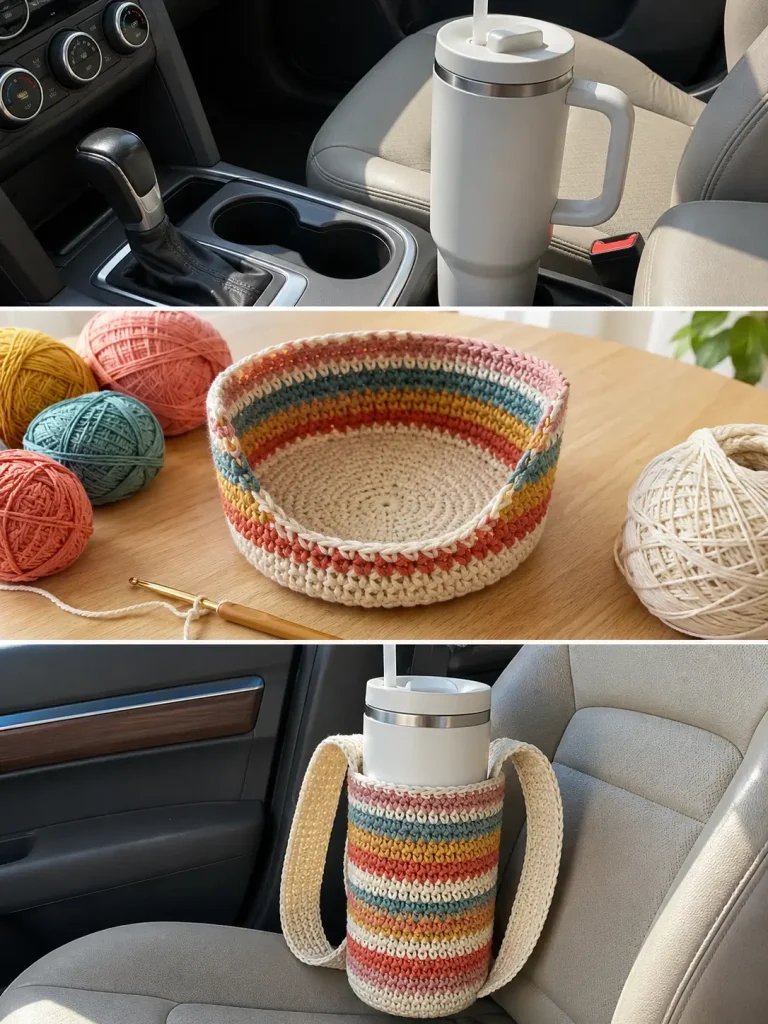
I love oversized water bottles.
I do not love the moment when you get into the car, try to put one in the cup holder, and realize the base is approximately twice the size of the space available.
So instead of forcing it into a cup holder it clearly wasn’t designed for, I decided to make something I could actually use:
a sturdy crochet water bottle carrier.
It holds the bottle securely, gives me a comfortable strap for carrying it, and means I don’t have to grab the bottle itself every time I move it.
And because the pattern is based on the actual size of your bottle rather than one fixed stitch count, you can adjust it for:
- large insulated tumblers
- reusable water bottles
- wide travel bottles
- kids’ bottles
- smaller thermos-style bottles
The best part?
It is much easier to crochet than it looks.
Why I Made This Instead of Another Cup Cozy
A cup cozy is useful when you want:
- insulation
- grip
- decoration
But it doesn’t solve the biggest problem with an oversized bottle:
how do you carry the thing comfortably?
A crochet bottle carrier gives the bottle its own little bag.
For mine, I wanted:
- a solid base
- snug sides
- a strong strap
- enough height to keep the bottle secure
- easy access to the lid
- no complicated shaping
So I built it from the bottom up.
A Quick Note About Using It in the Car
This project is a water bottle carrier, not a replacement automotive cup holder or safety restraint.
If you bring it into a vehicle, don’t hang, attach, or place it anywhere that could interfere with:
- pedals
- steering
- gear controls
- parking brake
- seat belts
- driver visibility
- airbags or airbag deployment areas
Follow your vehicle manufacturer’s instructions about storing loose objects.
The crochet carrier is especially useful for getting the bottle to and from the car without trying to balance a giant bottle in your hands with everything else you’re carrying.
What You’ll Need
For a sturdy bottle holder, I recommend a yarn that doesn’t stretch excessively.
You’ll need:
- Worsted-weight cotton or cotton-blend yarn
- Crochet hook suitable for your yarn
- Scissors
- Yarn needle
- Stitch marker
- Measuring tape
- Your actual water bottle
Optional:
- Small swivel clip or D-ring if you want removable hardware
- Contrasting yarn for stripes
Why Cotton Yarn Works Well
Cotton is one of my favorite choices for crochet projects that need some structure.
Compared with very stretchy yarns, cotton can help the carrier keep its shape.
It also works well for:
- bags
- baskets
- market totes
- bottle carriers
- kitchen projects
A cotton blend can also work nicely if you want something slightly softer.
Whatever yarn you choose, make a small test first.
Some cotton yarns are much firmer than others.
The Color Combination I Used
This type of project is perfect for leftover yarn.
For a cheerful striped version, try:
- cream
- coral
- muted teal
- mustard
- dusty pink
You don’t need equal amounts of every color.
The stripes can be completely irregular.
That actually makes the carrier look more handmade.
Before You Crochet: Measure the Bottle
You only need two measurements.
1. Bottom diameter
Measure straight across the bottom of the bottle.
2. Height
Measure from the base to approximately where you want the crochet carrier to stop.
I like the crochet to cover most of the bottle while leaving the lid completely accessible.
The Pattern Is Adjustable
This is important.
There is no universal stitch count because water bottles come in wildly different sizes.
Instead, we’ll crochet a flat circle until it matches the base of your bottle.
Then we’ll stop increasing and crochet upward.
That makes the pattern much easier to customize.
Crochet Terms
This tutorial uses US terminology.
- ch = chain
- sc = single crochet
- inc = increase, meaning 2 sc in the same stitch
- sl st = slip stitch
- st = stitch
- BLO = back loop only
Step 1: Crochet the Base
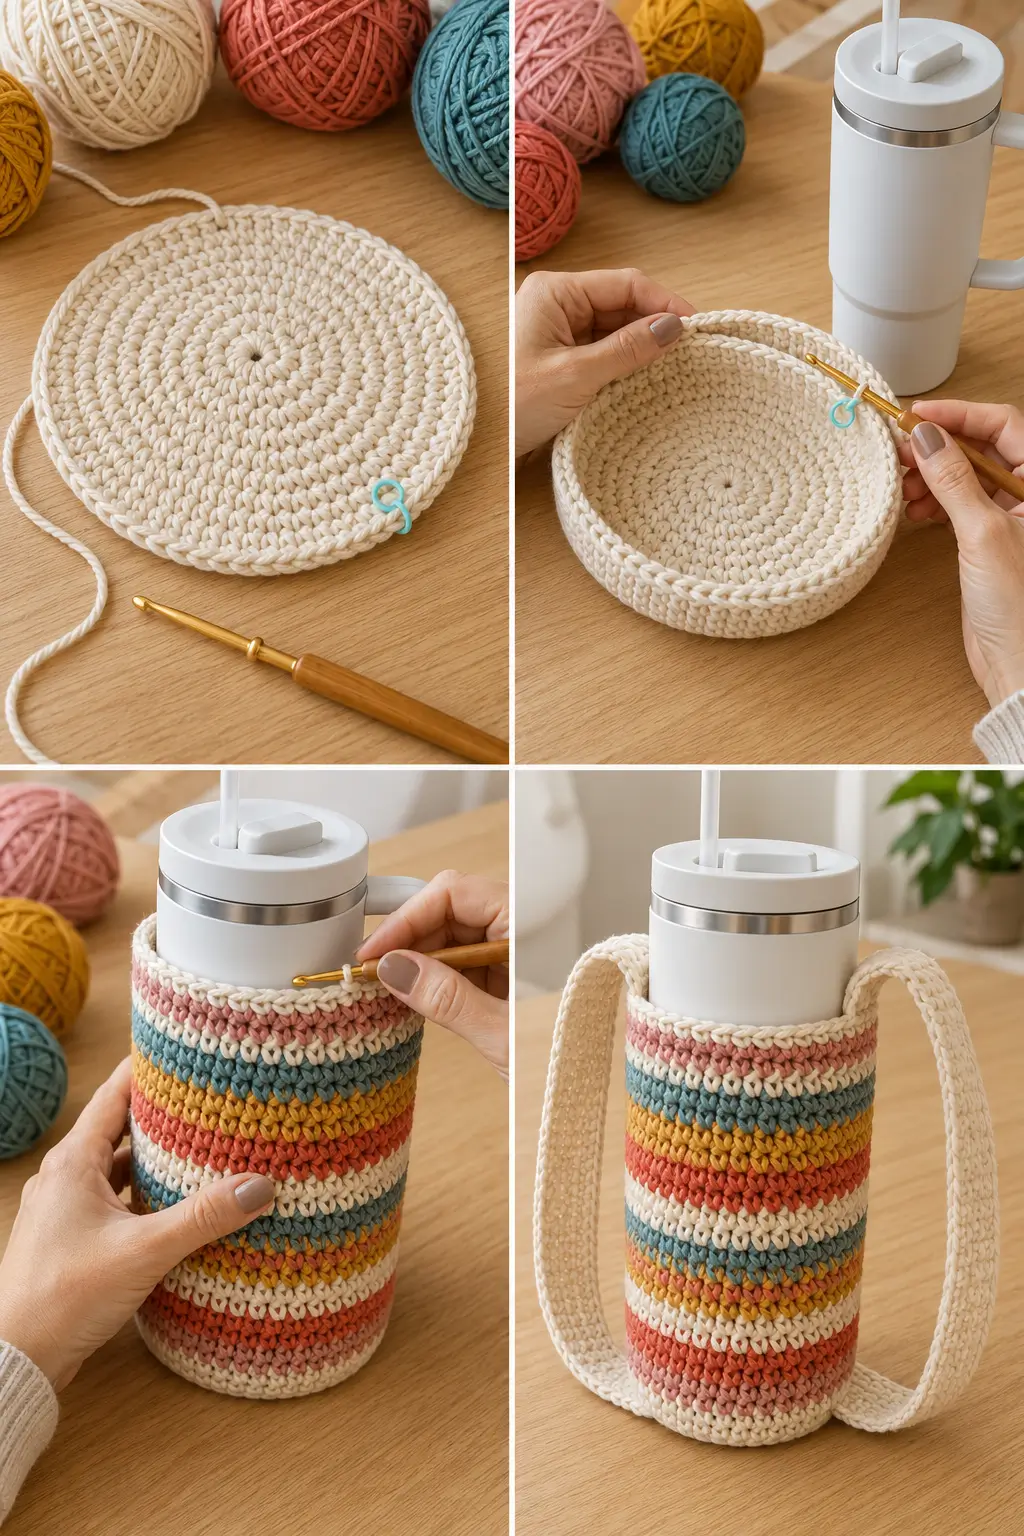
Start with a magic ring.
If you don’t like magic rings, you can chain a few stitches, join them into a ring, and work into that center instead.
Round 1
Work:
6 sc into the ring
Place a stitch marker in the first stitch.
You now have:
6 stitches
Round 2
Work:
2 sc in every stitch around
You now have:
12 stitches
Round 3
Repeat:
1 sc, inc
around.
You now have:
18 stitches
Round 4
Repeat:
2 sc, inc
around.
You now have:
24 stitches
Round 5
Repeat:
3 sc, inc
around.
You now have:
30 stitches
Keep Increasing the Circle
Continue the same pattern.
Each round adds one more single crochet between increases.
For example:
Round 6
4 sc, inc
Round 7
5 sc, inc
Round 8
6 sc, inc
Continue until the circle is approximately the same size as the bottom of your bottle.
Don’t Make the Base Much Larger Than the Bottle
This isn’t a basket.
You want the bottle to feel supported.
Place the bottle on top of the crochet circle periodically.
Stop increasing when the circle is approximately level with the bottle base or just slightly smaller, depending on your yarn and tension.
A very stretchy yarn may require a slightly snugger base.
What If My Circle Starts Ruffling?
If the base becomes wavy or ruffled, you may have:
- too many increases
- loose tension
- a hook that is too large for the fabric you’re trying to create
The circle should lie reasonably flat.
What If It Starts Curling Into a Bowl?
A slight curve isn’t necessarily a disaster because we’re eventually turning the circle into a carrier.
But if it cups dramatically while you’re still increasing, check:
- your stitch count
- whether you missed increases
- whether your tension is very tight
Step 2: Turn the Base Into the Side Wall
Once the base is wide enough, stop increasing.
For the next round, work:
1 sc in the back loop only of every stitch
This creates a subtle ridge and helps define the transition from the bottom to the side.
After that round, return to working through both loops unless you want a different texture.
Step 3: Crochet Straight Up
Now it gets wonderfully easy.
Work:
1 sc in every stitch around
No increases.
Continue working even rounds.
As you crochet, the fabric will begin forming a tube around the bottle.
Periodically slide the bottle inside to test the fit.
It should feel:
- snug
- supportive
- not excessively stretched
You should still be able to remove the bottle easily.
Add Stripes If You Want Them
This is where the project becomes fun.
Change color whenever you like.
You might make:
- 3-round stripes
- random scrap-yarn stripes
- alternating cream and color
- one solid-colored carrier
- a color-blocked version
There is no need to follow an exact stripe sequence.
If you’re using several colors, weave in the ends as you go.
Otherwise the inside can become a yarn-end jungle very quickly.
How High Should the Carrier Be?
I like the carrier to cover approximately the lower two-thirds to three-quarters of the bottle.
That gives it support while leaving the top easy to grab.
Avoid covering:
- the lid
- straw mechanism
- drinking spout
- opening mechanism
Keep trying the bottle inside the carrier as you work.
Stop when the height feels secure.
Step 4: Make the Top Edge Stronger
Once the carrier reaches your preferred height, work one or two final rounds of single crochet.
For an especially neat edge, finish with one round of slip stitches.
Don’t make the final round dramatically tighter than the body or you may make the opening difficult to use.
Fasten off only if you’re making the strap separately.
Step 5: Make a Strap That Doesn’t Feel Flimsy
This is the part I would not rush.
A giant water bottle can become surprisingly heavy when full.
A skinny chain strap may stretch and dig into your hand or shoulder.
Instead, make a flat crochet strap.
Simple Crochet Strap
Chain enough stitches to reach your desired finished strap length.
Remember that crochet can stretch under weight, so don’t automatically make it extremely long.
Starting in the second chain from the hook:
Sc across the chain.
Turn.
Ch 1, sc across.
Repeat until the strap is approximately:
3 to 5 rows wide
depending on your yarn.
This creates a simple flat strap rather than a single chain.
Want an Even Stronger Strap?
If you know how to work a denser strap technique such as:
- thermal stitch
- Romanian cord
- tightly worked slip stitch
- reinforced single crochet
you can use that instead.
The goal is to reduce stretching.
For a heavy bottle, strap construction matters almost as much as the carrier itself.
Step 6: Attach the Strap Securely
Position one end of the strap on one side of the carrier.
Position the other end directly opposite it.
Make sure the strap isn’t twisted.
Use your yarn needle and matching yarn to sew each end securely across several stitches and several rows.
Don’t attach the entire weight of the bottle to one single stitch.
Spread the attachment area across a wider section of fabric.
Then test the carrier with an empty bottle first.
After that, gradually add weight and check:
- stitches
- seams
- strap attachment
- stretching
If anything looks weak, reinforce it.
Shoulder Strap or Short Carrying Handle?
You can make either.
Short handle
Good for:
- carrying between rooms
- taking the bottle to the car
- moving around the house
- shorter projects
Longer shoulder strap
Good for:
- walking
- festivals
- markets
- outdoor events
- situations where you need your hands free
For a long strap, pay extra attention to stretch.
A strap that looks perfect when the bottle is empty can become much longer once a full bottle is inside.
Why I Prefer a Dense Stitch for This Project
You could make a beautiful open mesh bottle carrier.
But for a very heavy oversized bottle, I like a denser lower section because it gives the base more support.
Single crochet creates:
- compact fabric
- good structure
- simple shaping
- easy color changes
You can absolutely add decorative mesh or openwork higher up if you want.
Just keep the bottom and attachment points sturdy.
An Alternative: Solid Bottom + Mesh Upper Body
If you want to use less yarn, try this variation.
Crochet the solid circular base exactly as above.
Work several rounds of single crochet for the lower section.
Then transition into a simple mesh pattern for the upper body.
That gives you:
strength at the bottom + lighter fabric above
Just make sure the openings aren’t large enough for narrow parts of your particular bottle to push through unexpectedly.
Keep Testing the Actual Bottle
This might be the most important advice in the entire tutorial.
Don’t crochet 40 rounds based purely on measurements.
Put the bottle inside repeatedly.
Check:
Width
Is it too tight?
Height
Has it reached the right spot?
Stretch
Does the bottle pull the fabric downward?
Strap
Does the full bottle make it uncomfortably long?
Crochet is flexible.
Use that flexibility instead of treating the project like rigid engineering.
How to Make the Holder Less Stretchy
If your carrier stretches too much, try:
- a smaller crochet hook
- tighter single crochet
- firmer cotton yarn
- shorter strap
- reinforced strap
- denser stitch pattern
You can also sew a narrow woven strap or webbing inside a crochet strap if you want the crochet appearance with less stretch.
Don’t Make the Carrier Too Loose
A water bottle carrier should fit more like a sleeve than a shopping bag.
If the body is much wider than the bottle, the bottle can lean around inside.
For a snugger fit:
- stop increasing the base slightly earlier
- use a slightly smaller hook
- maintain consistent tension
Just don’t make it so tight that inserting the bottle becomes difficult.
What About the Handle on Giant Tumblers?
Some oversized tumblers already have a built-in handle.
That’s fine.
You can make the crochet carrier stop below the handle.
Before settling on your final height, slide the bottle into the work and check that:
- the existing handle is usable
- the lid can be removed
- the straw is accessible
Design around the bottle you actually own.
Can I Make This With Acrylic Yarn?
Yes.
You don’t have to use cotton.
Acrylic yarn can work, particularly for a lighter bottle.
Just be aware that different yarns behave differently.
Some acrylics can:
- stretch more
- feel softer
- create a less rigid carrier
If using acrylic, make a sample and test it under the weight of the bottle.
Can I Use Leftover Yarn?
Absolutely.
This is one of my favorite reasons to make the striped version.
You can use relatively small quantities of several colors.
Just try to keep the yarns reasonably similar in:
- thickness
- fiber behavior
- gauge
Switching randomly between very thin yarn and very thick yarn can distort the carrier.
Can Beginners Make This?
Yes.
If you know:
- chain
- single crochet
- increase
- work in the round
- sew pieces together
you can make this.
The only part that requires a little attention is keeping track of the increases while making the flat base.
Once the sides begin, most of the project is simply:
single crochet around and around.
Common Problems
My base won’t lie flat
Count your stitches carefully.
If it ruffles, you may have too many stitches.
If it cups too early, you may have too few.
My carrier keeps getting wider
Once the base is complete, stop increasing.
Work exactly one single crochet in each stitch.
My bottle barely fits
Your tension may be tighter than expected.
If you’re still early in the project, it may be easier to undo a few rounds and adjust.
My strap stretched dramatically
This is common with crochet straps carrying weight.
Shorten it or remake it with a denser construction.
A wider strap can also feel much more comfortable.
The carrier leans to one side
Check that the two strap ends are attached directly opposite each other.
Also check whether one attachment point is significantly higher than the other.
Easy Ways to Customize It
Once you understand the basic construction, you can make dozens of variations.
Try:
- granny-stripe colors
- rainbow stripes
- neutral cream and beige
- color-block sections
- checkerboard colorwork
- tiny embroidered flowers
- surface crochet
- a small key pocket
- contrasting top edge
You could even make several sizes for different bottles.
Add a Small Pocket
If you use the carrier while walking, a tiny outside pocket can be surprisingly handy.
Make a small rectangle of single crochet.
Sew it to the outside of the bottle carrier along:
- bottom
- left side
- right side
Leave the top open.
Keep the pocket small and light.
Good options include:
- lip balm
- a small key
- folded cash
Avoid putting anything very heavy in it.
This Would Make a Great Gift
Water bottles are everywhere now.
That makes this a practical handmade gift for:
- walkers
- students
- teachers
- travelers
- festival-goers
- gardeners
- sports parents
If you know the person’s bottle size, you can make the carrier specifically for it.
That custom fit makes the project feel much more thoughtful than a generic sleeve.
How Much Yarn Do You Need?
It depends heavily on:
- bottle size
- yarn weight
- stitch
- strap length
- color changes
A small bottle carrier may use relatively little yarn, while a large dense carrier with a long shoulder strap can require considerably more.
Instead of trusting a universal yardage estimate, weigh your yarn before and after making a sample or your first carrier.
If you’re using leftover yarn, keep enough of your main color available for:
- top edge
- strap
- reinforcing seams
Why This Is Such a Satisfying Scrap-Yarn Project
Some scrap projects feel like you’re inventing reasons to use leftover yarn.
This one actually solves a problem.
You can take five small yarn leftovers that weren’t enough for anything substantial and turn them into something you genuinely carry.
And every stripe reminds you of an older project.
That is my favorite kind of scrap crochet.
Frequently Asked Questions
What is the best stitch for a crochet water bottle holder?
Single crochet is a very practical choice because it creates dense, relatively sturdy fabric.
Mesh stitches can also work, especially in the upper section, but the design should still support the weight of your bottle.
What yarn is best?
Firm cotton or a cotton blend is a good starting point because it can create structured fabric.
Other fibers can work too, but test how much they stretch under weight.
How do I make the pattern fit my bottle?
Crochet the circular base until it matches the bottom of your actual bottle.
Then stop increasing and crochet straight upward.
This makes the project easy to customize.
How do I stop the strap from stretching?
Use a dense, relatively wide strap rather than a single chain.
You can also try thermal stitch or reinforce the strap with non-stretch material.
Can I wash the bottle carrier?
That depends on the yarn you use.
Check the yarn manufacturer’s care instructions.
Because this is a practical item that may be carried outdoors, choosing washable yarn can be useful.
Can I make one for a large tumbler?
Yes.
That is actually where an adjustable pattern is especially useful.
Measure the base and repeatedly test the tumbler inside the project as you crochet.
Can I hang it from something inside my car?
I would not treat a crochet strap as an automotive storage or restraint system.
Keep the carrier and bottle away from the driver’s controls, footwell, visibility area, seat belts, and airbag deployment zones, and follow your vehicle manufacturer’s guidance for storing loose objects.
Its main job is to make that oversized bottle easier to carry.
Final Thoughts
I started this project because my oversized bottle was simply too big for the cup holder.
But I ended up liking the crochet carrier for a completely different reason:
I use it even when I’m nowhere near the car.
I can grab the strap instead of wrapping my hand around a giant tumbler.
I can carry the bottle while holding other things.
I can use leftover yarn.
And because the entire pattern is based on the bottle itself, I don’t have to hunt for a pattern made for one exact brand or size.
Just make the base.
Test the bottle.
Crochet upward.
Add a sturdy strap.
Sometimes the best crochet projects aren’t the fanciest ones.
They’re the ones that solve one small annoying problem—and then quietly become something you use all the time.



