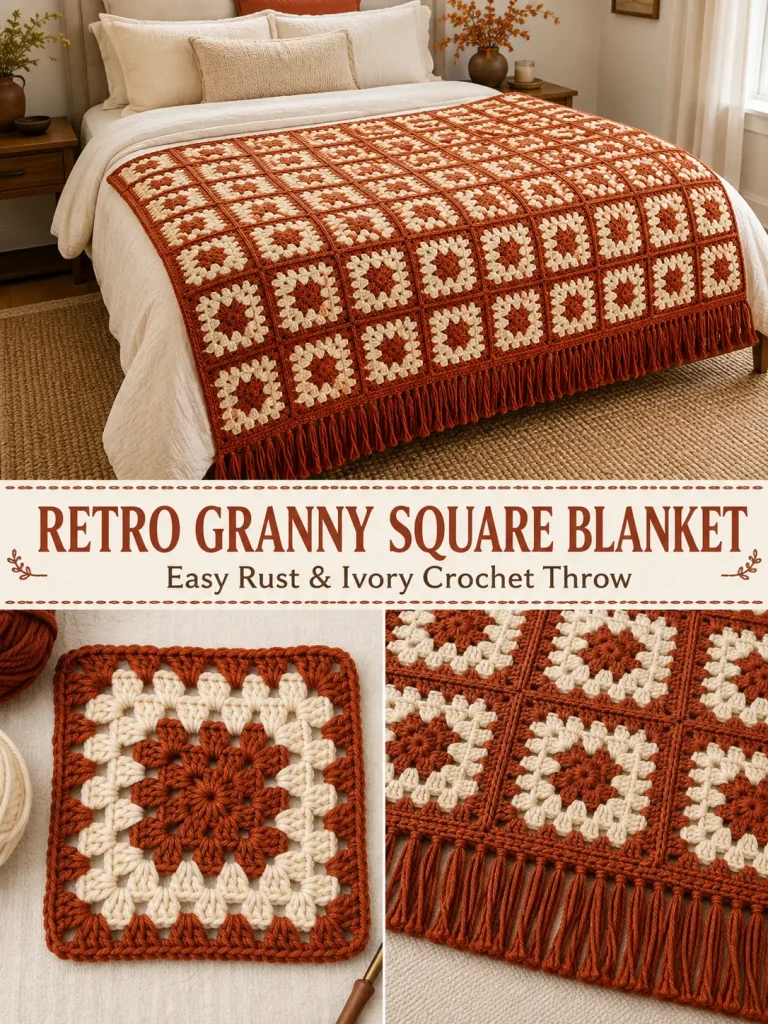
There is something about a rust-and-cream crochet blanket that immediately feels warm, nostalgic, and perfect for fall.
At first glance, this blanket looks complicated because the finished fabric is filled with repeated geometric shapes, strong contrasting seams, and dozens of little color changes.
But the secret is much simpler:
Every square is the same.
You crochet one classic granny square using the same five-round color sequence, make enough copies, join them with rust-colored seams, add a simple border, and finish the short edges with soft fringe.
That repetition is exactly what gives the finished blanket its beautiful vintage look.
This is an original crochet pattern inspired by the visual style of a rust-and-cream granny-square throw, rather than a reproduction of an unknown designer’s instructions.
Retro Granny Square Blanket at a Glance
Skill level: Confident beginner
Terminology: US crochet terms
Construction: Individual granny squares joined after blocking
Sample layout: 6 squares across × 9 squares long
Total squares: 54
Approximate square size: 7 inches after blocking
Approximate blanket size before fringe: about 42 × 63 inches, plus border
Main colors:
- Warm rust / cinnamon
- Soft warm ivory / natural cream
Joining color: Rust
Border: Rust
Fringe: Rust
Why This Blanket Looks More Complicated Than It Is
The strong visual effect comes from repeating the same color sequence:
Rust → Ivory → Rust → Ivory → Rust
Every square ends with rust.
Then the squares are joined with more rust.
That creates a visible rust-colored framework around all of the cream sections, making the finished blanket look much more intricate than the individual motif actually is.
Once you can crochet one square correctly, the rest of the blanket is repetition.
Materials
You will need:
- Worsted-weight / Category 4 yarn in warm rust
- Worsted-weight / Category 4 yarn in soft warm ivory
- 5 mm or 5.5 mm crochet hook
- Yarn needle
- Scissors
- Stitch markers, optional
- Measuring tape
- Blocking mats and rust-resistant pins, optional but useful
Use yarns of approximately the same weight and fiber behavior.
A smooth yarn works especially well because it keeps the granny clusters and color contrast easy to see.
How Much Yarn?
Exact yarn use will depend heavily on:
- yarn brand
- hook size
- tension
- finished square size
- joining method
- fringe length
For a throw around 42 × 63 inches, expect this to be a fairly yarn-intensive project.
The most reliable method is to make one complete square first, weigh it, and calculate from your actual crochet.
Because every square uses the same color sequence, you can also weigh the rust and ivory yarn separately before and after making your sample square.
Then calculate:
grams used per square × 54 squares
Add additional rust yarn for:
- joining
- border
- fringe
- swatching
- normal variation
I would purchase extra yarn rather than trying to finish with exactly the calculated amount, especially if matching dye lots matters.
Abbreviations
- ch = chain
- dc = double crochet
- sc = single crochet
- sl st = slip stitch
- sp = space
- st = stitch
- sts = stitches
- rep = repeat
The beginning ch 3 counts as one double crochet in the granny-square instructions below.
Before Making 54 Squares
Make one complete test square first.
Use the exact:
- yarn
- hook
- color sequence
- tension
you plan to use for the blanket.
Then:
- Fasten off.
- Weave in the ends.
- Block it using a method suitable for your yarn.
- Allow it to dry completely.
- Measure it.
For the sample blanket, aim for approximately:
7 × 7 inches
If yours is smaller or larger, that is okay.
Just use your actual measurement when planning the final blanket size.
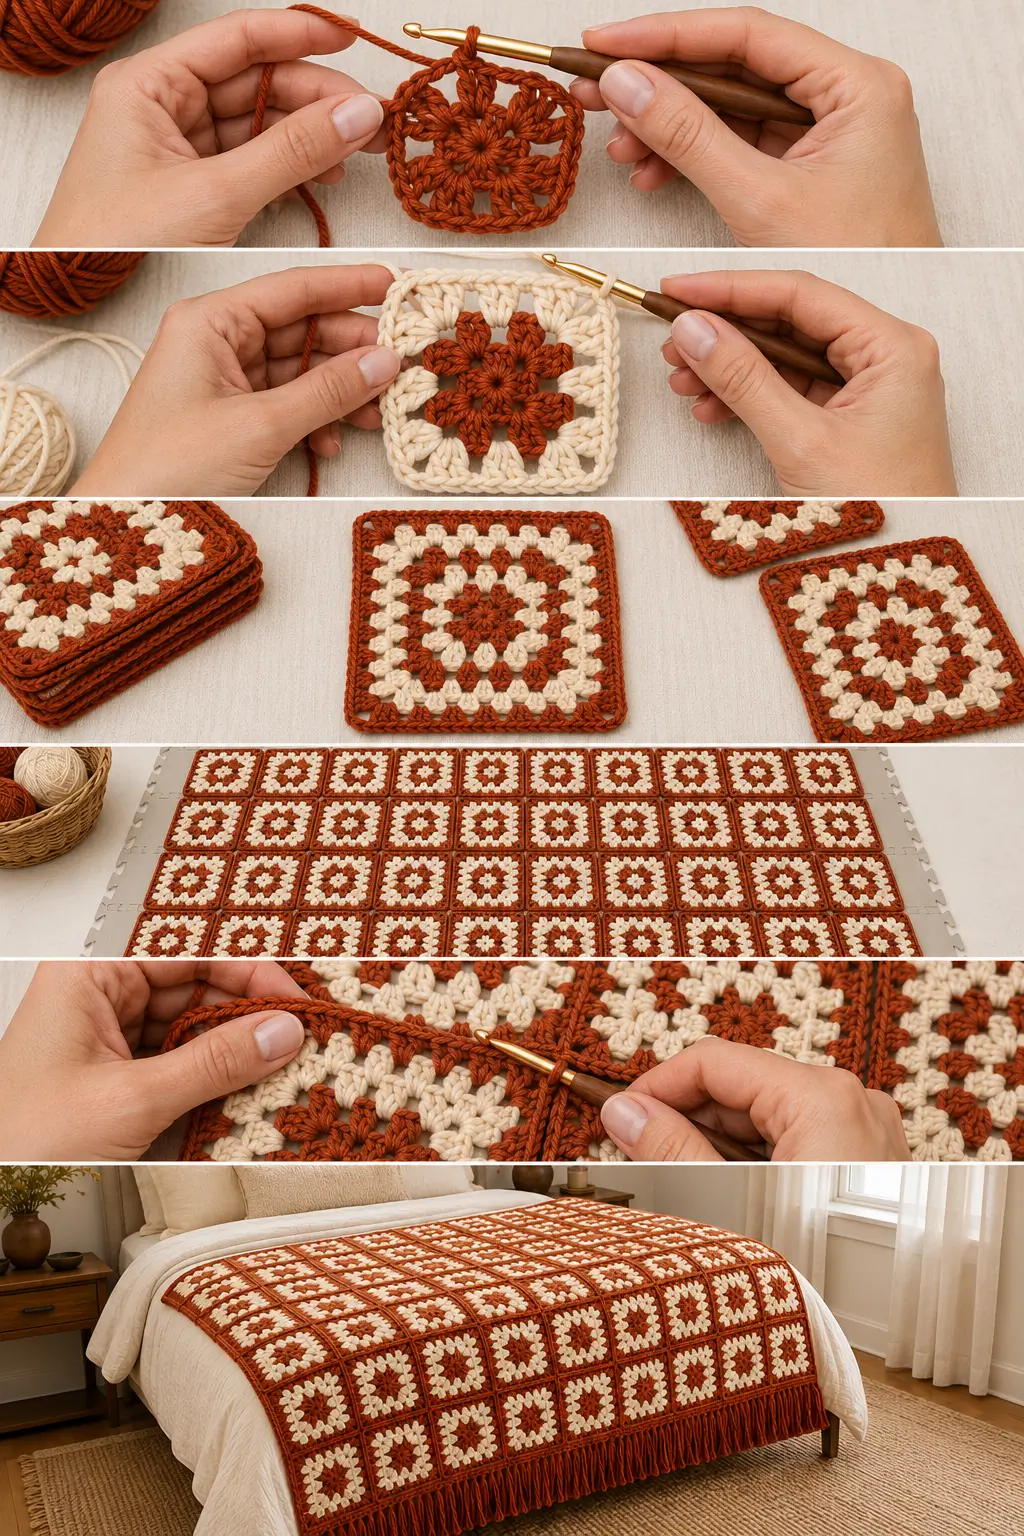
THE GRANNY SQUARE
Every square follows the exact same five-round color sequence.
Round 1
Rust
Round 2
Ivory
Round 3
Rust
Round 4
Ivory
Round 5
Rust
This repeated sequence creates the vintage geometric effect.
Round 1 — Rust
With rust yarn, make a magic ring.
If you prefer not to use a magic ring:
Ch 4 and sl st into the first chain to form a ring.
Into the center work:
Ch 3, 2 dc, ch 2.
Then repeat:
3 dc, ch 2
three more times.
You should now have:
- 4 groups of 3 dc
- 4 corner ch-2 spaces
Join with a sl st to the top of the beginning ch 3.
Fasten off rust.
Round 2 — Ivory
Join ivory yarn in any corner ch-2 space.
Work:
Ch 3, 2 dc, ch 2, 3 dc
in the same corner.
Ch 1.
In the next corner work:
3 dc, ch 2, 3 dc
Ch 1.
Repeat in the remaining two corners.
Join with a sl st to the beginning ch 3.
Fasten off ivory.
You now have two granny clusters at each side of the square, separated by the corner.
Round 3 — Rust
Join rust yarn in any corner ch-2 space.
In that corner work:
Ch 3, 2 dc, ch 2, 3 dc.
Ch 1.
In the next side ch-1 space work:
3 dc
Ch 1.
In the next corner work:
3 dc, ch 2, 3 dc
Ch 1.
Continue around, working:
In every side ch-1 space:
3 dc
In every corner:
3 dc, ch 2, 3 dc
with ch 1 between each cluster.
Join.
Fasten off rust.
Round 4 — Ivory
Join ivory yarn in any corner.
Work:
Ch 3, 2 dc, ch 2, 3 dc
in the same corner.
Ch 1.
Now work:
3 dc in each ch-1 space along the side
with:
ch 1 between clusters.
At the next corner work:
3 dc, ch 2, 3 dc.
Continue around.
Join with a sl st.
Fasten off ivory.
Round 5 — Rust
Join rust yarn in any corner.
Work:
Ch 3, 2 dc, ch 2, 3 dc
in that corner.
Ch 1.
Continue around exactly as before:
Each side ch-1 space:
3 dc
Between clusters:
Ch 1
Each corner:
3 dc, ch 2, 3 dc
Join with a sl st to the beginning ch 3.
Fasten off.
What the Finished Square Should Look Like
Your finished square should clearly show five concentric granny rounds:
Rust center
then
Ivory
then
Rust
then
Ivory
then
Rust outer round
The outside rust round is particularly important.
When all of the squares are joined, those rust edges combine with the rust joining yarn to create the strong geometric framework seen across the finished blanket.
Make 54 Squares
For the sample throw, make:
54 identical squares
Arrange them:
6 squares across
and
9 squares down
Do not begin joining immediately.
Finish all of the squares first if possible.
This gives you a chance to compare their sizes and correct any noticeably different motifs before assembly.
Weave In the Ends as You Go
With five color rounds, every square creates several yarn ends.
Multiply that by 54 squares and you can see how quickly they accumulate.
I strongly recommend weaving in the ends after every few squares.
Leaving all of them until the end turns a relaxing blanket project into an evening spent staring at hundreds of yarn tails.
Block the Squares
Blocking before joining is worth the extra step.
It helps:
- straighten the edges
- improve the square shape
- make motifs easier to align
- make finished sizes more consistent
Block every square to approximately the same measurements.
Do not aggressively stretch a smaller square to force it to match a much larger one.
If one motif is dramatically different, check:
- stitch count
- hook size
- yarn thickness
- tension
Arrange the Blanket
Lay all 54 squares on a large clean surface.
Arrange them:
6 across × 9 down
Because every square uses the same color sequence, you do not need to worry about complicated color placement.
However, check that:
- every square faces the same direction
- all right sides face upward
- no square is accidentally flipped
- the edges line up properly
Take a photograph of the full arrangement before picking anything up.
PART 2 — CREATE THE VISIBLE RUST JOIN
The visible rust seams are an important part of this blanket.
Rather than trying to hide the joins, we are going to make them part of the design.
Use rust yarn.
The easiest method for creating a visible raised seam is a single-crochet join.
Single-Crochet Join
Place two squares together with:
wrong sides touching
and
right sides facing outward.
Align the corresponding edges.
Join rust yarn through the corner spaces of both squares.
Ch 1.
Now insert the hook through the corresponding edge loops of both squares.
Work:
1 sc
Continue working one single crochet through both squares across the entire edge.
At the next corner, work through both corresponding corner spaces.
Fasten off.
When you open the squares flat, the rust single-crochet seam should sit visibly on the front.
Don’t Pull the Join Too Tightly
The seam should hold the squares together without shortening their edges.
If you crochet the joining stitches too tightly, the blanket can:
- pucker
- ripple
- pull inward
Relax your tension or use a hook half a size larger for joining if necessary.
Best Joining Order
The easiest assembly method is:
First:
Join the 6 squares of each row together.
You will create:
9 long strips
Then:
Join the 9 strips together along their long edges.
This is much easier than randomly joining one square at a time.
Check the Blanket While Joining
After joining every few strips, lay the blanket flat.
Check:
- seams
- corners
- alignment
- overall width
At the points where four squares meet, keep the joining stitches neat and avoid packing several unnecessary stitches into the same corner.
One secure joining stitch through the aligned corner spaces is usually enough before continuing along the next edge.
PART 3 — ADD THE RUST BORDER
Once all 54 squares are joined, keep using rust yarn.
The blanket already has plenty of visual texture, so the border should remain simple.
Border Round 1
Join rust yarn in any outer corner.
Ch 1.
Work sc evenly around the entire blanket.
Along the top and bottom edges, work into the available stitches and chain spaces.
Along the sides, distribute the stitches evenly across the square edges.
At each blanket corner work:
3 sc in the corner
Continue around.
Join with a sl st to the first sc.
Border Round 2
Ch 1.
Sc in each stitch around.
At each corner work:
3 sc in the center corner stitch
Continue around.
Join.
Optional Border Round 3
For a slightly more substantial edge, repeat Border Round 2 once more.
The photographed style works especially well with a simple rust border because it visually connects the outside of the blanket to all of the internal rust seams.
Fasten off.
Check the Border Before Adding Fringe
Lay the blanket flat.
If the border:
Waves outward
You may have added too many stitches.
Pulls inward
You may have too few.
Correct the problem before adding fringe.
Fringe will not fix an uneven border.
PART 4 — ADD THE FRINGE
The fringe gives this blanket its final vintage throw appearance.
I prefer adding fringe to the two short ends only.
This keeps it decorative without putting tassels along the sides where they can become annoying during use.
Cut the Fringe
Cut rust yarn into pieces approximately:
10–11 inches long
Each piece will fold in half, creating fringe approximately:
5 inches long
before final trimming.
Make One Fringe Bundle
Take:
3 pieces of rust yarn
Hold them together.
Fold the group in half.
You now have one bundle containing six loose ends.
Attach the Fringe
Insert your crochet hook through a border stitch from back to front.
Catch the folded center of the yarn bundle.
Pull the loop partly through.
Then pull all six loose yarn ends through that loop.
Tighten gently.
Do not pull so aggressively that the blanket edge puckers.
Fringe Spacing
Attach one fringe bundle approximately:
every 2 border stitches
along both short ends.
You can adjust this slightly depending on how full you want the fringe.
The goal is:
soft and full
rather than an extremely dense wall of yarn.
Trim the Fringe
Once every bundle is attached:
- Lay the blanket flat.
- Comb the fringe gently with your fingers.
- Trim the ends evenly.
Aim for approximately:
4½–5 inches finished length
Small variations are fine.
Perfectly machine-straight fringe can actually make a handmade blanket look less natural.
Want Less Fringe?
Use:
2 strands per bundle
instead of 3.
Or attach a bundle every:
3 border stitches
instead of every 2.
Want More Fringe?
Use:
4 strands per bundle
but check the weight.
A very heavy fringe can pull on the crochet border.
Final Finished Look
When complete, the blanket should have:
- repeated rust-and-ivory granny squares
- rust center in every square
- ivory second round
- rust third round
- ivory fourth round
- rust outer round
- visible rust joining seams
- rust outer border
- soft rust fringe on the short ends
The result should feel:
retro
warm
graphic
cozy
and especially beautiful for fall.
Why the Two Colors Work So Well
You could make this blanket with ten different colors.
But I actually think the limited palette is what makes it special.
Rust gives you:
- warmth
- fall color
- strong definition
Ivory gives you:
- contrast
- softness
- breathing room
Together, they make a classic granny square feel almost geometric.
Alternative Fall Color Combinations
If you want the same pattern but a different mood, try:
Olive + Oatmeal
Soft woodland fall
Deep Plum + Cream
Rich and slightly unexpected
Caramel + Ivory
Warm neutral autumn
Walnut + Mushroom
Earthy vintage
Dusty Rose + Oatmeal
Soft feminine fall
But for the version in this article, keep the beautiful:
warm rust + soft ivory
combination throughout.
How to Make a Smaller Lap Blanket
Make:
5 squares across × 7 squares down
That requires:
35 squares
If each blocked square measures approximately 7 inches, the motif section will be approximately:
35 × 49 inches
before the border.
How to Make a Larger Blanket
Try:
7 squares across × 10 squares down
That requires:
70 squares
With approximately 7-inch motifs, that creates a square section around:
49 × 70 inches
before adding the border.
How to Calculate Any Size
Measure one blocked square.
Then decide your target width and length.
Use:
desired width ÷ square width = number of squares across
and
desired length ÷ square height = number of squares down
Round to a whole number of squares.
Then multiply:
squares across × squares down
to find your total motif count.
Remember that joining and border rounds can add a little extra size.
Can I Make One Giant Granny Square Instead?
You can make a blanket from one continuously growing granny square, but it will produce a very different visual.
The strong geometric grid in this blanket comes from:
many individual squares + visible rust joins
If you want the same retro patchwork effect, individual motifs are the better choice.
Can I Join as I Go?
Yes, if you already know a join-as-you-go method.
However, for this version I prefer making the squares separately because:
- blocking is easier
- size differences are easier to correct
- the visible rust seam is part of the design
- assembly is more beginner-friendly
What If My Squares Aren’t Perfectly Square?
Check your corners first.
Every corner should contain:
3 dc, ch 2, 3 dc
If you accidentally miss part of a corner increase, the motif can begin pulling out of shape.
Blocking can correct mild unevenness.
It cannot completely fix a square with missing stitches.
What If My Square Starts Twisting?
Granny squares can sometimes develop a slight rotational lean.
This can be influenced by:
- tension
- stitch direction
- yarn
- how tightly you join each round
A little movement often settles with blocking.
If the twisting becomes severe, make sure your stitch counts and corner placements are correct.
What If the Center Hole Is Too Large?
If using a magic ring, pull the tail firmly after Round 1.
Then weave the center tail securely in several directions.
Do not simply cut it close to the stitches.
The center needs to remain secure during use and washing.
Should I Cut the Yarn After Every Round?
For this exact alternating-color design, yes.
You switch:
Rust → Ivory → Rust → Ivory → Rust
and each new color is joined at the beginning of its round.
This keeps the color changes clean and avoids carrying long unused yarn strands around the back of the square.
Best Way to Change Colors
After finishing a round:
- Slip stitch to join.
- Fasten off the current yarn.
- Pull the tail through.
- Join the next color in a corner space.
Joining each round in a corner also helps make the beginning point less noticeable.
Should I Weave Ends Before Blocking?
Yes.
Weave them securely first.
Then block.
This lets you see the square in its true finished state before joining.
Can I Skip the Fringe?
Absolutely.
Without fringe, the blanket becomes a cleaner, more modern granny-square throw.
The rust border already provides a complete finished edge.
The fringe is purely stylistic.
Is This Beginner Friendly?
If you know:
- chain
- double crochet
- single crochet
- slip stitch
- working into chain spaces
you can make this blanket.
The project looks ambitious because there are many squares.
But technically, you are repeating the same five-round motif 54 times.
That makes it much easier than the final blanket suggests.
The Best Way to Finish It Without Getting Overwhelmed
Don’t think:
“I have to make 54 squares.”
Try:
3 squares today.
Then another three tomorrow.
Make small stacks.
Weave in the ends.
Block them in batches.
Eventually those little stacks become nine complete rows.
That is one of the things I love most about granny-square blankets.
A big project is really just a collection of tiny finished projects.
Frequently Asked Questions
What kind of granny square is this?
It uses a classic granny-square construction with groups of three double crochets separated by chain spaces and larger corner spaces.
How many rounds are in each square?
Five.
The color sequence is:
Rust – Ivory – Rust – Ivory – Rust
How many squares are in the sample blanket?
They are arranged:
6 across × 9 down
Why are all the outer rounds rust?
The repeated rust edges combine visually with the rust joining seams, creating the strong grid effect across the finished blanket.
Do I need fringe?
No.
It is optional.
The blanket is completely finished after the border.
Can I use more colors?
Yes.
But changing the palette dramatically changes the look.
The two-color rust-and-ivory version is what creates the strong vintage graphic style shown here.
What yarn weight should I use?
The sample is designed around worsted-weight / Category 4 yarn.
You can use another weight, but the square size, hook size, yarn requirements, and final blanket dimensions will change.
Do all squares have to be exactly 7 inches?
No.
They need to be consistent with one another.
If all of your blocked squares measure 6½ inches instead of 7, use that measurement when calculating your finished blanket.
Final Thoughts
This is one of those blankets that makes people assume you spent ages learning a complicated stitch pattern.
But when you look closely, the whole design comes from one simple decision:
Repeat the same granny square again and again.
Rust.
Ivory.
Rust.
Ivory.
Rust.
Then connect everything with more rust.
The joining lines become part of the pattern.
The fringe finishes the vintage look.
And suddenly a very familiar crochet square turns into a blanket that feels much more elaborate than the actual construction.
That’s exactly the kind of crochet project I love:
simple enough to relax with, but impressive enough that nobody believes it was simple.



