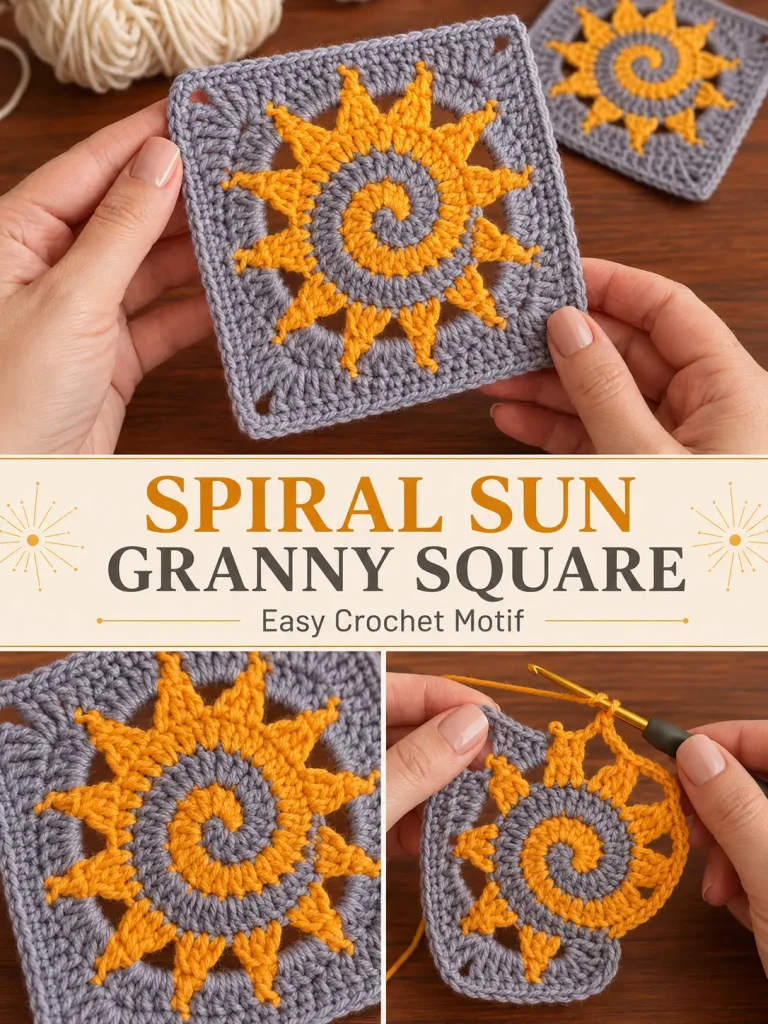
I love granny squares that make you stop for a second and wonder:
“How did they do that?”
This Spiral Sun Granny Square has exactly that effect.
At first glance, the center looks complicated—a raised spiral winds through the middle, golden rays stretch outward, and everything finishes inside a neat square frame.
But I wanted a version that was much easier to reproduce consistently.
So instead of trying to crochet several colors into a complicated continuous spiral, this version uses a simple trick:
crochet the round center first, add the spiral on top with surface crochet, add the sun rays, then turn the whole motif into a square.
The finished square keeps the same striking visual idea while making the construction much easier to understand.
Spiral Sun Granny Square at a Glance
Skill level: Confident beginner / intermediate
Terminology: US crochet terms
Construction: Center outward
Approximate finished size: 6–7 inches, depending on yarn and hook
Main colors:
- Golden orange
- Soft medium gray
Main techniques:
- crochet in the round
- surface slip stitch
- chains
- single crochet
- double crochet
- treble crochet
- squaring a circular motif
The Color Combination
For this version use:
Sun and Spiral
Golden pumpkin-orange / warm amber
Center Base and Square
Soft medium gray
This combination makes the sun stand out dramatically without using lots of colors.
You can reverse the spiral colors if you want, but for the sample square keep:
gray center + golden spiral + golden rays + gray square border
Materials
You will need:
- Worsted-weight / Category 4 yarn in golden orange
- Worsted-weight / Category 4 yarn in medium gray
- 4.5–5 mm crochet hook
- Yarn needle
- Scissors
- Stitch markers, optional
Choose yarns with good stitch definition.
Very fuzzy yarn can hide the spiral.
Abbreviations
- ch = chain
- sc = single crochet
- hdc = half double crochet
- dc = double crochet
- tr = treble crochet
- sl st = slip stitch
- st = stitch
- sts = stitches
- sp = space
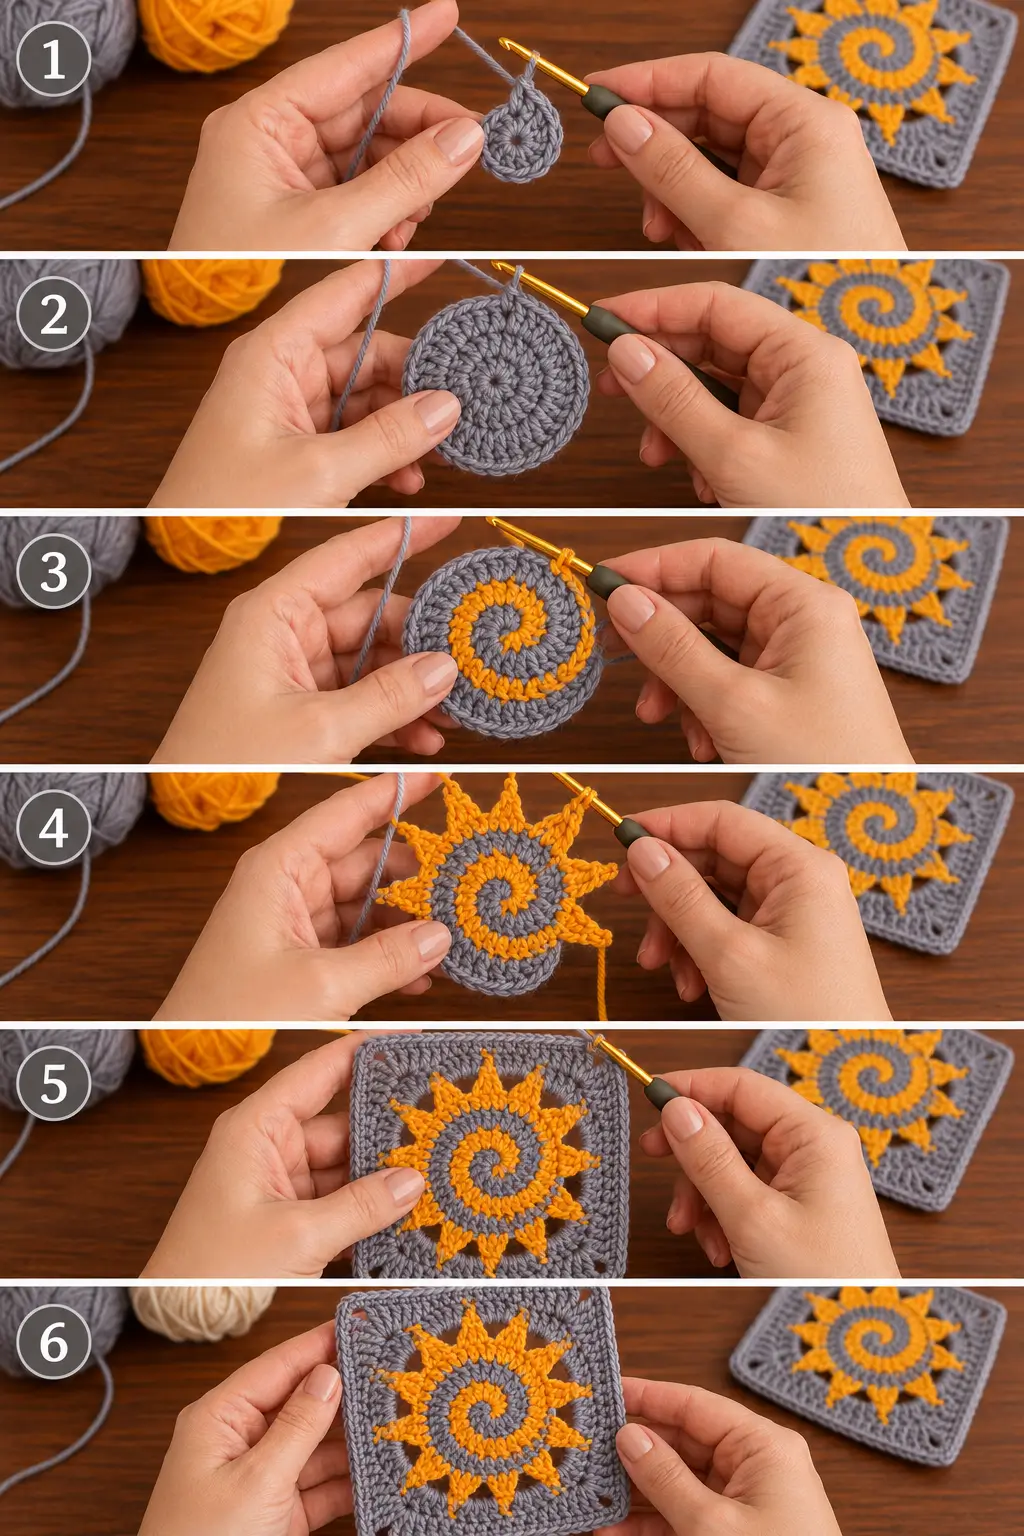
PART 1 — CROCHET THE ROUND CENTER
Start with medium gray.
Make a magic ring.
Round 1
Ch 2.
Work:
12 dc into the magic ring.
Join with a slip stitch to the first dc.
Pull the center closed.
You should have:
12 dc
Round 2
Ch 2.
Work:
2 dc in every stitch around.
Join.
You should have:
24 dc
Round 3
Ch 2.
Repeat:
1 dc in next stitch, 2 dc in next stitch
around.
Join.
You should have:
36 dc
Fasten off gray.
You now have a flat circular center.
If the circle is badly ruffling or cupping, check your stitch count before continuing.
PART 2 — ADD THE GOLDEN SPIRAL
This is the little trick that creates the dramatic center without complicated color changes.
Use golden orange.
The spiral is added using surface slip stitch.
How to Surface Crochet the Spiral
Place the gray circle with the right side facing you.
Hold the golden yarn behind the work.
Insert the hook from front to back close to the center of the circle.
Catch the golden yarn and pull up a loop.
Now insert the hook into the next nearby stitch or space following a gentle circular path.
Pull the yarn through the fabric and immediately through the loop already on the hook.
You have made one surface slip stitch.
Continue.
Follow a Spiral Path
Instead of crocheting around in one perfect circle, gradually move outward.
Think:
center → small circle → wider circle → outer edge
Keep approximately the same distance between each section of the spiral.
Do not pull tightly.
The gray center should stay completely flat.
Continue until the spiral reaches close to the outer edge of Round 3.
Fasten off.
What the Spiral Should Look Like
You should now have:
- gray circular background
- one continuous raised golden line
- spiral beginning near the center
- spiral gradually widening outward
The spiral does not need to be mathematically perfect.
A slight handmade irregularity actually looks beautiful in this motif.
Important Surface Crochet Tip
If your gray circle begins puckering, your surface slip stitches are too tight.
Undo several stitches and try again with a looser tension.
The golden stitches should sit on top of the gray fabric without pulling it inward.
PART 3 — MAKE THE SUN RAYS
Now use the same golden orange yarn.
Join the yarn to any stitch around the outside of the gray circle.
We are going to create 12 pointed rays.
The 36 stitches around the circle divide neatly into 12 groups of 3 stitches.
One Sun Ray
Slip stitch into the next stitch.
Ch 6.
Starting in the second chain from the hook, work back down the chain:
- sl st in first chain
- sc in next chain
- hdc in next chain
- dc in next chain
- tr in final chain
Now:
skip the next stitch on the gray circle
and slip stitch into the following stitch.
One pointed ray is complete.
Repeat the Rays
Repeat the same ray construction around the entire circle.
You should finish with:
12 golden pointed rays
spaced evenly around the center.
Fasten off.
Check the Ray Placement
Before continuing, lay the motif flat.
You should have:
- 12 rays
- approximately equal spacing
- golden spiral clearly visible
- gray circle still lying flat
The rays should point outward rather than folding over the center.
Light blocking can help later.
PART 4 — TURN THE SUN INTO A SQUARE
Now switch back to medium gray.
This stage looks complicated, but the 12 rays make the math easy.
Think of them as:
4 corner rays
with
2 intermediate rays between every corner
So every third ray becomes a corner.
Squaring Round 1
Join gray yarn near the tip of any ray that you have chosen as a corner.
Work into or securely around the upper tip of that ray:
3 dc, ch 2, 3 dc
This forms Corner 1.
First Side
Ch 2.
Attach to the tip of the next ray with:
1 sc
Ch 2.
Attach to the tip of the next ray with:
1 sc
Ch 2.
At the next ray work:
3 dc, ch 2, 3 dc
This creates Corner 2.
Continue Around
Repeat the same construction around all four sides:
At each corner ray:
3 dc, ch 2, 3 dc
At each of the two rays between corners:
sc into ray tip
Between each attachment:
ch 2
When all four sides are complete, join with a slip stitch.
You should now clearly see a square forming around the circular sun.
Check the Shape Before Continuing
Lay the motif flat.
You should see:
- one corner approximately every quarter turn
- two ray attachment points between corners
- four clear sides
- open spaces between the rays and square frame
If the square pulls inward badly, your chain sections may be too tight.
If necessary, replace ch 2 with ch 3 to suit your tension.
This is a decorative motif, so a small tension adjustment is completely reasonable.
PART 5 — FILL OUT THE SQUARE
Keep using gray.
Slip stitch into the first corner ch-2 space.
Squaring Round 2
In the corner work:
Ch 3, 2 dc, ch 2, 3 dc
Then work across the side.
In each chain space along the side work:
3 dc
You may use ch 1 between groups if the fabric needs a little more room to lie flat.
At the next corner work:
3 dc, ch 2, 3 dc
Continue around all four sides.
Join.
PART 6 — FINAL GRAY BORDER ROUND
For a clean square edge, work one more round.
Slip stitch to a corner.
In the corner:
Ch 3, 2 dc, ch 2, 3 dc
Then work:
1 dc in each stitch across the side
When you reach any chain space, work enough double crochets into that space to maintain an even edge—usually 2–3 dc, depending on the size of the space.
At every corner:
3 dc, ch 2, 3 dc
Continue around.
Join and fasten off.
What the Finished Square Should Look Like
Your final motif should show four very clear layers:
Center
Soft gray round crochet disc
Spiral
Raised golden-orange spiral traveling from center outward
Sun
12 pointed golden rays
Outer Frame
Medium-gray square border
The motif should lie reasonably flat after blocking.
Blocking the Square
Blocking is especially useful for this design.
The sun rays may curl slightly after crocheting.
Use a blocking method suitable for your yarn.
Pin the square so:
- all four corners are square
- each ray points outward
- the center stays round
- the spiral is not stretched
- the outer edges remain straight
Allow the square to dry completely before removing the pins.
What If My Sun Rays Curl?
A little curling is normal.
You can gently shape the rays during blocking.
If they curl dramatically, your chain stitches may be too tight.
Try using slightly looser tension when making the ray chains.
What If the Square Border Ruffles?
This means the outer rounds have too much fabric.
Possible causes include:
- too many stitches in the side spaces
- chains that are too loose
- overly loose tension
Reduce the number of side stitches slightly.
What If the Border Pulls Inward?
You probably need slightly more room around the sun.
Try:
- ch 3 instead of ch 2 between ray attachments
- slightly looser tension
- one additional stitch in larger side spaces
The motif should lie flat rather than being forced into an exact count that does not suit your tension.
What If the Spiral Looks Uneven?
That is okay.
The spiral is surface crocheted by eye.
For a more regular result, place a few removable stitch markers on the gray circle before beginning.
Use them to mark the approximate path.
Then surface crochet along that guide.
Can I Sew the Spiral Instead?
Yes.
If surface crochet feels awkward, thread golden yarn onto a yarn needle and add the spiral with a neat chain-stitch embroidery line.
The visual effect will be similar.
How Many Squares Would I Need for a Blanket?
That depends on the finished size of your blocked square.
For example, if each square measures approximately 6½ inches:
Small lap blanket
6 × 8 squares = 48 motifs
Sofa throw
7 × 9 squares = 63 motifs
Larger throw
8 × 10 squares = 80 motifs
Always measure one finished blocked square before calculating your blanket.
A Beautiful Blanket Layout
For a really striking blanket, alternate two versions.
Square A
Gray background + golden sun
Square B
Warm ivory background + golden sun
Keep the golden spiral and rays consistent.
Then join everything with gray.
That would give you the sunshine effect without making the blanket overwhelmingly bright.
Turn It Into a Pillow
Four motifs can make a beautiful cushion front.
Arrange:
2 × 2
Join the four squares.
Then crochet or sew a simple solid-color back panel.
That would make the spiral sun the focal point without requiring dozens of squares.
Turn It Into a Tote Bag
Make:
2 large spiral sun squares
Use one for the front and one for the back.
Join around three sides.
Add a sturdy crochet strap.
This motif is graphic enough to make the entire bag interesting without extra decoration.
Turn It Into a Fall Version
Even though the motif is a sun, the right colors can make it work beautifully for late summer and fall.
Try:
- golden amber sun
- mushroom background
- deep plum border
or:
- caramel sun
- oatmeal background
- walnut border
The geometric sun shape works surprisingly well in autumn palettes.
Why This Motif Gets So Much Attention
A normal granny square is familiar.
This one adds one detail that makes people look twice:
the spiral.
The eye naturally follows it toward the center.
Then the pointed rays lead the eye back outward.
Then the square border frames everything.
That combination makes a relatively small crochet motif feel much more elaborate than it actually is.
Frequently Asked Questions
Is the spiral crocheted at the same time as the center?
Not in this version.
The gray center is crocheted first, then the golden spiral is added with surface slip stitches.
This makes the pattern much easier to control.
How many rays are there?
This version uses:
12 rays
The 36 stitches in the final center round divide evenly into 12 ray sections.
Why use surface crochet for the spiral?
It lets you create a very visible two-color spiral without having to manage complicated simultaneous color changes in the center.
Can beginners make this?
If you are already comfortable with:
- double crochet
- working in the round
- chains
- slip stitch
you can make the main motif.
The surface spiral and squaring stage may require a little patience the first time.
Make one practice square before beginning a large project.
Can I use different colors?
Absolutely.
The pattern works with many combinations.
For the version shown here, use:
golden orange + medium gray
for the strongest resemblance to the inspiration.
Why isn’t this copied from the linked pattern?
Because the goal is to create useful original crochet content rather than reproduce another site’s written pattern.
This version uses a different construction approach—especially the separately added surface-crochet spiral—while preserving the visual idea that makes the motif so appealing.
Final Thoughts
This is exactly the kind of granny square I love for social crochet content.
It looks like something that would take ages to figure out.
But when you break it apart, it is really just:
a circle
a spiral
some rays
and a square border
The golden-orange and gray combination makes every layer easy to see, and the raised spiral gives the finished motif that little extra detail that makes people stop scrolling.
Make one square first.
Because once you see the spiral and rays come together, I have a feeling one square won’t be enough.



