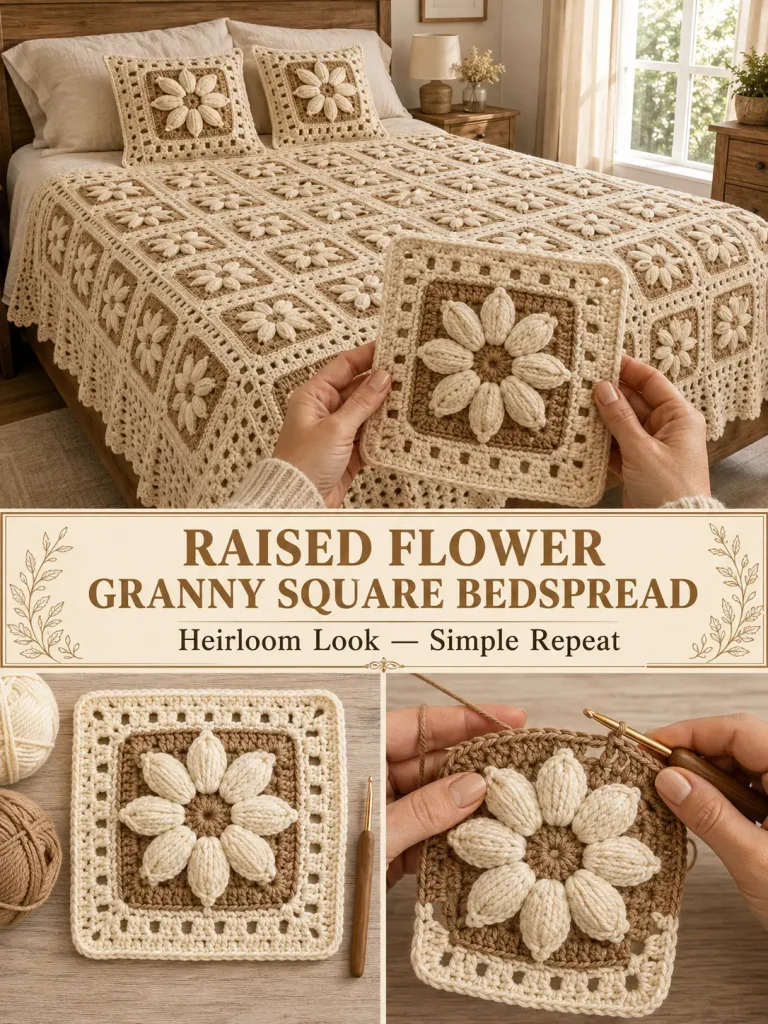
This is one of those crochet blankets that looks like it must involve dozens of complicated techniques.
It doesn’t.
The visual impact comes from repeating one raised flower granny square over and over.
Each motif starts with a warm caramel center, grows into a raised ring of soft cream petals, returns to the caramel shade behind the flower, and then finishes with an airy cream square frame.
Join enough squares together and the individual little flowers suddenly become an entire heirloom-style bedspread.
For this original version, I kept the beautiful neutral color direction:
- warm cream
- natural caramel/taupe
No bright colors.
No complicated tapestry work.
Just texture, repetition, and a beautiful raised flower in every square.
Raised Flower Granny Square Bedspread at a Glance
Skill level: Confident beginner / intermediate
Terminology: US crochet terms
Construction: Individual motifs joined after blocking
Motif: Raised 8-petal flower granny square
Suggested yarn: Worsted-weight / Category 4
Suggested hook: 5 mm, adjusting as needed
Approximate blocked square size: 6–7 inches
Main colors:
- Warm natural cream
- Caramel / warm taupe
The square is designed to lie flat while the cream petals sit slightly raised above the background.
Why This Construction Works
The key is making the flower and the background separately.
The first caramel round is worked normally.
Then the cream petals are worked into the front loops only.
That leaves the back loops available.
We return to those unused back loops with caramel yarn and build the background behind the raised petals.
This gives us:
a genuinely raised flower without having to sew eight separate petals onto every square.
That is especially useful when you need dozens of motifs for a blanket.
Materials
You will need:
- Worsted-weight / Category 4 yarn in warm cream
- Worsted-weight / Category 4 yarn in warm caramel or taupe
- 5 mm crochet hook
- Yarn needle
- Scissors
- Stitch markers
- Measuring tape
- Blocking mats and pins, optional but useful
Use yarns of approximately the same thickness.
A smooth yarn with good stitch definition is best because it makes the petals and granny clusters clearly visible.
Yarn Choice
For a bedspread that will actually be used, think about:
- washability
- softness
- weight
- durability
A washable acrylic, cotton blend, or other blanket-friendly yarn can work.
Keep in mind that a large granny-square bedspread can become quite heavy, especially with raised flower motifs.
Make one complete square before purchasing yarn for an entire bed-sized project.
Abbreviations
- ch = chain
- sc = single crochet
- hdc = half double crochet
- dc = double crochet
- sl st = slip stitch
- st = stitch
- sts = stitches
- sp = space
- FLO = front loop only
- BLO = back loop only
- dc-cl = double crochet cluster
Special Stitch: 3-Double-Crochet Cluster
This stitch creates the slightly puffy flower petals.
3-dc cluster
Yarn over.
Insert hook into the indicated stitch or loop.
Yarn over and pull up a loop.
Yarn over and pull through 2 loops.
Do not finish the double crochet.
Repeat this process 2 more times in the same stitch.
You should now have 4 loops on your hook.
Yarn over and pull through all 4 loops.
One 3-dc cluster is complete.
PART 1 — MAKE THE CARAMEL FLOWER CENTER
Using caramel/taupe yarn, make a magic ring.
Round 1
Ch 1.
Work:
8 sc into the magic ring.
Join with a sl st to the first sc.
Pull the center closed.
You should have:
8 sc
Do not cut the center tail too short.
Weave it securely later.
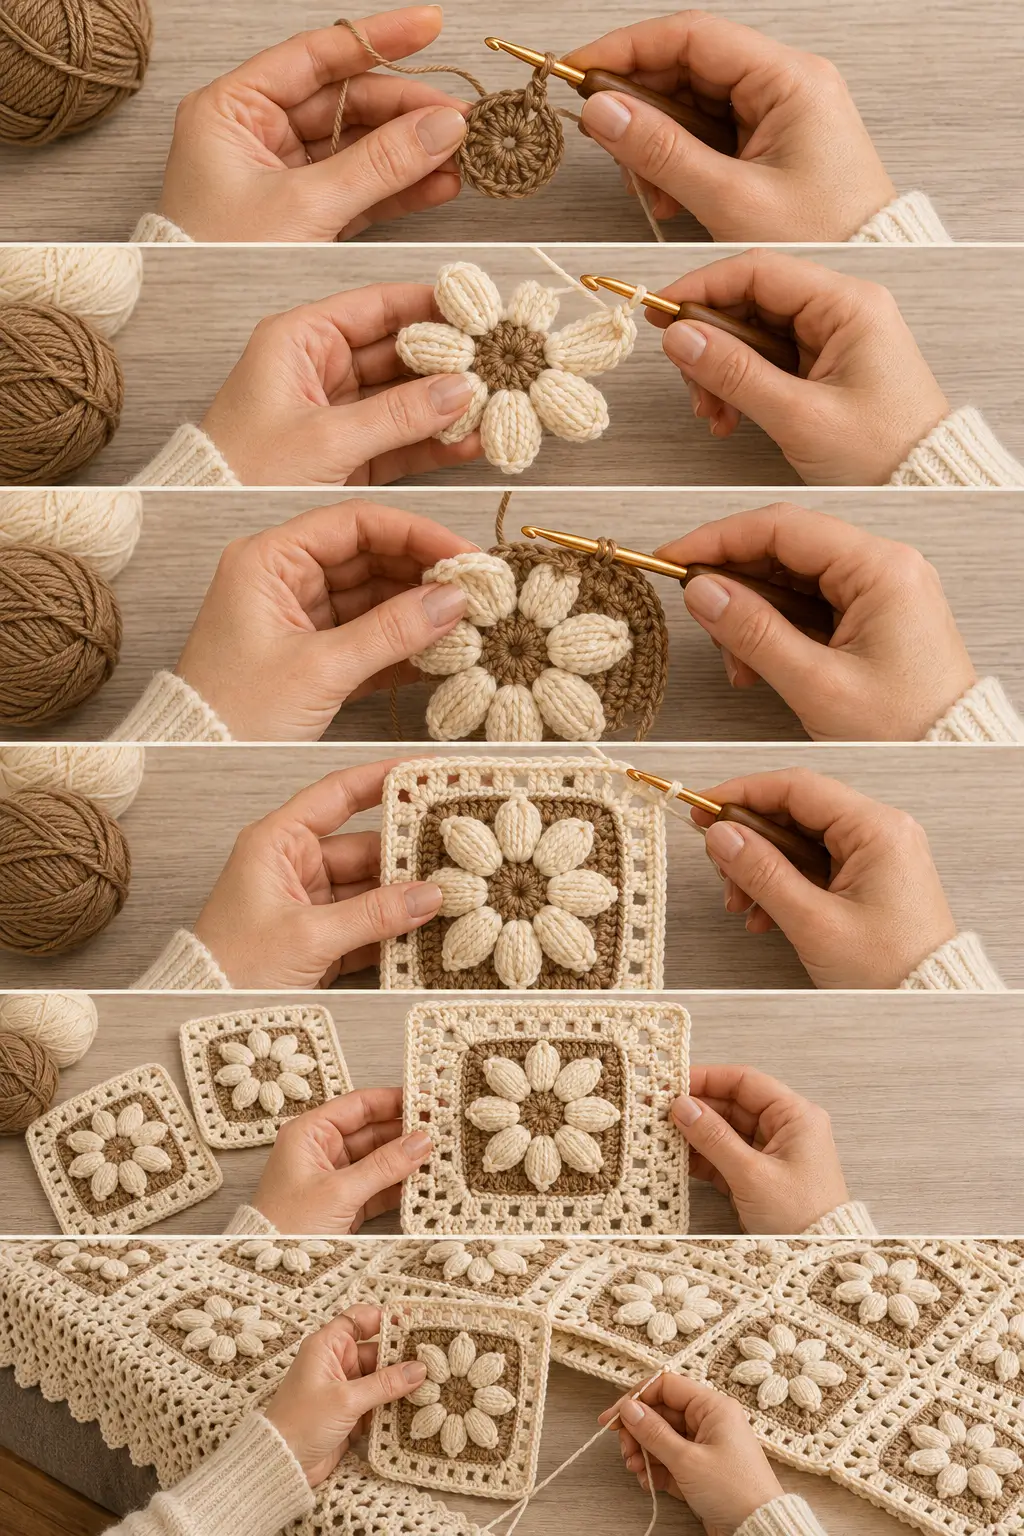
PART 2 — MAKE THE 8 RAISED CREAM PETALS
Switch to cream yarn.
This round is worked into the FRONT LOOPS ONLY of Round 1.
The unused back loops will be needed later.
Join cream yarn in the front loop of any stitch.
Petal 1
Working into the same front loop:
Sl st, ch 2, 3-dc cluster, ch 2, sl st.
That creates one raised petal.
Move to the front loop of the next stitch.
Repeat the exact same petal.
Continue Around
Work one petal into the FLO of every Round 1 stitch.
You should finish with:
8 cream petals
Fasten off cream.
Check the Flower
From the front, you should now see:
- caramel center
- 8 raised cream petals
- petals forming a complete ring
Turn the flower slightly and look behind the petals.
You should still be able to see the unused back loops from Round 1.
Those are where the background begins.
PART 3 — BUILD THE BACKGROUND BEHIND THE PETALS
Use caramel/taupe yarn again.
With the right side facing you, gently lift the petals so you can access the unused back loops from Round 1.
Join caramel into any unused BLO.
Round 3
Ch 3.
This counts as the first dc.
Work:
1 dc into the same BLO.
Now work:
2 dc into each remaining unused BLO around.
Join with a sl st to the top of the beginning ch 3.
You should have:
16 dc
The caramel circle should now sit behind the cream petals.
The petals remain visible and raised on the front.
Round 4 — Expand the Caramel Background
Ch 3.
Work 1 dc in the same stitch.
Then repeat:
1 dc in next stitch, 2 dc in next stitch
around.
Join.
You should have:
24 dc
Fasten off caramel.
You now have a round caramel background surrounding the flower.
PART 4 — TURN THE FLOWER INTO A SQUARE
Now switch back to cream.
There are 24 stitches around the caramel circle.
We will divide them into four equal sections of 6 stitches.
Every sixth section produces a corner.
Round 5 — First Squaring Round
Join cream yarn in any stitch.
In that stitch work:
Ch 3, 1 dc, ch 2, 2 dc.
That is your first corner.
Now:
Dc in each of the next 5 stitches.
In the next stitch work:
2 dc, ch 2, 2 dc.
Then:
Dc in the next 5 stitches.
Repeat this pattern around.
You should finish with:
- 4 corner ch-2 spaces
- 4 straight sides
- a recognizable square shape
Join with a sl st.
Check the Square
Lay the motif flat.
The cream petals should still sit raised above the caramel center.
The new cream round should begin pulling the circular flower into a square.
You should not have to aggressively stretch the corners.
PART 5 — ADD THE AIRY GRANNY FRAME
This round creates the open granny-style appearance visible around the flower.
Slip stitch into the next corner ch-2 space.
Round 6
In the corner work:
Ch 3, 2 dc, ch 2, 3 dc.
Now work across the side.
You have approximately 9 stitches forming each side between corner spaces.
Repeat:
Ch 1, skip 2 stitches, 3 dc in the next stitch
three times across the side.
Ch 1.
In the next corner work:
3 dc, ch 2, 3 dc.
Repeat around all four sides.
Join with a sl st.
The square should now have a much more recognizable granny-square frame.
PART 6 — FINAL CREAM EDGE
For the last motif round, we want a stable edge that is easier to join.
Slip stitch into a corner ch-2 space.
Round 7
In the corner work:
Ch 1, sc, ch 2, sc.
Now work across the side.
Work:
1 sc in every dc
and
1 sc into every ch-1 space
across.
At the next corner work:
sc, ch 2, sc
in the corner space.
Repeat around.
Join with a sl st.
Fasten off.
Finished Square
Your finished motif should show:
Center
Caramel/taupe circle
Flower
8 raised cream petals
Background
Caramel/taupe crochet surrounding the petals
Square frame
Warm cream
Outer structure
Cream granny-style open spaces and stable finishing edge
The overall look should feel soft, dimensional, neutral, and slightly vintage.
Blocking the Motif
I strongly recommend blocking before assembly.
Pin the square so:
- all four sides are equal
- all corners form approximately 90-degree angles
- the cream flower remains raised
- the background lies flat
Do not squash the petals flat.
Blocking is meant to straighten the square, not remove its texture.
Make One Sample Square Before the Blanket
Do not crochet 70 motifs before checking the finished dimensions.
Make one.
Finish it.
Block it.
Measure it.
Suppose your square measures:
6½ inches
Use that measurement—not somebody else’s—to plan the finished blanket.
BLANKET SIZE OPTIONS
Because square sizes vary, these are planning examples.
Lap Blanket
Try:
6 squares across × 8 squares down
Total:
48 squares
If each motif is 6½ inches:
approximately:
39 × 52 inches before border
Sofa Throw
Try:
8 squares across × 10 squares down
Total:
80 squares
At 6½ inches each:
approximately:
52 × 65 inches before border
Large Bed Throw
Try:
10 squares across × 12 squares down
Total:
120 squares
At 6½ inches:
approximately:
65 × 78 inches before border
Bedspread
For a full bedspread, measure the actual mattress first.
Decide how far you want the crochet to drop down each side.
Then use:
desired finished width ÷ blocked square width
and
desired finished length ÷ blocked square height
Round each answer to the nearest practical whole number of motifs.
Bed and mattress dimensions vary, so measuring the actual bed gives a much better result than relying on a generic label such as “queen.”
Make All the Squares
Crochet the required number of identical motifs.
Keep the color placement consistent:
caramel center
cream raised petals
caramel background
cream square frame
This repetition is what gives the finished bedspread its elegant look.
Weave in Ends as You Go
This pattern has several color changes.
Do yourself a favor.
After every few motifs:
weave in the ends.
If you make 80 squares and save every yarn tail until the end, finishing the blanket becomes much less enjoyable.
PART 7 — JOIN THE SQUARES
The image style works best when the joining yarn blends into the cream outer rounds.
Use cream yarn.
For a neat relatively flat join, use a whip-stitch seam.
Whip-Stitch Join
Place two blocked squares with:
right sides facing each other
and the edges aligned.
Thread a yarn needle with cream yarn.
Working through corresponding edge stitches, whip stitch from one corner to the other.
Keep your tension relaxed.
The seam should be secure without shortening the square edges.
Joining Order
The easiest method is:
First
Join squares into long rows.
Then
Join the completed rows together.
For example, an 8 × 10 blanket becomes:
10 strips containing 8 squares each
Then those strips are joined to one another.
Alternative Crochet Join
If you prefer using the crochet hook, you can join with slip stitch.
Place the squares with right sides together.
Insert the hook through corresponding loops of both squares and work slip stitches across.
Use relaxed tension.
A too-tight slip-stitch seam can make the blanket pucker.
Check the Blanket During Assembly
After joining several rows, lay the work flat.
Check:
- alignment
- square dimensions
- seams
- flower direction
- overall drape
Because the flowers are symmetrical, orientation is less important than with directional motifs, but the squares should still be aligned neatly.
PART 8 — CROCHET THE BLANKET BORDER
The original visual style has a decorative cream edge, so I would keep the entire border warm cream.
Join cream yarn at any outer corner.
Border Round 1
Ch 1.
Work single crochet evenly around the entire blanket.
Across square edges:
work approximately one sc in every available stitch.
At each blanket corner work:
3 sc
Where square seams meet, work carefully so you do not create large gaps.
Join with sl st.
Border Round 2 — Open Granny Edge
Slip stitch into the center corner stitch.
In that corner work:
Ch 3, 2 dc, ch 2, 3 dc.
Along each side repeat:
Ch 1, skip approximately 2 stitches, 3 dc in next stitch
Adjust the final spacing slightly if necessary so the clusters reach the next corner evenly.
At every corner:
3 dc, ch 2, 3 dc
Join.
Border Round 3 — Decorative Scallop
Join cream yarn in any ch-1 space.
In the next suitable space work:
5 dc
Sl st into the next space.
Repeat:
5 dc in next space, sl st in next space
around.
At the blanket corners, adjust the spacing so one scallop sits neatly around each corner rather than pulling it inward.
Join and fasten off.
Important Border Rule
Large blankets rarely have edge stitch counts that fit one decorative repeat perfectly.
Do not force a scallop into every exact space if the blanket begins waving.
The important goal is:
- even spacing
- flat edge
- symmetrical corners
You may occasionally skip or redistribute one space to maintain a flat border.
What If the Blanket Border Ruffles?
Too many stitches or clusters are being added.
Undo the affected section and space the stitches slightly farther apart.
What If the Border Pulls Inward?
You probably need:
- more side stitches
- looser tension
- more room around the corners
The blanket should lie flat before you consider it finished.
What If My Petals Are Too Flat?
Make sure you are using a cluster rather than ordinary flat double crochets.
You can also gently lift the petals with your fingers after blocking.
Do not heavily press or steam directly on raised synthetic petals, as excessive heat can permanently flatten or damage some fibers.
Follow the yarn manufacturer’s care instructions.
What If the Petals Curl Too Much?
The chains surrounding the cluster may be too tight.
Try making the petal chains more relaxed.
You can also lightly shape each petal during blocking.
What If the Background Shows Through the Flower?
Some visible caramel between the cream petals is intentional.
It helps define the flower.
If the gaps are much larger than expected, check that:
- you made all 8 petals
- the petal clusters are full
- your hook is not dramatically oversized
What If the Center Hole Is Visible?
Pull the magic ring firmly.
Then weave the starting tail back through several center stitches in different directions.
A secure center matters on a blanket that may be washed and used repeatedly.
Can I Make the Petals Caramel and the Background Cream?
Yes.
But it produces a very different effect.
For the version inspired by the image, keep:
cream petals + caramel center/background + cream outer square.
That contrast is what makes the raised flowers visible across the whole bedspread.
Can I Add More Flower Colors?
Technically yes.
But I would resist the temptation for this design.
The limited neutral palette is one of its strongest features.
The texture becomes the decoration.
Optional Matching Pillow Cover
The same motif can make a matching cushion without inventing another pattern.
For a simple approximately 18-inch cushion front, make enough blocked motifs to cover the required dimensions.
For example, if your squares are approximately 6 inches:
3 × 3 squares = approximately 18 inches
Join the 9 squares.
That becomes the cushion front.
Simple Pillow Back
For an easier pillow construction, make a plain cream crochet or fabric back panel to match the finished front dimensions.
Place front and back together.
Join around three sides.
Insert an appropriately sized pillow form.
Close the remaining side securely.
For a removable pillow cover, make an envelope-style backing instead of permanently closing all four sides.
Don’t Add Loose Decorations to the Pillow
The raised flower itself provides plenty of texture.
Avoid:
- loose beads
- buttons
- dangling cords
especially if the cushion will actually be used rather than displayed.
How Much Yarn Will I Need?
This varies too much for one honest universal number.
Raised flowers use more yarn than flat granny squares, and blanket dimensions vary significantly.
The best method is:
- Weigh the caramel yarn before making one complete motif.
- Weigh it afterward.
- Repeat with cream if possible.
- Calculate yarn used per finished square.
- Multiply by the total number of squares.
- Add extra cream for joining and border.
I would add at least a reasonable reserve for:
- swatching
- tension variation
- joining
- border
- repairs
- matching dye lots
How to Make the Project Easier
Batch the work.
Instead of finishing one motif completely at a time, you can work production-style:
Day 1
Make several caramel centers.
Day 2
Add cream petals.
Day 3
Add caramel backgrounds.
Day 4
Square everything in cream.
Some crocheters find this much faster because they repeat the same motion over and over.
Why This Pattern Looks So Impressive
From across the room, you don’t immediately see individual crochet rounds.
You see:
rows and rows of dimensional flowers.
The cream frames connect visually into a light lace-like grid.
The caramel centers repeat across the blanket.
And because every flower is slightly raised, changing daylight creates natural shadows across the bedspread.
That is why the project looks much more complicated than one individual square really is.
Frequently Asked Questions
Is the flower sewn onto the granny square?
No.
In this version, the cream petals are crocheted directly into the front loops of the center round.
The background is then worked into the unused back loops.
How many petals does each flower have?
8 petals.
Is this a traditional granny square?
Not exactly.
It is an original raised flower granny-square motif that finishes with granny-style open spaces and a square frame.
Can beginners make this?
A confident beginner who already understands:
- chain
- single crochet
- double crochet
- clusters
- working in the round
- front and back loops
should be able to make it.
Make one practice motif first.
Do I need to make a bedspread?
No.
Use the same square for:
- lap blankets
- sofa throws
- cushion covers
- bags
- table runners
- smaller decorative blankets
Does every square need to be exactly the same size?
They need to be very close.
Small differences can usually be improved through blocking.
Large differences should be corrected before joining.
Should I block before joining?
Yes.
For a large motif blanket, blocking before joining makes assembly much easier.
Can I omit the scalloped border?
Absolutely.
Stopping after the simple cream border gives the blanket a cleaner, more modern appearance.
Final Thoughts
The thing I love most about this bedspread is that the finished result looks almost heirloom-level complicated.
But every section comes back to the same small motif.
One caramel center.
Eight cream petals.
Caramel behind the flower.
Cream around the outside.
Then repeat.
Once dozens of those little flowers are connected, the cream edges visually merge into a lacy framework and the caramel centers spread across the whole bed.
It looks elaborate.
But you never have to crochet the entire bedspread at once.
You only have to make one little flower square at a time.
And that is exactly the kind of big crochet project that feels achievable.



